The Ultimate Butter Swim Biscuits (Golden, Flaky & Easy)

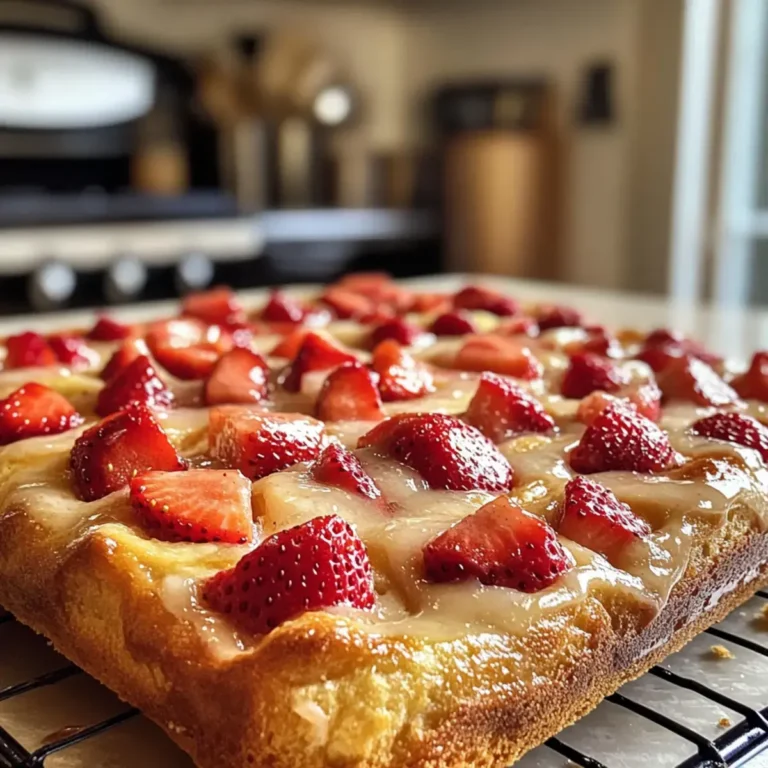
Prepare to witness the easiest, most decadent biscuits you will ever create. These Butter Swim Biscuits are a culinary revelation, delivering on every promise of a perfect biscuit with almost zero effort. Imagine nine thick, square-cut biscuits, with deeply golden-brown, craggy tops, baked so closely together they form a single, pull-apart masterpiece. They literally swim in a bath of rich, golden melted butter, which pools at the edges and in the deep cuts, creating an unbelievably crisp crust and a cloud-like, flaky interior.
This isn’t just a recipe; it’s a guarantee for a show-stopping side that will have everyone reaching for seconds. Forget everything you thought you knew about complicated biscuit-making. This recipe is designed for maximum flavor and texture with minimal fuss, making it an absolute must-try for any home baker.
Why You Will Love This Recipe
- Unbelievably Flaky Layers: The simple folding technique creates dozens of soft, white, flaky interior layers that peel apart effortlessly, providing a delightful texture with every bite. This method is key to achieving that signature biscuit sensation that is so highly sought after.
- Crispy, Buttery Crust: Baking the biscuits directly in a pool of melted butter gives them a slightly fried, perfectly crisp bottom and edges that are simply irresistible. This unique cooking process infuses the biscuits with an unparalleled richness.
- Stunning Craggy Tops: The minimal mixing results in beautiful, textured tops that bake to a perfect deep golden-brown, just like a professional bakery would make. These rustic tops are not only visually appealing but also contribute to the overall texture.
- No Kneading, No Chilling: This is a simple, straightforward drop-biscuit style dough. You mix, fold, cut, and bake, making it incredibly accessible even for beginner bakers. The process is streamlined for efficiency and ease.
- Quick Preparation: With a prep time of just 10 minutes and a cook time of 25 minutes, these biscuits are perfect for busy weeknights or impromptu brunch gatherings. They deliver impressive results with very little time commitment.
Ingredients You Need
The magic of these biscuits lies in how basic, high-quality ingredients come together to create something extraordinary. Each component plays a crucial role in achieving that perfect, buttery result that defines this recipe. Using fresh, good-quality ingredients will elevate the final outcome significantly, making the biscuits truly memorable.
Butter Swim Biscuits
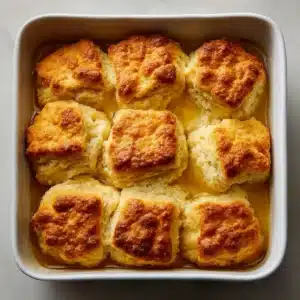
Prepare to witness the easiest, most decadent biscuits you will ever create. These Butter Swim Biscuits are a culinary revelation, delivering on every promise of a perfect biscuit with almost zero effort. Imagine nine thick, square-cut biscuits, with deeply golden-brown, craggy tops, baked so closely together they form a single, pull-apart masterpiece. They literally swim in a bath of rich, golden melted butter, which pools at the edges and in the deep cuts, creating an unbelievably crisp crust and a cloud-like, flaky interior. This isn’t just a recipe; it’s a guarantee for a show-stopping side that will have everyone reaching for seconds.
- 2.5 cups All-Purpose Flour (300g)
- 4 tsp Baking Powder (16g)
- 2 tbsp Granulated Sugar (25g)
- 1.5 tsp Fine Sea Salt (9g)
- 2 cups Cold Buttermilk (480ml)
- 0.5 cup Unsalted Butter, melted (113g or 1 stick)
- 1Preheat your oven to 425°F (220°C). Pour the 1/2 cup (113g) of melted unsalted butter into an 8x8 inch (20x20 cm) square baking dish, ensuring the bottom is fully coated.
- 2In a large bowl, whisk together the all-purpose flour, baking powder, granulated sugar, and fine sea salt until well combined.
- 3Pour the 2 cups (480ml) of cold buttermilk into the dry ingredients. Use a spatula to mix until just combined and a shaggy dough forms. Do not overmix.
- 4Turn the dough out onto a lightly floured surface. Gently pat into a rectangle, fold it in half, then fold it in half again. Pat the dough down into a 1-inch (2.5 cm) thick square. Cut into 9 equal biscuits.
- 5Arrange the biscuit squares snugly in the baking dish with the melted butter. Bake for 20-25 minutes, or until the tops are risen, craggy, and a deep golden-brown.
Keywords: Biscuits, Butter, Flaky, Easy, American, Southern, Breakfast, Side Dish
- all-purpose flour: the structural backbone of our biscuits, providing the necessary foundation for a tender, fluffy outcome.
- baking powder: this powerhouse leavener reacts with the buttermilk to create the lift and airy texture inside, resulting in those thick, impressive biscuits.
- granulated sugar: just a touch of sugar is essential not only for balancing the flavor but also for helping the tops achieve that beautiful, deep golden-brown color during baking.
- fine sea salt: salt is a flavor enhancer, sharpening the taste of the butter and buttermilk, making these biscuits taste deeply savory and rich.
- cold buttermilk: the acid in buttermilk tenderizes the gluten and activates the baking powder for a superior rise, creating superior flakiness.
- unsalted butter, melted: the star of the show, a full stick of butter is melted to create the “swim” bath, ensuring every nook and cranny is infused with rich, golden flavor.
The exact quantities for each ingredient can be found within the recipe card itself, ensuring you have all the precise measurements needed for success.
Variations
While these butter swim biscuits are perfect as is, they also lend themselves beautifully to a variety of creative adaptations. You can easily transform them into something new with a few simple tweaks, catering to different dietary needs or flavor preferences.
For a delightful dessert twist, consider adding a touch of cinnamon and a tablespoon of brown sugar to the dry ingredients. You could also fold in a handful of fresh or frozen blueberries or chopped chocolate chips just before shaping. Serve these sweet variations warm with a drizzle of honey or a dollop of whipped cream for an indulgent treat.
To create a breakfast sensation, try incorporating savory elements. Add finely chopped chives, shredded sharp cheddar cheese, or even small pieces of cooked bacon or sausage directly into the dough. These additions make for a robust and satisfying biscuit that pairs wonderfully with eggs or a side of fresh fruit.
For those seeking a lower-carb option, though significantly different from the original, you could experiment with almond flour or a low-carb baking blend. This would require adjusting the liquid content and potentially adding a binder like xanthan gum. The texture will naturally differ, but it opens the door to adapting the concept for specific dietary lifestyles.
How to Prepare butter swim biscuits
Step 1: Preparing the Butter Bath & The Dry Foundation
First, preheat your oven to 425°F (220°C). This high heat is crucial for a fast rise and developing that signature golden color quickly. While the oven is heating up, take your unsalted butter, a full stick, and melt it thoroughly. Carefully pour this melted butter directly into your 8×8 inch baking dish, ensuring you tilt the dish to coat the entire bottom surface evenly. This butter will be the luxurious bath your biscuits will “swim” in.
In your large mixing bowl, the vessel where the magic begins, you will combine all of your dry ingredients. Whisk together the all-purpose flour, baking powder, granulated sugar, and fine sea salt until they are uniformly combined and no pockets of any single ingredient remain. This step ensures that the leavening and seasoning are evenly distributed throughout the dough, which is fundamental for consistent results. You are essentially building the perfect foundation for a tender and flavorful crumb.
The temperature of your oven is paramount here; a hot oven guarantees that the biscuits will puff up quickly and develop a beautifully crisp exterior before the interior has a chance to overcook. The even distribution of the melted butter in the pan sets the stage for the unique crispness that defines this biscuit style. This initial preparation is key to unlocking the full potential of the recipe.
Step 2: Creating the Perfect Shaggy Dough
Now comes the moment to introduce the wet ingredient to your perfectly combined dry ingredients. Pour the cold buttermilk directly into the large mixing bowl containing your flour mixture. Using your silicone spatula or a similar tool, begin to mix the ingredients together. The goal here is to combine them until they are just moistened; you will hear a soft squishing sound as the liquid hydrates the flour.
The absolute key to achieving the desired texture is to stop mixing as soon as there are no visible dry streaks of flour left. The dough will look intentionally shaggy, somewhat sticky, and decidedly messy—this is precisely the visual cue you want to see for achieving those desirable craggy tops and a supremely tender interior. Over-mixing at this stage is the sworn enemy of flakiness and can lead to tough biscuits.
Embrace the imperfection of the shaggy dough; it is a sign that you are on the right track to developing those delicate layers. This minimal mixing approach ensures that the gluten in the flour is not overdeveloped, which is critical for a tender crumb. The slight stickiness is also an advantage, helping the dough to hold its shape and create the desired texture.
Step 3: Shaping and Cutting the Square Biscuits
Gently flour your work surface, whether it’s a clean countertop or a large cutting board, to prevent the slightly sticky dough from adhering too much. Carefully turn the shaggy dough out onto this prepared surface. With your hands, gently pat the dough down into a rough rectangle shape. Aim for a thickness of about one inch (2.5 cm) to ensure substantial biscuits.
Next, you will perform a simple lamination technique that is crucial for developing the biscuit’s layers. Fold the dough in half, as if you were closing a book. Then, fold it in half again, creating more layers within the dough structure. Pat the dough down once more to ensure it is roughly a square shape, maintaining that one-inch (2.5 cm) thickness.
Using a bench scraper or a large, sharp knife, make clean, decisive cuts through the dough to create nine equal squares. You will immediately see the beautiful, soft white layers on the cut sides of the dough, a testament to the gentle handling and folding. These sharp edges are important for an even rise.
Step 4: The Final Butter Swim and Baking to Perfection
With great care, transfer the nine biscuit squares you just cut directly into the prepared baking dish. Arrange them snugly together, ensuring they are nestled close to one another in the melted butter. The butter will naturally begin to rise up the sides of the dough pieces, creating the signature “swim” that gives these biscuits their distinctive name and contributes to their magical texture. Do not be alarmed by the amount of butter; it is intentional and essential for the outcome.
Place the baking dish into your preheated oven. Bake for approximately 20-25 minutes. You will know they are ready when you observe that the tops have risen significantly, are beautifully craggy in appearance, and have achieved a deep golden-brown color. The aroma filling your kitchen will be incredible, a rich, nutty scent of butter that signifies perfection is imminent.
As they bake, the butter will bubble furiously around the crispy edges, further enhancing the texture and flavor. This process creates a wonderfully crisp bottom and sides while keeping the interior incredibly moist and tender. The combination of high heat and the butter bath is what makes these biscuits truly spectacular and unlike any other. The final appearance is a testament to the simple yet effective technique employed.
Step 5: Observing the Transformation
During the baking process, pay close attention to how the biscuits transform. The edges will crisp up beautifully as they absorb the surrounding melted butter. You’ll notice the dough expanding upwards, creating those sought-after thick, tall biscuits with invitingly craggy peaks. The golden hue will deepen gradually, indicating the Maillard reaction is working its magic and developing complex flavors.
The butter itself will transform from a liquid pool into a flavorful, slightly browned coating for the biscuits. It infuses every crevice and surface, ensuring no part of the biscuit is left untouched by its richness. This immersion is what sets these biscuits apart and guarantees their signature taste and texture. The sight of them puffing up and browning is a truly rewarding part of the baking experience.
The visual appeal of these biscuits, with their rustic tops and golden crusts, is a significant part of their charm. They look homemade in the most delightful way, promising comfort and deliciousness. The bubbling butter around them is a visual confirmation of the rich, indulgent experience awaiting you.
Step 6: Resting and Enjoying
Once the biscuits have reached that perfect deep golden-brown hue and have puffed up gloriously, carefully remove the baking dish from the oven. Allow the biscuits to rest in the dish for a few minutes. This brief resting period allows the internal structure to set slightly, making them easier to handle and serve. The residual heat will continue to work its subtle magic.
As they cool slightly, the butter will continue to cling to the biscuits, ensuring maximum flavor infusion. The craggy tops will retain their beautiful texture, and the crisp edges will remain delightful. The aroma will be intoxicating, a warm invitation to enjoy this culinary masterpiece. These biscuits are truly a testament to how simple techniques can yield extraordinary results.
Serve them warm, either directly from the pan or carefully lifted out. The pull-apart nature of these biscuits makes them perfect for sharing, with each biscuit revealing its tender, flaky interior. They are best enjoyed fresh, showcasing their incredible texture and buttery flavor in their prime.
Pro Tips for butter swim biscuits
- Do Not Overwork the Dough: The moment your flour is hydrated by the buttermilk, stop mixing. Lumps are your friend and lead to a tender, craggy biscuit. Over-mixing develops gluten, resulting in tough, dense biscuits, so resist the urge to achieve a perfectly smooth dough.
- Use Cold Ingredients: Especially the buttermilk. Cold ingredients hitting the hot oven create steam, which is essential for pushing the layers apart and achieving maximum flakiness. Make sure your buttermilk is chilled straight from the refrigerator.
- Don’t Twist the Cutter: When you cut the squares, press straight down with your knife or bench scraper and pull straight up. Twisting the blade can seal the edges of the dough, preventing the biscuits from rising evenly and to their full, thick potential. A clean cut is key for a good rise.
- Trust the Process: It might seem like an excessive amount of butter in the baking dish, but have faith! The flour will absorb a significant portion of it during baking, and the rest is essential for frying the outside to a perfect crisp, infusing it with unparalleled flavor. This buttery bath is non-negotiable for the signature results.
- Embrace the Rustic Look: The beauty of these biscuits lies in their natural, craggy tops. Don’t try to smooth them out before baking. The uneven surfaces contribute to the texture and appearance, making them uniquely appealing and truly homemade.
Serving Suggestions for butter swim biscuits
Decoration
These biscuits are often celebrated for their natural beauty, with their deeply golden-brown, craggy tops often requiring no additional decoration. However, a sprinkle of flaky sea salt over the tops just as they come out of the oven can enhance the savory notes and add a touch of elegance. For a slightly more festive look, especially during holidays, a light dusting of finely chopped fresh herbs like chives or parsley can add a pop of color and a fresh aromatic element.
Side Dishes
Butter swim biscuits are incredibly versatile and pair wonderfully with a wide range of main courses and side dishes. They are the perfect accompaniment to hearty dinner entrees such as roasted chicken, pot roast, or a flavorful stew. Consider serving them alongside a comforting bowl of cajun-inspired dishes or a rich, savory meatloaf. They also make a fantastic base for absorbing delicious sauces and gravies.
For a delightful breakfast or brunch spread, these biscuits are ideal. Serve them with your favorite breakfast meats like sausage or bacon, scrambled eggs, or a side of fresh fruit salad. They are a welcome addition to any table, elevating the entire meal experience with their irresistible flavor and texture. They are particularly good with dishes that have a bit of moisture, like a hearty breakfast hash.
Creative Serving Ideas
Beyond their role as a simple side, butter swim biscuits can be transformed into unique and exciting dishes. Try slicing them in half horizontally and filling them with fried chicken, pulled pork, or a generous smear of pimento cheese for a decadent sandwich. They also make an excellent base for open-faced sandwiches or mini quiches.
For an even more indulgent experience, consider making a savory version of the biscuit itself by incorporating cheese, herbs, or finely diced jalapeños into the dough. These flavored biscuits can then be used as the foundation for sliders or as a unique topping for casseroles. The possibilities are truly endless, allowing you to get creative in the kitchen and impress your guests with your culinary flair.
Preparation & Storage
Storing Leftovers
These biscuits are undoubtedly best enjoyed fresh and warm straight from the oven, when their texture and flavor are at their absolute peak. However, if you happen to have any leftovers, they can be stored effectively. Place the cooled biscuits in an airtight container or wrap them tightly in plastic wrap or aluminum foil to prevent them from drying out.
Store them at room temperature for up to 2 days for optimal freshness and texture. While they will remain edible beyond this point, their crispness will diminish, and they may become slightly softer. For longer preservation, consider the freezing method described below.
Freezing
To preserve the delightful quality of these butter swim biscuits for an extended period, freezing is an excellent option. Ensure the biscuits are completely cooled before proceeding with the freezing process. This is crucial to prevent the formation of ice crystals, which can negatively impact the texture upon thawing and reheating.
Once cooled, you can freeze the biscuits individually wrapped in plastic wrap, or place them in a single layer on a baking sheet and freeze until firm. Then, transfer the frozen biscuits to a heavy-duty freezer bag or an airtight container. Properly stored, these butter swim biscuits can maintain their quality in the freezer for up to 3 months.
Reheating
When you’re ready to enjoy your frozen or leftover butter swim biscuits, reheating them properly will help restore their delightful texture and warmth. The best method for reheating is in the oven, as this helps to re-crisp the exterior.
Preheat your oven to 350°F (175°C). Place the biscuits on a baking sheet in a single layer. If reheating from frozen, you may need to add a few extra minutes to the reheating time. Bake for about 5-7 minutes for unfrozen biscuits, or until they are warmed through and the crust has regained its desirable crispness. Avoid microwaving, as this tends to make the biscuits rubbery and soft.
Frequently Asked Questions
-
Can I use self-rising flour for this recipe instead of all-purpose flour?
Yes, you can certainly substitute self-rising flour in this recipe, but you’ll need to make a couple of adjustments. If you opt for self-rising flour, you must omit the baking powder entirely, as it already contains leavening agents. Additionally, reduce the amount of salt to 1/2 teaspoon, since self-rising flour typically includes salt as well. This substitution will yield a slightly different texture, but it’s a viable option if you have self-rising flour on hand.
-
Do I absolutely have to use buttermilk? What if I only have regular milk available?
Buttermilk is highly recommended for achieving the best possible flavor and texture in these butter swim biscuits. Its natural acidity plays a crucial role in reacting with the baking powder, resulting in a superior rise and a more tender crumb. However, if you find yourself without buttermilk, you can easily create a substitute. For every cup of buttermilk needed, combine 1 tablespoon of lemon juice or white vinegar with 1 cup of regular milk. Let this mixture sit for about 5-10 minutes until it appears slightly curdled, then use it as you would buttermilk in the recipe.
-
How do I achieve those beautifully craggy tops that are characteristic of this biscuit style?
The naturally craggy tops are a direct result of the dough’s consistency and how it’s handled. The secret lies in using a slightly wet, shaggy dough that is minimally mixed. By avoiding over-mixing the ingredients and refraining from smoothing the surface of the dough before baking, you allow the biscuits to rise unevenly in the hot oven. This uneven expansion creates those beautiful, rustic, and appealing textures that are so desirable in a biscuit.