Ultimate Banana Pudding Cheesecake: A Deliciously Creamy Treat

There’s a certain joy that comes when you combine two classic desserts into one divine creation, and that’s precisely what this Banana Pudding Cheesecake offers. Picture it: a creamy, velvety cheesecake layered atop a crunchy graham cracker crust, with the blissful taste of ripe bananas seamlessly woven throughout.
The unexpected ease of making this delightful dish will revive your culinary spirit, especially if you’re tired of the same takeout order night after night. This recipe captures the nostalgia of a comforting banana pudding while elevating it to a luscious cheesecake that even the most discerning dessert enthusiasts will applaud. You’ll be thrilled to discover how simple it is to prepare—perfect for impressing guests at your next gathering or indulging in a sweet treat after a long day. So, grab those ripe bananas and let’s dive into a dessert that blends rich flavors and cherished memories in every slice!
Why You Will Love This Recipe
- Effortless Elegance: Prepare a sophisticated dessert that looks and tastes like it came from a professional bakery, yet requires surprisingly simple steps. The combination of creamy cheesecake and classic banana pudding flavors is a guaranteed winner for any occasion, big or small. It’s the perfect way to impress without the stress.
- Nostalgic Comfort: This recipe taps into deeply cherished childhood memories of warm, comforting banana pudding. By transforming it into a decadent cheesecake, it offers a familiar yet excitingly new flavor profile that evokes feelings of home and happy gatherings. It’s a taste of nostalgia with a luxurious upgrade.
- Versatile Delight: Adapt this recipe to suit your personal preferences or dietary needs with ease. Whether you opt for a classic graham cracker crust or a vanilla wafer base, or even explore dairy-free alternatives, the core deliciousness remains. This adaptability makes it a go-to for any event or craving.
- Crowd-Pleasing Perfection: Few desserts can unite a group quite like a perfectly crafted cheesecake. The rich, creamy texture combined with the sweet banana and subtle vanilla notes creates an irresistible harmony that appeals to a wide range of palates. It’s a surefire way to earn rave reviews from family and friends alike.
Ingredients You Need
Crafting this exceptional Banana Pudding Cheesecake begins with selecting quality ingredients that will bring out the best in every layer. Using ripe bananas is paramount for that authentic, sweet flavor, and ensuring your cream cheese is perfectly softened will lead to an incredibly smooth and creamy filling. We’ve chosen classic components that meld beautifully, but remember that the magic truly happens when you use fresh, high-quality items for each part of the dessert.
Banana Pudding Cheesecake
Indulge in a divine creation that perfectly combines two classic desserts: a creamy, velvety cheesecake layered atop a crunchy graham cracker crust, with the blissful taste of ripe bananas seamlessly woven throughout. This recipe captures the nostalgia of a comforting banana pudding while elevating it to a luscious cheesecake, offering an unexpectedly easy way to impress your guests or enjoy a sweet treat.
- For the Crust:
- 1 cup Graham Cracker Crumbs (or vanilla wafer crumbs)
- 1/4 cup Granulated Sugar
- 1/2 cup Unsalted Butter, melted
- For the Cheesecake Filling:
- 16 oz Cream Cheese, softened
- 1/2 cup Sour Cream (or Greek yogurt)
- 1 cup Heavy Cream
- 3 large Eggs, room temperature
- 3 ripe Bananas, mashed
- 1 pkg Instant Vanilla Pudding Mix
- For Topping:
- 1 cup Whipped Cream
- Ground Cinnamon (optional)
- 1Prepare Crust: Preheat oven to 350°F (175°C). Grease a 9-inch springform pan. Combine graham cracker crumbs, granulated sugar, and melted butter. Press firmly into the bottom of the pan and bake for 10 minutes. Let cool completely.
- 2Prepare Filling: Beat softened cream cheese until smooth. Mix in granulated sugar, sour cream, heavy cream, and vanilla extract. Gradually add eggs one at a time, mixing gently. Stir in mashed bananas until well combined.
- 3Fill Crust: Pour the cheesecake filling onto the cooled crust and spread evenly.
- 4Bake Cheesecake: Bake for 50-60 minutes, until the edges are set and the center remains slightly jiggly.
- 5Cool Cheesecake: Turn off the oven and leave the door ajar for 1 hour to allow the cheesecake to cool slowly. This helps prevent cracks.
- 6Chill Cheesecake: Transfer the cheesecake to a wire rack to cool completely, then refrigerate for at least 4 hours or overnight.
- 7Prepare Pudding Layer: In a separate bowl, mix the instant vanilla pudding mix with milk and let it thicken. Gently fold in the whipped cream until incorporated.
- 8Assemble and Garnish: Spread the pudding mixture over the chilled cheesecake. Top with freshly sliced bananas and serve chilled. Optionally, drizzle with caramel sauce.
Keywords: Banana Pudding Cheesecake, cheesecake recipe, banana dessert, pudding cheesecake, easy dessert, homemade cheesecake, comforting dessert, classic dessert mashup
These are the core elements that build the foundation of your delicious dessert, with specific quantities detailed in the recipe card for your convenience.
Variations
Elevate your Banana Pudding Cheesecake experience by exploring a world of creative variations designed to tantalize your taste buds and suit any preference. Imagine a rich, dark chocolate ganache swirled into the creamy filling for a sophisticated contrast, or perhaps a sprinkle of toasted pecans for an added textural delight. These small adjustments can transform a beloved classic into something entirely new and exciting.
For those seeking a lighter, brighter profile, consider adding the zest of a fresh lemon or lime to the cheesecake batter. This citrusy tang cuts through the richness beautifully, creating a wonderfully refreshing counterpoint to the sweet bananas. It’s a simple yet impactful addition that brings a delightful zing to every bite, making the dessert feel less heavy and more invigorating.
If you’re aiming for a dairy-free indulgence, you can effortlessly adapt this recipe using creamy coconut cream instead of heavy cream and a good quality plant-based cream cheese. This ensures that everyone can enjoy a slice of this delightful creation, regardless of dietary restrictions. These thoughtful modifications allow you to personalize your Banana Pudding Cheesecake, making it uniquely yours for any special occasion or simply a treat for yourself.
How to Prepare Banana Pudding Cheesecake
Step 1: Crafting the Perfect Crust
Begin your journey to Banana Pudding Cheesecake perfection by preheating your oven to a precise 350°F (175°C). This initial step is crucial for ensuring your crust bakes up golden and crisp, providing a stable and delicious foundation for the rich filling to come. While the oven heats, take a moment to meticulously prepare your 9-inch springform pan; a thorough greasing will guarantee effortless removal later, preventing any heartbreak when it’s time to unveil your masterpiece.
In a medium-sized mixing bowl, combine the graham cracker crumbs with granulated sugar and melted unsalted butter until the mixture resembles damp sand. This amalgamation is the heart of your crust, and its consistency is key to achieving the desired texture. Firmly press this crumb mixture evenly into the bottom of your prepared springform pan. The pressure applied here is important; it compacts the crumbs, creating a cohesive layer that won’t crumble when you slice into the finished cheesecake. Once pressed, bake this crust for approximately 10 minutes until it is lightly golden and fragrant. After baking, remove it from the oven and allow it to cool completely on a wire rack. This cooling period is vital for setting the crust and preventing it from becoming soggy when the filling is added.
Step 2: Assembling the Creamy Cheesecake Filling
With your crust cooling, it’s time to focus on the luscious cheesecake filling that defines this decadent dessert. In a large mixing bowl, begin by beating the softened cream cheese until it achieves a wonderfully smooth and creamy consistency. Ensure there are no lumps; this is the foundation of a truly velvety cheesecake texture. Gradually incorporate the granulated sugar, mixing until it is well combined and fully integrated into the cream cheese base. This sugar not only sweetens but also aids in the overall texture and stability of the filling.
Next, gently stir in the sour cream and heavy cream, along with a touch of vanilla extract for that classic flavor. These dairy components contribute richness and a subtle tang, balancing the sweetness and ensuring the filling remains incredibly moist. Now, carefully add the eggs, one at a time, mixing gently after each addition until just combined. Over-mixing at this stage can introduce too much air, potentially leading to cracks. Finally, fold in your mashed ripe bananas. The riper the bananas, the more intense and natural their sweetness will be, infusing the entire cheesecake with their delightful flavor. Mix until everything is just incorporated, creating a beautifully fragrant and creamy batter ready for the crust.
Step 3: Baking the Cheesecake to Perfection
Gently pour the prepared creamy cheesecake filling over the completely cooled graham cracker crust, spreading it out evenly with a spatula to ensure a uniform layer. The smooth batter should rest perfectly on the crumb base, promising a delightful texture contrast. Now, carefully transfer the springform pan into the preheated oven, which should still be at 350°F (175°C). Bake the cheesecake for approximately 50 to 60 minutes. The goal here is for the edges of the cheesecake to appear set and slightly puffed, while the center should still retain a slight jiggle when the pan is gently nudged. This slight wobble indicates that the cheesecake will continue to cook and set as it cools, preventing it from becoming overdone or dry.
Once the baking time is complete, resist the urge to remove the cheesecake immediately. Instead, turn off the oven and prop the oven door slightly ajar, perhaps with a wooden spoon. Allow the cheesecake to cool slowly inside the oven for about one hour. This gradual cooling process is a critical technique to prevent drastic temperature changes, which are the primary cause of unsightly cracks on the surface of cheesecakes. By allowing it to acclimate gently to the room temperature, you significantly increase your chances of achieving a smooth, uncracked finish. This patient approach is a hallmark of professional cheesecake making and is well worth the extra effort for a beautiful presentation.
Step 4: The Essential Cooling and Chilling Process
After the hour of slow cooling within the oven, carefully remove the cheesecake from the oven and place it on a wire rack to continue cooling completely. It’s important to let it reach room temperature naturally, which can take another hour or two depending on your kitchen’s ambient temperature. Rushing this step can also contribute to cracking, so patience is truly a virtue when it comes to creating the perfect cheesecake. Once the cheesecake has completely cooled to room temperature, it’s time for the crucial chilling phase.
Transfer the cooled cheesecake, still in its springform pan, to the refrigerator. Cover it loosely with plastic wrap, ensuring it doesn’t touch the surface directly if possible. It needs to chill for a minimum of 4 hours, but for the best results and a perfectly set texture, refrigerate it overnight. This extended chilling period allows the cheesecake to firm up completely, meld its flavors, and develop that signature dense, creamy texture that makes cheesecake so irresistible. Properly chilled cheesecake is easier to slice cleanly and offers the most satisfying eating experience.
Step 5: Preparing the Irresistible Pudding Topping
While your cheesecake is diligently chilling and firming up, it’s the perfect time to prepare the delectable vanilla pudding topping that crowns this masterpiece. In a separate bowl, combine the instant vanilla pudding mix with the specified amount of milk. Whisk vigorously until the mixture begins to thicken; follow the package instructions for best results. Instant pudding is wonderfully convenient, creating a smooth, creamy texture without the need for stovetop cooking, making this dessert even more accessible.
Once the pudding has reached its desired thickness, gently fold in the whipped cream. Be delicate with your folding motion to maintain the airiness of the whipped cream, ensuring a light and fluffy topping that contrasts beautifully with the dense cheesecake. You want to incorporate the whipped cream until it’s just combined, creating a luscious, cloud-like layer. Once your cheesecake has chilled sufficiently and is perfectly set, carefully remove the sides of the springform pan. Gently spread this delightful vanilla pudding mixture evenly over the top of the chilled cheesecake, creating a smooth, inviting surface.
Step 6: The Grand Finale: Garnishing and Serving
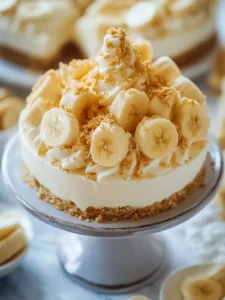
The final flourish for your Banana Pudding Cheesecake is the garnish, which adds both visual appeal and an extra layer of deliciousness. Arrange freshly sliced ripe bananas artfully over the vanilla pudding topping. The vibrant yellow of the banana slices against the creamy white pudding creates a beautiful aesthetic that is both inviting and representative of the dessert’s delightful flavors. Ensure the banana slices are fresh for the best appearance and taste, as they can brown if left out for too long.
For an optional but highly recommended touch of indulgence, consider drizzling warm caramel sauce over the banana slices and pudding layer. The rich, sweet caramel complements the banana and vanilla flavors wonderfully, adding another dimension of taste and texture. It transforms the dessert into an even more decadent treat, perfect for special celebrations. Serve the Banana Pudding Cheesecake chilled, allowing each slice to showcase its beautifully layered construction and creamy, dreamy texture. This final presentation ensures your dessert is as visually stunning as it is delicious.
Pro Tips for Banana Pudding Cheesecake
Room Temperature is Key: Always ensure your cream cheese, eggs, and sour cream are at room temperature before you begin mixing. This is a fundamental rule for achieving a uniformly smooth and creamy cheesecake batter. Cold ingredients create lumps and can lead to an uneven texture that is difficult to correct. Take the time to let them sit out for at least an hour before starting, or use a quick method like microwaving the cream cheese in short bursts.
Gentle Mixing for Smoothness: When incorporating the eggs into the cheesecake filling, add them one at a time and mix on low speed until just combined. Over-mixing can introduce too much air, which causes the cheesecake to puff up too much during baking and then collapse and crack as it cools. A gentle hand ensures a dense, fudgy texture.
The Water Bath Advantage: For an exceptionally smooth and crack-free cheesecake, consider baking it in a water bath (bain-marie). Wrap the bottom of your springform pan tightly in several layers of heavy-duty aluminum foil to prevent any water from seeping in. Place the wrapped pan inside a larger baking pan, and then carefully pour hot water into the larger pan until it reaches about halfway up the sides of the springform pan. This creates a humid, gentle baking environment that promotes even cooking and minimizes cracking.
Patience During Cooling: The cooling process is just as important as the baking itself. Resist the temptation to take the cheesecake straight from the hot oven to a cold countertop. Allowing it to cool gradually in the turned-off oven with the door ajar, followed by complete cooling at room temperature before chilling, is crucial for preventing cracks and achieving the perfect set.
Don’t Skip the Chill Time: While it might be tempting to dig in as soon as it’s firm, the overnight chilling period is non-negotiable for optimal flavor and texture development. The cheesecake needs this time to fully set, allowing the flavors to meld and the creamy texture to reach its peak. This step ensures every slice is a luxurious experience.
Serving Suggestions for Banana Pudding Cheesecake
Decoration
The visual appeal of your Banana Pudding Cheesecake can be as delightful as its taste. For a classic and beautiful finish, arrange thin, uniform slices of fresh banana in a decorative pattern across the top of the pudding layer. You can create concentric circles, a beautiful fan shape, or even a whimsical arrangement that showcases the bright yellow fruit.
Consider adding a sprinkle of finely crushed graham cracker crumbs or toasted vanilla wafer crumbs around the edges of the cheesecake or lightly over the banana slices. This not only adds visual texture but also reinforces the delightful crust flavors. A dusting of ground cinnamon or nutmeg can also provide a warm, inviting visual cue and enhance the overall aromatic experience of the dessert.
Side Dishes
While Banana Pudding Cheesecake is a star on its own, a few carefully chosen accompaniments can elevate the entire dessert experience. A simple yet elegant pairing is a scoop of high-quality vanilla bean ice cream. The cold, creamy contrast to the chilled cheesecake is wonderfully refreshing and creates a delightful textural interplay.
Fresh berries, such as strawberries, blueberries, or raspberries, offer a vibrant and slightly tart counterpoint to the sweetness of the cheesecake and banana. Their natural acidity cuts through the richness, providing a palate-cleansing effect with each bite. A small dollop of freshly whipped cream, perhaps lightly sweetened, can also add an extra layer of airy indulgence alongside a slice.
Creative Serving Ideas
For a more whimsical presentation, try serving individual portions of Banana Pudding Cheesecake in elegant parfait glasses or small mason jars. Layer crumbled crust, cheesecake filling, and pudding for a deconstructed, charming look. This method is also perfect for make-ahead desserts for parties, as it keeps everything fresh and beautifully presented.
Consider a drizzle of warm salted caramel sauce or a rich chocolate ganache over the slices just before serving. These decadent additions offer a sophisticated twist, complementing the banana and cream cheese flavors in unique ways. You could even experiment with a sprinkle of toasted coconut flakes for a tropical flair that pairs wonderfully with bananas.
Preparation & Storage
Storing Leftovers
To keep your delicious Banana Pudding Cheesecake fresh and delightful for as long as possible, proper storage is essential. Once the cheesecake has been completely chilled and enjoyed, cover any remaining portions tightly. Use plastic wrap pressed directly onto the surface of the cheesecake to prevent it from drying out or absorbing odors from other foods in the refrigerator.
Alternatively, you can transfer individual slices or the entire remaining portion into an airtight container. This will further protect it from air exposure and maintain its signature creamy texture. Refrigerated leftovers are best consumed within 3 to 4 days to ensure the highest quality of flavor and consistency. Always ensure the cheesecake is properly chilled before storing.
Freezing
Banana Pudding Cheesecake freezes remarkably well, allowing you to enjoy this decadent treat at a later date. It’s best to freeze the cheesecake before adding any fresh banana slices to the topping, as they can become mushy upon thawing. First, ensure the cheesecake is completely chilled and set. Then, wrap the entire cheesecake, or individual slices, very securely in a double layer of plastic wrap, followed by a layer of heavy-duty aluminum foil.
This double wrapping is crucial to prevent freezer burn and maintain the cheesecake’s texture and flavor integrity. Properly wrapped, your Banana Pudding Cheesecake can be stored in the freezer for up to 3 months. Label the package with the date of freezing so you can keep track of its freshness.
Reheating
This Banana Pudding Cheesecake is optimally enjoyed served chilled, which is how its creamy texture and flavors are best appreciated. However, if you prefer a slightly softer, more yielding consistency, you can gently bring it to room temperature. Simply remove the cheesecake from the refrigerator about 30 to 45 minutes before you plan to serve it. Allow it to sit on the counter, uncovered, to allow the chilling to dissipate slightly.
If reheating from frozen, the process requires patience and care. Remove the cheesecake from the freezer and unwrap the foil and plastic wrap. Place it in the refrigerator to thaw overnight. Once fully thawed, you can then let it sit at room temperature for about 30 minutes if a softer texture is desired. Avoid using a microwave to reheat cheesecake, as this can lead to uneven warming and a compromised texture.
Frequently Asked Questions
-
How do I choose the right bananas for the Banana Pudding Cheesecake?
The ideal bananas for this recipe are those that are ripe, displaying a good number of brown spots on their peels. These spots indicate that the sugars within the bananas have fully developed, resulting in a sweeter, more intense banana flavor that is perfect for both the filling and any decorative slices. Overly green bananas will lack sweetness and may have a starchy taste, while excessively black or bruised bananas might have an unpleasant texture or off-flavor. Aim for that perfect balance of ripeness, where the banana is soft but not mushy, and its aroma is sweet and inviting.
-
What is the best way to store leftover Banana Pudding Cheesecake?
To maintain the delightful texture and rich flavor of your leftover Banana Pudding Cheesecake, proper refrigeration is key. Ensure the cheesecake is completely cooled before storing it. Cover the remaining portion tightly with plastic wrap, pressing it directly onto the surface of the cheesecake to minimize air exposure, or place it in an airtight container. This prevents the cheesecake from drying out and absorbing any unwanted odors from other foods in the refrigerator. Properly stored, it will remain a delicious treat for up to 3 to 4 days.
-
Can I freeze Banana Pudding Cheesecake?
Yes, Banana Pudding Cheesecake is an excellent candidate for freezing, allowing you to preserve its deliciousness for future enjoyment. It is highly recommended to freeze the cheesecake before adding the fresh banana slices to the topping, as these can become soft or discolored upon thawing. Once the cheesecake is completely chilled and set, wrap it very thoroughly in multiple layers of plastic wrap, followed by a robust layer of aluminum foil. This double protection is crucial for preventing freezer burn and maintaining the cheesecake’s quality for up to three months. When you’re ready to enjoy it, allow it to thaw completely overnight in the refrigerator before serving or bringing to room temperature.