Baked Chicken Parmesan: 5 Irresistible Comforting Secrets

Is there anything more comforting than a perfectly baked chicken Parmesan resting on your plate, its golden crust promising a symphony of flavors? This classic Italian-American dish is a testament to simple ingredients transformed into something truly extraordinary through careful preparation and a touch of culinary magic. It’s the kind of meal that evokes warmth, shared laughter, and a feeling of home, making it a perennial favorite for family dinners and special gatherings alike.
The allure of Baked Chicken Parmesan lies in its harmonious blend of textures and tastes: the tender, succulent chicken, the satisfying crunch of the breadcrumb coating, the rich, tangy embrace of marinara sauce, and the gooey, melted layer of mozzarella and Parmesan cheese. Each component plays its part, creating a cohesive and deeply satisfying dining experience that appeals to palates of all ages. It’s more than just a meal; it’s an invitation to slow down, savor the moment, and enjoy the simple pleasure of good food.
Why You Will Love This Recipe
- Effortless Elegance: Creates a restaurant-quality dish with minimal fuss, perfect for impressing guests or treating yourself.
- Crispy Perfection: Achieves a delightful crunch on the chicken coating without deep frying, offering a healthier yet equally satisfying texture.
- Flavorful Fusion: Expertly balances the savory notes of chicken and cheese with the bright, zesty notes of a good marinara sauce.
- Customizable Delight: Easily adaptable to various dietary needs and personal preferences, ensuring everyone at the table can enjoy a delicious serving.
- Weeknight Warrior: Comes together quickly enough to be a weeknight meal, yet it feels special enough for any occasion.
Ingredients You Need
The foundation of any exceptional dish is the quality of its ingredients. For Baked Chicken Parmesan, selecting fresh, high-quality components will elevate your culinary creation from good to absolutely unforgettable. Think vibrant tomatoes for your marinara, finely grated Parmesan for that sharp, nutty bite, and fresh chicken breasts for a tender, juicy result. These elements work in concert to create a dish that is both deeply satisfying and wonderfully balanced.
Baked Chicken Parmesan: 5 Irresistible Comforting Secrets
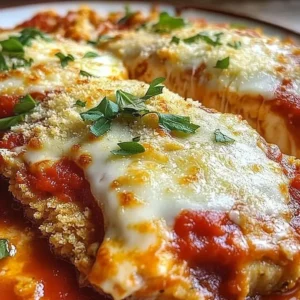
This Baked Chicken Parmesan recipe embodies comfort food at its finest. It's the kind of meal that warms your soul, brings family together, and makes even the simplest of evenings feel special. The combination of tender chicken, crispy breadcrumbs, savory marinara, and lavish mozzarella is simply irresistible. It's quick and easy to prepare, making it an ideal choice for weeknight dinners or special occasions.
- 4 boneless chicken fillets
- 1 cup breadcrumbs
- 1/2 cup grated Parmesan cheese
- 1 teaspoon Italian seasoning
- 1 jar marinara sauce (24 oz)
- 1 cup shredded mozzarella cheese
- 2 tablespoons olive oil
- 1Preheat your oven to 375°F (190°C).
- 2In a medium bowl, combine breadcrumbs, grated Parmesan cheese, and Italian seasoning.
- 3Coat each chicken fillet lightly with olive oil.
- 4Dip each coated fillet into the breadcrumb mixture, pressing gently to ensure an even coating.
- 5Arrange the coated chicken fillets in a single layer in a baking dish.
- 6Pour marinara sauce generously over the chicken.
- 7Sprinkle shredded mozzarella cheese evenly over the marinara sauce.
- 8Bake for 25-30 minutes, or until chicken is cooked through and cheese is bubbling and golden.
- 9Let cool for a few minutes before serving.
- 10Serve hot.
Keywords: Baked Chicken Parmesan, Chicken Recipe, Comfort Food, easy dinner, Italian recipe
The precise quantities for these essential items are detailed within the accompanying recipe card, ensuring you have everything you need for a perfect bake.
Variations
While the classic Baked Chicken Parmesan is a masterpiece on its own, its inherent versatility allows for a myriad of delightful variations. These creative twists can introduce new flavor profiles and cater to different dietary preferences, making the dish accessible and exciting for everyone.
For a vibrant and flavorful departure, consider a Pesto Parmesan version. Before adding the marinara sauce, spread a generous layer of fresh basil pesto over the breaded chicken. The aromatic basil and garlic notes of the pesto will meld beautifully with the cheese and tomato, creating a uniquely herbaceous and Mediterranean-inspired dish that is both refreshing and decadent.
If you’re seeking a lighter, more vegetable-forward option, the Mediterranean Veggie Parmesan is an excellent choice. Layer thinly sliced zucchini, bell peppers, and red onions between the chicken and the marinara sauce. The vegetables will roast alongside the chicken, absorbing the delicious flavors and adding a wonderful texture and nutritional boost to the classic. This variation offers a delightful way to sneak in extra greens while maintaining the beloved cheesy, saucy essence of chicken Parmesan.
For those who crave a bit of heat, a Spicy Kick Chicken Parmesan can be achieved by incorporating red pepper flakes into the breadcrumb mixture or by adding a pinch of cayenne pepper to the marinara sauce. This subtle warmth can transform the comforting dish into something more exciting and dynamic, appealing to those who enjoy a touch of spice in their meals. Adjust the amount of heat to your personal preference for a truly custom experience.
How to Prepare Baked Chicken Parmesan
Step 1: Prepare Your Workspace and Preheat the Oven
The journey to delicious Baked Chicken Parmesan begins with proper preparation. Begin by preheating your oven to 375°F (190°C). This ensures that by the time your ingredients are ready, the oven will be at the optimal temperature for achieving a perfectly cooked and golden-brown exterior. Simultaneously, take this opportunity to gather all your ingredients and necessary kitchen tools. Having everything within easy reach will streamline the cooking process and prevent any last-minute scrambling, allowing you to focus on the enjoyable task of creating this comforting meal.
Ensure your baking dish is readily available, as it will be the vessel for this culinary creation. A standard 9×13 inch baking dish is typically ideal for this recipe, allowing ample space for the chicken fillets without overcrowding. Clear your countertops and set up your breading station, which will typically involve three shallow dishes: one for flour (optional, but can help with adhesion), one for the egg wash, and one for the breadcrumb mixture. This organized approach is a cornerstone of efficient and successful cooking, setting you up for a stress-free and enjoyable preparation experience.
Step 2: Prepare the Chicken Cutlets
The chicken is the star of this dish, so its preparation is paramount. Start with boneless, skinless chicken breasts. To ensure even cooking and a tender bite, it’s highly recommended to pound the chicken breasts to an even thickness, approximately ½ inch. You can achieve this by placing the chicken between two sheets of parchment paper or plastic wrap and gently pounding them with a meat mallet, the flat side of a heavy pan, or even a rolling pin. This technique not only ensures uniform cooking but also tenderizes the meat, making it more receptive to the flavorful coatings and allowing it to cook through more quickly.
Once pounded, you’ll want to season the chicken cutlets generously on both sides with salt and freshly ground black pepper. This initial seasoning is crucial for building flavor from the inside out. Some recipes also recommend a light dusting of flour at this stage to help the egg wash adhere better, creating an even more robust crust. Ensure your workspace is set up for dredging: have a shallow dish with seasoned flour, a dish with beaten eggs (mixed with a tablespoon of water or milk for better consistency), and a dish containing your breadcrumb mixture. This methodical layering ensures each cutlet is perfectly coated, setting the stage for a crispy, golden finish.
Step 3: Create the Flavorful Breadcrumb Coating
The breadcrumb mixture is where much of the magic happens, transforming a simple chicken cutlet into a crispy, savory delight. In a shallow dish, combine your chosen breadcrumbs – panko breadcrumbs are highly recommended for their airy, crispy texture, but traditional Italian-style breadcrumbs also work wonderfully. To these, add grated Parmesan cheese, which lends a sharp, nutty depth of flavor and helps create a beautiful golden hue as it bakes. Now is the time to infuse the mixture with classic Italian herbs and spices.
Incorporate dried Italian seasoning, which typically includes a blend of oregano, basil, thyme, and rosemary. A pinch of garlic powder and onion powder can further enhance the savory profile, while a touch of salt and freshly ground black pepper will ensure the coating is well-seasoned. Some cooks also like to add a hint of paprika for color or a pinch of red pepper flakes for a subtle kick. Whisk all these dry ingredients together thoroughly, ensuring that the spices and cheese are evenly distributed throughout the breadcrumbs. This ensures every bite of your chicken will be bursting with delicious, well-rounded flavor, making the crust as enjoyable as the chicken itself.
Step 4: Dredge and Coat the Chicken Cutlets
Now for the satisfying process of coating the chicken. Take one pounded and seasoned chicken cutlet and first dredge it lightly in the seasoned flour, if using. Tap off any excess flour; this layer acts as a base for the egg wash to adhere to. Next, dip the floured cutlet into the beaten egg mixture, ensuring it is fully coated. Let any excess egg drip back into the dish. This sticky coating is what allows the breadcrumbs to cling effectively to the chicken.
Finally, transfer the egg-coated cutlet to the dish with the breadcrumb and Parmesan mixture. Press the chicken gently into the crumbs, ensuring that both sides are thoroughly coated. You want a nice, even layer of breadcrumbs all over. For an extra-thick and crunchy coating, you can repeat the egg wash and breadcrumb process once more, creating a double-breaded cutlet. Once coated, set the prepared chicken cutlet aside on a clean plate or parchment-lined baking sheet, and repeat this dredging process for all the remaining chicken cutlets. This methodical coating ensures a beautifully crisp exterior on every piece.
Step 5: Assemble the Dish in the Baking Pan
With your chicken cutlets perfectly breaded, it’s time to assemble them in the baking dish. Lightly grease your baking dish with a little olive oil or cooking spray. This prevents the chicken and sauce from sticking and helps with easy cleanup later. Arrange the coated chicken cutlets in a single layer in the prepared baking dish. It’s important not to overcrowd the pan; if necessary, use two smaller baking dishes. Giving each cutlet a little breathing room allows them to cook evenly and ensures that the breadcrumb coating becomes wonderfully crisp rather than steaming and becoming soggy.
Once the chicken is in place, generously spoon the marinara sauce over each chicken cutlet. Ensure that the sauce covers the majority of the breaded surface, allowing the flavors to meld and the sauce to gently simmer during baking. Don’t be afraid to be a little generous here; the sauce is a key component of the dish. You can use a good quality store-bought marinara sauce, or, for an even more exquisite flavor, a homemade sauce made from fresh tomatoes, garlic, and herbs. The goal is to create a rich, flavorful base that complements the chicken and cheese beautifully.
Step 6: Top with Cheese and Bake to Perfection
The crowning glory of any chicken Parmesan is the melted cheese. After the marinara sauce has been distributed, sprinkle the shredded mozzarella cheese evenly over the sauce-covered chicken. For an extra layer of cheesy goodness and a more complex flavor, you can also sprinkle a little extra grated Parmesan cheese over the mozzarella. The combination of these cheeses will create that irresistible, gooey, and slightly browned topping that is characteristic of this beloved dish. Some chefs even recommend adding a few dollops of ricotta cheese for extra creaminess, though this is purely optional.
Place the assembled baking dish into the preheated oven at 375°F (190°C). Bake for approximately 25-30 minutes, or until the chicken is cooked through and reaches an internal temperature of 165°F (74°C) when tested with a meat thermometer. The cheese should be melted, bubbly, and beginning to turn a beautiful golden brown. Keep an eye on it during the last few minutes of baking to prevent the cheese from burning. Once cooked, carefully remove the dish from the oven and let it rest for about 5-10 minutes before serving. This resting period allows the juices to redistribute within the chicken and the cheese to set slightly, making it easier to serve and preventing the toppings from sliding off.
Pro Tips for Baked Chicken Parmesan
The Importance of Pounding: For tender, evenly cooked chicken, always pound your chicken breasts to about ½-inch thickness. This ensures a consistent cooking time and a more enjoyable texture, preventing dry, tough pieces.
Double Dredge for Extra Crispiness: For a truly robust and crispy coating, consider a double dredge. After dipping in egg, coat with breadcrumbs, then dip back into the egg and coat again with breadcrumbs. This creates a thicker, more satisfying crust.
Panko is Your Friend: While any breadcrumbs work, panko breadcrumbs offer a lighter, airier, and incredibly crispy texture that is superior for achieving that ideal crunch without deep frying.
Quality Marinara Makes a Difference: Don’t underestimate the power of a good marinara sauce. Whether homemade or a high-quality store-bought variety, a flavorful sauce is crucial to the overall taste profile of your dish. Consider simmering it with a clove of garlic and a bay leaf for added depth.
Rest Before Serving: Allow the Baked Chicken Parmesan to rest for at least 5-10 minutes after it comes out of the oven. This crucial step allows the juices to settle back into the chicken, resulting in a more tender and flavorful bite, and prevents the cheesy topping from sliding off when you serve it.
Serving Suggestions for Baked Chicken Parmesan
Decoration
To elevate the visual appeal of your Baked Chicken Parmesan, a simple garnish can make a significant impact. A scattering of fresh, vibrant green chopped parsley or basil leaves over the top just before serving adds a pop of color and a touch of freshness. This not only makes the dish look more appetizing but also provides a subtle aromatic contrast to the rich flavors of the chicken and cheese. Consider adding a sprinkle of red pepper flakes for a hint of color and a promise of a slight kick for those who appreciate it.
Side Dishes
Baked Chicken Parmesan pairs wonderfully with a variety of classic Italian accompaniments. A simple side of spaghetti or linguine, tossed with a little olive oil or extra marinara sauce, is a perfect complement, allowing you to soak up every last bit of deliciousness. For a lighter and more refreshing option, a fresh garden salad with a vinaigrette dressing provides a welcome contrast to the richness of the chicken. Garlic bread, with its warm, toasty flavor and crispy crust, is another quintessential pairing that complements the Italian theme beautifully and is perfect for mopping up any extra sauce.
Creative Serving Ideas
Think beyond the standard plate for a more engaging dining experience. Serve individual chicken Parmesan portions on top of a bed of creamy polenta or a creamy risotto for a more gourmet presentation. Another creative idea is to serve it open-faced on crusty Italian bread for delicious chicken Parmesan sandwiches, perfect for a casual lunch or a hearty appetizer. For a fun family-style presentation, arrange the chicken Parmesan on a large platter garnished with fresh herbs and serve alongside individual bowls of pasta or a large, shareable salad for a truly communal dining event. You can even consider serving it as a topping for baked potatoes for an unexpected and comforting twist.
Preparation & Storage
Storing Leftovers
Leftover Baked Chicken Parmesan is a culinary treasure that can be enjoyed for days to come. Once the dish has cooled completely to room temperature, carefully transfer any remaining portions into an airtight container. This is essential to prevent the chicken from drying out and to maintain its optimal texture and flavor. Store the container in the refrigerator for up to 3 to 4 days. Ensure the container is well-sealed to prevent any odors from other foods in the refrigerator from affecting the chicken Parmesan.
Freezing
For longer-term storage, Baked Chicken Parmesan freezes remarkably well. It’s best to freeze individual portions so you can reheat only what you need. Once cooled, wrap each portion tightly in plastic wrap, followed by a layer of aluminum foil or place them in a freezer-safe bag or container. Properly stored, frozen chicken Parmesan can maintain its quality for up to 2 to 3 months. This makes it an excellent option for preparing ahead of time or for stocking up on delicious homemade meals for future busy days.
Reheating
Reheating Baked Chicken Parmesan requires a bit of care to bring back its delicious crispy texture and melty cheese. The best method is often in the oven. Preheat your oven to 350°F (175°C). Place the leftover or frozen chicken Parmesan in an oven-safe dish. To prevent the topping from drying out, cover it loosely with aluminum foil. Bake for about 15-20 minutes for refrigerated leftovers, or 30-40 minutes for frozen portions, or until heated through and the cheese is bubbly again. If you prefer a crispier crust, you can remove the foil for the last 5 minutes of baking. For a quicker reheat, you can use a microwave, but be aware that the breading may lose some of its crispiness.
Frequently Asked Questions
-
Can I make Baked Chicken Parmesan entirely in advance and reheat it later?
Yes, you absolutely can prepare Baked Chicken Parmesan in advance. You can bread and assemble the chicken in the baking dish, cover it tightly, and refrigerate it for up to 24 hours before baking. If you are baking from chilled, you might need to add a few extra minutes to the baking time. For reheating fully cooked leftovers, the oven is the best method, as detailed in the storage section, to help retain the crispiness of the breading and the meltiness of the cheese.
-
What are the best cheese alternatives if I don’t have mozzarella or Parmesan?
While mozzarella and Parmesan are traditional, you can certainly experiment with other cheeses. Provolone cheese offers a similar meltability and a slightly sharper flavor that pairs well. Gruyère can add a nutty, complex depth, and a blend of Italian cheeses like Fontina or even a spicy pepper jack can introduce exciting new dimensions to the dish. For a vegetarian option that mimics the cheesy flavor without dairy, nutritional yeast can be incorporated into the breadcrumb mixture, and a good quality vegan mozzarella alternative can be used for the topping.
-
How can I ensure my Baked Chicken Parmesan is extra crispy and not soggy?
Achieving maximum crispiness involves a few key steps. Firstly, pound the chicken to an even thickness for uniform cooking. Secondly, ensure your breadcrumb mixture is generously seasoned and that you coat the chicken thoroughly, pressing the crumbs on firmly. Using panko breadcrumbs is highly recommended for their light, airy texture which crisps up beautifully. Thirdly, avoid overcrowding the baking dish; give the chicken pieces space to allow hot air to circulate. Finally, don’t smother the chicken entirely in sauce; apply it generously but allow the edges of the breading to remain somewhat exposed to the oven’s heat.