How to Make Banana Chips
Discover the simple joy of homemade snacks with these incredibly easy baked banana chips. They offer a delightful crunch and a natural sweetness that’s perfect for satisfying those mid-day cravings or adding a healthy twist to your routine. This recipe unlocks a world of guilt-free snacking that’s surprisingly simple to achieve right in your own kitchen.
Imagine a treat that’s both wholesome and delicious, requiring only a handful of ingredients and minimal effort. These oven-baked wonders transform ripe bananas into crispy, golden delights, proving that healthy eating can be absolutely delightful. You’ll be amazed at how quickly these become a go-to snack for the whole family.
Why You Will Love This Recipe
- Healthy Snacking: Enjoy a satisfying crunch without the guilt, as these chips are naturally sweet and free from added oils or sugars.
- Simple Ingredients: Requiring only ripe bananas and a touch of lemon juice, this recipe is accessible to everyone.
- Easy Preparation: With just a few steps, you can transform simple fruit into a delightful, crispy snack.
- Versatile Treat: Perfect as a standalone snack, a topping for yogurt or cereal, or even incorporated into lunchboxes.
- Diet-Friendly: These baked banana chips are a fantastic option for those looking for gluten-free and dairy-free snacks.
Ingredients You Need
The beauty of these baked banana chips lies in their simplicity, using just a couple of high-quality, natural ingredients. Opting for ripe yet firm bananas ensures the best texture and sweetness, while fresh lemon juice plays a crucial role in preventing browning and adding a subtle brightness. Every element comes together to create a snack that’s both nourishing and incredibly satisfying.
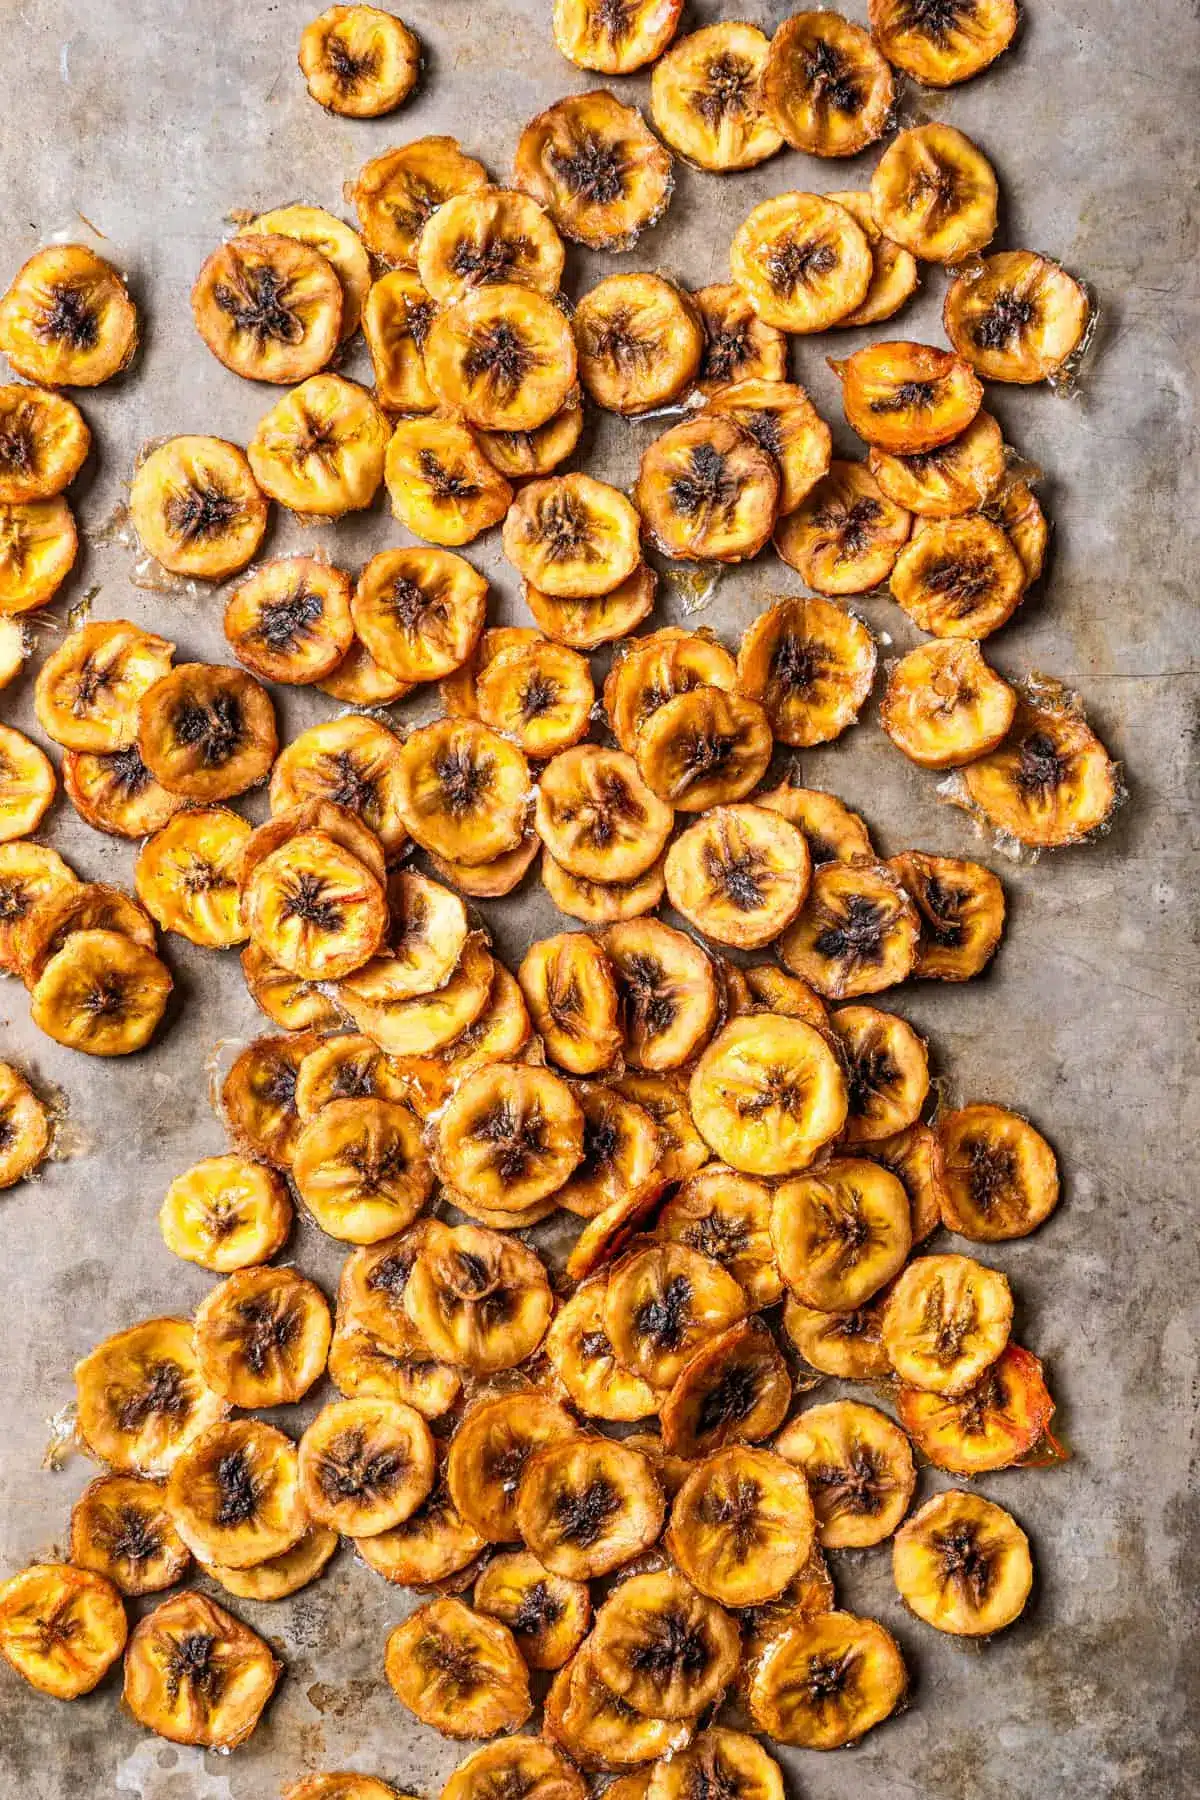
Baked Banana Chips
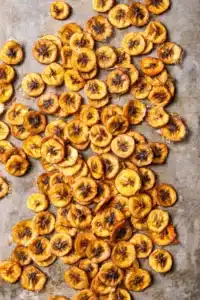
Deliciously sweet, guilt-free baked banana chips make a perfectly portable, light, and tasty snack to have on hand in case a craving strikes!
- 10 ripe but firm bananas, thinly sliced
- Freshly squeezed lemon juice (1 lemon is plenty)
- 1Preheat the oven to 200ºF. Cover a sheet pan with foil and lightly grease it with cooking spray.
- 2Toss the banana slices in lemon juice. Arrange the bananas in a single layer on the prepared baking sheet.
- 3Bake for 1 hour; check to see if the tops are firm and starting to turn color. If so, flip the slices with a metal spatula and continue to bake for 1 hour longer or until desired crispness.
- 4Remove from the oven and transfer the banana chips to a wire rack to cool completely. The longer they cool, the crunchier they will get. Store in an airtight container.
Keywords: banana chips, baked, healthy snack, fruit chips, gluten-free
- ripe but firm bananas: choose bananas that are yellow with a few brown spots, indicating ripeness and natural sweetness, but still firm enough to hold their shape when sliced.
- freshly squeezed lemon juice: this essential ingredient acts as an antioxidant, preventing the banana slices from turning brown too quickly and adds a hint of refreshing tartness.
You’ll find the exact quantities and precise measurements for all the ingredients within the recipe card, ensuring perfect results every time you bake.
Variations
Elevate your baked banana chips with a sprinkle of warmth and spice by adding cinnamon. A light dusting of this classic spice before baking infuses the chips with an aroma that’s simply irresistible. This simple addition transforms the chips into a comforting treat, perfect for cooler evenings or as a delightful accompaniment to a warm cup of tea.
For those seeking a savory twist, consider a dash of smoky paprika and a pinch of garlic powder. This combination introduces a surprising depth of flavor, turning the naturally sweet banana into a more complex, intriguing snack. It’s a bold departure from the usual, offering a unique taste experience that will have you reaching for more.
To cater to a low-carb lifestyle, you can omit the bananas and instead use thinly sliced plantains, specifically green ones. While the texture will be different, the baking process can yield a savory, crispy chip that fits within carb-conscious eating plans. This alternative requires a slightly different approach to baking time but offers a satisfying crunch.
Another delightful variation involves a touch of sweetness and sophistication by adding a hint of cardamom. This aromatic spice lends an exotic fragrance and a subtly sweet, floral note that complements the banana beautifully. It’s a refined touch that makes these chips feel like a gourmet indulgence, perfect for special occasions or when you want to treat yourself.
For a touch of vibrancy and a hint of exotic flavor, try infusing your lemon juice with a tiny bit of lime zest. This adds an extra layer of citrusy brightness that cuts through the sweetness, creating a more complex flavor profile. It’s a subtle change that makes a noticeable difference, offering a refreshing tang.
How to Prepare baked banana chips
Step 1: Oven and Baking Sheet Preparation
The first crucial step in creating perfect baked banana chips is to preheat your oven to the ideal low temperature, which is 200°F (93°C). This gentle heat is essential for drying out the banana slices without burning them, allowing them to crisp up gradually over time. Setting your oven to this specific temperature is key to achieving that desirable crunch.
Simultaneously, prepare your baking sheets by lining them with parchment paper or aluminum foil. This not only prevents the banana slices from sticking to the pan but also significantly simplifies the cleanup process afterward. A light coating of cooking spray on top of the parchment paper or foil adds an extra layer of protection against any potential sticking. This meticulous preparation ensures a smooth baking experience.
Having your baking sheets ready and your oven preheating creates an efficient workflow, allowing you to move on to the banana preparation without delay. This foundational step sets the stage for successful dehydration and crisping, ensuring each chip reaches its full potential of deliciousness. It’s a small detail that makes a significant difference in the final outcome of your baked banana chips.
Step 2: Slicing the Bananas
Selecting the right bananas is paramount for this recipe; you’ll want to choose ripe but still firm bananas. Look for fruits that are mostly yellow with only a few small brown spots; these will offer the best balance of sweetness and structural integrity for slicing. Overly ripe bananas can become mushy during the baking process, leading to a less desirable texture. The firmness ensures they hold their shape when thinly sliced.
Using a sharp knife or a mandoline slicer, carefully slice the bananas into uniform, thin rounds. Aim for a thickness of approximately ¼ inch (about 0.6 cm). Consistency in slice thickness is vital for even baking; if some slices are significantly thicker than others, they will bake at different rates, potentially resulting in some chips being burnt while others remain undercooked. Precision here leads to a batch of uniformly crispy chips.
Take your time with this step, as uneven slices are the most common reason for inconsistent results. A mandoline slicer can be particularly helpful in achieving perfectly even slices quickly and safely, but a sharp knife wielded with care will also suffice. The goal is to create a collection of perfect, uniform discs ready for their transformation into crispy chips.
Step 3: The Lemon Juice Bath
Once your bananas are perfectly sliced, the next critical step involves a gentle bath in freshly squeezed lemon juice. This isn’t just for flavor; the citric acid in lemon juice acts as a natural antioxidant, significantly slowing down the browning process that bananas are prone to undergo when exposed to air. It helps maintain their appealing yellow color throughout the baking process. This step is vital for visual appeal and also contributes to the overall quality of the chips.
In a medium-sized bowl, pour enough fresh lemon juice to comfortably coat all the banana slices. Add the sliced bananas to the bowl and gently toss them to ensure each slice is lightly coated on all sides. Avoid over-soaking them; a quick toss for about 30 seconds to a minute is sufficient. The goal is a light coating, not a prolonged marination, as leaving them too long can affect the texture.
This quick dip in lemon juice is a small but impactful step that ensures your banana chips maintain their attractive color and prevent any unpleasant bitterness from oxidation. It’s a simple trick that elevates the final presentation and overall eating experience of your homemade chips. This preparation is key to achieving a professional-looking and tasting product.
Step 4: Arranging on the Baking Sheet
Carefully arrange the lemon-coated banana slices in a single layer on the prepared baking sheets. It is absolutely essential that the slices do not overlap or touch each other. Overlapping will cause them to steam rather than bake, leading to chewy chips instead of crispy ones. Giving each slice enough space allows the hot air to circulate freely around them, promoting even drying and crisping.
If your baking sheets are too small to accommodate all the slices in a single layer without crowding, it is far better to use multiple baking sheets or bake in batches. This might add a little extra time to the overall process, but it guarantees a superior texture and crispness for every single banana chip. Patience at this stage pays off handsomely in the end result.
Take your time to ensure each slice is perfectly positioned for optimal air circulation. This deliberate arrangement is a fundamental aspect of achieving that satisfying crunch. Think of it as giving each banana slice its own personal space to achieve peak crispiness. This attention to detail makes all the difference for perfectly baked chips.
Step 5: The Baking Process
Place the baking sheets into the preheated oven and begin the slow and steady baking process. Initially, bake the banana slices for approximately 1 hour. During this first hour, the bananas will begin to lose moisture and soften. It’s important to observe them periodically, even during this initial stage, as oven temperatures can vary.
After the first hour, it’s time to check the progress and, if necessary, flip the slices. Using a thin metal spatula, carefully flip each banana slice to the other side. This ensures that both sides of the chip are exposed to the heat and dry evenly. If the tops are already firm and starting to show a slight golden hue, it’s a good indicator that flipping is beneficial.
Continue baking for another 1 to 2 hours, or until the banana chips reach your desired level of crispness. The exact time will depend heavily on the thickness of your slices and the specific calibration of your oven. You are looking for them to be dry to the touch and have a noticeable crispness when gently bent. Some may become crispy sooner than others, so it’s wise to remove perfectly done chips and leave any still-chewy ones in for a bit longer.
Step 6: Cooling for Maximum Crispness
Once the banana chips have achieved the desired crispness directly from the oven, immediately transfer them from the baking sheets to a wire rack. This step is crucial because the chips will continue to crisp up as they cool down. Leaving them on a hot baking sheet would trap steam and prevent them from reaching their full crunchy potential. The wire rack allows for optimal air circulation all around the chips, facilitating rapid and even cooling.
Ensure the chips are spread out on the wire rack in a single layer, just as they were on the baking sheet. Avoid stacking them or letting them touch extensively, as this can lead to soft spots or uneven cooling. The goal is to expose as much surface area of each chip to the ambient air as possible to encourage maximum dehydration and crispness. Patience during this cooling phase is rewarded with superior texture.
Allow the banana chips to cool completely, which may take anywhere from 30 minutes to an hour or even longer depending on your room’s humidity and temperature. You will notice them becoming progressively more brittle and crunchy as they shed the last traces of moisture. This complete cooling process is the final transformation, turning your baked slices into perfectly crisp, delightful snacks ready to be enjoyed.
Pro Tips for baked banana chips
Even Slicing is Key: Strive for uniformity in your banana slices. A mandoline slicer is your best friend here, ensuring each slice is the same thickness for consistent baking. If using a knife, take your time to achieve precise, even cuts of about ¼ inch. This single step dramatically improves the final texture of your chips.
Don’t Rush the Bake: Low and slow is the mantra for perfectly baked banana chips. Resist the urge to crank up the oven temperature, as this will likely result in burnt exteriors and chewy interiors. The gentle heat over an extended period is what allows the moisture to evaporate effectively, leading to that delightful crispness without bitterness.
Watch Them Closely: Ovens can be finicky, and banana slices vary in thickness and ripeness. Keep a watchful eye on your chips, especially during the latter stages of baking. Some chips may crisp up faster than others; be prepared to remove done chips from the baking sheet and leave the remaining ones in to finish. This prevents any chips from becoming overdone.
Cooling is Crucial: The magic of crispiness truly happens during the cooling phase. Once baked, transfer the chips immediately to a wire rack to cool completely. This allows air to circulate freely, drawing out any residual moisture and solidifying their crunchy texture. They will continue to crisp up as they sit, so patience is vital here.
Storage Matters: For maximum longevity and crispness, store your completely cooled banana chips in an airtight container at room temperature. Avoid refrigerating them, as the humidity can make them lose their crunch. Properly stored, these homemade delights can last for several weeks, making them a perfect pantry staple.
Serving Suggestions for baked banana chips
Decoration
These baked banana chips, with their natural golden hue and delicate crisp, serve as an elegant and wholesome garnish. Sprinkle them artistically over fruit salads, yogurt parfaits, or smoothie bowls for an added layer of texture and visual appeal. Their slightly curved shape and textured surface add an artisanal touch to any dish, making your creations look as good as they taste.
Their rustic charm makes them a fantastic decorative element for cakes and desserts. Imagine them delicately placed around the edge of a chocolate cake or crusted onto the sides of a creamy cheesecake. They offer a delightful contrast to softer textures, providing both visual interest and a pleasing mouthfeel. They can also be crushed and used as a unique crust for pies or tarts.
For an extra touch of flair, consider a very light dusting of powdered sugar or a drizzle of melted dark chocolate over some of the chips before using them as decoration. This adds a touch of sweetness and indulgence, transforming them into a more decadent garnish. This simple addition can elevate an ordinary dessert into something truly special and visually stunning.
Side Dishes
Baked banana chips are a fantastic accompaniment to a variety of breakfast dishes, offering a delightful crunch that complements softer textures. Serve them alongside pancakes, waffles, or French toast for a delightful textural contrast that awakens the palate. Their natural sweetness makes them a perfect, healthy addition to any morning meal, providing a satisfying crunch with every bite.
They also pair wonderfully with yogurt and granola, adding an extra layer of crunch and flavor to your morning routine. Imagine a creamy bowl of Greek yogurt topped with your favorite granola, and then generously adorned with these crispy banana chips. This combination is not only delicious but also visually appealing, making breakfast an event.
For a more substantial meal, consider them as a surprisingly good side for certain savory dishes. While it might seem unusual, their subtle sweetness and crisp texture can complement richer, more savory flavors. They can offer a unique textural counterpoint to dishes like certain types of curries or even some slow-cooked pork recipes, providing an unexpected but welcome contrast.
Creative Serving Ideas
Transform your baked banana chips into a delightful component of a homemade trail mix. Combine them with nuts, seeds, dried fruits, and perhaps a few dark chocolate chips for an energy-boosting snack perfect for hikes or long journeys. This customizable mix allows for endless flavor combinations, making it a versatile option for any outdoor adventure or busy day.
Another innovative idea is to incorporate them into savory dishes. Crush them finely and use them as a crunchy coating for chicken tenders or fish fillets before baking. This adds a subtle sweetness and a fantastic textural element that is far more interesting than traditional breadcrumbs. The banana flavor will be mild, providing a unique umami depth.
Consider creating a sophisticated dessert by layering crushed banana chips with whipped cream, fresh fruit, and perhaps a drizzle of caramel sauce in a glass. This creates a visually stunning parfait that offers a delightful interplay of creamy, fruity, and crunchy textures. It’s an elegant way to present a simple snack in a more elevated dessert format.
Preparation & Storage
Storing Leftovers
Once your delicious baked banana chips have cooled completely, the key to maintaining their crispness is proper storage. Ensure they are entirely dry and at room temperature before transferring them to an airtight container. This prevents any moisture from the air from rehydrating the chips and making them soft. Glass jars with tight-fitting lids or good quality plastic containers are ideal for this purpose.
Store the sealed container in a cool, dry place away from direct sunlight and heat. A pantry or a cupboard works perfectly. Properly stored, these homemade banana chips can retain their delightful crunch for up to two to three weeks, making them a fantastic pantry staple for spontaneous snacking. It’s always best to check their texture before consuming after a long storage period.
If you notice any signs of softness or moisture, it’s a clear indication that the seal on your container may not be airtight, or perhaps the chips weren’t fully cooled before storage. In such cases, you might be able to revive them by spreading them back on a baking sheet and placing them in a very low oven (around 150°F/65°C) for about 10-15 minutes to dry out again, though this isn’t always guaranteed.
Freezing
While freezing is not the ideal method for preserving the crisp texture of baked banana chips, it can be an option if you have an abundance and need to store them for an extended period. However, it’s important to manage expectations, as the freezing and thawing process can significantly impact their crispness, often leading to a softer, chewier texture upon thawing. The moisture within the chips can form ice crystals, which break down their structure.
If you choose to freeze them, ensure they are absolutely, completely cooled. Package them in freezer-safe bags or containers, removing as much air as possible to prevent freezer burn. For best results, consider a double-layer of protection, perhaps placing sealed bags inside a larger airtight container. This helps to minimize their exposure to the cold, dry air of the freezer.
When you are ready to use them, thaw them slowly at room temperature. Avoid microwaving or rapid thawing, as this will likely result in sogginess. It is highly recommended to try and consume them as soon as possible after thawing. For those who prioritize ultimate crispness, room temperature storage is undoubtedly the superior choice.
Reheating
If your baked banana chips have lost some of their crispness due to humidity or prolonged storage, you can often revive them with a brief period in a low oven. Preheat your oven to a very low temperature, around 200°F (93°C), the same temperature you used for baking them initially. This gentle heat is effective at re-evaporating any moisture that has crept back into the chips.
Spread the slightly softened chips in a single layer on a baking sheet lined with parchment paper. Place the baking sheet in the preheated oven and bake for about 10 to 15 minutes. Keep a close eye on them during this time, as they can go from revived to overcooked very quickly. The goal is to gently dry them out, not to bake them further.
Once they feel crisp to the touch, remove them from the oven and transfer them to a wire rack to cool completely. As they cool, they should regain a significant portion of their original crunch. This reheating method is a fantastic way to salvage chips that might have softened, ensuring you can still enjoy their delightful texture. It’s a simple trick to bring them back to their prime crunchiness.
Frequently Asked Questions
-
Can I use green bananas instead of ripe ones for baked banana chips?
While this recipe is optimized for ripe bananas to achieve a naturally sweet and slightly softer chip, you can use firmer, less ripe bananas if you prefer a less sweet and potentially crisper result. However, very green bananas might not develop the sweetness you desire and could result in a starchier texture. The key is finding bananas that are firm enough to slice neatly but still have some degree of ripeness for flavor. If using greener bananas, you might need to adjust baking times slightly, as they contain more moisture. For a truly different texture and flavor profile, unripe plantains are often used for savory chips.
-
Why are my baked banana chips not crispy?
There are several common reasons why your baked banana chips might not be achieving the desired crispness. The most frequent culprit is insufficient drying time; the bananas simply haven’t lost enough moisture. Ensure you are baking them at a low temperature for a long duration, and be patient. Another critical factor is slice thickness; if your slices are too thick, they will take much longer to dry out. Overlapping slices on the baking sheet will cause steaming instead of crisping. Finally, remember that cooling is essential – chips continue to crisp up as they cool. If removed from the oven and they feel slightly pliable, they should become crispier as they sit on the wire rack.
-
How thin do the banana slices need to be for optimal crispiness?
For the crispiest baked banana chips, aim for slices that are uniformly thin, ideally around ¼ inch (approximately 0.6 cm) in thickness. This consistent thinness is paramount because it allows for even dehydration and crisping. If slices are too thick, they will retain too much moisture and may remain chewy even after prolonged baking. Conversely, if they are excessively thin, they risk burning before they have a chance to crisp properly. Using a mandoline slicer can greatly help in achieving this perfect, consistent thickness, ensuring all your chips bake evenly and reach that satisfying crunch you’re looking for.