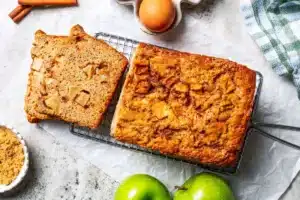
Easy Apple Bread Recipe – One Bowl, No Yeast!

There’s a certain magic that happens when the cozy aroma of spiced apples fills your kitchen, promising warmth and delicious comfort. This apple bread recipe captures that essence perfectly, transforming simple, wholesome ingredients into a treat that feels both rustic and elegant. It’s the kind of baked good that instantly elevates your morning coffee or becomes the star of an afternoon tea. Get ready to fall in love with its tender crumb and burst of sweet, spiced apple goodness.
This recipe is designed for ease and maximum flavor, making it an ideal choice for bakers of all levels. Imagine a single bowl for mixing and a quick assembly process that gets you from your pantry to the oven in mere minutes. The result is a beautifully moist and flavorful loaf, studded with chunks of perfectly softened apples, each bite a delightful reminder of why baking with fruit is always a good idea. It’s a truly satisfying creation that brings simple joy to any table.
Why You Will Love This Recipe
- Effortless Preparation: With a one-bowl mixing method and minimal assembly, you can have this delightful bread ready for the oven in about 10 minutes.
- Moist and Tender Crumb: The combination of butter, Greek yogurt, and the natural moisture from the apples ensures a wonderfully soft and yielding texture throughout the loaf.
- Bursting with Apple Flavor: Generous amounts of freshly chopped apples, combined with warm spices like cinnamon and nutmeg, create an intensely satisfying fruity experience in every slice.
- Versatile Enjoyment: This apple bread is perfect for breakfast, a mid-day snack, or even a simple dessert, making it a go-to recipe for any occasion.
- Year-Round Appeal: While apples evoke autumn, this bread is delicious any time of year, utilizing readily available ingredients for a consistent treat.
Ingredients You Need
The beauty of this apple bread lies in its reliance on common pantry staples and readily available fresh produce. Opting for quality ingredients, especially your apples, will make a noticeable difference in the final outcome. Using a crisp, slightly tart variety ensures a delightful contrast to the sweetness of the bread itself. Don’t hesitate to explore different apple types to discover your personal favorite for this recipe.
Apple Bread Recipe
This quick apple bread is a soft, spiced loaf filled with juicy cinnamon apples. Mix the batter in one bowl, and it's ready for the oven in 10 minutes!
- 1½ cups Granny Smith apples, peeled and chopped
- ½ cup brown sugar
- 1 teaspoon ground cinnamon
- ½ teaspoon ground nutmeg
- ½ cup unsalted butter, softened
- ½ cup granulated sugar
- ¼ cup brown sugar
- 2 eggs
- ½ cup Greek yogurt
- 1 teaspoon pure vanilla extract
- ½ cup milk
- 1¾ cups all purpose flour
- 1 teaspoon ground cinnamon
- ¼ teaspoon ground nutmeg
- 1 teaspoon baking powder
- ½ teaspoon baking soda
- 1Prepare the apples: Peel and chop your apples into bite-sized pieces. Toss the apples with brown sugar, cinnamon, and nutmeg. Set aside.
- 2Prepare to bake: Heat your oven to 350ºF (175ºC). Line a 9x5-inch loaf pan with parchment paper.
- 3Make the bread batter: In a large bowl, cream the softened butter with granulated sugar and brown sugar using an electric mixer. Beat in the eggs one at a time. Stir in the Greek yogurt, vanilla extract, and milk until combined.
- 4Add the dry ingredients: Sift the all-purpose flour, cinnamon, nutmeg, baking powder, and baking soda over the wet ingredients. Stir until just combined; do not overmix.
- 5Assemble: Spread half of the bread batter into the prepared loaf pan. Layer half of the prepared apples on top. Pour the remaining batter over the apples, then top with the remaining apples.
- 6Bake: Bake for 60-70 minutes, or until a toothpick inserted into the center comes out clean. Cover the bread with aluminum foil halfway through baking to prevent the top from burning.
- 7Serve: Remove the bread from the oven and let it rest in the pan for about 10 minutes. Transfer to a wire rack to cool completely before slicing and serving.
Keywords: apple bread, quick bread, spiced bread, cinnamon apples, fall baking, dessert, breakfast, snack
- apples: peeled and chopped into bite-sized pieces; Granny Smith are recommended for their tartness, but Pink Lady, Honeycrisp, or Fuji also work beautifully.
- brown sugar: to sweeten the apple filling and aid in caramelization, though granulated sugar can be substituted.
- cinnamon: ground cinnamon is essential for that warm, comforting spice profile in the apple layer.
- nutmeg: a pinch of ground nutmeg complements the cinnamon, adding depth and complexity to the apple filling.
- unsalted butter: softened to room temperature for easy creaming with sugars to form the base of the bread batter.
- granulated sugar: used in the bread batter for sweetness and structure.
- brown sugar: also incorporated into the batter to add moisture and a richer, slightly caramel-like flavor.
- eggs: at room temperature, they help bind the ingredients and contribute to the cake’s tender texture.
- greek yogurt: provides moisture and a slight tang, contributing to a remarkably soft crumb; sour cream is a suitable alternative.
- vanilla extract: pure vanilla extract enhances all the other flavors and adds a lovely aroma.
- milk: any kind of milk will work, adding necessary liquid to the batter.
- all purpose flour: the foundation of the bread’s structure; consider a whole wheat blend for variation.
- cinnamon: ground cinnamon is also added to the bread batter for an overall spiced flavor.
- nutmeg: ground nutmeg is included in the batter to harmonize with the apple filling.
- baking powder: a key leavening agent that helps the bread rise and achieve a light texture.
- baking soda: another leavening agent that works with acidic ingredients to ensure a good rise.
The specific quantities for each ingredient are detailed within the recipe card for your convenience.
Variations
Elevating this already delightful apple bread recipe is simple with a few creative twists that cater to different tastes and dietary needs. Imagine transforming this comforting loaf into something entirely new, while retaining its inherent charm and ease of preparation.
For a decadent vegan rendition, you can easily swap out the dairy components. Replace the butter with a plant-based alternative like vegan butter or coconut oil (ensure it’s solid but softened). For the Greek yogurt, a thick, unsweetened plant-based yogurt such as soy or coconut yogurt will work wonderfully. Ensure your sugars and other dry ingredients are also vegan-friendly, and you’ll have a delicious plant-based apple bread that everyone can enjoy. The texture should remain remarkably similar, offering that same moist crumb and delightful apple chunks.
If you’re following a low-carb lifestyle, this recipe can be adapted with a few key substitutions. Use a low-carb flour blend, such as almond flour and coconut flour, in place of all-purpose flour. You’ll likely need to adjust the liquid content slightly, as low-carb flours absorb moisture differently. Sweeten the bread batter and the apple filling with a sugar substitute like erythritol or stevia. While the texture might vary slightly, you’ll still achieve a wonderfully spiced, apple-flavored treat that fits your dietary goals. It’s a fantastic way to enjoy a comforting baked good without compromising your carb intake.
Adding a touch of gourmet flair is also incredibly simple. Consider infusing the batter with a hint of cardamom or a pinch of ground ginger for an extra layer of warmth and complexity. For the apple filling, a tablespoon of finely chopped walnuts or pecans can add a delightful crunch and nutty undertone that pairs beautifully with the apples and spices. These small additions can transform an everyday treat into something truly special, perfect for entertaining or when you simply want to indulge in something a little more sophisticated. Explore these variations and make this apple bread recipe your own.
How to Prepare apple bread recipe
Step 1: Prepare the Apples
The initial step in creating this exquisite apple bread involves meticulously preparing the star ingredient: the apples. Begin by peeling your chosen apples thoroughly, ensuring that no skin remains. Then, proceed to chop them into uniform, bite-sized pieces. The goal here is not to create minuscule dice, but rather substantial chunks that will retain their shape and provide a satisfying burst of flavor and texture within the bread. Small, uniform pieces ensure even cooking and distribution throughout the batter.
Once chopped, these apple pieces are then gently tossed with brown sugar, ground cinnamon, and a whisper of ground nutmeg. This simple coating serves multiple purposes. The brown sugar begins to draw out the natural moisture from the apples, creating a slightly syrupy consistency as it mixes with the spices. The cinnamon and nutmeg infuse the apples with their warm, aromatic essence, promising that signature spiced flavor that defines this bread. This mixture is then set aside, allowing the flavors to meld and deepen while you prepare the bread batter itself.
This seemingly straightforward step is crucial for the final taste and texture of your apple bread. Allowing the apples to macerate in the sugar and spices for a short period before baking helps them to soften beautifully within the loaf. It also prevents them from absorbing too much moisture from the batter, which could lead to a gummy texture. The resulting apple mixture is a fragrant, pre-sweetened, and spiced component that will be layered into the bread, ensuring each bite is packed with delicious apple goodness. The aroma alone at this stage is incredibly inviting, hinting at the delightful bake to come.
Step 2: Prepare to Bake
With your fragrant apple mixture ready, the next phase is to prepare your baking environment and equipment. This involves preheating your oven to the correct temperature, which is 350°F (175°C). This consistent temperature is vital for ensuring the bread bakes evenly and achieves a perfect golden-brown crust. Proper preheating is a fundamental step in baking that guarantees your loaf begins its journey in an optimally warm environment, promoting consistent rise and browning from the moment it enters the oven.
Concurrently, you’ll need to prepare your loaf pan. A standard 9×5-inch loaf pan is ideal for this recipe. To ensure your bread releases cleanly and easily, it’s highly recommended to line the pan with parchment paper. You can achieve this by cutting a piece of parchment paper that fits the bottom of the pan and then creating two long strips that will line the sides, creating ‘handles’. These parchment strips will extend slightly above the rim of the pan, providing a convenient way to lift the baked bread out once it has cooled slightly. This technique not only prevents sticking but also makes the entire process of removing and cooling the bread significantly less messy.
This preparatory stage, while seemingly simple, lays the groundwork for a successful bake. A correctly preheated oven and a properly prepared pan are essential for achieving the best possible outcome. They ensure that the heat distribution is optimal and that the bread doesn’t adhere to the pan, which can be a common frustration in baking. Taking these few extra moments to set up your baking station correctly will prevent potential issues down the line and contribute to a beautifully presented and perfectly baked apple bread. It’s the quiet efficiency before the baking magic begins.
Step 3: Make the Bread Batter
Now, it’s time to bring together the components for the delicious bread batter. In a large mixing bowl, cream together the softened unsalted butter with the granulated sugar and brown sugar. Using an electric mixer is highly recommended for this step; it allows you to achieve a light, fluffy, and well-emulsified mixture. Continue beating until the mixture is pale in color and appears airy, incorporating air into the butter and sugar which contributes to the bread’s tender texture. This creaming process is fundamental for developing a rich flavor and an appealing crumb structure.
Once the butter and sugar mixture is perfectly creamed, it’s time to incorporate the eggs. Add the eggs one at a time, beating well after each addition. This gradual incorporation ensures that the eggs are fully emulsified into the butter and sugar mixture, preventing a greasy texture and promoting a cohesive batter. Following the eggs, stir in the Greek yogurt and pure vanilla extract until they are just combined. The Greek yogurt adds a wonderful moisture and a subtle tang, contributing to the overall tenderness of the bread, while the vanilla extract enhances the sweet, spiced aromas.
The final wet ingredient to incorporate is the milk. Add the milk to the creamed mixture and stir gently until it is just combined. At this stage, it’s important to avoid overmixing. The goal is to create a smooth, homogenous liquid base for your dry ingredients. The mixture should look smooth and well-blended, with no large pockets of butter or sugar remaining. This careful creaming and blending process sets the stage for the dry ingredients, ensuring a beautiful, moist, and flavorful bread once everything is brought together in the next step.
Step 4: Add the Dry Ingredients
With the wet ingredients perfectly combined, the next crucial step is to introduce the dry ingredients to form the structure of your apple bread. This is where a touch of finesse comes in to ensure a tender crumb. Instead of simply dumping the dry ingredients into the wet mixture, it’s highly beneficial to sift them. Using a fine-mesh sieve or a dedicated sifter, sift the all-purpose flour, ground cinnamon, ground nutmeg, baking powder, and baking soda directly over the wet ingredients in the mixing bowl. Sifting aerates the flour and removes any potential lumps, leading to a lighter, more even texture in the finished bread.
The combination of baking powder and baking soda acts as the primary leavening agents for this quick bread. Baking powder provides a double-acting lift, reacting both when it gets wet and when it’s exposed to heat, while baking soda reacts with the acidic components in the batter (like yogurt and brown sugar) to create additional lift. The careful sifting ensures these leaveners are evenly distributed throughout the flour, which is critical for a uniform rise. The spices, cinnamon and nutmeg, are also sifted at this stage, ensuring their flavors are dispersed throughout the batter, not just concentrated in pockets.
Once sifted, gently stir the dry ingredients into the wet ingredients. This is a critical moment where overmixing must be avoided at all costs. Use a spatula or a wooden spoon and fold the ingredients together until they are just combined. Stop mixing as soon as you no longer see streaks of dry flour. A few small lumps in the batter are perfectly acceptable and, in fact, desirable, as overmixing can develop the gluten in the flour too much, resulting in a tough, dense loaf. The aim is to create a cohesive batter that still retains some lightness and airiness.
Step 5: Assemble
The assembly of your apple bread is a straightforward yet strategic process that ensures the delightful apple filling is perfectly integrated with the batter. Begin by transferring approximately half of the prepared bread batter into the parchment-lined 9×5-inch loaf pan. Use your spatula to spread this initial layer evenly across the bottom of the pan, creating a stable base for the first layer of apples. This ensures that the apples are distributed throughout the loaf, rather than sinking entirely to the bottom during baking.
Once the first layer of batter is in place, carefully add half of the prepared apple mixture on top of the batter. Distribute the spiced apple chunks evenly over the batter, trying to create a relatively consistent layer. This layer of apples will become wonderfully soft and jammy during baking, infusing the surrounding bread with their sweet, spiced flavor. Taking care at this stage to spread the apples as evenly as possible will contribute to a more balanced flavor profile in every slice.
After the first layer of apples has been added, pour the remaining half of the bread batter over the apples. Again, use your spatula to gently spread this top layer of batter, ensuring it covers the apples completely. Finally, arrange the remaining portion of the spiced apple mixture on top of this final layer of batter. This layering technique ensures that the bread is studded with apples both in the middle and on top, creating a visually appealing loaf with delightful pockets of fruit throughout. The process is simple but highly effective in maximizing the apple experience in every slice.
Step 6: Bake
The final stage is the actual baking of your masterpiece. Carefully place the assembled loaf pan into the preheated oven. The initial baking time is approximately 60 to 70 minutes. It is crucial to keep a close eye on the bread, especially towards the end of the baking period, as oven temperatures can vary. A golden-brown crust is a good visual indicator that the bread is nearing completion.
A key technique to ensure the bread bakes through without the top becoming too dark or the apples on top burning is to cover it with aluminum foil. After about 30-35 minutes of baking, or when you notice the top is starting to brown nicely, gently cover the loaf pan with a piece of aluminum foil. This tenting technique reflects heat away from the surface, allowing the inside of the bread to cook through without sacrificing the appearance of the crust. You can crimp the foil around the edges of the pan to secure it in place.
Continue baking with the foil on for the remaining time, or until a toothpick inserted into the center of the loaf comes out clean. This test is the definitive way to know your bread is fully baked. If the toothpick comes out with wet batter clinging to it, the bread needs more time. If it comes out clean or with a few moist crumbs, it’s ready. The total baking time can range slightly depending on your oven and the moisture content of your apples, so relying on the toothpick test is paramount for perfection. The aroma filling your kitchen during this final bake is truly intoxicating.
Pro Tips for apple bread recipe
Don’t Overmix: This is a cardinal rule in quick bread baking. Overmixing the batter after adding the dry ingredients develops the gluten in the flour, leading to a tough and dense loaf. Mix just until the ingredients are combined; a few small lumps are perfectly fine and actually desirable for a tender crumb.
Room Temperature Ingredients: Ensure your butter, eggs, and yogurt are at room temperature before you begin. This allows them to emulsify properly, creating a smoother batter and a more even texture. Softened butter creams better with sugar, and room temperature eggs bind more effectively, contributing to a lighter, more cohesive loaf.
Proper Cooling is Key: Resist the urge to slice into the bread immediately after taking it out of the oven. Allow it to cool in the pan for about 10 minutes, then transfer it to a wire rack to cool completely. The internal structure is still setting, and slicing warm bread can cause it to crumble due to the soft apples within.
Apple Choice Matters: While this recipe works with many apple varieties, using a crisp, slightly tart apple like Granny Smith is highly recommended. These apples hold their shape well during baking and provide a delightful contrast to the sweet bread. Varieties that are too soft or mealy can break down excessively.
Uniform Apple Chunks: When chopping your apples, aim for consistent, bite-sized pieces. This ensures that the apples soften evenly throughout the baking process and are distributed uniformly within the bread. If pieces are too large, they may remain undercooked, while pieces that are too small might disappear entirely.
Serving Suggestions for apple bread recipe
Decoration
To enhance the visual appeal of your apple bread, consider a simple yet elegant dusting of powdered sugar once the loaf has cooled completely. For an extra touch of autumn charm, you can arrange a few thinly sliced apple rings (baked separately until slightly crisp) or a sprinkle of toasted chopped pecans or walnuts directly on top. A drizzle of caramel sauce or a light glaze made with powdered sugar and a touch of milk or apple cider can also add a delightful finishing touch.
Side Dishes
This apple bread is wonderfully self-sufficient, but it also pairs beautifully with a variety of accompaniments. A dollop of freshly whipped cream or a small scoop of vanilla bean ice cream transforms a slice into a delightful dessert. For a more breakfast-oriented serving, consider pairing it with a side of crispy bacon or a creamy Greek yogurt parfait topped with fresh berries. A warm cup of coffee or a spiced chai latte makes for an ideal beverage companion.
Creative Serving Ideas
Beyond simply slicing, get creative with how you serve this versatile bread. French toast is a fantastic option; slice the cooled bread into thick pieces, dip them in an egg mixture, and pan-fry until golden. This transforms it into a decadent breakfast or brunch dish. You could also crumble any leftover pieces and toast them in a pan with a little butter and cinnamon to create a delicious topping for yogurt or oatmeal. Alternatively, serve warm slices with a drizzle of maple syrup for an extra layer of sweetness.
Preparation & Storage
Storing Leftovers
Properly stored, leftover apple bread can maintain its deliciousness for several days. The best method is to keep it in an airtight container at room temperature. This prevents it from drying out and protects it from absorbing unwanted odors from other foods in your kitchen. Ensure the container is well-sealed to maintain freshness. If your kitchen is particularly warm or humid, you might consider refrigerating it, though this can sometimes affect the texture, making it slightly firmer.
If you plan to store the bread for more than a couple of days, consider wrapping the loaf tightly in plastic wrap before placing it in the airtight container. This adds an extra layer of protection against moisture loss and helps to preserve its soft crumb. Always check the bread for any signs of spoilage before consuming it, although with proper storage, it should remain good for up to 3-4 days. The rich spices and apple content tend to help it stay palatable longer than plainer baked goods.
When you’re ready to enjoy a slice of leftover bread, it’s often best to bring it back to room temperature. If it has become a bit firm from storage, a quick warming can revive its texture and flavor. This simple step ensures that you can savor the deliciousness of your apple bread for as long as possible, making it a convenient and ever-ready treat.
Freezing
For longer-term storage, freezing is an excellent option for this apple bread recipe. You can freeze the entire loaf or individual slices, depending on your preference. Begin by allowing the bread to cool completely. Once it’s at room temperature, wrap the loaf or slices tightly in a double layer of plastic wrap. This double wrapping is crucial for preventing freezer burn and maintaining the bread’s quality over time. Ensure there are no air pockets exposed.
After wrapping, place the securely packaged bread into a freezer-safe bag or an airtight container. This provides an additional barrier against moisture and odors, further protecting the bread. Label the bag or container with the date of freezing; this apple bread can be stored in the freezer for up to 3 months. Freezing is an ideal way to have this delicious treat on hand whenever a craving strikes, ensuring you always have a comforting slice ready to enjoy.
When you decide to thaw the bread, simply remove it from the freezer and unwrap it. Place it on a wire rack at room temperature and allow it to thaw naturally. This process usually takes a few hours, depending on the size of the portion you are thawing. Avoid rushing the thawing process by using a microwave, as this can sometimes lead to an uneven texture.
Reheating
Reheating is a fantastic way to enjoy your apple bread, bringing back that freshly baked warmth and aroma. If you have a slice that has been stored at room temperature or thawed from frozen, a gentle reheat can make it taste just like it was made yesterday. The best method for reheating is in a toaster oven or a conventional oven.
For a single slice, place it on a small baking sheet and warm it in a preheated oven at around 300°F (150°C) for about 5-10 minutes, or until it is heated through and slightly softened. If you’re reheating a larger portion or the whole loaf, you might need to increase the temperature slightly to 325°F (160°C) and extend the time. Keep an eye on it to prevent it from becoming too dry or browned.
A quick way to reheat a single slice is in a toaster oven set to a low to medium heat, being careful not to burn it. You can also use a microwave for a very quick reheat, but be aware that this can sometimes result in a chewier texture. If microwaving, heat in 15-second intervals until just warmed through. For the best results and texture, oven or toaster oven reheating is generally preferred. Consider serving your reheated slice with a warm beverage for the ultimate comfort experience.
Frequently Asked Questions
-
Can I use different types of apples in this recipe?
Absolutely! While Granny Smith apples are recommended for their perfect balance of tartness and firmness, which holds up well during baking, you can certainly use other apple varieties. Crisp apples like Honeycrisp, Fuji, or Pink Lady are excellent choices as they also maintain good texture. Softer apples like Red Delicious or Gala might break down more during baking, resulting in a mushier texture, so they are generally less preferred for this particular recipe where distinct apple pieces are desired. Experimenting with a mix of apples can also yield interesting flavor profiles and textures.
-
Why is my apple bread dense and not rising properly?
Several factors can contribute to a dense, improperly risen apple bread. The most common culprit is overmixing the batter after the dry ingredients have been added, which develops the gluten excessively, resulting in toughness. Ensure you are using fresh baking powder and baking soda, as expired leavening agents lose their potency. Using room temperature ingredients, especially butter and eggs, is also crucial for proper emulsification and a lighter texture. Finally, make sure your oven is accurately preheated to the specified temperature; an oven that is not hot enough will not provide the initial burst of heat needed for a good rise.
-
How can I make this apple bread recipe without dairy or gluten?
Adapting this apple bread for dairy-free and gluten-free needs is achievable with some substitutions. For a dairy-free version, replace the unsalted butter with a plant-based butter substitute or coconut oil (ensure it’s softened). Substitute the Greek yogurt with an unsweetened, thick plant-based yogurt, such as soy, coconut, or almond yogurt. For a gluten-free loaf, use a high-quality gluten-free all-purpose flour blend that contains xanthan gum. You may need to adjust the liquid content slightly as gluten-free flours can absorb moisture differently than wheat flour. The result will be a delicious, inclusive version of the classic apple bread.