Irresistible Brown Sugar Pop Tart Cookies That Melt in Your Mouth
There is something incredibly nostalgic about the first bite of these homemade Brown Sugar Pop Tart Cookies. As the warm, cinnamon-brown sugar filling oozes from between two soft, buttery cookies, I cannot help but be transported back to carefree childhood days spent in the kitchen. The joy of creating these treats takes center stage here, serving as a sweet reminder that life’s simplest pleasures—like indulging in a freshly baked dessert—never go out of style.
Whether you are hosting a cozy afternoon at home or need an indulgent treat for a special gathering, these cookies are sure to impress your guests. With their glossy vanilla glaze and the option to experiment with flavors like maple or extra cinnamon, they offer a delightful twist on a beloved pantry staple. You will be surprised at how easily these tender, mouthwatering cookies come together, giving you more time to savor the moments that truly matter with those you love.
Why You Will Love This Recipe
- Quick Preparation: You can have this nostalgic dessert ready for the oven in under an hour, making it an ideal choice for last-minute cravings.
- Nostalgic Flavor: The combination of a buttery, tender crust and a gooey cinnamon-brown sugar center mimics the comfort of classic toaster pastries.
- Customizable Nature: You have the freedom to adjust the spices, swap the glazes, or even add nuts to create a version that perfectly suits your taste buds.
- Crowd-Pleasing Result: These cookies are a hit at any bake sale, holiday party, or dessert table due to their beautiful presentation and comforting taste.
- Simple Ingredients: You likely already have the majority of these staple baking items in your pantry, making this an accessible project for any skill level.
Ingredients You Need
Creating the perfect cookie depends on using high-quality pantry staples that provide structure and rich flavor. Each component, from the softened butter to the fragrant cinnamon, plays a vital role in achieving that signature melt-in-your-mouth texture. Please refer to the recipe details below to ensure you have the exact measurements required for your dough, filling, and finishing glaze.
Brown Sugar Pop Tart Cookies
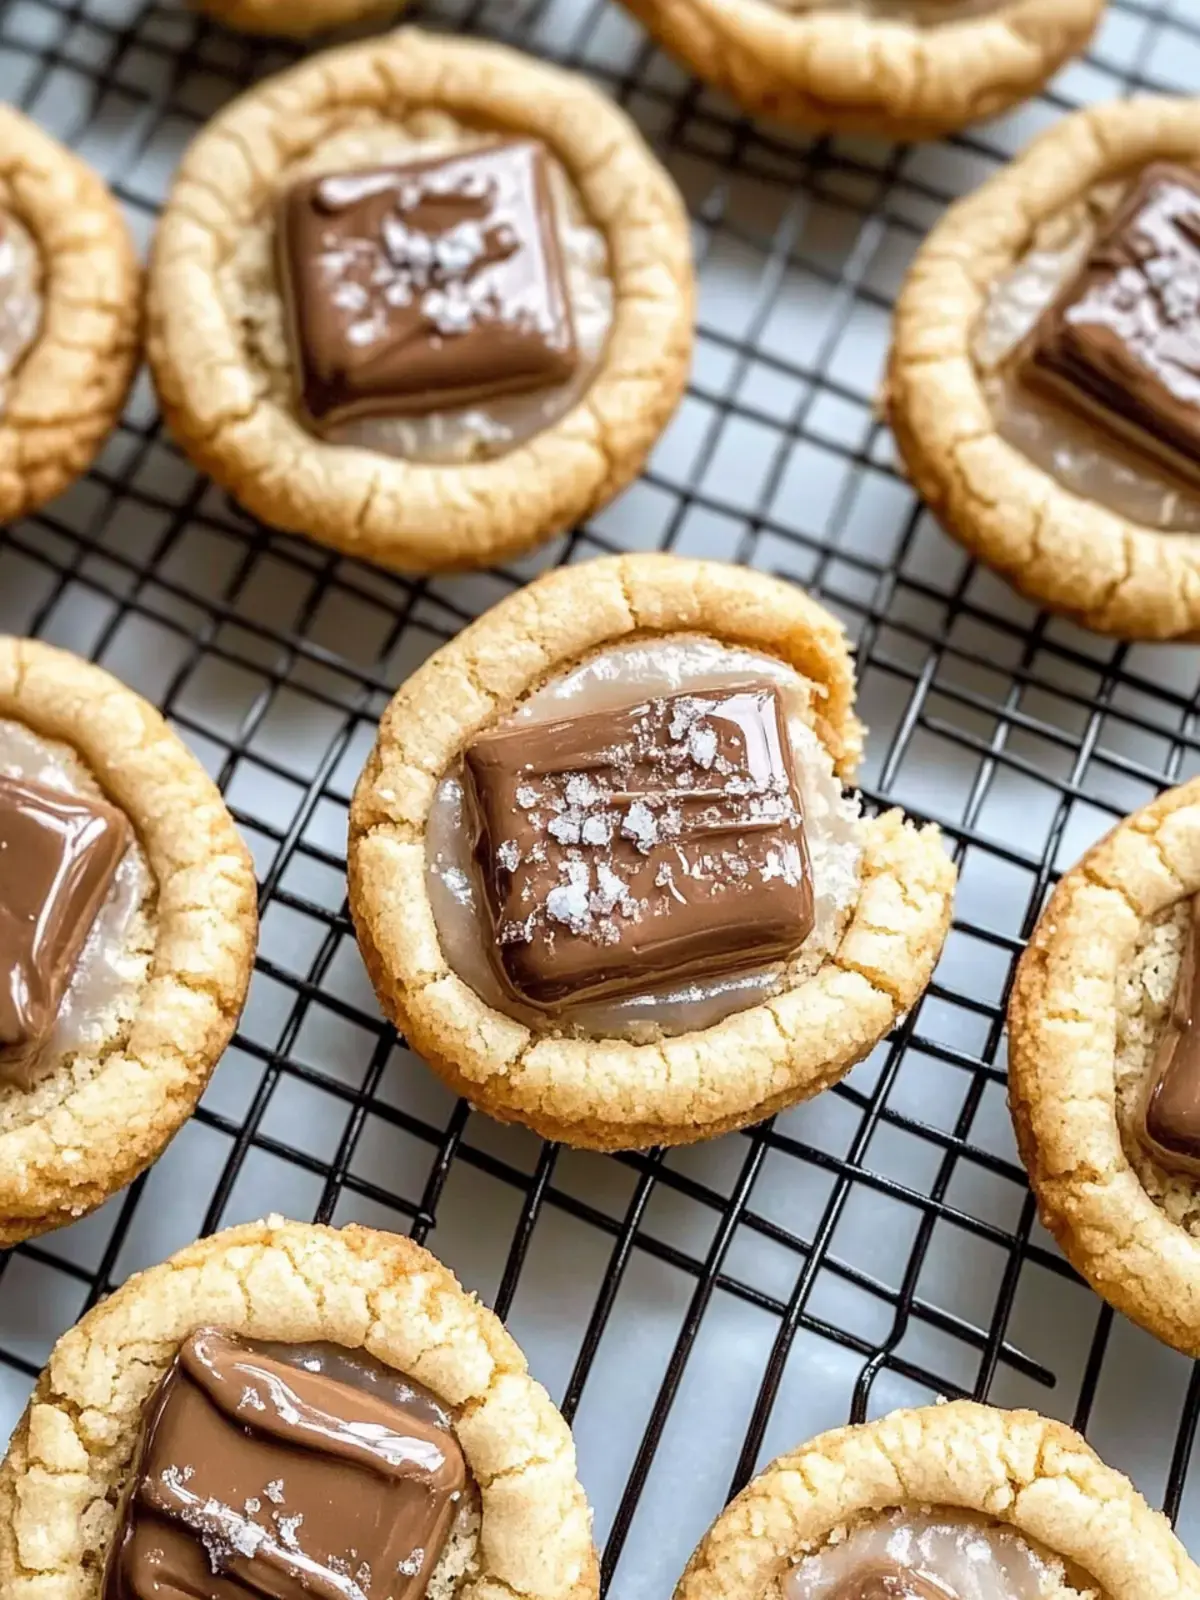
These Brown Sugar Pop Tart Cookies evoke nostalgic memories with their buttery, tender texture and gooey, cinnamon-brown sugar filling. Finished with a glossy vanilla glaze, they are the ultimate indulgent treat.
- For the Dough:
- 1 cup Butter, softened
- 1 cup Granulated Sugar
- 1 cup Brown Sugar
- 2 large Eggs
- 1 teaspoon Vanilla Extract
- 3 cups Flour
- 1 teaspoon Baking Powder
- 1/2 teaspoon Salt
- For the Filling:
- 1/2 cup Brown Sugar
- 1 teaspoon Cinnamon
- 1 tablespoon Melted Butter
- 1 tablespoon Flour
- For the Glaze:
- 1 cup Powdered Sugar
- 2 tablespoons Milk
- 1/2 teaspoon Vanilla Extract
- 1Cream the softened butter, granulated sugar, and brown sugar in a large bowl for 3-5 minutes until fluffy.
- 2Beat in eggs and vanilla extract.
- 3In a separate bowl, whisk together flour, baking powder, salt, and cinnamon; gradually add to the wet ingredients to form a soft dough.
- 4Wrap and chill the dough for at least 30 minutes.
- 5Mix filling ingredients (brown sugar, cinnamon, melted butter, flour) into a thick paste.
- 6Roll out dough on a floured surface, cut into shapes, place a spoonful of filling on half, and seal with the remaining pieces.
- 7Bake at 350°F (175°C) for 10-12 minutes until golden.
- 8Cool slightly, then drizzle with the mixture of powdered sugar, milk, and vanilla.
Keywords: pop tart cookies, brown sugar cookies, sandwich cookies, nostalgic desserts, homemade cookies
- butter: use softened, unsalted butter for a rich and tender base that yields the best cookie texture.
- granulated sugar: provides essential sweetness and helps create the necessary structure for the dough.
- brown sugar: adds deep moisture and a hint of molasses flavor which is crucial for the filling and the dough.
- eggs: serve as the binding agent to hold the cookies together and provide a soft, cake-like crumb.
- vanilla extract: enhances the overall aromatic profile of the cookies and balances the sweetness.
- flour: the foundation of your cookie, which should be measured carefully to prevent the dough from becoming too dry.
- baking powder: acts as a leavening agent to ensure the cookies rise slightly and maintain a fluffy interior.
- salt: a pinch is necessary to balance the sugary elements and amplify the depth of the cinnamon and vanilla.
- cinnamon: the core spice that creates the nostalgic warmth of a classic pop tart filling.
- milk: used to adjust the consistency of your powdered sugar glaze until it is perfectly pourable.
- powdered sugar: creates the smooth, sweet, and glossy finish that sets these cookies apart.
Variations
The Maple Twist: For those who love autumn-inspired flavors, consider adding a teaspoon of maple extract to your glaze or the filling mixture. This simple change creates a sophisticated depth that pairs incredibly well with the natural notes of the brown sugar.
Nutty Crunch: If you enjoy texture in your breakfast-inspired treats, try folding finely chopped pecans or walnuts into your dough. This addition provides a satisfying crunch that beautifully contrasts with the soft, gooey filling in every single bite.
Spicy or Fruity Twists: Adventurous bakers might consider adding a tiny pinch of cayenne pepper to the filling to balance the sugar with a subtle kick. Alternatively, you can swap the brown sugar filling entirely for a high-quality fruit preserve, such as strawberry or raspberry, to create a refreshing variation.
How to Prepare Brown Sugar Pop Tart Cookies
Step 1: Cream the Dough
The Foundation: In a large mixing bowl, combine your softened butter with the granulated sugar and brown sugar. Using an electric hand mixer, beat these ingredients together until the mixture is visibly light, airy, and fluffy.
Timing Matters: This process usually takes between three to five minutes, so be patient. Creaming the butter and sugar correctly ensures that your cookies develop the perfect tender texture right from the start.
Step 2: Add Wet Ingredients
Binding the Mixture: Add the eggs one at a time to your creamed butter mixture, ensuring each is fully incorporated before adding the next. Pour in the vanilla extract during this stage to infuse the dough with a deep, aromatic sweetness.
Consistency Check: Ensure that the mixture looks smooth and creamy before moving on to the dry ingredients. This step sets the stage for a rich, uniform dough that is easy to work with later.
Step 3: Combine Dry Ingredients
Dry Mix: In a separate medium-sized bowl, whisk together your all-purpose flour, baking powder, salt, and the warm cinnamon. Whisking ensures that the leavening agents and spices are evenly distributed, preventing pockets of baking powder in your final cookies.
Combining the Two: Gradually add your dry mixture to the wet butter and sugar base, mixing on low speed until a soft dough forms. It is very important that you do not overmix at this stage, as too much gluten development will make the cookies tough rather than tender.
Step 4: Chill the Dough
The Importance of Cold: Wrap your prepared dough tightly in plastic wrap and place it in the refrigerator for at least thirty minutes. This chilling time is essential because it allows the flour to hydrate and the butter to firm up.
Easier Handling: A well-chilled dough is significantly easier to roll out without sticking to your surface or tools. It also helps the cookies maintain their specific shapes during the baking process, preventing them from spreading too thin in the heat of the oven.
Step 5: Assemble and Bake
Preparing the Filling: While the dough rests, combine your brown sugar, a touch of melted butter, cinnamon, and a small amount of flour in a bowl. Mix until you achieve a thick, spreadable paste that won’t run too much once it hits the heat.
Rolling and Filling: Roll your chilled dough out on a floured surface to your desired thickness and cut into even rectangles or fun shapes. Place a small, measured spoonful of filling on one piece and top it with a second piece, pressing the edges firmly with a fork to seal.
The Final Bake: Arrange your assembled cookies on a parchment-lined baking sheet, providing enough space between them. Bake them in a preheated oven at 350°F (175°C) for about ten to twelve minutes until the edges take on a lovely golden hue.
Step 6: Glaze and Finish
Cooling Down: Once the cookies are baked, remove them from the oven and allow them to rest on the baking sheet for several minutes. This cooling period helps them firm up and ensures the internal filling stabilizes before you apply the glaze.
Glazing Technique: Whisk your powdered sugar, milk, and vanilla extract together to create a smooth, drizzling consistency. Once the cookies are cool enough, use a spoon to drizzle the glaze elegantly over the tops, allowing it to set properly before you serve these delightful treats.
Pro Tips for Brown Sugar Pop Tart Cookies
Tip 1: Always ensure your butter is softened to room temperature, but not melted, before starting. Using melted butter can cause your cookies to spread excessively in the oven and lose their signature thickness.
Tip 2: When measuring your flour, use the “spoon and level” method rather than scooping directly from the bag. This prevents packing the flour down, which often leads to dry, crumbly cookies that lack a tender mouthfeel.
Tip 3: If you find that your filling is leaking during the baking process, you are likely using too much filling for the size of the dough. Keep the filling to a small, centered dollop and make sure your edge seals are airtight by using the tines of a fork.
Tip 4: If you want to refine your skills, check out this funfetti cookies recipe to see how different dough compositions behave. Learning to master different textures will make you a much more confident baker in the long run.
Serving Suggestions for Brown Sugar Pop Tart Cookies
Decoration
To elevate the visual appeal of your cookies, sprinkle a mixture of cinnamon and granulated sugar over the wet glaze. You can also add colorful sprinkles or edible glitter to make them look like festive, bakery-grade treats for a party.
Side Dishes
These cookies pair beautifully with a cold, crisp glass of milk for the ultimate nostalgic experience. For an adult-friendly snack, serve them alongside a hot cup of black coffee or a spicy chai tea to contrast the sweetness of the sugar glaze.
Creative Serving Ideas
For a decadent dessert, serve a warm cookie topped with a single scoop of high-quality vanilla bean ice cream. If you are preparing a large lunch or afternoon gathering, arrange these on a tiered tray for a beautiful centerpiece that everyone can easily reach.
Preparation & Storage
Storing Leftovers
To maintain their soft texture, keep your cookies in an airtight container at room temperature for up to three days. If you prefer, you can store them in the refrigerator for up to one week, though you should let them return to room temperature before serving for the best flavor experience.
Freezing
You can freeze unglazed cookies for up to two months by layering them with parchment paper in a freezer-safe bag. When you are ready to enjoy them, simply thaw the cookies in the refrigerator overnight and apply a fresh batch of glaze before serving.
Reheating
If you want to experience that “freshly baked” warmth again, place your cookie in the microwave for ten to fifteen seconds. This short burst of heat will soften the interior filling and make the glaze slightly gooey without drying out the dough.
Frequently Asked Questions
- What type of butter is best for the dough? Always use softened, high-quality unsalted butter for the best texture in your cookies. Avoid using melted butter, as it changes the chemical structure of the dough, often leading to a denser and greasier result than you want for a pop-tart-style cookie.
- Can I make these cookies ahead of time? Yes, you can prepare the cookie dough up to 24 hours in advance and store it in the refrigerator tightly wrapped. You can also mix the filling early, provided you keep it in an airtight container, allowing you to quickly assemble and bake them whenever you are ready.
- Are there any dietary concerns I should be aware of? This recipe uses traditional flour, eggs, and dairy, which means it contains gluten and common allergens. If you need to make these allergy-friendly, you can experiment with gluten-free flour blends and high-quality vegan butter, though keep in mind that the final texture may vary slightly from the classic version.