Ultimate Cheesecake Banana Pudding Bites
Are you on the hunt for a dessert that masterfully blends the luxurious tang of cheesecake with the comforting, sweet embrace of banana pudding? Your search ends here with these incredible Cheesecake Banana Pudding Bites! These delightful treats are not just a feast for the palate but are surprisingly simple to create, making them an ideal choice for any celebration, from birthdays to casual gatherings.
Imagine the exquisite sensation of a velvety smooth, creamy filling resting upon a perfectly buttery graham cracker foundation, crowned with fresh, ripe banana slices. This dessert truly embodies decadence and appeals to a wide range of tastes, offering a visually stunning and utterly irresistible experience. The wonderful news is that you don’t need to be a seasoned baker to bring these sensational bites to life.
Why You Will Love This Recipe
- Effortless Assembly: These bites come together with minimal fuss, making them perfect for busy bakers. You’ll be amazed at how quickly you can create a show-stopping dessert.
- Flavor Harmony: The classic combination of creamy cheesecake, sweet banana, and crunchy graham cracker offers a symphony of tastes and textures that is simply irresistible. Each bite is a balanced delight.
- Crowd-Pleasing Appeal: Whether served at a party or as a family treat, these bites are universally loved, appealing to both children and adults with their familiar yet elevated flavors. They are guaranteed to disappear fast.
- Customizable Creation: The beauty of these bites lies in their adaptability; easily tailor them to suit dietary needs or personal preferences by swapping ingredients or adding your favorite toppings for a unique touch.
- Make-Ahead Marvel: Prepare these delightful bites in advance, freeing up your time for hosting. They store beautifully, ensuring a delicious dessert is always ready when needed.
Ingredients You Need
Selecting high-quality ingredients is paramount to achieving the best flavor and texture in your Cheesecake Banana Pudding Bites. Opt for fresh, ripe bananas for optimal sweetness and a smooth cream cheese that is softened to room temperature for a lump-free filling. Using good quality graham crackers and butter will ensure a delicious and sturdy crust.
Cheesecake Banana Pudding Bites

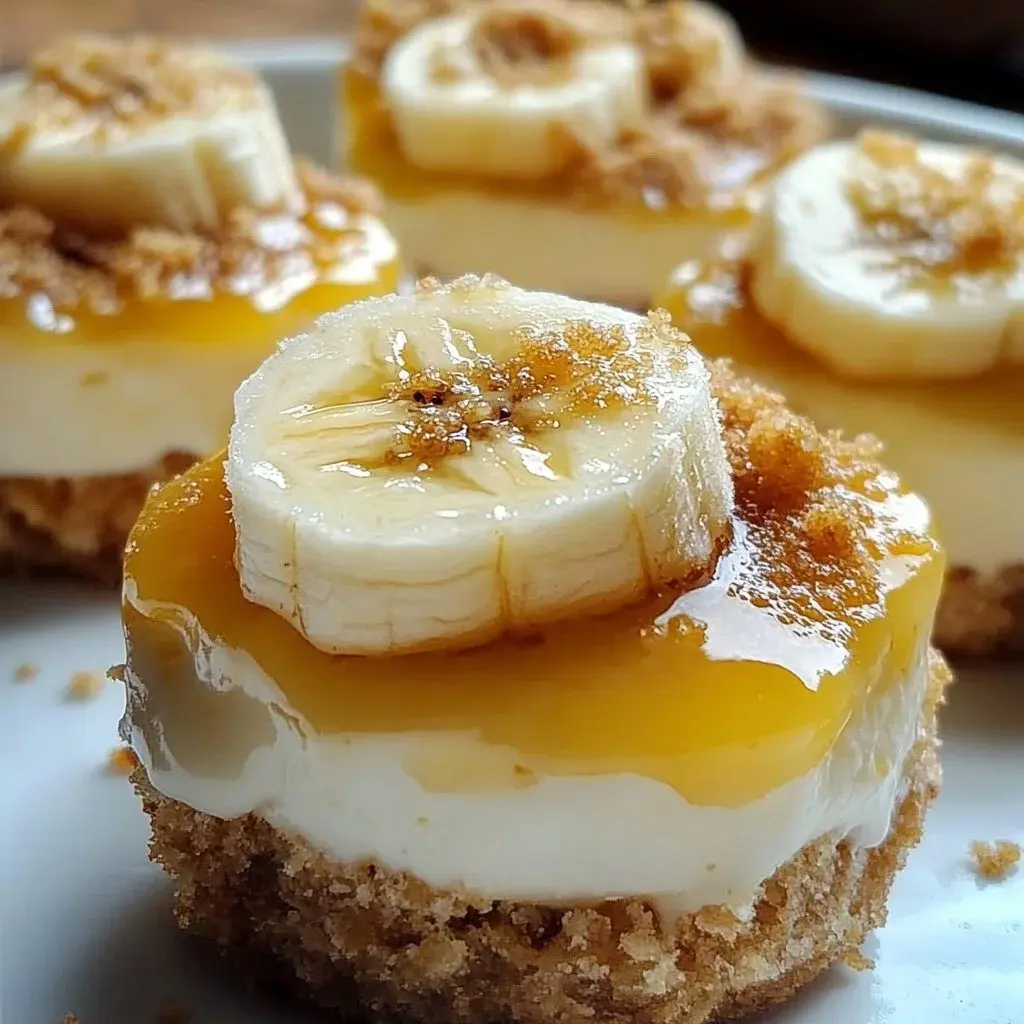
A delightful dessert that combines the richness of cheesecake with the comforting goodness of banana pudding, perfectly portioned in bite-sized treats. This recipe is incredibly simple, making it accessible to bakers of all levels. The combination of crunchy crust, rich filling, and fresh banana slices creates a balance that is undeniably delicious.
- For the Crust:
- 240 g graham cracker crumbs
- 25 g granulated sugar
- 60 ml unsalted butter, melted
- For the Filling:
- 225 g cream cheese, softened
- 60 g powdered sugar
- 120 ml heavy cream
- 2.5 ml vanilla extract
- 120 ml vanilla pudding
- For Assembly & Garnish:
- 1 ripe banana, sliced
- 32 g crushed Nilla wafers
- Extra banana slices, for garnish
- 1Preparation: Gather all your ingredients and ensure that your cream cheese is softened adequately for easy mixing.
- 2Make the Crust: In a bowl, combine the graham cracker crumbs, granulated sugar, and melted butter. Mix until the texture resembles wet sand. Distribute a small portion of the crust mixture into each bite-sized cup or silicone mold. Press firmly to compact it into an even base.
- 3Make the Filling: In a clean mixing bowl, beat the softened cream cheese and powdered sugar on medium speed until smooth. Add the heavy cream and vanilla extract to the mixture, and continue beating until light and mousse-like, about 2-3 minutes.
- 4Layering: Spoon a thin layer of vanilla pudding over each prepared crust base. Arrange banana slices over the pudding layer in each bite. Cover the banana pudding layer with the whipped cheesecake filling, smoothing it to create a level top.
- 5Garnishing and Chilling: Gently press the set cheesecake bites into crushed Nilla wafers. Refrigerate the assembled bites for a minimum of 2 hours or until the filling is completely firm.
Keywords: Banana Pudding, Cheesecake, Dessert Bites, Easy Desserts, No-Bake Dessert
The precise quantities for each ingredient can be found within the detailed recipe card, ensuring you have the perfect balance for these exquisite bites.
Variations
Elevating these Cheesecake Banana Pudding Bites with creative variations can introduce exciting new dimensions to an already delightful treat. Consider a decadent chocolate twist by incorporating unsweetened cocoa powder into the cream cheese mixture, transforming these into rich chocolate-banana delights that are perfect for serious chocoholics.
For those seeking a delightful crunch and nutty undertones, integrating finely chopped toasted pecans or walnuts into the graham cracker crust and sprinkling some on top adds a wonderful textural contrast and earthy flavor. This variation makes the bites particularly appealing for autumn gatherings or as a sophisticated dessert option.
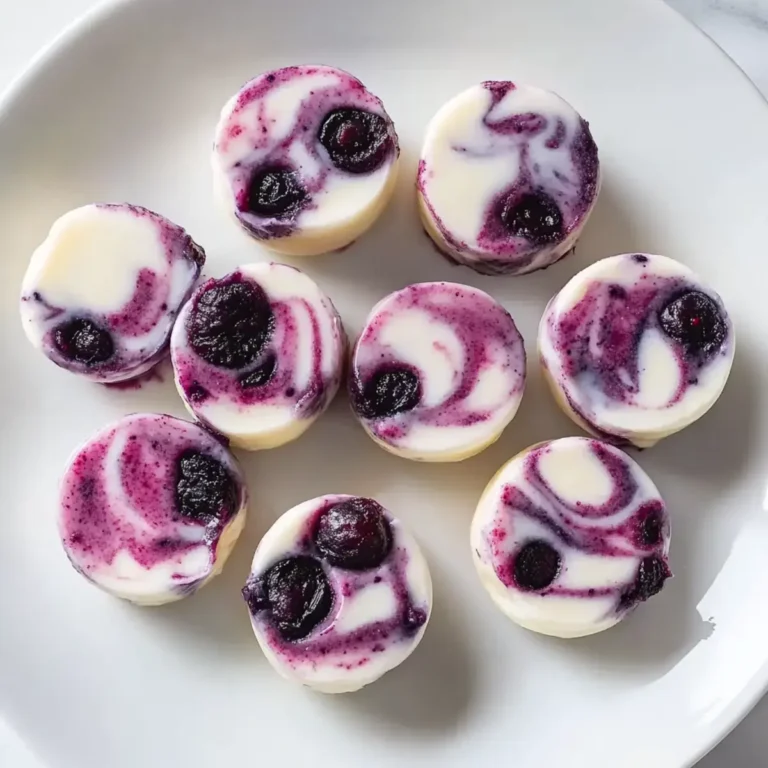
Furthermore, you can explore a vibrant fruit layering technique by adding a thin layer of sliced strawberries or blueberries between the pudding and cheesecake layers. This adds a burst of freshness and a beautiful visual appeal, making each bite a delightful surprise of mixed berry and banana goodness.
How to Prepare Cheesecake Banana Pudding Bites
Step 1: Crafting the Foundation
Begin by meticulously gathering all your necessary ingredients, ensuring that your cream cheese has reached a perfectly softened state at room temperature. This crucial step is the key to achieving a smooth, luxurious filling that is free from any undesirable lumps. Proper preparation at this stage sets the stage for a seamless and enjoyable baking process, allowing you to focus on the delightful assembly of your dessert.
In a medium-sized mixing bowl, combine the precisely measured graham cracker crumbs, granulated sugar, and the melted unsalted butter. Stir these components together with a fork or a spatula until the mixture achieves a consistency that resembles damp sand. This uniform texture is essential for creating a cohesive and stable crust that will beautifully hold the creamy layers above it.
Next, carefully distribute an equal portion of this graham cracker mixture into your chosen bite-sized molds or silicone muffin liners. Employ the bottom of a small glass or your fingers to firmly and evenly press the crumbs down, creating a compact and sturdy base for each bite. Ensuring this crust is well-compacted is vital for preventing it from crumbling when the bites are eventually served, providing a satisfying crunch with every mouthful.
Step 2: Weaving the Cheesecake Magic
Transitioning to the heart of your creation, place the softened cream cheese into a clean, dry mixing bowl. Add the finely sifted powdered sugar, which will lend a delicate sweetness and smooth texture to the filling. Using an electric mixer, whether a stand mixer with a paddle attachment or a handheld mixer, begin to beat these ingredients together on a medium speed.
Continue mixing until the cream cheese and powdered sugar are thoroughly combined and the mixture appears exceptionally smooth and creamy, with absolutely no trace of grainy sugar or lumps of cream cheese. This thorough blending is fundamental to achieving that signature velvety texture that defines classic cheesecake. Take care not to overmix at this stage; just ensure perfect homogeneity.
Once the cream cheese base is impeccably smooth, it’s time to introduce the liquid elements that will transform it into a lighter, mousse-like consistency. Gradually pour in the cold heavy cream and the fragrant vanilla extract. Continue to beat the mixture on medium-high speed for approximately two to three minutes.
You are aiming for a transformation where the mixture becomes visibly lighter, fluffier, and develops soft peaks. This process incorporates air, giving the cheesecake filling its airy, luscious quality. Observe the mixture carefully; it should be spreadable yet hold its shape beautifully when the beaters are lifted. This step is critical for the final texture of your delightful bites.
Step 3: Layering the Flavors
With your creamy cheesecake mixture perfectly whipped and your crusts ready, it’s time to begin the artful layering process. Take your prepared vanilla pudding, which should be chilled but still spoonable, and carefully dollop a thin, even layer onto the surface of each pressed graham cracker crust. Ensure this layer is consistent across all the bites to guarantee a balanced flavor profile in every single one.
This layer of pudding acts as a bridge between the crunchy crust and the rich cheesecake filling, adding its own signature sweet and creamy essence to the overall experience. A uniform layer here means no bite will be shortchanged on this comforting pudding flavor, contributing to the overall harmony of the dessert.
Now, it’s time to introduce the star fruit: the ripe banana. Arrange thin slices of ripe banana evenly over the layer of vanilla pudding in each of your prepared molds. Aim for full coverage, ensuring that each bite will contain a delightful piece of sweet banana, enhancing the overall flavor profile and adding a fresh, fruity counterpoint to the richness of the cheesecake.
The ripeness of the banana is key here; slightly overripe bananas will offer the most sweetness and softest texture, making them blend beautifully with the other components. If your bananas are very firm, slicing them thinner can help ensure they soften adequately during the chilling process.
Step 4: The Grand Finale of Filling and Garnish
With the pudding and banana layers perfectly in place, it’s time to generously top each bite with the luxurious, whipped cheesecake mixture you prepared earlier. Spoon a sufficient amount of the filling to completely cover the banana slices, filling the mold almost to the brim. Use the back of your spoon or a small offset spatula to gently smooth the surface of the cheesecake layer.
Strive for a beautifully level top on each bite, as this not only enhances the visual appeal but also ensures a neat presentation when they are served. This smooth surface provides a perfect canvas for the final, delightful garnish, making your Cheesecake Banana Pudding Bites look as good as they taste.
For the final touch of texture and flavor, prepare your crushed Nilla wafers. Gently invert each filled bite onto a plate or tray covered with the crushed Nilla wafers, pressing lightly so the wafers adhere to the exposed top surface of the cheesecake filling. This crunchy coating adds a delightful textural contrast and a subtle vanilla-flavored crunch that perfectly complements the creamy interior.
Alternatively, you can spoon the crushed Nilla wafers directly onto the top of the cheesecake filling and gently press them down. This step is not just for aesthetics; the wafer coating provides an addictive crunch that beautifully balances the smooth, creamy elements of the dessert, making each bite a complex and satisfying experience. The visual of the golden crumbs clinging to the white filling is also incredibly appealing.
Step 5: The Patience of Chilling
Your Cheesecake Banana Pudding Bites are now fully assembled and adorned, but they require a crucial period of chilling to allow the flavors to meld and the textures to set properly. Carefully arrange the filled molds on a flat tray or baking sheet. This stability is important to prevent any accidental spills or disruptions during the chilling process.
Place the tray into the refrigerator and allow the bites to chill for a minimum of two hours. However, for the best results and a perfectly firm set, consider chilling them for at least four hours, or even overnight. This extended chilling time is essential for the cheesecake filling to firm up completely, achieving that signature creamy yet solid consistency.
During this chilling phase, the ingredients harmonize, allowing the creamy cheesecake to firm up beautifully against the soft pudding and sweet banana, all supported by the crisp graham cracker crust. The cold temperature solidifies the fats in the cream cheese and butter, creating a delightful bite that holds its shape wonderfully. Rushing this step will inevitably lead to a softer, less structured dessert that may not impress as much.
Step 6: Presentation and Enjoyment
Once your Cheesecake Banana Pudding Bites have reached their optimal chilled state and are perfectly firm, it’s time to reveal them. If you used silicone molds, gently push the bites out from the bottom; they should release effortlessly. If you used mini muffin liners, you might need to peel them away carefully.
Arrange these beautiful bites on a decorative serving platter or individual dessert plates. For an extra touch of visual appeal, you can garnish each bite with an additional thin slice of fresh banana right before serving. This adds a pop of color and reinforces the banana flavor profile.
These bites are best served chilled, allowing you to fully appreciate the delightful contrast between the cool, creamy filling and the crisp crust. They are the perfect size for a single, satisfying indulgence, making them ideal for parties, picnics, or simply enjoying as a sweet treat after a meal. Their elegant presentation makes them a welcome addition to any dessert table, promising a delightful experience for all who partake.
Pro Tips for Cheesecake Banana Pudding Bites
Perfectly Ripe Bananas: For the sweetest and most flavorful banana flavor, select bananas that are just ripe, with a few brown spots. These will have a softer texture and a more intense sweetness, which is ideal for this dessert. Using underripe bananas might result in a firmer texture and less pronounced flavor, while overly ripe ones could make the bites too mushy.
Room Temperature Cream Cheese is Key: Always ensure your cream cheese is fully softened to room temperature before you begin mixing. This is non-negotiable for achieving a smooth, lump-free cheesecake filling. Cold cream cheese will resist blending, leading to a gritty texture that can be quite disappointing. Leave it out on the counter for at least an hour, or gently warm it in the microwave for very short intervals, checking frequently.
Don’t Skip the Chill Time: Patience is a virtue, especially when it comes to desserts. The chilling period is critical for the bites to set properly. A minimum of two hours is recommended, but four hours or even overnight will yield the best, firmest results. This allows the cheesecake mixture to solidify and the flavors to meld beautifully. Serving them too soon will result in a softer, less structured bite.
Flavorful Pudding Variations: While vanilla pudding is classic and delicious, don’t hesitate to experiment with other flavors to create unique twists. Consider butterscotch pudding for a richer, caramel-like note, or even a hint of chocolate pudding for a more complex flavor profile. This simple swap can dramatically change the overall taste experience of your bites.
Crust Consistency Matters: When mixing the graham cracker crust, the goal is a texture like wet sand. If it feels too dry and crumbly, add a little more melted butter, a teaspoon at a time, until it holds together when squeezed. Conversely, if it feels too wet, add a few more graham cracker crumbs. A well-formed crust is the sturdy base that holds everything together.
Serving Suggestions for Cheesecake Banana Pudding Bites
Decoration
To make your Cheesecake Banana Pudding Bites truly spectacular, consider adding some eye-catching decorations. A delicate dusting of powdered sugar can offer a simple yet elegant finish, creating a snow-like effect. Alternatively, a light drizzle of caramel sauce or a rich chocolate ganache can add an extra layer of indulgence and visual appeal.
Fresh fruit toppings are also a fantastic choice. Thin slices of additional banana, fresh strawberries, or a few plump blueberries can provide a burst of color and reinforce the fruity elements of the dessert. Edible flowers can add a touch of sophistication for special occasions.
A sprinkle of chopped toasted nuts, such as pecans or walnuts, can provide a wonderful textural contrast and a sophisticated nutty flavor. For a whimsical touch, consider adding a small dollop of whipped cream to the top of each bite, perhaps with a tiny sprig of mint or a dusting of cinnamon.
Side Dishes
These decadent bites rarely need accompaniments, but if you’re serving them as part of a larger dessert spread, consider pairing them with lighter options. A fresh fruit salad, featuring a medley of seasonal fruits, can offer a refreshing counterpoint to the richness of the bites. This provides a balanced end to a meal.
A simple bowl of vanilla or French vanilla ice cream can also be a delightful addition, allowing guests to enjoy a combination of creamy textures and complementary flavors. The cool ice cream alongside the chilled bites creates a delightful temperature contrast that is very pleasing.
For a more sophisticated pairing, a small cheese board featuring mild cheeses like brie or cream cheese can offer a savory element that complements the sweetness of the dessert. This is particularly effective if serving at an adult gathering where a variety of flavor profiles are appreciated. The subtle saltiness of the cheese cuts through the sweetness beautifully.
Creative Serving Ideas
Elevate your presentation by arranging the Cheesecake Banana Pudding Bites on a tiered dessert stand. This creates a visually stunning focal point and allows guests to easily access each bite. Adding small, decorative labels with the name of the dessert can also be a nice touch, especially for larger gatherings or potlucks.
Consider serving these bites in individual mini glasses or parfait cups for an elegant, single-serving presentation. Layer the components artfully within the glass for a beautiful visual effect that showcases the different textures and colors. This method also makes them incredibly easy for guests to enjoy on the go.
For a fun, interactive dessert experience, set up a “decorate your own” station. Provide an assortment of toppings like whipped cream, sprinkles, chocolate chips, mini Nilla wafers, and extra banana slices, allowing guests to customize their own Cheesecake Banana Pudding Bites. This is a particularly engaging idea for children’s parties or casual get-togethers.
Preparation & Storage
Storing Leftovers
Leftover Cheesecake Banana Pudding Bites should be stored promptly in an airtight container. This is crucial to prevent them from drying out or absorbing other odors from the refrigerator. Ensure the container has a good seal to maintain their freshness and prevent any potential spoilage. They will keep best when stored with a bit of space between them to avoid sticking.
Place the airtight container in the refrigerator. These delightful bites can typically remain fresh and delicious for up to 4 to 5 days when stored correctly. It’s always a good idea to check their appearance and smell before consuming them after a few days, just to be sure.
To maintain their ideal texture, it’s recommended to consume them within this timeframe for the best flavor and consistency. While they can be stored longer, their texture might begin to degrade slightly over extended periods in the cold.
Freezing
If you find yourself with an abundance of Cheesecake Banana Pudding Bites and want to preserve them for a longer period, freezing is an excellent option. Ensure that each bite is completely firm from chilling before you begin the freezing process. This prevents them from becoming misshapen during freezing.
To freeze, you can place the bites individually on a baking sheet lined with parchment paper and freeze them until solid. Once frozen, transfer them to a heavy-duty freezer bag or an airtight freezer-safe container. Removing as much air as possible from the bag will help prevent freezer burn and maintain quality.
Frozen Cheesecake Banana Pudding Bites can maintain their quality for up to 1-2 months. When you are ready to enjoy them, it is best to thaw them slowly in the refrigerator overnight. This gradual thawing process helps to preserve their texture and prevents condensation from affecting the delicate layers.
Reheating
It is important to note that Cheesecake Banana Pudding Bites are best enjoyed chilled and are not typically meant to be reheated. The delicate balance of creamy cheesecake, soft pudding, and crisp crust is designed to be appreciated at cold temperatures.
Attempting to reheat these bites, especially in a microwave or oven, would likely melt the cheesecake filling and make the crust soggy. This would drastically alter the intended texture and overall delightful experience of the dessert. The components are not designed to withstand heat without compromising their structure and flavor.
Therefore, the ideal method for enjoying them after storage or freezing is to simply allow them to come to the optimal serving temperature. For frozen bites, this means thawing them completely in the refrigerator. For refrigerated leftovers, ensure they are cool and firm before serving.
Frequently Asked Questions
- <strong>Can I prepare these Cheesecake Banana Pudding Bites ahead of time for a party?</strong> Yes, absolutely! These delightful bites are fantastic candidates for make-ahead preparation, which can significantly reduce stress on the day of your event. You can assemble them completely, including the garnishes, up to 24 hours in advance and store them in an airtight container in the refrigerator. This allows the flavors to meld beautifully and ensures everything is perfectly set. Just make sure your bananas are fresh when you assemble them if preparing the day before to minimize any browning.
- <strong>Is it possible to freeze these bites for longer storage, and if so, what is the best method?</strong> Certainly! Freezing is a great option for preserving these Cheesecake Banana Pudding Bites for future enjoyment. For the best results, ensure the bites are fully chilled and firm before freezing. You can place them on a parchment-lined baking sheet and freeze them until solid, then transfer them to an airtight freezer-safe container or a heavy-duty freezer bag, removing as much air as possible. This method helps prevent freezer burn and maintain their texture for up to one to two months.
- <strong>What are the best substitutions if I have dietary restrictions or can’t find certain ingredients like Nilla wafers?</strong> For dietary adjustments, you have several excellent options. To make them gluten-free, simply substitute regular graham crackers with gluten-free graham crackers for the crust. If you need a dairy-free alternative for the creaminess, consider using a good quality dairy-free cream cheese and full-fat coconut cream instead of heavy cream. For the Nilla wafer coating, crushed digestive biscuits, shortbread cookies, or even finely chopped toasted nuts like almonds or pecans can provide a similar delightful crunch and flavor complexity.