Irresistible Chinese Salt and Pepper Pork in 30 Minutes
One evening, as I was flipping through my collection of cookbooks, I stumbled upon a classic that had me instantly reminiscing: Chinese Salt and Pepper Pork. The crunch of crispy fried pork mingling with the fiery kick of chili peppers brought back memories of bustling take-out nights when nothing else could satisfy that growing hunger.
What’s fantastic about this dish is its vibrant flavor profile and the ease of preparation. In just 30 minutes, you can elevate your weeknight routine, transforming simple ingredients into an impressive meal that rivals your favorite restaurant’s offerings. Whether you’re entertaining friends or just whipping up dinner for the family, this crowd-pleaser is sure to impress without the stress.
Get ready to take your taste buds on a journey as we delve into this savory recipe that’s as comforting as it is utterly delightful!
Why You Will Love This Recipe
- Flavorful Blend: A harmonious combination of spices enriches the pork, creating a dish that’s bursting with complex depth and savory notes. This complexity makes every bite an exciting experience.
- Quick Preparation: Dinner is on the table in approximately 30 minutes, making this recipe a perfect fit for busy weeknights without compromising on taste or quality. It’s ideal for those evenings when time is of the essence.
- Crispy Perfection: The distinct golden-fried aspect of the pork offers a delightful crunch that is incredibly satisfying and addictive, a hallmark of well-executed Chinese Salt and Pepper Pork. This textural element is key to the dish’s appeal.
- Versatile and Appealing: This dish serves beautifully as a standalone main course or can be paired with rice and vegetables for a more complete and nourishing meal. Its adaptable nature means it fits into various dining scenarios.
- Restaurant-Quality at Home: You can achieve the authentic, mouthwatering taste and texture of your favorite Chinese takeout right in your own kitchen. This recipe demystifies making this beloved dish.
Ingredients You Need
The quality of your ingredients plays a pivotal role in the final taste and texture of your Chinese Salt and Pepper Pork. Opting for fresh chilies and a well-marbled cut of pork shoulder will ensure maximum flavor and tenderness. Paying attention to the details in your ingredient selection can elevate this dish from good to truly exceptional.
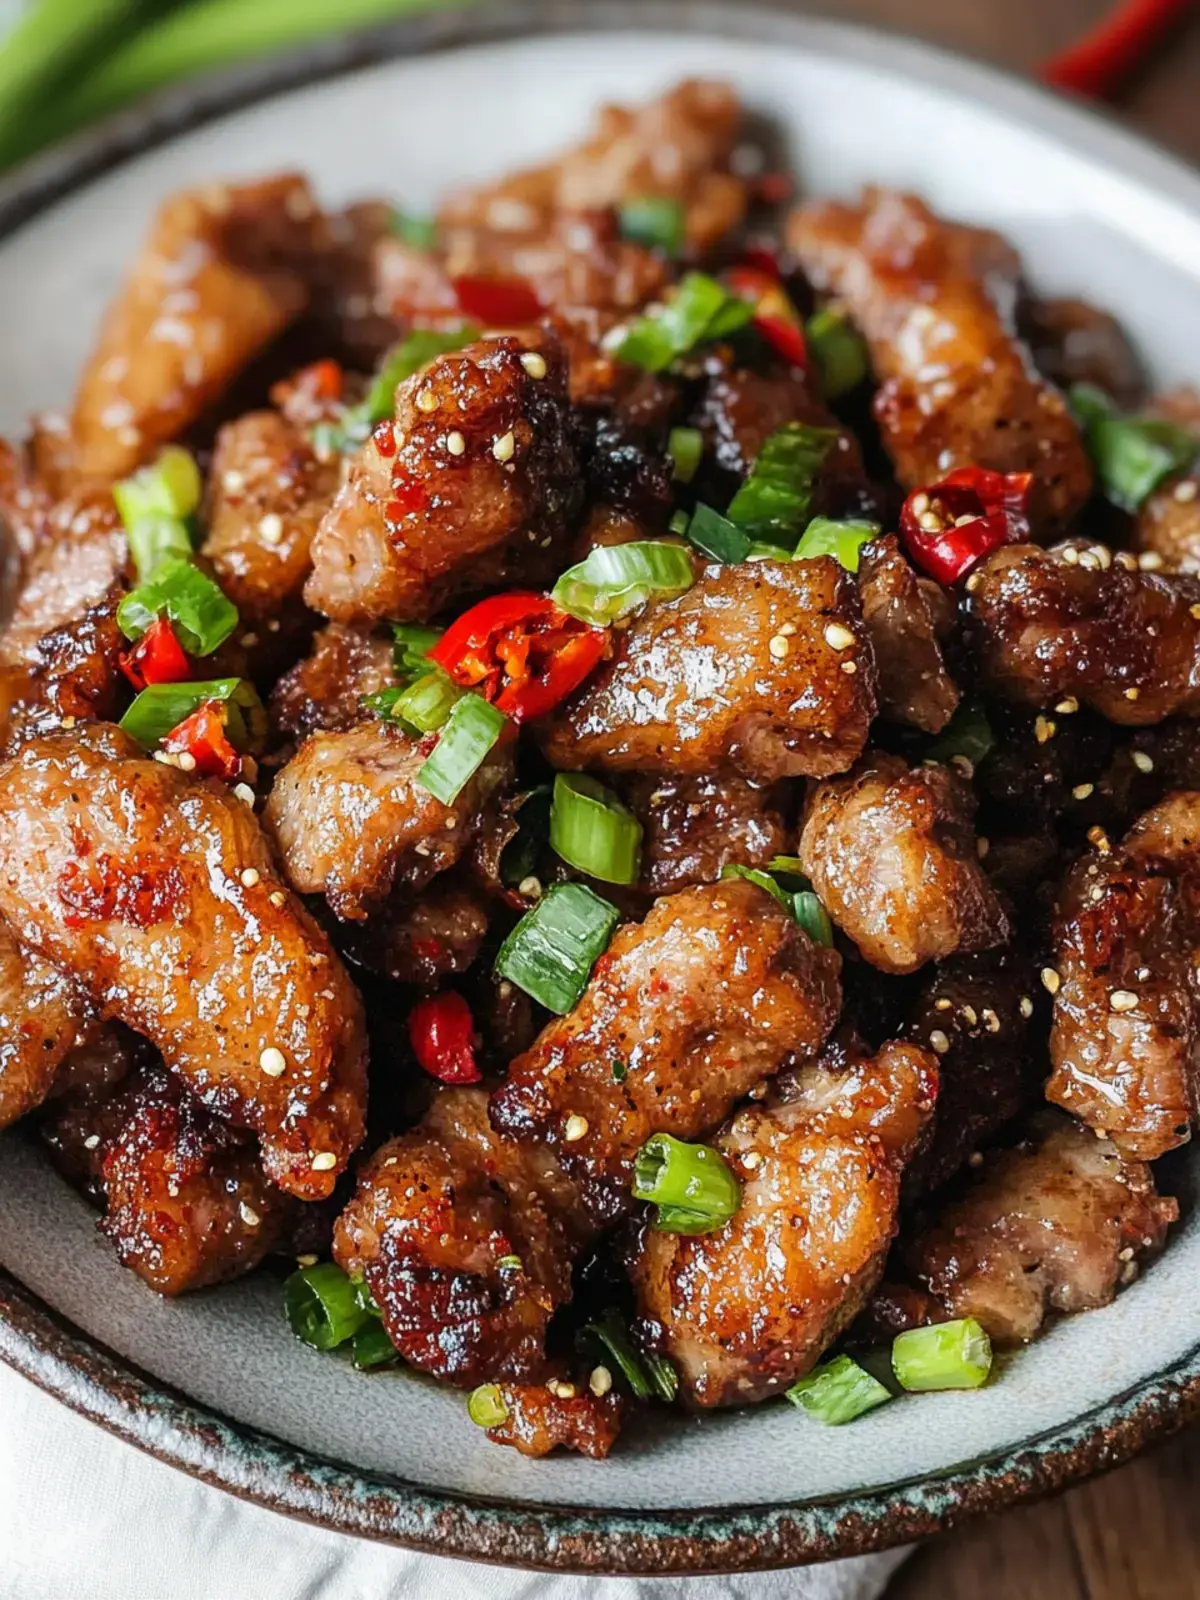
Chinese Salt and Pepper Pork
Experience the vibrant flavors of Chinese Salt and Pepper Pork, a quick and satisfying dish perfect for weeknight dinners.
- 1.65 lb boneless pork shoulder
- 0.5 cup cornstarch
- 1 tablespoon Shaoxing Cooking Wine
- 0.25 teaspoon salt
- 0.25 teaspoon black pepper
- 0.25 cup vegetable oil
- 2 large red chili peppers, sliced
- 1 large green chili, sliced
- 2 large green onions, finely sliced
- 1 teaspoon ginger, sliced with skin on
- 1 teaspoon white granulated sugar
- 1Slice the pork into strips approximately 1 inch wide and 2 inches long. Use a meat mallet to tenderize the strips until they're 0.25 to 0.5 inches thick. Transfer the pork to a large mixing bowl.
- 2Season the pork strips by combining the marinade ingredients: add Shaoxing cooking wine, salt, and black pepper. Then, coat each strip with cornstarch, ensuring an even layer for that signature crunch.
- 3Heat vegetable oil in a large pan over medium heat. Once the oil shimmers, carefully fry the marinated pork in small batches, making sure not to overcrowd the pan. Fry until golden crispy and cooked through, about 6-10 minutes, or until the internal temperature hits 145°F.
- 4Transfer the fried pork to a wire rack or paper towel-lined plate, allowing excess oil to drain off for maximum crispiness.
- 5Reserve 1 teaspoon of the oil in the pan. Add the sliced red chili, green chili, green onion, ginger, and white sugar. Stir-fry for 10 seconds until fragrant, then deglaze the pan with Shaoxing cooking wine.
- 6Toss the cooked pork back into the mix quickly for about 20 seconds. Remove from heat and season to taste with additional salt and black pepper. Serve immediately for the best texture and flavor.
Keywords: Chinese, Pork, Salt and Pepper, Stir-fry, Quick Dinner, Weeknight Meal
- boneless pork shoulder: choose a well-marbled cut for juicy, tender pieces that absorb flavor wonderfully.
- cornstarch: this is crucial for creating the signature golden, crispy coating that provides an irresistible crunch.
- Shaoxing Cooking Wine: adds a rich, nuanced flavor profile that is characteristic of many Chinese dishes; dry sherry is a suitable alternative if needed.
- salt: a foundational seasoning that enhances all the other flavors present in the dish.
- black pepper: provides a subtle warmth and a characteristic peppery note that complements the pork beautifully.
- vegetable oil: essential for achieving a perfectly fried exterior, ensuring the pork becomes wonderfully crisp.
- large red chili peppers, sliced: these contribute a vibrant color and a significant amount of heat, which can be adjusted to your personal preference.
- large green chili, sliced: adds another layer of fresh, slightly milder heat and a beautiful visual contrast to the red chilies.
- green onions, finely sliced: these offer a mild, fresh onion flavor and serve as an excellent garnish, adding a pop of color and freshness.
- ginger, sliced with skin on: the skin helps infuse a deeper, more aromatic essence during the stir-frying process, imparting a warm, zesty kick.
- white granulated sugar: a small amount helps to balance the heat from the chilies and enhances the overall savory depth of the dish.
The precise quantities for each ingredient are readily available in the accompanying recipe card, ensuring you have everything you need for success.
Variations
For those seeking a spicier experience, don’t hesitate to incorporate additional Thai bird chilies into the stir-fry. These small but potent peppers will deliver an authentic and robust heat that’s sure to excite the palate, provided you introduce them gradually to manage the intensity.
If you prefer a lighter protein, chicken thighs or succulent shrimp make excellent substitutes for pork. Both adapt beautifully to the marinade and frying process, offering a different yet equally delicious take on the classic salt and pepper profile.
A fantastic vegan alternative involves using firm tofu, pressed dry and cut into bite-sized cubes. Coat the tofu generously in cornstarch before frying to achieve that same satisfying crunch, proving this dish is wonderfully adaptable.
To boost the nutritional content and add textural variety, consider tossing in a handful of your favorite vegetables during the final stir-fry. Sliced bell peppers, crisp snap peas, or tender broccoli florets work exceptionally well and enhance the visual appeal.
A drizzle of toasted sesame oil just before serving can impart an incredible nutty aroma and flavor that elevates the entire dish. This simple addition offers a sophisticated layer of taste that many find irresistible.
For a low-carb option, replace the traditional cornstarch coating with almond flour or coconut flour. These alternatives provide a delightful crispiness without the carbohydrate load, catering to specific dietary needs while maintaining excellent flavor.
An extra layer of aromatic complexity can be achieved by mincing fresh garlic and adding it to the pan along with the ginger. This garlic boost complements the other aromatics and adds a pungent depth that many appreciate.
To enhance the overall savory impact, consider a final drizzle of soy sauce or a homemade spicy garlic sauce. This finishing touch adds an extra punch of flavor that makes the dish even more compelling.
These variations allow you to tailor the Chinese Salt and Pepper Pork to your specific tastes and dietary requirements, ensuring endless enjoyment of this versatile dish. Feel free to experiment and discover your favorite combination!
How to Prepare chinese salt and pepper pork
Step 1: Preparing the Pork
Begin by meticulously slicing the boneless pork shoulder into uniform strips, aiming for dimensions of approximately 1 inch in width and 2 inches in length. This consistent sizing is paramount for even cooking and a pleasing mouthfeel. Once sliced, employ a meat mallet to gently tenderize each strip until it reaches a thickness of about 0.25 to 0.5 inches.
This tenderizing process is a crucial step, as it breaks down the muscle fibers of the pork, ensuring that the final dish is exceptionally tender and succulent. The controlled thickness also aids in achieving a perfectly crispy exterior without overcooking the interior. After tenderizing, transfer all the prepared pork strips into a spacious mixing bowl, ready for the next stage of flavor infusion.
The tenderization ensures that the pork will cook quickly and evenly, absorbing the marinade more effectively. This attention to detail in the initial preparation sets the foundation for a truly outstanding Chinese Salt and Pepper Pork experience. It’s a small step that makes a significant difference in the final outcome of the dish, making the effort well worth it.
Step 2: Marinating and Coating the Pork
In the large mixing bowl containing the tenderized pork strips, proceed to season them generously with the marinade ingredients. This includes adding the Shaoxing cooking wine, a quarter teaspoon of salt, and another quarter teaspoon of black pepper. Ensure each strip is thoroughly coated with these aromatic flavorings.
Following the marinade, it’s time to coat each pork strip with cornstarch. Dust the pork liberally, ensuring an even and complete layer of cornstarch covers every piece. This coating is absolutely essential for achieving that signature golden-brown, crispy texture that defines this dish. Shake off any excess cornstarch to prevent clumping during the frying process, which ensures a better, more uniform crispiness.
This double-layer of seasoning and coating not only imparts flavor but also creates a barrier that helps the pork stay moist on the inside while becoming wonderfully crisp on the outside. The cornstarch adheres best to moist surfaces, so the marinade helps in this regard. The result is a perfectly textured piece of pork that is both juicy and crunchy, a true testament to careful preparation.
Step 3: Frying the Pork to Crispy Perfection
Next, heat a generous amount of vegetable oil in a large pan or wok over medium heat. You’ll know the oil is sufficiently hot when it begins to shimmer gently. Carefully add the marinated and cornstarch-coated pork strips to the hot oil in small batches; it is critically important not to overcrowd the pan.
Overcrowding the pan will cause the oil temperature to drop significantly, leading to the pork steaming rather than frying, which will result in a greasy, soggy texture instead of the desired crispiness. Fry the pork for approximately 6 to 10 minutes, turning the pieces occasionally, until they achieve a beautiful golden-crispy color and are cooked through. An internal temperature of 145°F indicates the pork is perfectly cooked.
Once the pork pieces are golden and crispy, remove them from the oil using a slotted spoon or spider strainer. Transfer the fried pork to a wire rack set over a baking sheet or to a plate lined with paper towels. This allows any excess oil to drain away, further enhancing the crispiness and preventing the pork from becoming heavy or oily.
Step 4: Preparing the Aromatic Stir-Fry Base
After draining the pork, carefully pour out most of the frying oil, leaving behind approximately 1 teaspoon in the pan. Return the pan to medium heat and add the sliced red chili peppers, green chili peppers, and finely sliced green onions. Include the ginger slices, with their skin still on for maximum aromatic infusion, and the white granulated sugar.
Stir-fry these aromatic ingredients for about 10 seconds, just until they become fragrant and their vibrant colors are released. This quick sautéing awakens the flavors of the chilies and ginger, preparing them to meld with the pork. The sugar helps to slightly caramelize these aromatics, adding a touch of sweetness that balances the heat and savory notes.
Be mindful not to overcook these aromatics, as they should retain a slight bite and their fresh character. The goal is to quickly toast them to release their essential oils and perfumes. This aromatic base is the foundation upon which the final flavors of the Chinese Salt and Pepper Pork will be built.
Step 5: Combining and Finishing the Dish
Once the aromatics are fragrant, deglaze the pan by adding a splash of Shaoxing cooking wine. This not only adds another layer of flavor but also helps to lift any delicious browned bits from the bottom of the pan, integrating them into the sauce. Scrape the bottom of the pan to ensure all these flavorful remnants are incorporated.
Immediately after deglazing, toss the cooked and crispy pork pieces back into the pan with the aromatics. Stir and toss everything together quickly for about 20 seconds, ensuring that each piece of pork is lightly coated with the fragrant stir-fry mixture. This brief toss is just enough to distribute the flavors without compromising the pork’s crispiness.
Remove the pan from the heat promptly. Taste the mixture and adjust seasonings as needed, adding more salt and black pepper if desired. Serve the Chinese Salt and Pepper Pork immediately, while it’s still wonderfully hot and crispy, for the absolute best texture and flavor experience. A garnish of additional sliced green onions can add a final touch of freshness and visual appeal.
Step 6: Serving and Enjoying
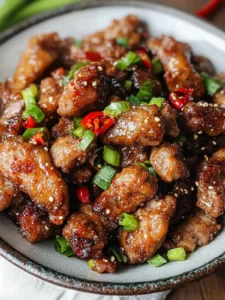
Present your freshly prepared Chinese Salt and Pepper Pork immediately after it comes off the heat. The goal is to savor the dish at its peak crispiness and flavor intensity. The vibrant colors of the chilies and green onions, combined with the golden-brown pork, make for a visually appealing presentation.
This dish is incredibly versatile and pairs wonderfully with a variety of accompaniments. Its savory and slightly spicy profile makes it a perfect candidate to be served alongside steamed rice, which acts as a mild canvas for the bold flavors. It also complements other dinner dishes beautifully, offering a delightful textural contrast and a burst of exciting flavor.
The aroma alone will entice your guests, and the satisfying crunch followed by the tender pork is an experience that consistently delights. Enjoy this homemade rendition that rivals any restaurant offering, showcasing the magic of simple ingredients prepared with care.
Pro Tips for chinese salt and pepper pork
Marinade Magic: For an even deeper flavor penetration and enhanced tenderness, allow the pork to marinate for at least 30 minutes, or even up to a few hours in the refrigerator. This extended marination time allows the Shaoxing wine, salt, and pepper to work their magic more effectively. This ensures each piece of pork is infused with flavor right to its core, leading to a more complex and satisfying taste experience.
Batch Frying is Key: Never overcrowd your frying pan. Frying the pork in small, manageable batches is essential to maintain the oil’s temperature. This ensures each piece fries properly, developing a beautiful golden-crisp exterior instead of becoming soggy. It might take a bit longer, but the superior texture is well worth the extra effort.
Perfect Oil Temperature: The temperature of your frying oil is critical. It needs to be hot enough (around 350-375°F or 175-190°C) before you add the pork. If the oil is too cool, the pork will absorb too much oil and become greasy. If it’s too hot, the outside will burn before the inside is cooked. Using a thermometer is the most reliable way to ensure consistency.
Even Cornstarch Coating: Ensure each piece of pork is evenly coated with cornstarch. Before frying, gently shake off any excess cornstarch. Too much loose cornstarch can clump up in the hot oil and burn, creating an unpleasant texture and appearance. A light, even dusting is what you aim for to achieve that perfect delicate crispiness.
Quick Toss for Freshness: When you reintroduce the fried pork to the stir-fried aromatics, do so quickly. Toss everything together for only about 20-30 seconds. This brief period is enough to coat the pork with the fragrant spices and chilies without allowing the pork to absorb moisture from the vegetables and sauces, thus preserving its crucial crunch.
Serving Suggestions for chinese salt and pepper pork
Decoration
A simple yet effective way to garnish your Chinese Salt and Pepper Pork is with a scattering of freshly sliced green onions. The bright green strands offer a beautiful visual contrast against the golden-brown pork and red chilies. Additionally, a few slivers of fresh red chili can be artfully placed on top for those who appreciate extra visual flair and a hint of impending spice.
Side Dishes
Steamed Jasmine rice is an indispensable companion, its fragrant grains providing a perfect neutral backdrop that allows the complex flavors of the pork to shine. For a bit of green and added crunch, lightly sautéed or steamed broccoli, perhaps with a hint of garlic, offers a refreshing counterpoint. A crisp Asian slaw, featuring shredded cabbage, carrots, and a light sesame dressing, brings a delightful textural contrast and a refreshing tang.
Consider pairing your dinner with a glass of chilled Tsingtao beer; its crisp, clean profile cuts through the richness of the fried pork and complements the subtle spice notes beautifully. For a more substantial meal, fluffy egg fried rice, packed with tender vegetables and protein, can make this a complete and satisfying feast. A side of sweet and sour cucumber salad provides a cool, acidic contrast that cleanses the palate between bites of savory pork.
Creative Serving Ideas
Elevate your presentation by serving the Chinese Salt and Pepper Pork in individual small bamboo steamers, creating an elegant dim sum-style experience. Alternatively, mound the crispy pork high in a shallow ceramic bowl and surround it with delicate lettuce cups, allowing guests to create their own wraps with a crisp filling. For a more casual gathering, arrange the pork on a platter alongside skewers of colorful grilled vegetables, such as bell peppers and zucchini, for a vibrant appetizer spread.
You could also serve it as a topping for savory rice porridge (congee), adding a delightful textural surprise to a comforting base. For a fusion twist, consider using the crispy pork as a filling for small, freshly made bao buns, offering a delightful combination of soft bun and crunchy pork. Another creative idea is to incorporate it into a vibrant stir-fried noodle dish, where the seasoned pork adds a delightful punch of flavor and crunch to every forkful.
Preparation & Storage
Storing Leftovers
To store any leftover Chinese Salt and Pepper Pork, ensure it has cooled down to room temperature. Transfer the cooled pork into an airtight container. Refrigerate it promptly, and it should remain fresh and enjoyable for up to 3 days. Proper sealing is key to preventing the pork from drying out or absorbing unwanted odors from other foods in the refrigerator.
When you are ready to enjoy the leftovers, it’s important to reheat them correctly to regain that desirable crispiness. Avoid the microwave, as it tends to make fried foods soggy. Instead, a skillet or a hot oven works best for reviving the texture. This simple step ensures you can still enjoy the dish almost as much as when it was freshly made.
Freezing
For longer-term storage, freezing is an excellent option for your Chinese Salt and Pepper Pork. Begin by spreading the cooked pork in a single layer on a baking sheet lined with parchment paper. Place this sheet in the freezer for about 1 to 2 hours, or until the pieces are solid. This initial freezing step, known as flash freezing, prevents the pork pieces from clumping together into a large mass.
Once the pork is frozen solid, carefully transfer it to an airtight container or a heavy-duty freezer bag. Remove as much air as possible from the bag before sealing to prevent freezer burn. Properly stored, the frozen Chinese Salt and Pepper Pork can be kept for up to 2 months without a significant loss of quality. This allows you to enjoy your delicious creation at a later date.
Reheating
The best method for reheating Chinese Salt and Pepper Pork to restore its delightful crispiness involves using a skillet. Thaw the frozen pork overnight in the refrigerator for optimal results. Then, heat a tablespoon of oil in a non-stick skillet over medium-high heat.
Add the thawed pork to the hot skillet and cook, stirring occasionally, for about 5-7 minutes, or until it is heated through and has regained its crispy texture. Alternatively, you can reheat it in a preheated oven at 375°F (190°C) on a baking sheet for about 10-12 minutes. This method ensures a more evenly heated product with retained crispiness, far superior to microwaving.
Frequently Asked Questions
-
What type of pork is best for Chinese Salt and Pepper Pork?
For the most tender and juicy results, the recommendation is to use boneless pork shoulder. This cut is inherently well-marbled, which contributes significantly to its flavor and ensures it remains moist throughout the cooking process, especially during frying. If you prefer a leaner option, pork loin can be used, though it may require slightly more careful cooking to prevent dryness.
-
How do I know when my pork is properly cooked?
The pork is considered properly cooked when it reaches an internal temperature of 145°F (63°C). This typically takes between 6 to 10 minutes of frying, depending on the thickness of your pork strips and the heat of your oil. Using a meat thermometer is the most accurate way to confirm doneness, ensuring the center is no longer pink and the juices run clear.
-
How should I store leftover Chinese Salt and Pepper Pork?
Leftovers should be stored in an airtight container and kept in the refrigerator for up to 3 days. When reheating, the best method to recapture that wonderful crispiness is to use a skillet over medium heat with a touch of oil, rather than a microwave, which can result in a less desirable texture. This approach helps to re-crisp the coating beautifully.
-
Can I freeze Chinese Salt and Pepper Pork?
Yes, you certainly can freeze Chinese Salt and Pepper Pork. To do so, freeze the cooked pork in a single layer on a baking sheet for about 1-2 hours until solid. Then, transfer the frozen pieces to an airtight container or freezer bag for storage, where they will keep well for up to 2 months. Reheating is best done after thawing in the refrigerator overnight, followed by pan-frying to restore crispness.
-
What should I do if the pork turns out soggy?
Soggy pork is often a result of too much moisture before frying or overcrowding the pan, which lowers the oil temperature. To avoid this, ensure the pork is well-drained after marinating and coat it evenly with cornstarch, shaking off any excess. Frying in small batches is crucial; this ensures each piece fries properly and achieves that glorious crispy exterior you’re looking for.
-
Is this recipe suitable for those with allergies?
The inclusion of Shaoxing Cooking Wine means this recipe contains gluten, which may be a concern for those with celiac disease or gluten sensitivity. It can be substituted with dry sherry or omitted entirely for a gluten-free version. Always double-check the labels of all ingredients, such as cornstarch, for any hidden allergens relevant to your specific dietary needs.