Irresistible No-Bake Maple Nut Goodies for Sweet Tooth Lovers

There I was, scrolling through my kitchen pantry, searching for a sweet escape from the humdrum of daily meals. Nothing beats the comfort of homemade desserts, and that’s when I stumbled upon the perfect inspiration: Easy No-Bake Maple Nut Goodies.
This delightful recipe unites creamy peanut butter, sweet maple flavoring, and crunchy cocktail peanuts, all enveloped in rich chocolate for a dessert that’s simply irresistible. With its quick prep and no-bake convenience, this is the ideal treat for anyone looking to satisfy their sweet tooth without the fuss.
Why You Will Love This Recipe
- Quick Preparation: You can whip up these no-bake treats in very little time. Just melt, mix, and chill, making them perfect for busy schedules.
- Decadent Flavor: The delightful combination of creamy peanut butter and aromatic maple flavoring creates a mouthwatering profile in every single bite.
- Versatile Options: Feel free to customize your batch by substituting ingredients like almond butter or dark chocolate to suit your specific cravings.
- Crowd-Pleasing Delight: These bars are perfect for family dessert gatherings, office parties, or simply a cozy night spent at home.
- Gluten-Free Goodness: You can enjoy these treats with total peace of mind since they cater to those with gluten sensitivities without sacrificing any richness.
Ingredients You Need
Creating high-quality homemade confections starts with selecting fresh, pantry-stable ingredients that meld perfectly together. For the best results, ensure your peanut butter is smooth and your chocolate chips are of a high-melting quality. Please note that exact quantities for every component are listed in the recipe card found at the bottom of this page.
Easy No-Bake Maple Nut Goodies
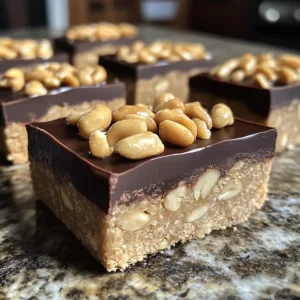
A delightful no-bake dessert featuring creamy peanut butter, aromatic maple flavoring, and crunchy cocktail peanuts, topped with rich chocolate.
- 2 cups Cocktail Peanuts
- 1/2 cup Margarine or Butter
- 1 1/2 cups Milk Chocolate Chips
- 1 cup Evaporated Milk
- 2 cups Powdered Sugar
- 2 teaspoons Maple Flavoring
- 1 package Vanilla Pudding Mix
- 1 cup Peanut Butter
- 1 cup Semi-Sweet Chocolate Chips
- 1Combine 1/2 cup margarine, 1 cup evaporated milk, and 1 1/2 cups milk chocolate chips in a saucepan over medium-low heat until melted.
- 2Cool for 5 minutes, then stir in 1 cup peanut butter and 2 teaspoons maple flavoring.
- 3Whisk 2 cups powdered sugar and 1 cup vanilla pudding mix in a bowl, then stir in the chocolate mixture.
- 4Fold in 2 cups cocktail peanuts until evenly distributed.
- 5Transfer to a greased 13x9-inch pan and spread evenly.
- 6Sprinkle 1 cup semi-sweet chocolate chips on top and refrigerate for at least 2 hours.
- 7Slice into squares and serve.
Keywords: no-bake, dessert, maple, peanut butter, gluten-free, snacks
- cocktail peanuts: these provide the essential crunch and nutty base for your dessert squares.
- margarine or butter: this ingredient adds the necessary fat to create a silky, rich texture in the base.
- milk chocolate chips: these melt down to form the creamy, sweet foundation of the mixture.
- evaporated milk: this contributes a thick, velvety consistency that helps the bars hold their shape.
- powdered sugar: this fine sugar sweetens the mixture while adding body to the fudge-like base.
- maple flavoring: this concentrated ingredient provides the signature autumn-inspired aroma and sweetness.
- vanilla pudding mix: this secret ingredient acts as a thickener, helping the goodies set properly after chilling.
- peanut butter: use a creamy variety to ensure the flavor is evenly distributed throughout every bite.
- semi-sweet chocolate chips: these are sprinkled on top to provide a satisfying, glossy finish.
Variations
Vegan Adaptations: You can easily transform this recipe by using plant-based margarine and dairy-free chocolate chips. Ensure your vanilla pudding mix is also plant-based to maintain the integrity of the dairy-free profile.
Low Carb Adjustments: For a lower sugar version, consider using a high-quality powdered erythritol instead of traditional sugar. You can also opt for sugar-free chocolate chips to significantly reduce the overall carbohydrate count of the bars.
Flavor Twists: Experiment by adding a pinch of sea salt to the top for a sophisticated salted-caramel vibe. Alternatively, fold in some dried cranberries or raisins to introduce a tart, chewy contrast to the sweet maple and peanut flavors.
How to Prepare Maple Nut Goodies
Step 1: Melt the Base Mixture
In a medium saucepan, begin by combining the margarine, evaporated milk, and milk chocolate chips. Use a heavy-bottomed pan to ensure even heat distribution while you work. This step is foundational for achieving a consistent, silky texture.
Keep the stovetop heat set to medium-low to prevent the chocolate from scorching. Gently stir the ingredients consistently for about 5 to 7 minutes as they begin to liquefy. You are looking for a completely smooth, glossy mixture with no lumps remaining.
Once the mixture is fully incorporated and smooth, immediately remove the pan from the heat source. Letting it sit on a hot burner can lead to seizing or burning, which will ruin the texture of your final product. Set the pan aside to cool slightly before moving on to the next phase.
Step 2: Add Flavorful Components
After allowing the chocolate base to cool for roughly 5 minutes, it is time to introduce the star flavors. Add your creamy peanut butter and the maple flavoring directly into the warm chocolate mixture. This timing is critical because it ensures the peanut butter blends seamlessly without becoming too thin.
Use a sturdy silicone spatula to stir the ingredients vigorously until they are fully integrated. The peanut butter should lose its individual streaks and become one with the chocolate base. Your kitchen will begin to smell heavenly as the maple aroma activates with the warmth of the chocolate.
If the mixture feels a little stiff, do not worry; this is natural as the chocolate cools. Ensure the mixture is smooth and uniform before you move to the dry ingredients. A uniform base ensures that every single square of your dinner party dessert is equally delicious.
Step 3: Combine Dry Ingredients
In a separate large mixing bowl, whisk together the powdered sugar and the vanilla pudding mix. Make sure there are no clumps of pudding powder remaining, as this can affect the texture of the set bars. Proper aeration here makes the final dough much easier to handle.
Gradually pour the warm chocolate and peanut butter mixture into the center of your dry ingredients. Mix gently using a folding motion rather than aggressive stirring. This technique preserves the structure of the batter and helps it reach the perfect consistency.
As you continue to mix, the batter will thicken into a heavy, luscious dough. This is the desired consistency that will hold the peanuts in place. If it feels too thin, allow it to sit for a minute, as the pudding mix needs a moment to begin its setting process.
Step 4: Fold in the Cocktail Peanuts
Now, carefully fold in the cocktail peanuts to your thick batter. Ensure you are getting to the bottom of the bowl so the nuts are evenly distributed from top to bottom. You want every single piece you cut later to have a generous amount of crunch.
Take your time with this step to avoid crushing the peanuts, as keeping them whole adds to the sensory experience. The contrast between the soft, creamy fudge and the crisp, salty peanuts is what makes this lunch or snack time delight so special. When the nuts are coated in a thin layer of the chocolate mixture, they are ready for the pan.
Step 5: Transfer to Baking Dish
Lightly grease your 13×9-inch baking pan with high-quality non-stick spray or a thin layer of softened butter. This is essential for a clean removal later. Pour the heavy mixture into the center of the pan to begin the spreading process.
Using an offset spatula, push the mixture toward the corners of the dish. Smooth the top as evenly as possible to ensure that every square has the same thickness. A flat, uniform surface also makes adding the final toppings much easier.
If the mixture is sticking to your spatula, lightly dampen the utensil with a tiny bit of water or oil. This simple trick allows you to glide over the surface without pulling the batter up. Now, your pan is prepared for its final layer and the critical chilling period.
Step 6: Add the Chocolate Topping
Sprinkle the remaining semi-sweet chocolate chips evenly over the smoothed surface of the mixture. You can press them down very lightly if you want them embedded, or leave them on top for a rustic appearance. These chips provide a sharp, dark cocoa contrast to the sweet maple fudge layer below.
Place your baking pan into the refrigerator on a flat, level shelf. Let it chill for at least 2 hours, though 3 hours is even better if your schedule allows. This cooling period is non-negotiable for the structure, as the fats need to solidify to make the bars sliceable.
Avoid placing the pan near strong-smelling foods in the fridge, as chocolate can easily absorb odors. Once the time is up, the top layer of chips should be firm to the touch. You are now just a few simple cuts away from serving your homemade Maple Nut Goodies.
Pro Tips for Maple Nut Goodies
Measure Carefully: Always use a level scoop when measuring your dry ingredients to ensure the perfect ratio of solids to liquids. Accurate measurement is the primary key to avoiding a base that is either too runny or overly crumbly.
Strategic Chilling: If you are in a rush, you can place the pan in the freezer for 45 minutes instead of the fridge. However, ensure you move them to the fridge afterward to prevent the texture from becoming too icy or hard.
Cutting Technique: Use a sharp, thin-bladed knife to cut the squares, and wipe the blade clean between each cut with a warm, damp cloth. This ensures perfectly clean, professional-looking edges for every piece you serve.
Ingredient Quality: Since this is a simple recipe with few moving parts, the quality of your peanut butter and chocolate will shine through. Opt for high-quality cocoa solids and natural peanut butter for a significantly elevated taste experience.
Serving Suggestions for Maple Nut Goodies
Decoration
For a beautiful presentation, you can drizzle a small amount of melted white chocolate across the top in a zig-zag pattern. A light dusting of sea salt or even a few chopped, toasted walnuts can add a professional finish. These visual touches make the bars perfect for gifting or serving at fancy events.
Side Dishes
Serve these bars alongside a platter of fresh, tart berries like raspberries or blackberries to cut through the richness. A small bowl of lightly salted almonds can also provide a palate-cleansing crunch. Pairing these with a light, crisp fruit salad creates a balanced dessert course for any meal.
Creative Serving Ideas
If you want to get creative, crumble a chilled bar over a bowl of warm, homemade German pancake or vanilla bean ice cream. The temperature contrast between the warm base and the cold, fudge-like chunks is absolutely divine. You can also serve them on a dessert board alongside other favorites like funfetti cookies.
Preparation & Storage
Storing Leftovers
Keep your leftover bars in an airtight container to prevent them from drying out or absorbing moisture from the air. Stored at room temperature in a cool, dark spot, they will remain delicious for up to one week. If your home is particularly warm, keep them in the pantry to maintain their shape.
Freezing
These goodies are incredibly freezer-friendly and can be kept for up to three months. To maximize freshness, wrap each bar individually in parchment paper before placing them in a freezer-safe bag. This allows you to grab a single, perfectly preserved portion whenever a craving strikes.
Reheating
If you prefer a softer, melt-in-your-mouth texture, you can bring a bar to room temperature for ten minutes before eating. We do not recommend microwaving the whole batch, as it will cause the fats to separate. If you really want a warm treat, a 5-second burst is enough to soften the chocolate just slightly.
Frequently Asked Questions
- What kind of peanuts should I use for the best crunch? Cocktail peanuts are the standard choice because they are usually roasted and salted to perfection, providing the ideal flavor profile. You can substitute these with dry-roasted peanuts if you prefer a less oily crunch or use a mix of cashews and almonds for a more complex, gourmet nut profile.
- How can I fix the texture if the mixture feels too gooey? Gooey bars are usually the result of either imprecise measurement of the liquids or insufficient chilling time. Make sure you are using a standard measuring cup and checking the consistency before you pour it into the pan. If they remain soft after two hours, return the pan to the refrigerator or move it to the freezer for an additional hour to firm up the fats.
- Are these treats safe for someone on a gluten-free diet? Yes, the ingredients in this recipe are naturally gluten-free provided you check the labels on your specific brands. The vanilla pudding mix is the most important component to verify, as some manufacturers may process it in facilities that handle wheat. Always confirm that your chocolate chips and pudding are certified gluten-free to accommodate those with celiac disease or gluten sensitivities.
For more inspiration, visit our Pinterest page for daily recipe ideas and kitchen tips. Always feel free to experiment with the base recipe, as these goodies are designed to be a flexible canvas for your own culinary creativity. Happy cooking, and enjoy every bite of your homemade Maple Nut Goodies!