Nut Free Granola: 7 Steps to Crunchy Perfection

Granola has become a beloved staple in many households, serving as a versatile snack, breakfast option, or topping for yogurt. But not all granolas are created equal, and that’s where our recipe for Nut Free Granola: 7 Steps to Crunchy Perfection comes in. Have you struggled to find a granola that meets your dietary preferences or concerns about nut allergies?
Picture waking up to the enticing aroma of freshly baked granola wafting through your kitchen; this Nut Free Granola recipe is not only easy to make but is absolutely bursting with delightful flavor and texture. You can easily customize it with your favorite dried fruits and spices, making it truly your own unique creation. The best part about this recipe is its simplicity, allowing you to whip up a wholesome batch in no time at all.
Why You Will Love This Recipe
- Flavorful and Customizable: This granola is a delightful combination of hearty oats, nutritious sunflower seeds, satisfying pumpkin seeds, and chewy dried fruits, providing a perfect and ever-changing medley of flavors.
- Incredibly Easy to Make: With just a handful of readily available ingredients and straightforward, easy-to-follow steps, creating this homemade granola is an absolute breeze, even for novice cooks.
- Versatile Ingredient Options: You have the freedom to swap out dried fruits and seeds based on what you have readily available in your pantry, allowing for truly endless variations and preventing recipe boredom.
- Perfect for the Whole Family: It’s a crowd-pleaser that is guaranteed to be a hit with both children and adults alike, making it a fantastic and inclusive family-friendly recipe for any occasion.
- Nutritious and Guilt-Free Snack: Packed with wholesome, nourishing ingredients, this granola is a healthy choice that can be enjoyed as a guilt-free indulgence any time of day.
Ingredients You Need
The foundation of any great granola lies in the quality of its ingredients. Using fresh, wholesome components will ensure your Nut Free Granola is not only delicious but also packed with beneficial nutrients. The combination of rolled oats, various seeds, and natural sweeteners creates a balanced and satisfying profile that is both nourishing and incredibly tasty.
Nut Free Granola: 7 Steps to Crunchy Perfection
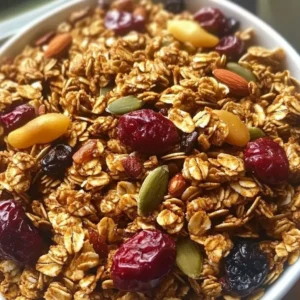
A delightful mix of oats, seeds, and dried fruits, this Nut Free Granola is easy to make and customizable, providing a healthy snack or breakfast option for the whole family.
- 2 cups rolled oats
- 1/2 cup pumpkin seeds
- 1/2 cup sunflower seeds
- 1/2 cup dried fruit (raisins, cranberries, etc.)
- 1/4 cup honey or maple syrup
- 1/4 cup coconut oil
- 1 teaspoon vanilla extract
- 1/2 teaspoon cinnamon
- 1/4 teaspoon salt
- 1Start by gathering all your ingredients. Make sure to pre-measure your oats, seeds, dried fruit, and liquids.
- 2Preheat your oven to 350°F (175°C).
- 3In a large bowl, combine the rolled oats, pumpkin seeds, sunflower seeds, dried fruit, cinnamon, and salt. Stir well to coat everything evenly.
- 4In a small saucepan over low heat, combine honey and coconut oil. Stir gently until the mixture is completely melted and well-blended.
- 5Once melted, remove the saucepan from heat and stir in the vanilla extract.
- 6Pour the melted mixture over the dry ingredients in the bowl. Mix everything together until all the oats and seeds are well-coated.
- 7Spread the granola mixture evenly onto a baking sheet lined with parchment paper.
- 8Bake the granola in the preheated oven for 20-25 minutes, stirring halfway through.
- 9Once baked, let it cool completely on the baking sheet.
- 10Break up the granola into your desired clumps and store it in an airtight container.
Keywords: Breakfast Recipe, Healthy Snack, Homemade Granola, Nut Free Granola, vegan option
- rolled oats: the hearty base providing fiber and sustained energy for your day.
- pumpkin seeds: offering a good source of protein and healthy fats with a delightful crunch.
- sunflower seeds: a fantastic nut-free option brimming with essential nutrients and a subtle, pleasant flavor.
- dried fruit (raisins, cranberries, etc.): these add natural sweetness and a satisfying chewy texture to the mix.
- honey or maple syrup: provides the necessary sweetness and acts as a crucial binder for the granola clusters.
- coconut oil: contributes richness and helps the granola toast to a perfect golden-brown perfection.
- vanilla extract: enhances the overall flavor profile with a warm, aromatic undertone.
- cinnamon: imparts a comforting, cozy spice that is characteristic of homemade granola.
- salt: a small amount balances the sweetness and elevates all the other delicious flavors.
The specific quantities for these ingredients are detailed within the provided recipe card, ensuring you have all the measurements you need for success.
Variations
One of the most wonderful aspects of making your own granola is the sheer ability to customize it according to your specific dietary needs and flavor preferences. This recipe is a perfect canvas for experimentation, allowing you to create personalized blends that cater to various lifestyles and tastes.
For a delightful Vegan Nut Free Granola, the substitution is wonderfully simple. Instead of using honey, opt for an equal amount of pure maple syrup or agave nectar. These plant-based sweeteners provide the necessary sweetness and binding properties without altering the core flavor profile significantly. You can also enhance this vegan version with unsweetened shredded coconut for an extra tropical touch and a boost of healthy fats.
If you are looking for a Low-Carb Nut Free Granola option, the adjustments can still yield a delicious result. While oats are a carbohydrate, you can reduce their quantity and increase the amount of seeds, such as sunflower, pumpkin, and even hemp seeds. Replace the honey or maple syrup with a low-carb sweetener like erythritol or stevia, adjusting to your preferred sweetness level. Adding sugar-free dried fruit alternatives or a few drops of almond extract can also contribute to a satisfying low-carb treat.
A particularly delicious and indulgent twist is the Chocolate Lover’s Nut Free Granola. After the granola has been baked and has cooled slightly, gently fold in a generous amount of your favorite chocolate chips, whether they are dairy-free or semi-sweet. The residual heat will soften them just enough to create delightful pockets of melted chocolate throughout the crunchy clusters. For an even richer flavor, consider adding a tablespoon of unsweetened cocoa powder to the dry ingredients before baking.
How to Prepare nut free granola
Step 1: Gather and Measure Your Ingredients
The initial step in creating any successful recipe involves meticulous preparation. Begin by carefully gathering all the necessary ingredients for your Nut Free Granola. Ensure you have accurate measurements for each component, as precision is key to achieving the perfect balance of textures and flavors in your final product. Having everything pre-measured and ready to go will significantly streamline the subsequent steps of the preparation process.
Take the time to measure out the rolled oats, pumpkin seeds, and sunflower seeds. Ensure your dried fruits are ready to be incorporated, whether they are raisins, cranberries, or a mix. Measure out your liquid sweetener, such as honey or maple syrup, and the coconut oil. Having all your dry and wet ingredients separated and quantified before you start mixing will prevent any rushed moments and ensure a smoother cooking experience.
Consider the type of oats you are using; rolled oats are ideal for their texture and ability to form clusters. If you are opting for a gluten-free version, make sure to use certified gluten-free rolled oats to avoid any cross-contamination. This preliminary step is foundational to the entire process, setting the stage for a perfectly baked and delightfully crunchy granola.
Step 2: Preheat Your Oven and Prepare the Baking Sheet
Preheating your oven to the correct temperature is a crucial element for achieving evenly baked granola. Set your oven to 350 degrees Fahrenheit (175 degrees Celsius) and allow it ample time to reach this temperature before you plan to bake. An accurately preheated oven ensures that the granola begins to toast and crisp up immediately upon entering, promoting uniform cooking throughout the entire batch.
Simultaneously, prepare your baking sheet by lining it with parchment paper. This step is incredibly important for several reasons. Parchment paper prevents the granola from sticking to the baking sheet, making cleanup an absolute breeze. It also aids in achieving an even bake by creating a non-stick surface that distributes heat gently and consistently across the bottom of the granola mixture. This helps to avoid scorching and ensures that every cluster bakes to golden perfection.
Ensure the parchment paper is spread out smoothly across the entire surface of the baking sheet, with no major wrinkles or folds, as these could lead to uneven baking in those specific areas. This attention to detail in preparing your baking surface will contribute significantly to the overall success and presentation of your homemade nut-free granola.
Step 3: Combine the Dry Ingredients
In a large, spacious mixing bowl, introduce your rolled oats, pumpkin seeds, and sunflower seeds. This forms the wholesome and hearty base of your granola, providing essential fiber and satisfying crunch. Next, add your chosen dried fruits to this mixture; they will soften slightly during baking, adding bursts of natural sweetness and chewiness that complement the other textures beautifully.
Now, it’s time to introduce the warming spices that give granola its characteristic comforting aroma and flavor. Sprinkle in the ground cinnamon, which is a classic choice that pairs wonderfully with oats and seeds. Add the ¼ teaspoon of salt; this seemingly small addition plays a vital role in balancing the sweetness of the other ingredients and enhancing the overall depth of flavor, preventing the granola from tasting flat.
With all the dry components in the bowl, use a large spoon or a spatula to stir everything together thoroughly. Ensure that the seeds and dried fruits are evenly distributed amongst the oats, and that the spices are coating all the ingredients uniformly. This even distribution is critical for ensuring consistent flavor and texture in every bite of your finished granola.
Step 4: Gently Melt the Wet Ingredients
In a separate small saucepan, combine your liquid sweetener, such as honey or pure maple syrup, with the coconut oil. Place this saucepan over low heat on your stovetop. It is essential to melt these ingredients gently and slowly to preserve their natural flavors and beneficial properties. Overheating can cause the sweetener to caramelize too quickly or the oil to break down, impacting the final taste and texture.
Stir the mixture continuously and gently as it heats. You are aiming for a smooth, fully liquid consistency where the oil and sweetener are thoroughly combined into a cohesive, syrupy liquid. This process usually takes only a few minutes. Watch carefully to ensure it does not boil or simmer vigorously, as this is unnecessary and could lead to undesirable results.
Once the honey (or maple syrup) and coconut oil are completely melted and beautifully blended into a homogenous liquid, remove the saucepan from the heat source immediately. This prevents any further cooking or potential scorching, ensuring the integrity of your wet ingredients. This perfectly combined liquid will be the key binder for your granola, helping all the dry ingredients adhere together to form those delightful clusters.
Step 5: Infuse with Vanilla Extract
Once you have removed the saucepan containing the melted honey or maple syrup and coconut oil from the heat, it’s time to introduce the aromatic vanilla extract. Stir in the teaspoon of vanilla extract into the warm liquid mixture. Vanilla is a wonderful flavor enhancer that complements the nutty notes of the seeds and the warmth of the cinnamon, adding a subtle yet significant layer of complexity to the overall taste profile of your granola.
Stir the vanilla extract into the melted liquid until it is fully incorporated. The fragrance of the vanilla will immediately become apparent, contributing to the enticing aroma that will fill your kitchen as the granola bakes. This step is simple but incredibly impactful in elevating the sensory experience of your homemade granola. The warmth of the liquid mixture helps to bloom the vanilla, releasing its full flavor potential.
Ensure the vanilla is completely dispersed throughout the liquid sweetener and oil mixture. This ensures that every bit of the granola will receive a hint of this delightful flavor, creating a more harmonious and well-rounded taste. The combination of the sweeteners, oil, and vanilla creates a fragrant and delicious coating that will bind and flavor all the dry ingredients.
Step 6: Combine Wet and Dry Ingredients
Now comes the exciting part where all the elements come together. Take the large bowl containing your combined dry ingredients (oats, seeds, and dried fruit). Carefully pour the warm, fragrant mixture of melted sweetener, coconut oil, and vanilla extract directly over the dry ingredients in the bowl. This is where the magic begins to happen as the liquid coating will bind everything together.
Using your large spoon or spatula, begin to mix everything thoroughly. Gently fold and stir the ingredients together, ensuring that every single oat, seed, and dried fruit is generously coated with the wet mixture. You want to achieve a uniform consistency where there are no dry pockets of oats or seeds remaining. This thorough coating is essential for proper baking and for creating those sought-after crunchy granola clusters.
Continue mixing until the entire mixture appears slightly glossy and all the dry ingredients have a beautiful sheen. It’s important not to overmix to the point of mushing the ingredients, but rather to ensure a comprehensive coating. This step is critical for the texture and flavor development of your nut-free granola, transforming simple ingredients into a cohesive, bakeable mixture ready for the oven.
Step 7: Spread Evenly on the Baking Sheet
Once your granola mixture is thoroughly combined and all ingredients are well-coated, it’s time to transfer it to the prepared baking sheet. Carefully spoon the granola mixture onto the parchment-lined baking sheet. Your goal is to spread it out into a single, even layer across the entire surface of the sheet. Avoid clumping the granola too much at this stage; a relatively even distribution will promote uniform baking.
Use the back of your spoon or spatula to gently spread the mixture outwards. If you prefer larger clusters in your finished granola, you can press down slightly on the mixture with your spatula to create more cohesive clumps. However, remember that the granola will spread a bit during baking, so don’t worry if it’s not perfectly uniform. The key is to create a relatively consistent thickness across the baking sheet.
Ensuring an even layer is crucial because it allows the heat to circulate uniformly around all parts of the granola. This prevents some areas from burning while others remain undercooked. A well-spread mixture will result in consistently baked, perfectly crunchy granola throughout the entire batch, making each bite a delightful experience.
Step 8: Bake to Golden Perfection
Place the prepared baking sheet into your preheated oven at 350°F (175°C). Allow the granola to bake for approximately 20 to 25 minutes. During this baking period, the oats and seeds will toast, becoming golden brown and wonderfully crisp. The aroma that will fill your kitchen is truly irresistible, a testament to the deliciousness that is unfolding.
Crucially, you need to stir the granola about halfway through the baking time, roughly after 10-12 minutes. Use a spatula to gently toss and stir the granola, bringing the edges towards the center and vice versa. This action ensures that all sides of the granola clusters are exposed to the heat, promoting even browning and preventing any parts from burning or becoming too dark. It also helps to break up any excessively large clumps if that is your preference.
Keep a close eye on the granola during the last few minutes of baking. It can go from perfectly golden to burnt very quickly. You are looking for a beautiful golden-brown color and a firm texture. Once it reaches this point, carefully remove the baking sheet from the oven. The granola will seem slightly soft when it’s hot, but it will crisp up significantly as it cools.
Step 9: Cool Completely for Optimal Crunch
This step is absolutely critical for achieving that signature crunchy texture that makes homemade granola so satisfying. Once you remove the baking sheet from the hot oven, resist the temptation to break apart the granola immediately. Instead, leave the granola undisturbed on the hot baking sheet. The residual heat from the pan will continue to help dry out and crisp up the granola, contributing to its final crunch.
Allow the granola to cool completely on the baking sheet. This process can take anywhere from 30 minutes to an hour, depending on the ambient temperature of your kitchen. As it cools, the granola will become noticeably firmer and develop that desirable brittle texture. Patience here is key; rushing this step will result in softer, chewier granola, which, while still tasty, won’t have the satisfying crispness you are aiming for.
Once the granola has reached room temperature and feels completely cool and firm to the touch, you can then proceed to break it into your desired cluster sizes. Use your hands to gently crumble the granola into smaller pieces or leave larger clusters intact, depending on your personal preference. This cooling phase is where the magic of texture transformation truly occurs, ensuring your nut-free granola is perfectly crunchy.
Step 10: Store and Enjoy Your Creation
After your delicious homemade Nut Free Granola has cooled completely and you have broken it into your preferred cluster sizes, it is time to store it properly to maintain its freshness and crunch. Transfer the cooled granola into an airtight container. This could be a glass jar with a tightly sealing lid, a plastic container with a secure closure, or even a resealable bag.
Storing the granola in an airtight container is paramount to protecting it from moisture and air, which are the primary enemies of crispiness. If exposed to humidity, the granola can quickly lose its satisfying crunch and become stale. Properly stored, your homemade granola will retain its delightful texture and flavor for up to two weeks, making it a convenient and healthy option to have on hand.
Now, the most rewarding part: enjoy your meticulously crafted Nut Free Granola! Sprinkle it over yogurt, enjoy it with your favorite milk, use it as a topping for smoothie bowls, or simply savor a handful as a healthy and satisfying snack. You’ve created a delicious, wholesome treat that is perfect for any time of day.
Pro Tips for nut free granola
Toast Your Oats and Seeds: For an even deeper, nuttier flavor profile, consider toasting your rolled oats and seeds lightly in a dry pan or in the oven for a few minutes before combining them with the wet ingredients. This process awakens their natural oils and enhances their inherent deliciousness.
Don’t Skip the Salt: That small pinch of salt might seem insignificant, but it’s a flavor enhancer that balances the sweetness and brings out the best in all the other ingredients. It prevents the granola from tasting one-dimensionally sweet.
Achieve Perfect Clusters: To create larger, more satisfying granola clusters, gently press the mixture down onto the baking sheet after spreading it out. Once baked, avoid stirring too much as it cools; instead, let the larger pieces form naturally as it cools and solidifies.
Experiment with Spices: While cinnamon is a classic, don’t be afraid to branch out. A pinch of nutmeg, ginger, cardamom, or even a touch of allspice can add wonderful complexity and warmth to your granola, especially during cooler months.
Cooling is Key: I cannot stress this enough – allow your granola to cool *completely* on the baking sheet before breaking it apart. The crunch develops significantly as it cools. Placing it in the refrigerator can speed up this process if you’re in a hurry, but natural cooling on the counter is usually best for texture.
Serving Suggestions for nut free granola
Decoration
Elevate the visual appeal of any dish by generously sprinkling your freshly baked Nut Free Granola as a decorative element. Its golden-brown color and varied textures provide an inviting and appetizing finish to both sweet and savory creations, making them look as good as they taste.
Consider adding a few whole dried cranberries or pumpkin seeds on top of yogurt parfaits or smoothie bowls for an extra visual pop and textural contrast. A light dusting of edible flowers or a drizzle of contrasting colored fruit puree can also enhance the presentation, making your granola-topped dishes truly stand out.
Side Dishes
Nut Free Granola excels as a versatile side component that adds crunch and flavor to various meals. It transforms simple fruit salads into more substantial and exciting dishes, offering a delightful contrast in texture to soft fruits. Consider serving it alongside fresh berries or sliced peaches for a truly delightful combination.
It also makes an excellent accompaniment to breakfast pastries or muffins, providing a healthy and satisfying crunch that complements the softness of baked goods. Imagine serving a side of homemade granola with a slice of banana bread or a warm apple muffin for a delightful textural interplay. This granola can also be an unexpected yet welcome addition to certain savory dishes, like a light chicken salad, offering a unique crunchy element.
Creative Serving Ideas
Beyond the typical yogurt bowl, explore the boundless creative possibilities for serving your Nut Free Granola. For an exciting breakfast twist, layer it with Greek yogurt, fresh berries, and a drizzle of honey in a parfait glass for an elegant presentation. This creates a visually appealing and deliciously layered treat that’s perfect for brunch or a special morning meal.
Consider making homemade granola bars by pressing the mixture more firmly onto the baking sheet and baking until firm, then cutting into bars. These are perfect for on-the-go snacking or packing in lunchboxes. You can also crumble the granola and use it as a crunchy coating for baked chicken tenders or fish, adding a healthy, flavorful crust that kids and adults alike will adore. Furthermore, sprinkle it over ice cream or baked fruit crumbles for an added layer of texture and sweetness.
Preparation & Storage
Storing Leftovers
To ensure your delicious homemade Nut Free Granola stays fresh and wonderfully crunchy, it’s essential to store it correctly. Once the granola has cooled completely to room temperature after baking, transfer it into an airtight container. This could be a glass jar with a tight-fitting lid, a sturdy plastic container with a secure seal, or even a high-quality resealable bag.
Keeping the container tightly sealed is crucial because it prevents moisture and air from reaching the granola. Exposure to humidity is the primary reason why granola loses its crispness and becomes stale. Stored in this manner at room temperature, your granola should remain fresh and delightfully crunchy for up to two weeks, making it a convenient staple to have on hand.
Always check the seal of your container before storing to ensure no air can get in. If you notice any condensation inside the container, it might indicate that the granola was not fully cooled before storage, or the seal isn’t tight enough, and it’s best to re-dry it slightly in a low oven.
Freezing
If you find yourself with an abundance of freshly baked Nut Free Granola or wish to extend its shelf life significantly, freezing is an excellent option. The process is straightforward and helps maintain the granola’s texture and flavor for an extended period. Ensure the granola is completely cooled before you begin the freezing process to prevent the formation of ice crystals.
Divide the cooled granola into portion-sized amounts or store the entire batch. Place the granola into freezer-safe bags or airtight freezer containers. It’s a good idea to press out as much air as possible from the bags before sealing them to minimize freezer burn. Label the containers with the date to keep track of how long it’s been stored.
Properly frozen, your homemade nut-free granola can retain its quality for several months, typically up to 2-3 months. This makes it incredibly convenient to have a ready supply of this healthy snack or breakfast component available whenever you desire, without worrying about it spoiling. It’s a fantastic way to batch-prepare and always have a delicious, wholesome option readily accessible.
Reheating
Occasionally, even when stored properly, your granola might lose a bit of its signature crunch, especially if it has been exposed to humidity or has been in storage for a longer duration. Fortunately, reviving its crispness is quite simple. The most effective way to reheat and restore the crunch to your nut-free granola is by gently warming it in the oven.
Spread the granola in a single layer on a baking sheet. Place it in a preheated oven set to a low temperature, around 250-300°F (120-150°C). Allow it to bake for approximately 5 to 10 minutes, keeping a very close eye on it to prevent any burning. This short period of gentle heat will help evaporate any residual moisture and re-crisp the oats and seeds.
Alternatively, if you just need a quick refresh, you can spread the granola on a microwave-safe plate and heat it in short intervals of 15-30 seconds, checking the crispness in between. Be cautious with microwaving, as it can sometimes make the granola chewy rather than crisp if overdone. After reheating, allow the granola to cool completely once again on the baking sheet before storing it, as this helps to set the crispness.
Frequently Asked Questions
-
Can I prepare this nut-free granola ahead of time, and how should I store it to maintain its freshness and crunch?
Absolutely! Making a large batch of this nut-free granola ahead of time is one of its greatest advantages, offering convenience for busy mornings or quick snacks. Once the granola has completely cooled after baking, it is essential to store it in an airtight container to protect it from moisture and air, which can lead to staleness and loss of crunch. Properly sealed at room temperature, your homemade granola should maintain its delightful texture and flavor for up to two weeks. If you find your environment is particularly humid, or you want to ensure maximum freshness, consider storing it in the refrigerator, which can extend its life slightly longer.
-
What are the best substitutions for the ingredients if I have dietary restrictions or simply want to try something new?
This recipe is wonderfully adaptable to various dietary needs and preferences. For a vegan version, the most common substitution is to replace the honey with an equal amount of pure maple syrup or agave nectar; both provide sweetness and act as binders effectively. If you have a sensitivity to coconut oil, you can substitute it with another neutral-flavored oil like olive oil or a mild vegetable oil, though coconut oil contributes a lovely richness. When it comes to seeds and dried fruits, feel free to experiment widely: swap pumpkin seeds for sesame seeds, flaxseeds, or chia seeds, and use your favorite dried fruits like apricots, dates, or even chopped apples. For a gluten-free granola, ensure you are using certified gluten-free rolled oats, as standard oats can sometimes be cross-contaminated.
-
How long does homemade nut-free granola typically last, and what are the signs that it might no longer be good to eat?
When stored correctly in an airtight container at room temperature, homemade nut-free granola generally stays fresh and maintains its optimal crunch for about two weeks. If you notice a loss of crispness, it might be a sign that it has absorbed some moisture, and a short stint in a low oven can often revive it. Signs that the granola may no longer be good to eat include the development of off-smells, such as rancid or musty odors, which can indicate spoilage of the oils in the seeds or oats. You might also notice a significant change in texture, becoming unusually sticky or slimy, rather than crumbly. If you see any signs of mold or discoloration, it’s best to discard the batch immediately, although this is quite rare with properly dried and stored granola.