Ultimate Japanese Katsu Bowl
Japanese Katsu Bowls are a delightful fusion of flavor, texture, and comfort that bring the heart of Japanese cuisine into your own kitchen. Imagine sinking your teeth into a perfectly crispy, golden-brown cutlet resting on a steaming bed of fluffy rice, topped with a rich, tangy drizzle of savory tonkatsu sauce. These bowls are more than just a meal; they are an experience that evokes warmth, nostalgia, and pure satisfaction with every single bite.
Have you ever craved a restaurant-quality dish that is surprisingly simple to prepare right at home? Japanese Katsu Bowls fit the bill perfectly, requiring only a handful of pantry staples and straightforward cooking techniques to impress your family and friends. The intoxicating aroma that fills your home as you fry the cutlets will have everyone gathering around the table long before the final assembly is even complete.
Why You Will Love This Recipe
- Quick Preparation: You can achieve a professional, crispy result in roughly 30 minutes, making this ideal for a busy dinner schedule.
- Customizable Components: The recipe is incredibly adaptable, allowing you to easily swap the traditional pork for chicken, tofu, or even hearty vegetables depending on your preferences.
- Satisfying Textures: The beautiful contrast between the crunchy panko breading and the tender, juicy interior provides a mouth-watering sensory experience that keeps you coming back for more.
- Family-Friendly Appeal: Because this dish balances mild flavors with an approachable crispy exterior, it is a guaranteed hit for both kids and adults at any lunch or evening gathering.
- Excellent Meal Prep: These components hold up exceptionally well, making them a perfect candidate for your weekly breakfast or midday meal planning needs.
Ingredients You Need
Selecting high-quality ingredients is the secret to elevating your home-cooked katsu to the level of a specialty restaurant. By focusing on fresh proteins and premium breadcrumbs, you ensure that every layer of the dish contributes to the overall umami experience. Please refer to the measurements listed below for the perfect balance of flavors and coatings.
Japanese Katsu Bowls

Japanese Katsu Bowls are a delightful fusion of flavor, texture, and comfort. Imagine sinking your teeth into a crispy, golden cutlet resting on a bed of fluffy rice, topped with a rich drizzle of savory tonkatsu sauce. These bowls are perfect for a quick weeknight dinner or a special family gathering.
- 2 pieces pork cutlets (about 1 pound) (You can substitute with chicken or tofu.)
- 1 cup panko bread crumbs (Use gluten-free panko if needed.)
- 1/2 cup all-purpose flour (Substitute with cornstarch for gluten-free.)
- 2 large eggs, beaten (For breading the cutlets.)
- 1/4 cup tonkatsu sauce (For drizzling over cutlets.)
- 1/2 cup vegetable oil (For frying the cutlets.)
- salt and pepper to taste (For seasoning the cutlets.)
- 2 cups cooked rice (Japanese short-grain rice is preferred.)
- 1Pound the pork cutlets to even thickness and season with salt and pepper.
- 2Set up a breading station with flour, beaten eggs, and panko bread crumbs.
- 3Dredge each cutlet in flour, dip in eggs, then coat with panko.
- 4Heat oil in a large pan over medium heat until shimmering.
- 5Fry the cutlets for about 4-5 minutes per side until golden brown.
- 6Remove cutlets and drain excess oil on paper towels. Slice the cutlets into strips.
- 7Spoon the cooked rice into serving bowls.
- 8Lay the sliced cutlets on top and drizzle with tonkatsu sauce.
Keywords: Comfort Food, Easy Recipe, Family Meal, Japanese Katsu Bowls, Katsu
- pork cutlets: lean, tender slices of meat pounded to an even thickness for uniform cooking.
- panko bread crumbs: light and airy Japanese-style crumbs that provide an unmatched crunch compared to standard breadcrumbs.
- all-purpose flour: acts as the essential base layer that helps the egg mixture adhere properly to the protein.
- large eggs: beaten thoroughly to create the binding agent for the breading process.
- tonkatsu sauce: a thick, sweet, and savory Japanese condiment that serves as the perfect finishing touch.
- vegetable oil: a neutral oil with a high smoke point is ideal for achieving a golden, crispy fry.
- japanese short-grain rice: prized for its sticky, slightly sweet profile that creates the ideal foundation for the bowl.
All specific quantities and detailed prep instructions are outlined within the comprehensive recipe section below. Ensuring you have these core items ready will make your cooking process seamless and enjoyable.
Variations
Vegan Adaptations: If you prefer a plant-based meal, simply swap the pork for extra-firm tofu or thick slices of eggplant. Use a flax-egg substitute for the binding process and ensure your panko is free of any dairy additives to keep the dish entirely vegan.
Low Carb Alternatives: You can easily transform this into a low-carb masterpiece by replacing the traditional rice with seasoned cauliflower rice or a base of sautéed cabbage. These alternatives provide a fresh, light crunch that pairs beautifully with the savory, breaded protein without the heavy starch content.
Global Fusion: Feel free to experiment by adding a dash of curry powder to your panko mixture for an aromatic twist. You can also drizzle the finished bowl with a spicy mayonnaise or a garlic-infused soy reduction to completely shift the flavor profile toward your favorite global cuisines.
How to Prepare Japanese Katsu Bowls
Step 1: Preparing the Foundation
The success of your katsu begins with properly prepping the meat. Start by taking your pork cutlets and using a meat mallet to pound them to an even thickness of about half an inch.
This process is essential for ensuring that the protein cooks uniformly throughout. Once flattened, season each side generously with sea salt and freshly cracked black pepper to build a savory base flavor.
Step 2: The Breading Assembly Line
Organization is the secret to a stress-free frying experience. Set up three separate shallow dishes: one for the flour, one for your beaten eggs, and the final one for your crispy panko crumbs.
Arrange these in a logical sequence from left to right to create an efficient dredging station. If you enjoy building your culinary skills, you might also like trying recipes like baked lemon chicken to explore different crust techniques.
Step 3: Creating the Perfect Crust
Dredge each seasoned cutlet into the flour first, shaking off any excess so you only have a very light, even coating. This thin layer is crucial because it acts as the primary adhesive for the rest of the breading.
Next, dip the floured cutlet into the beaten eggs until it is fully submerged and coated. Finally, press the meat firmly into the panko breadcrumbs, ensuring that every corner is thoroughly covered to maximize that delightful, signature crunch.
Step 4: Achieving the Perfect Fry
Fill a heavy-bottomed pan with enough vegetable oil to reach about half an inch deep. Heat the oil over medium heat until it reaches a temperature where a small test piece of breading sizzles immediately upon contact.
Carefully slide the cutlets into the hot oil, ensuring you do not overcrowd the pan. Cooking them in smaller batches maintains the heat level of the oil, which is the most important factor for preventing a greasy or soggy crust.
Step 5: Draining and Resting
Fry the cutlets for roughly 4 to 5 minutes per side until they achieve a deep, uniform golden brown color. Use a digital thermometer if you are unsure, aiming for an internal temperature that guarantees the meat is fully cooked through.
Once finished, immediately remove the cutlets and place them on a wire rack or a plate lined with paper towels. Allowing the cutlets to rest for a few minutes before slicing is a professional technique that helps the juices redistribute within the meat.
Step 6: Final Assembly
While the meat rests, divide your warm, fluffy Japanese short-grain rice into individual serving bowls. Take a sharp knife and slice the rested cutlets into consistent, bite-sized strips, revealing the tender center.
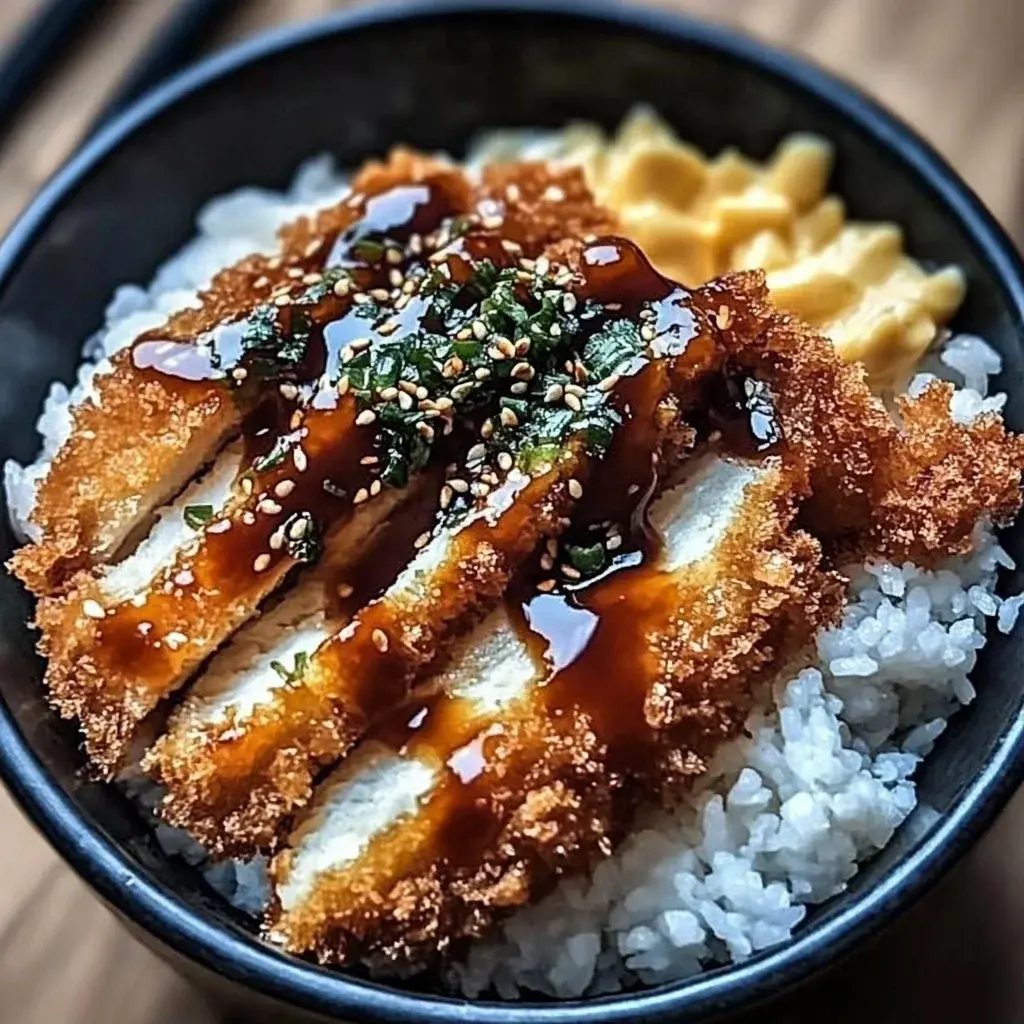
Lay the slices neatly over the rice and drizzle a generous amount of tonkatsu sauce over the top. Serve immediately while the cutlet is still warm and at its peak crispiness for the ultimate comfort experience.
Pro Tips for Japanese Katsu Bowls
Mastering the Temperature: Always use a thermometer to check your oil, as too low of a temperature will result in a breading that absorbs excess oil rather than crisping up. Aim for 350°F to ensure a light, clean finish.
The Rice Secret: Always wash your rice under cold running water until the water runs clear before cooking. This removes surface starch, which prevents the grains from becoming gummy or overly sticky in your bowl.
Aromatic Marinades: For an extra layer of umami, try marinating your pork in a mix of soy sauce, grated garlic, and ginger for 30 minutes before breading. This tiny step adds professional depth that will make your home cooking shine.
Storage Strategy: If you must reheat your leftovers, avoid the microwave at all costs, as it will destroy the texture of the breading. Using an air fryer or a toaster oven for a few minutes is the best way to return the cutlet to its original crispy state.
Serving Suggestions for Japanese Katsu Bowls
Decoration
Elevate the visual appeal of your bowl by sprinkling finely sliced green onions over the top for a fresh, vibrant pop of color. Toasted sesame seeds add another layer of visual interest and a subtle nutty flavor that complements the richness of the pork and sauce perfectly.
Side Dishes
Serve your katsu alongside a bowl of miso soup to cleanse the palate between bites of the savory breaded meat. A small side of tangy pickled vegetables or a crisp cucumber salad provides a refreshing acidity that cuts through the richness of the fried cutlet beautifully.
Creative Serving Ideas
For a fun twist, try serving the cutlet on a bed of shredded cabbage mixed with a light, creamy sesame dressing. If you love discovering new textures, you can also serve it as a “katsu sando” by placing the cutlet between two slices of crustless white bread, similar to popular street food styles found in Japan.
Preparation & Storage
Storing Leftovers
To keep your katsu fresh, store the breaded cutlets separately from the rice in airtight containers. They will retain their best quality for up to three days when kept in the refrigerator, ensuring you have a quick meal ready when hunger strikes.
Freezing
You can freeze the breaded, uncooked cutlets by placing them between sheets of parchment paper in a freezer-safe bag. This allows you to fry them straight from the freezer, though you should extend the cooking time slightly to ensure the center reaches the correct temperature.
Reheating
To restore that signature crunch, place your cold cutlets in an air fryer at 375°F for about five minutes. If you are using a standard oven, place them on a rack to allow hot air to circulate underneath, ensuring the bottom doesn’t turn soft.
Frequently Asked Questions
- Can I prepare the breading process ahead of time? Yes, you can bread your cutlets in the morning and keep them chilled in the refrigerator until you are ready to fry them for dinner. This allows the coating to set firmly, which often results in an even crunchier finish when you finally hit them with the hot oil.
- Is it possible to make this dish gluten-free? Absolutely, simply replace the standard all-purpose flour with a high-quality gluten-free flour blend and substitute traditional breadcrumbs with gluten-free panko. Always ensure your tonkatsu sauce is certified gluten-free, as many commercial brands contain wheat-based soy sauce, but most specialty markets carry safe alternatives.
- Does this dish work well for meal prep during the work week? It works wonderfully if you keep the components separate until the very last second before eating. By reheating only the cutlet in an air fryer or toaster oven and serving it over fresh rice, you maintain the contrast between the crispy protein and the soft starch that defines a perfect Katsu Bowl.
For more inspiration, you can visit our Pinterest page to see visual guides on plating these delicious bowls. If you enjoy this savory meal, you might also be interested in trying an easy lobster bisque recipe or some sweet funfetti cookies for dessert.