Easy Zero Sugar Brownies with Greek Yogurt – Irresistible Comfort Treat
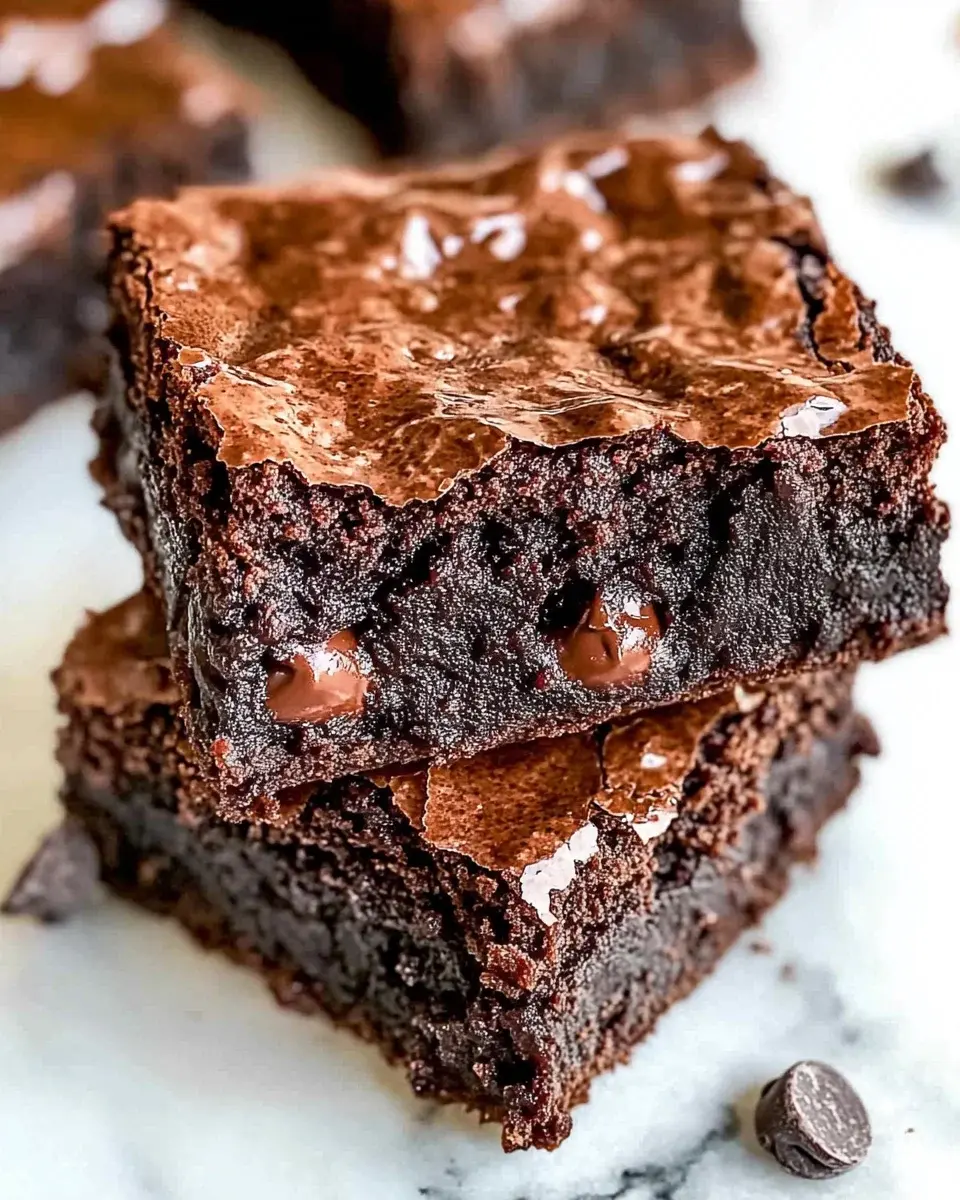
Indulging in a decadent chocolate treat does not have to mean compromising your health goals or spiking your blood sugar. These easy zero sugar brownies with Greek yogurt offer the perfect solution for anyone craving a fudgy, rich experience while keeping things strictly refined sugar-free.
Whether you are a seasoned baker or just looking for a simple dessert that fits into your busy lifestyle, this recipe is incredibly forgiving and satisfying. The addition of Greek yogurt provides a unique moisture and protein boost that traditional recipes often lack, making every single bite feel luxurious.
Why You Will Love This Recipe
- Healthier Option: You can enjoy the rich, deep taste of high-quality cocoa without the guilt, thanks to the zero sugar content and nutrient-dense ingredients.
- Quick Preparation: With a mere 10 minutes of active prep time, this recipe is ideal for last-minute cravings or preparing lunch box treats.
- Versatile Ingredients: You have the freedom to customize the batter with your favorite sugar substitutes, nut butters, or even a handful of sugar-free chocolate chips for extra intensity.
- Kid-Friendly: Because these brownies maintain a classic fudgy consistency, children will never suspect they are eating a healthier, sugar-free alternative to traditional sweets.
- Gluten-Free Adaptable: The formula is highly flexible, allowing you to swap out regular flour for your preferred gluten-free blend without ruining the final texture.
Ingredients You Need
Achieving the perfect balance of flavor depends entirely on the quality of the ingredients you choose to incorporate into your mixing bowl. Always opt for unsweetened cocoa powder and high-quality Greek yogurt to ensure the texture remains velvety and the chocolate flavor remains intense. You can find the specific measurements for every item listed below in the comprehensive recipe card included later in this guide.
Easy Zero Sugar Brownies with Greek Yogurt
Indulge in the decadence of Easy Zero Sugar Brownies with Greek Yogurt, a delightful treat that satisfies your chocolate cravings while keeping health in focus. These brownies boast a rich and moist texture without any added sugar, making them perfect for family gatherings or a quick afternoon snack.
- 1/2 cup chopped chocolate pieces
- 1 cup vanilla-flavored Greek yogurt
- 1/2 cup sweetener of choice (like erythritol or monk fruit)
- 3/4 cup all-purpose flour (or gluten-free alternative)
- 1/2 cup cocoa powder
- 1/2 teaspoon baking soda
- 1/2 cup preferred milk (unsweetened almond milk recommended)
- Optional: 1 cup chocolate chips
- 1Preheat your oven to 350°F (175°C).
- 2In a mixing bowl, whisk together the flour, cocoa powder, and baking soda.
- 3In another bowl, combine the yogurt, sweetener, and milk until smooth.
- 4Gradually mix the dry ingredients into the wet mixture until just combined. Fold in optional chocolate chips.
- 5Pour the batter into a greased 8x8-inch baking dish and spread evenly.
- 6Bake for about 25 minutes or until a toothpick inserted comes out clean.
- 7Let cool for 10 minutes before cutting into squares and serving.
Keywords: brownies, zero sugar, greek yogurt, healthy dessert, gluten-free adaptable
- chopped chocolate pieces: adds deep chocolate flavor and melty pockets of richness throughout the brownie.
- vanilla-flavored greek yogurt: acts as the primary fat and moisture source, replacing traditional oils or excessive butter.
- sweetener of choice: granulated monk fruit or erythritol works perfectly to provide sweetness without the calories of refined sugar.
- all-purpose flour: provides the structural base, though you may easily substitute this with a gluten-free blend.
- cocoa powder: choose a high-quality unsweetened cocoa for the best depth and color in your finished dessert.
- baking soda: essential for ensuring your brownies have the right lift and texture during the baking process.
- preferred milk: unsweetened almond or soy milk helps reach the perfect batter consistency without adding unwanted sugar.
- chocolate chips: an optional addition that adds extra crunch and a professional finish to your brownies.
Variations
Vegan Version: To make these entirely plant-based, substitute the Greek yogurt with a thick, unsweetened coconut or almond milk yogurt. Ensure your chocolate chips are also dairy-free to maintain the vegan status of the dessert.
Low Carb Lifestyle: If you are strictly watching your carbohydrate intake, swap the all-purpose flour for almond flour or coconut flour. Note that you may need to adjust the liquid ratio slightly, as coconut flour is significantly more absorbent than traditional wheat-based alternatives.
Protein-Packed Twist: Enhance the nutritional value of your dinner party finale by folding in a scoop of chocolate protein powder. This turns your simple brownie into a post-workout recovery snack that still tastes like a forbidden indulgence.
How to Prepare zero sugar brownies
Step 1: Preheat the Oven
Start by preheating your oven to exactly 350°F (175°C). Ensuring the oven reaches the proper temperature before the pan enters is critical for consistent results.
Prepare your baking dish by greasing it lightly with coconut oil or a non-stick spray. This prevents the brownies from sticking to the edges, ensuring perfect squares every time you slice them.
Step 2: Mix Dry Ingredients
In a large mixing bowl, combine your flour, cocoa powder, and baking soda. Using a fine-mesh sieve to sift these dry ingredients will help remove any clumps from the cocoa powder.
Whisk the ingredients together until they are completely uniform in color. A consistent blend at this stage prevents pockets of baking soda or flour in your finished bake.
Consider adding a pinch of salt if you enjoy a contrasting flavor profile. This simple step helps wake up the chocolate notes and creates a more professional, balanced taste.
Step 3: Combine Wet Ingredients
In a separate medium-sized bowl, combine your vanilla Greek yogurt, your chosen sweetener, and your milk. Whisk these together vigorously until the sweetener is fully dissolved and the mixture is smooth.
If you prefer a stronger vanilla aroma, you can add a small splash of pure vanilla extract to this mixture. This enhances the overall sensory experience of the brownie even without sugar.
Ensure the Greek yogurt is at room temperature before you start the mixing process. Cold yogurt can sometimes cause the mixture to look slightly curdled, but consistent whisking will smooth it out effectively.
Step 4: Combine Mixtures
Slowly pour your wet mixture into the bowl containing the dry ingredients. Use a sturdy spatula to fold the components together rather than using a high-speed mixer.
Stir only until you no longer see streaks of dry flour. Overmixing is the primary cause of dense, rubbery brownies, so keep the movement gentle and brief.
This is the ideal time to fold in your chopped chocolate or optional chocolate chips. Distribute them evenly throughout the batter to ensure every bite contains a bit of extra decadence.
Step 5: Bake the Brownies
Pour your batter into your prepared 8×8-inch baking dish. Use the back of your spatula to spread the mixture into the corners, ensuring a flat, even surface for uniform baking.
Place the dish in the center rack of your preheated oven. Bake for approximately 25 minutes, or until the edges begin to pull slightly away from the sides of the pan.
Test the center with a toothpick to ensure it comes out with just a few moist crumbs attached. If you see wet, liquid batter, add another two minutes and check again.
Step 6: Cool and Serve
Allow the brownies to rest in the pan for at least 10 minutes once removed from the oven. This cooling phase allows the structure of the Greek yogurt to set properly, making them easier to slice.
If you try to cut them while they are piping hot, they may fall apart or appear too soft. Patience is key to achieving that clean, bakery-style square look.
Once cooled to your preference, slice them into nine or twelve even pieces. You can follow us on Pinterest for more visual inspiration on how to plate these treats.
Pro Tips for zero sugar brownies
Quality Matters: Use the highest quality cocoa powder available to you, as it is the star of the show. Dark, Dutch-processed cocoa often provides a more intense, professional flavor that mimics premium chocolate bars.
The Toothpick Test: Because these brownies rely on yogurt rather than fat for moisture, they can dry out quickly if overbaked. Aim for that “slightly moist crumb” on the toothpick rather than a perfectly clean one to maintain the fudgy texture.
Cool Completely: It is tempting to dig in immediately, but cooling is part of the cooking process. As the brownies reach room temperature, the starches firm up, providing a much better mouthfeel.
Measure Correctly: Always use a spoon to fill your measuring cup with flour, then level it off with a knife. Packing flour directly into the cup often leads to using too much, which creates a dry, cakey brownie instead of a moist one.
Serving Suggestions for zero sugar brownies
Decoration
Dust the tops lightly with a small amount of powdered sugar substitute to create a classic look. You could also drizzle a tiny bit of warmed-up nut butter across the top in an artistic pattern.
Side Dishes
Pair these with a side of fresh, tart berries like raspberries or blackberries to cut through the richness of the chocolate. A small spoonful of plain Greek yogurt on the side creates a perfect “deconstructed” dessert experience.
Creative Serving Ideas
Try warming them up in the microwave for just 15 seconds before topping with a small dollop of sugar-free whipped cream. They also pair wonderfully with a hot cup of black coffee or unsweetened almond milk for a perfect mid-afternoon pick-me-up.
Preparation & Storage
Storing Leftovers
Place any remaining brownies in an airtight container to keep them from drying out. They will stay fresh at room temperature for up to two days, or in the refrigerator for up to five days.
Freezing
For longer storage, wrap each brownie individually in plastic wrap and place them in a heavy-duty freezer bag. They can be kept frozen for up to three months without sacrificing quality.
Reheating
When you are ready to eat a frozen brownie, let it thaw on the counter for about an hour. If you prefer it warm, a quick 10-second blast in the microwave will bring back that fresh-out-of-the-oven softness.
Frequently Asked Questions
-
Can I use any type of yogurt for this recipe?
While plain Greek yogurt is the standard, you can technically use other thick varieties if they are unsweetened. However, Greek yogurt is highly recommended because its higher protein and lower water content result in a much fudgier, more stable brownie structure.
-
How do I make these brownies gluten-free?
Making this breakfast-appropriate treat gluten-free is very simple. Just swap the all-purpose flour for a 1:1 gluten-free baking blend that contains xanthan gum. The results are virtually indistinguishable from the original wheat-based version.
-
What sweeteners can I use if I want to avoid specific sugar substitutes?
You can experiment with any granulated sweetener that measures 1:1 like sugar, such as monk fruit or stevia blends. If you are not strictly following a zero-sugar diet, you could also use a small amount of coconut sugar or date paste, though these will technically add natural sugars to the final nutritional profile.