Vegan Kimchi: The Perfect Easy Recipe You'll Love
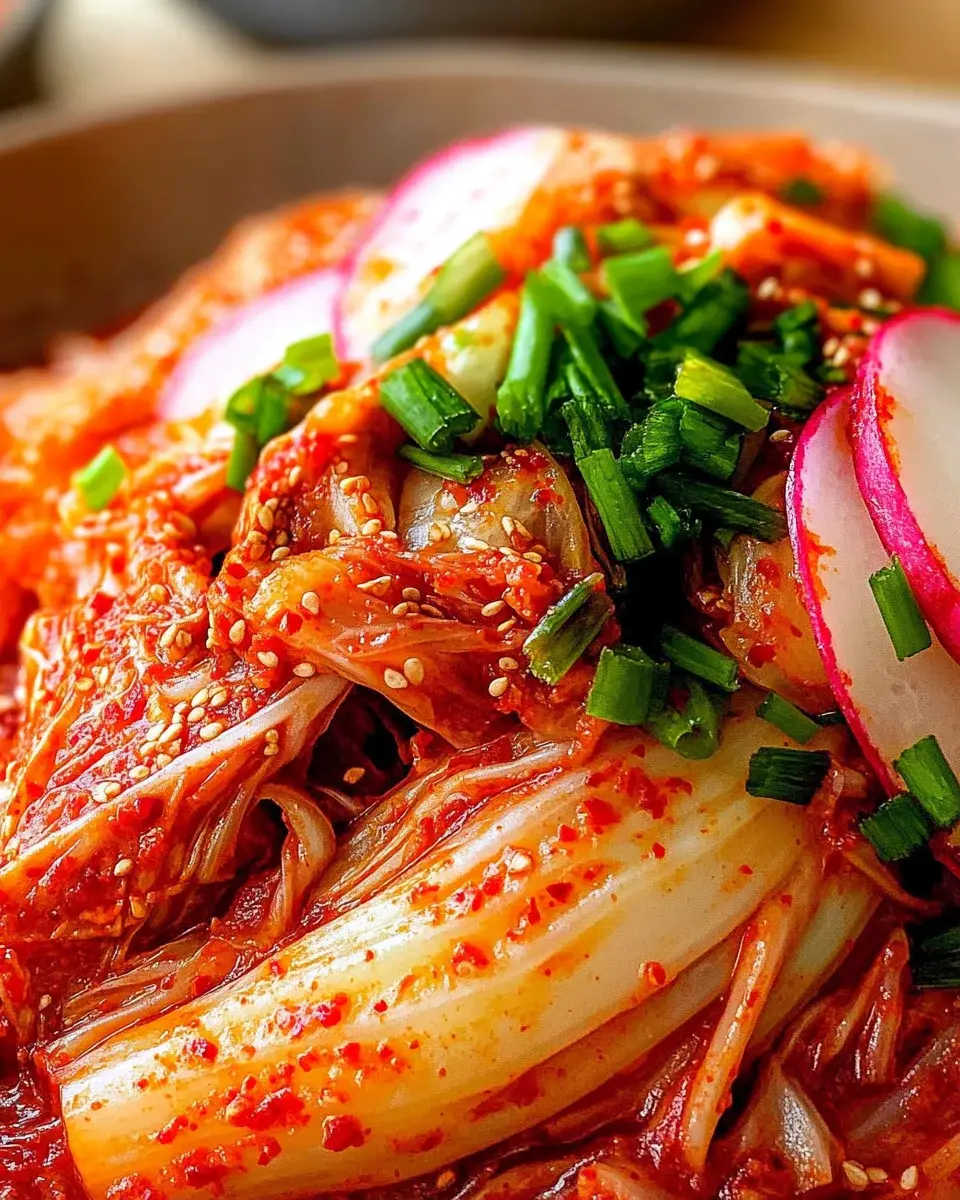
Vegan kimchi is a delightful and tangy fermented dish that captures the essence of traditional flavors without using any fish or shellfish. This recipe is not only simple to prepare but also versatile enough for various occasions, whether you’re enjoying it fresh as a side dish or incorporating it into meals like kimchi jjigae or kimchi pancakes.
The unique combination of napa cabbage, spices, and vegetables creates a mouthwatering experience that everyone will love! With its inherent probiotic qualities and vibrant taste, this vegan kimchi promises a healthful and delicious addition to your culinary repertoire, inviting you to explore the exciting world of fermented foods right in your own kitchen.
Why You Will Love This Recipe
- Easy to Make: This vegan kimchi requires minimal ingredients and straightforward steps, making it accessible for all skill levels, perfect for beginners and experienced cooks alike.
- Flavorful Kick: The perfect balance of spice from the gochugaru and sweetness from the apple ensures that this kimchi bursts with complex flavor in every bite, creating a truly memorable taste sensation.
- Versatile Usage: Enjoy it fresh as a vibrant side dish, or explore its exciting potential in a myriad of recipes like spicy ramen, savory pancakes, or as a zesty topping for tacos.
- Health Benefits: Rich in beneficial probiotics that support gut health and packed with essential vitamins and minerals, this vegan kimchi is not only delicious but also a fantastic choice for a healthy lifestyle.
- Customizable: Feel free to adjust the spice levels to your exact preference or add your favorite crisp vegetables to make this kimchi uniquely yours, ensuring it perfectly matches your palate.
Ingredients You Need
To create this vibrant and flavorful vegan kimchi, selecting the freshest ingredients is paramount. The quality of your napa cabbage, the potency of your garlic and ginger, and the specific type of Korean chili flakes (gochugaru) will significantly impact the final taste and texture of your fermented masterpiece. Taking a moment to source good quality produce will undoubtedly elevate your kimchi-making experience and the deliciousness of the finished product.
Vegan Kimchi Salad
Vegan kimchi is a delightful and tangy fermented dish that captures the essence of traditional flavors without using any fish or shellfish. This recipe is not only simple to prepare but also versatile enough for various occasions, whether you’re enjoying it fresh as a side dish or incorporating it into meals like kimchi jjigae or kimchi pancakes. The unique combination of napa cabbage, spices, and vegetables creates a mouthwatering experience that everyone will love!
- 1 head napa cabbage (average 4 lb/1800g per head)
- Kosher salt (about 1 cup or as needed for salting)
- 1 cup water
- ⅓ cup rice flour (regular or glutinous)
- ½ large apple
- ½ medium yellow onion (peeled cut into smaller chunks)
- 15 cloves garlic (trimmed)
- 1 inch knob of ginger (peeled and cut into smaller pieces)
- 1 tablespoon mushroom powder
- ½ tablespoon kosher salt
- 1 cup gochugaru (coarse) (divided, also known as Korean red pepper flakes)
- 8 ounces Korean radish (peeled and julienned)
- 4 ounces carrot (peeled and julienned)
- 3 ounces Asian chives
- 1Start by cutting the napa cabbage into quarters lengthwise. Remove the core and chop it into bite-sized pieces. In a large mixing bowl, sprinkle kosher salt over the cabbage. Allow it to sit for about 30 minutes until it wilts.
- 2While the cabbage is resting, combine water and rice flour in a saucepan over medium heat. Stir constantly until thickened. Remove from heat and let cool.
- 3In a blender or food processor, combine apple, onion, garlic, ginger, mushroom powder, kosher salt, and half of the gochugaru. Blend until smooth.
- 4Add the cooled rice paste to the blended mixture. Stir well to combine. Then add the remaining gochugaru along with julienned radish, carrot, and chives. Mix everything evenly.
- 5Once the cabbage has wilted, rinse it under cold water to remove excess salt. Drain well before adding it to the mixture of spices and vegetables. Use your hands (wear gloves if desired) to mix everything together thoroughly.
- 6Transfer the mixture into an airtight container pressing down firmly to minimize air pockets. Leave some space at the top as kimchi expands during fermentation. Seal tightly and let it ferment at room temperature for about 1-2 days before moving it to the refrigerator.
Keywords: vegan, kimchi, fermentation, korean, spicy, side dish, probiotics, healthy, customizable
- napa cabbage: 1 head (average 4 lb/1800g per head)
- kosher salt: about 1 cup or as needed for salting
- water: 1 cup
- rice flour: ¼ cup (regular or glutinous)
- apple: ½ large
- yellow onion: ½ medium (peeled, cut into smaller chunks)
- garlic: 15 cloves (trimmed)
- ginger: 1 inch knob (peeled and cut into smaller pieces)
- mushroom powder: 1 tablespoon
- kosher salt: ½ tablespoon
- gochugaru (coarse): 1 cup (divided, also known as Korean red pepper flakes)
- Korean radish: 8 ounces (peeled and julienned)
- carrot: 4 ounces (peeled and julienned)
- Asian chives: 3 ounces
The precise quantities for all these wonderful ingredients are readily available in the accompanying recipe card, ensuring you have a perfect balance for your batch of delicious vegan kimchi.
Variations
For those seeking a plant-based culinary adventure, this vegan kimchi recipe serves as an excellent foundation for numerous creative twists. Consider introducing a low-carb variation by omitting the rice flour paste and instead using a thickening agent like xanthan gum or simply reducing the liquid content slightly, focusing on the rich flavors of the vegetables and spices to create a satisfyingly crunchy and tangy condiment.
Another delightful adaptation involves infusing a subtle sweetness and unique aroma by incorporating finely grated pear alongside the apple in the flavoring mixture. This adds a different dimension to the fermentation process and contributes a nuanced flavor profile that is both refreshing and complex, perfect for those who enjoy a slightly sweeter kimchi.
You can also explore a spicier version by increasing the gochugaru quantity or by adding a few dried chilies to the blender with the other flavoring ingredients. For an even more intense heat, consider incorporating a pinch of cayenne pepper or a dash of sriracha into the paste, transforming your kimchi into a fiery delight that will awaken your taste buds.
How to Prepare vegan kimchi recipe
Step 1: Prepare the Cabbage
Begin by carefully preparing the napa cabbage, which forms the heart of your kimchi. Slice the large head of napa cabbage lengthwise into quarters, making sure to remove the tough, fibrous core from each quarter. This core can be a bit stubborn, so a sharp chef’s knife is your best friend here.
Once quartered and cored, chop the cabbage into manageable, bite-sized pieces, roughly 1 to 1.5 inches in size. Place these chopped pieces into a generously sized mixing bowl, ensuring you have ample space to work with. This step is crucial for making the salting process more effective and for ensuring the seasoning can penetrate evenly.
Now, it’s time for the essential salting step. Sprinkle a good amount of kosher salt generously over all the cabbage pieces, making sure to get it between the leaves. Let the salted cabbage sit undisturbed for approximately 30 minutes, allowing the salt to draw out excess moisture and begin the wilting process, which is key to achieving the perfect texture.
Step 2: Make the Rice Paste
While your napa cabbage is undergoing its salting transformation, you can concurrently prepare the vital rice flour paste. In a clean, medium-sized saucepan, combine one cup of water with ¼ cup of rice flour. Whisk them together thoroughly to ensure there are no lumps, creating a smooth, milky mixture.
Place the saucepan over medium heat on your stovetop. Continuously stir the mixture with a whisk or a wooden spoon, patiently waiting for it to thicken. This process usually takes about 5 to 10 minutes of consistent stirring; you’re looking for a consistency similar to a thin gravy or wallpaper paste.
Once the mixture has thickened to your desired consistency, remove the saucepan from the heat. It’s crucial to let this rice paste cool down completely before incorporating it into the other ingredients. Cooling prevents it from cooking the other components prematurely and ensures a better texture for the final kimchi.
Step 3: Blend Flavoring Ingredients
This stage is where the magic really starts to happen, as you bring together the aromatic core of your vegan kimchi. Gather a blender or a food processor for this step, as it will help you achieve a beautifully smooth and emulsified paste. Into the blender, add the peeled and roughly chopped half of a large apple, which provides natural sweetness and a tenderizing quality.
Next, add the peeled and chunked half of a medium yellow onion, contributing a subtle pungency and depth of flavor. Toss in all 15 trimmed cloves of garlic, offering that signature pungent kick essential to kimchi’s character. Follow this with the peeled and chopped knob of ginger, which brings warmth and a fresh, zesty note that balances the other ingredients wonderfully.
Now, add the dry ingredients to the blender: one tablespoon of mushroom powder for an umami boost and half a tablespoon of kosher salt to help with seasoning and preservation. Finally, add about half a cup of your gochugaru (coarse Korean red pepper flakes), reserving the rest for later. Blend these ingredients together until you achieve a thoroughly smooth, uniform paste; this may take a minute or two, depending on your blender’s power.
Step 4: Mix Everything Together
With your vibrant flavoring paste ready and the rice flour paste cooled, it’s time to unite them into a cohesive seasoning base. Carefully pour the completely cooled rice flour paste into the blender container with the blended apple, onion, garlic, ginger, mushroom powder, salt, and gochugaru. Stir these elements together briefly within the blender to ensure they begin to combine, or give it a quick pulse or two.
Once they have started to incorporate, transfer the contents of the blender into a large, clean mixing bowl, if you haven’t already done so. Add the remaining half cup of gochugaru to this bowl, ensuring you have the full cup in total, as this is the primary source of the kimchi’s characteristic color and heat. Stir this mixture thoroughly with a spoon or spatula until the rice paste and the blended aromatics are completely integrated, creating a rich, reddish paste.
Next, it’s time to introduce the fresh vegetables that will add crunch and further flavor complexity. Add the julienned Korean radish and carrot, along with the chopped Asian chives, directly into the bowl with the seasoned paste. Use your spoon or spatula to gently toss these vegetables into the paste, ensuring each strand of radish and carrot, and each piece of chive, is thoroughly coated in the flavorful mixture.
Step 5: Combine with Cabbage
Now that your cabbage has had adequate time to wilt and soften from the salting process, it’s time to prepare it for its final union with the seasoned vegetables. Gently rinse the wilted cabbage pieces under cold running water. This rinsing is crucial for removing any excess saltiness that might have accumulated during the wilting stage, ensuring your kimchi is perfectly seasoned and not overwhelmingly salty.
After rinsing, ensure you drain the cabbage very well. Excess water can dilute the flavor of your kimchi and potentially hinder the fermentation process. You can pat it gently with paper towels or spread it out on a clean kitchen towel for a few minutes to allow any remaining moisture to evaporate. Proper drainage is key for achieving the desired texture and taste.
Once the cabbage is well-drained, add it directly into the large mixing bowl containing the seasoned vegetables and the flavorful paste. Now comes the fun, hands-on part! Using your hands, thoroughly mix everything together. It’s highly recommended to wear food-grade gloves for this step, as the gochugaru can stain your hands and is quite potent. Ensure every piece of cabbage, radish, carrot, and chive is evenly coated with the vibrant kimchi paste, creating a beautiful, unified mixture.
Step 6: Ferment Your Kimchi
The final stage before enjoying your homemade vegan kimchi is the crucial fermentation process, which develops its signature tangy flavor and probiotic richness. Carefully transfer the entire mixture from the large bowl into a clean, airtight container. Glass jars or food-grade plastic containers with tight-fitting lids are ideal for this purpose, preventing contamination and allowing for proper fermentation.
As you pack the kimchi into the container, press down firmly on the mixture with your hands or a spoon. This pressing action is vital for removing any trapped air pockets, which can lead to spoilage. Minimizing air exposure is key to encouraging beneficial lactic acid bacteria to thrive and ensuring a clean fermentation process.
Once the container is filled, ensure there is about an inch or two of headspace at the top. This is because kimchi will expand and produce gases as it ferments, and leaving adequate room prevents the lid from being pushed off or excess liquid from overflowing. Seal the container tightly and place it in a warm spot at room temperature, away from direct sunlight. Allow it to ferment for approximately 1 to 2 days; the exact time depends on your room’s temperature. You’ll know it’s fermenting when you see small bubbles forming and can detect a pleasant, sour aroma. After this initial room-temperature fermentation, move the container to the refrigerator to slow down the fermentation process and store your delicious vegan kimchi.
Pro Tips for vegan kimchi recipe
Use Fresh, High-Quality Ingredients: The foundation of excellent vegan kimchi lies in the freshness and quality of its components. Opt for crisp, firm napa cabbage that feels heavy for its size, vibrant carrots, and pungent garlic and ginger. Freshness ensures better texture, brighter flavor, and a more robust fermentation.
Adjust Spice to Your Liking: Gochugaru, the Korean red pepper flakes, is the primary source of heat. Don’t be afraid to adjust the amount used to suit your personal spice tolerance. If you prefer milder kimchi, start with less and add more if desired. For a fiery kick, increase the quantity or even add a pinch of cayenne pepper.
Proper Fermentation is Key: Allow your kimchi sufficient time to ferment at room temperature before refrigerating. This initial period is crucial for developing the complex tangy flavors and beneficial probiotics. Taste a small piece after 24 hours; if it’s not tangy enough for your liking, let it sit out for a few more hours, but monitor it closely to prevent over-fermentation.
Taste and Adjust as You Go: During the fermentation process, don’t hesitate to taste your kimchi periodically. This allows you to check on the flavor development and make minor adjustments to the seasoning if necessary. A little extra salt or a touch more gochugaru can sometimes make a world of difference.
Invest in Good Storage Containers: Airtight containers are essential for storing kimchi, both during fermentation and afterwards. This prevents spoilage, maintains freshness, and stops the strong aromas from permeating your refrigerator. Glass jars with tight-fitting lids or high-quality food-grade plastic containers are excellent choices.
Serving Suggestions for vegan kimchi recipe
Decoration
A sprinkle of toasted sesame seeds can add visual appeal and a nutty aroma to your plated vegan kimchi. For a pop of vibrant color, consider garnishing with finely chopped fresh scallions or a few delicate cilantro leaves. A tiny drizzle of toasted sesame oil over the top can also enhance its visual richness and aromatic profile.
Side Dishes
Steamed white or brown rice forms a classic and comforting base that perfectly balances the spicy, tangy notes of kimchi. Consider pairing it with pan-fried or baked tofu, which absorbs the kimchi flavors beautifully and provides a hearty protein component. A simple stir-fry of seasonal vegetables, like broccoli, bell peppers, and snap peas, tossed with a bit of soy sauce or tamari, makes for a healthy and complementary side.
Creative Serving Ideas
Transform your vegan kimchi into a zesty filling for vegetarian dumplings or use it as a vibrant topping for avocado toast, adding an unexpected layer of flavor. Incorporate it into savory pancakes or crepes for a delightful brunch or appetizer option. You can also stir it into hearty noodle soups like ramen or udon for an instant flavor upgrade, creating a truly satisfying meal that highlights the versatility of this fermented wonder.
Preparation & Storage
Storing Leftovers
To keep your delicious vegan kimchi fresh and flavorful, it’s crucial to store it correctly. Always transfer any leftover kimchi from its serving dish back into an airtight container. Glass jars with tight-fitting lids are ideal for preserving its quality and preventing the potent aroma from spreading throughout your refrigerator.
Keep the container in the coldest part of your refrigerator, away from the door where temperature fluctuations are more common. Properly stored, vegan kimchi can maintain its delightful taste and texture for up to three months, though its flavor will continue to develop and become more sour over time, which many people enjoy.
Freezing
While fresh and refrigerated kimchi offers the best texture, freezing is a viable option if you have an abundance or want to store it long-term. It’s best to freeze kimchi in smaller portions, using freezer-safe containers or heavy-duty freezer bags. This allows you to thaw only what you need, preventing repeated thawing and refreezing which can degrade quality.
Ensure that the containers are well-sealed to prevent freezer burn. While the texture might change slightly upon thawing, becoming a bit softer, the vibrant flavor profile will largely remain intact. Frozen vegan kimchi can last for up to six months without significant loss of taste.
Reheating
If you’ve chosen to freeze your vegan kimchi and have thawed it, or if you’re using older, more fermented kimchi in a cooked dish, reheating is simple. For a quick stovetop method, heat a small amount of kimchi in a non-stick skillet over medium heat for a few minutes, adding a splash of water or vegetable broth if it seems dry. This brings out its savory notes and is perfect for incorporating into fried rice or stews.
Alternatively, you can reheat kimchi in the microwave in short intervals, stirring in between, until it reaches your desired temperature. Oven reheating is also an option; spread the kimchi on a baking sheet and heat at 350°F (175°C) for about 10-15 minutes until warmed through. This is great for dishes where you want the kimchi to meld with other ingredients.
Frequently Asked Questions
-
What is Vegan Kimchi made of, and how does it differ from traditional kimchi?
Vegan kimchi is primarily composed of fermented napa cabbage, complemented by a vibrant medley of vegetables such as carrots and radish, and seasoned with a rich paste of garlic, ginger, onion, and Korean chili flakes (gochugaru). The key distinction from traditional kimchi lies in the exclusion of animal products; specifically, it omits fish sauce, fermented shrimp, or other seafood ingredients that are commonly used in non-vegan versions to achieve umami depth. Instead, vegan kimchi relies on ingredients like mushroom powder, soy sauce, or other plant-based umami boosters to replicate that savory complexity.
-
How long does Vegan Kimchi typically last, and what are the best storage practices to ensure longevity and optimal flavor?
When stored correctly in an airtight container in the refrigerator, vegan kimchi can maintain its deliciousness and beneficial properties for approximately three months. The fermentation process will naturally continue, albeit at a slower pace due to the cold temperature, leading to a progressively more sour and complex flavor profile over time, which many enthusiasts appreciate. For even longer storage, up to six months, freezing is an option, though it may slightly alter the texture. Always ensure your storage container is clean, airtight, and kept in the coldest part of your fridge to maximize freshness and prevent spoilage.
-
Can I customize my Vegan Kimchi recipe by adding different vegetables or adjusting the spice level, and what are the best ways to do so?
Absolutely! The beauty of making kimchi at home is its inherent customizability. You can certainly add a variety of other vegetables to your kimchi base alongside the traditional radish and carrot; thinly sliced daikon radish, cucumbers, bell peppers, or even a handful of bean sprouts can add unique textures and flavors. To adjust the spice level, simply modify the amount of gochugaru you use; for milder kimchi, reduce the quantity, and for spicier kimchi, increase it or add other chili elements like cayenne pepper or dried chilies during the blending stage. Experimenting with different vegetables and spice levels allows you to create a personalized kimchi that perfectly suits your taste preferences.