Mediterranean Bowl Recipe – A Meal Prep Favorite
This Mediterranean bowl recipe is a vibrant explosion of flavors and textures, designed to bring a taste of the sun-drenched Mediterranean right to your plate. Imagine fluffy, lemony quinoa forming the perfect base for a symphony of roasted vegetables, crispy seasoned chickpeas, and creamy dollops of homemade tzatziki and hummus. It’s a dish that is as nourishing as it is delicious, making it an ideal choice for a healthy and satisfying meal.
Whether you’re a seasoned home cook or just starting your culinary journey, this recipe offers a fantastic opportunity to explore fresh ingredients and build a meal that is both visually appealing and incredibly good for you. It’s the kind of dish that can be customized to your liking, ensuring that every bite is an enjoyable experience. Prepare yourself for a truly delightful gastronomic adventure that celebrates the wholesome goodness of Mediterranean cuisine.
Why You Will Love This Recipe
- Quick Preparation: Dinner is on the table in about 45 minutes, making it perfect for busy weeknights or speedy lunches.
- Nutrient-Rich: Packed with fiber, protein, healthy fats, and essential vitamins, this bowl offers a complete and balanced meal.
- Customizable: Easily adapt the ingredients to suit your dietary preferences or what you have on hand, from adding different vegetables to swapping grains.
- Meal Prep Friendly: Components can be prepared ahead of time and assembled for grab-and-go meals throughout the week, saving you time and effort.
- Vibrant Flavors & Textures: The combination of tangy lemon, warm cumin, creamy yogurt, savory olives, and sweet tomatoes creates a complex and satisfying taste sensation.
Ingredients You Need
The beauty of this Mediterranean bowl lies in its fresh, wholesome ingredients, each contributing its unique character to the final dish. Choosing high-quality produce will undoubtedly elevate the flavors and overall enjoyment of your meal. We’re focusing on simple, accessible items that come together to create something truly spectacular. Remember, the exact quantities can be found in the recipe card below, but understanding the role of each component is key.
Mediterranean Bowl Recipe

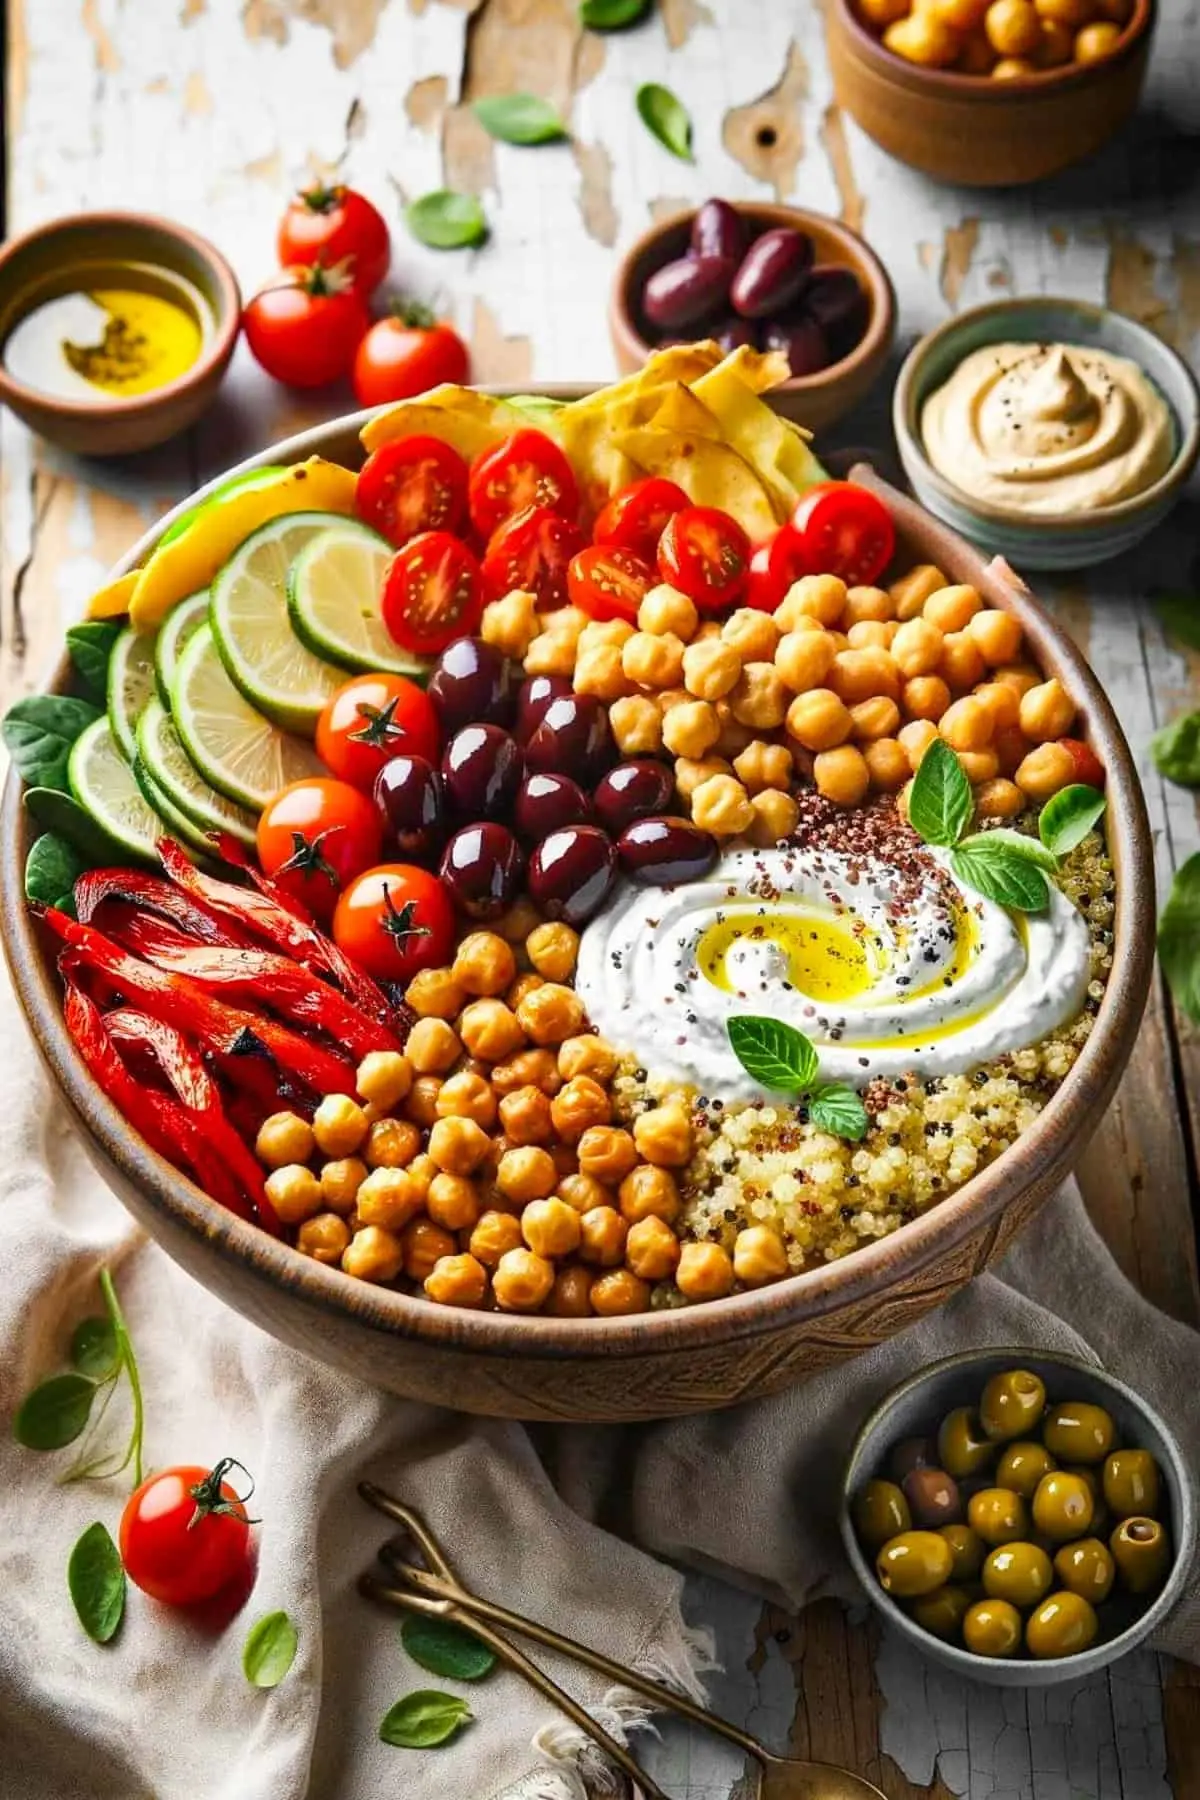
This Mediterranean bowl recipe might just become your new favorite meal prep dish. The bowls are made with lemony quinoa, crispy chickpeas, roasted veggies, homemade tzatziki, hummus, cherry tomatoes, and Kalamata olives. They are so flavorful and nutritious – you have to try them!
- 1 cup quinoa
- 1¾ cups water
- ½ teaspoon sea salt
- 2 tablespoons olive oil
- 2 tablespoons lemon juice
- ½ cup chopped fresh parsley
- 15 ounce can chickpeas, drained and dried with a paper towel
- 1 tablespoon olive oil
- 1 teaspoon Sea salt
- 1 teaspoon ground cumin
- 1 eggplant, cut into ½ inch cubes
- 3 red bell peppers, cut into thin strips
- 2 tablespoons olive oil
- 1½ teaspoons sea salt
- 1 teaspoon freshly ground black pepper
- 1 cup Greek yogurt
- ½ large English cucumber, cut into paper-thin slices
- 2 tablespoons chopped fresh dill
- ¼ cup olive oil
- 1 cup pitted olives, Kalamata or black
- 18 cherry tomatoes, halved
- ¾ cup hummus
- ½ cup chopped fresh parsley
- 1For the quinoa: In a small pot, place the quinoa, water, and sea salt. Bring the water to a boil before reducing the heat to low. Cover the pot and let simmer for 15 minutes. Remove from the heat and let sit for 10 minutes. Fluff the quinoa with a fork and stir in the olive oil, lemon juice, and chopped fresh parsley.
- 2For the toasted chickpeas: Preheat the oven to 425˚F and line a baking sheet with aluminum foil. In a bowl, combine the chickpeas, olive oil, sea salt, and cumin and toss to combine. Spread the chickpeas over the prepared baking sheet and bake for 25 minutes.
- 3For the roasted veggies: Line a baking sheet with aluminum foil. Spread the eggplant and red bell peppers over the baking sheet. Drizzle with olive oil and season with salt and pepper. Toss to coat the veggies. Roast at 425˚F for 25 minutes.
- 4For the tzatziki: While the quinoa, chickpeas, and veggies are cooking, make the tzatziki by combining the Greek yogurt, cucumbers, dill, and olive oil in a mixing bowl; stir to incorporate.
- 5To assemble: Divide the quinoa between 6 bowls. Divide the toasted chickpeas, roasted veggies, olives, and cherry tomatoes between the 6 bowls. Spoon a hefty dollop of tzatziki and hummus over each bowl and garnish with chopped fresh parsley. Serve.
Keywords: Mediterranean, bowl, quinoa, chickpeas, roasted vegetables, tzatziki, hummus, meal prep, healthy, vegetarian
This list covers the core components, from the fluffy quinoa and crispy chickpeas to the vibrant roasted vegetables and refreshing tzatziki. Each ingredient plays a crucial role in building the complex flavor profile and satisfying textures that define this dish. Feel free to explore the variations to discover even more delightful additions that can personalize your bowl.
Variations
The foundation of this Mediterranean bowl is wonderfully adaptable, allowing for endless creativity in the kitchen. This is where you can truly make the recipe your own by incorporating different flavors and dietary needs.
Vegan Delight: To transform this into a fully vegan masterpiece, simply swap the Greek yogurt in the tzatziki for a plant-based alternative like coconut yogurt or cashew cream. Ensure your hummus is also vegan-friendly, which most store-bought versions are, or make your own with tahini and lemon. This simple substitution maintains the creamy element without compromising the Mediterranean essence, offering a compassionate and delicious meal option.
Low-Carb Version: For those mindful of carbohydrate intake, the quinoa can be substituted with a bed of mixed greens or a base of cauliflower rice. This drastically reduces the carbohydrate count while still providing a satisfying and nutritious foundation for your bowl. You can then load up on the roasted vegetables, protein sources, and creamy toppings without worry, making it a lighter yet equally flavorful choice.
Protein Powerhouse: While chickpeas and quinoa offer a good amount of protein, you can easily boost this bowl by adding your favorite protein. Grilled chicken or fish, seasoned tofu, or even some pre-cooked lentils would be fantastic additions. Consider marinating chicken in lemon and herbs before grilling, or pan-searing tofu until golden brown for an extra layer of deliciousness and satiety.
Spice It Up: For those who enjoy a little heat, consider adding a pinch of red pepper flakes to the roasted vegetables or drizzling a spicy harissa sauce over the finished bowl. A sprinkle of za’atar or sumac on the vegetables before roasting can also introduce a delightful Middle Eastern twist. Experiment with different spice blends to discover your favorite flavor combinations.
Mediterranean Fusion: Don’t shy away from adding other Mediterranean-inspired ingredients. A sprinkle of crumbled feta cheese, a few briny capers, or some thinly sliced red onion can add even more depth and complexity. You could even incorporate a dollop of baba ghanoush for a smoky eggplant variation, further enhancing the regional flavors.
Global Inspiration: While rooted in Mediterranean flavors, feel free to draw inspiration from other cuisines. A drizzle of tahini dressing instead of tzatziki, or a sprinkle of toasted sesame seeds can add an interesting textural and flavor dimension, demonstrating the versatility of the grain bowl format.
How to Prepare mediterranean bowl recipe
Step 1: Preparing the Quinoa Base
The foundation of our delicious Mediterranean bowl is perfectly cooked quinoa, which offers a light, fluffy texture and a slightly nutty flavor. To begin, rinse one cup of quinoa thoroughly under cold running water using a fine-mesh sieve. This step is crucial for removing any bitter saponins that can coat the grains. After rinsing, combine the quinoa with 1 ¾ cups of water and ½ teaspoon of sea salt in a small saucepan.
Bring the mixture to a rolling boil over medium-high heat. Once boiling, reduce the heat to the lowest setting, cover the pot tightly with a lid, and let it simmer gently for 15 minutes. During this simmering period, it’s vital not to lift the lid, as this can disrupt the steaming process and lead to unevenly cooked quinoa. After the 15 minutes are up, remove the pot from the heat and allow it to sit, still covered, for another 10 minutes. This resting period allows the quinoa to absorb any remaining moisture and become perfectly tender.
Once rested, uncover the pot and gently fluff the quinoa with a fork, breaking up any clumps. Now comes the flavor infusion: stir in 2 tablespoons of olive oil and 2 tablespoons of fresh lemon juice. The lemon juice adds a bright, zesty counterpoint to the earthy quinoa, making it incredibly appetizing. Finally, gently fold in ½ cup of chopped fresh parsley, which adds a burst of herbaceous freshness and a vibrant green color. Set this flavorful quinoa aside to keep warm while you prepare the other components of your bowls.
Step 2: Roasting the Chickpeas to Crispy Perfection
Crispy, seasoned chickpeas are a delightful textural element in these Mediterranean bowls, providing a satisfying crunch with every bite. Preheat your oven to 425°F (220°C) and line a baking sheet with aluminum foil for easy cleanup. This high heat is essential for achieving that desirable crispiness.
Drain and thoroughly dry one 15-ounce can of chickpeas. It’s incredibly important to dry them as much as possible with paper towels or a clean kitchen towel; moisture is the enemy of crispiness. In a medium bowl, combine the dried chickpeas with 1 tablespoon of olive oil, 1 teaspoon of sea salt, and 1 teaspoon of ground cumin. Toss everything together until the chickpeas are evenly coated in the oil and spices. The cumin imparts a warm, aromatic depth that complements the chickpeas beautifully.
Spread the seasoned chickpeas in a single layer on the prepared baking sheet. Ensure they are not overcrowded, as this will steam them rather than roast them. Place the baking sheet in the preheated oven and bake for 25 minutes, or until they are golden brown and delightfully crispy. You can give them a gentle shake halfway through the baking process to ensure even browning. Once done, remove them from the oven and let them cool slightly on the baking sheet; they will continue to crisp up as they cool.
Step 3: Roasting the Vegetables
The roasted vegetables bring sweetness, tenderness, and a slight char to the bowls, adding another layer of complexity and visual appeal. For this step, you’ll need one eggplant, cut into ½-inch cubes, and three red bell peppers, cut into thin strips. You can use other colors of bell peppers if preferred, but red offers a lovely sweetness when roasted.
Prepare another baking sheet by lining it with aluminum foil. Spread the cubed eggplant and the bell pepper strips evenly over the baking sheet. Drizzle them generously with 2 tablespoons of olive oil, ensuring all the pieces are lightly coated. Season them with 1 ½ teaspoons of sea salt and 1 teaspoon of freshly ground black pepper. Toss the vegetables gently on the baking sheet to distribute the oil and seasonings evenly.
Roast these vegetables in the same 425°F (220°C) oven as the chickpeas for approximately 25 minutes. The goal is for the eggplant to become tender and slightly caramelized, and the bell peppers to soften and develop sweet, roasted notes. Keep an eye on them towards the end of the cooking time; you want them to be tender and slightly browned, but not burnt. Once roasted to perfection, remove the vegetables from the oven and set them aside with the chickpeas.
Step 4: Crafting the Creamy Tzatziki Sauce
A cool, tangy tzatziki sauce is an essential component of any authentic Mediterranean experience, and this homemade version is simple yet incredibly flavorful. While the quinoa, chickpeas, and vegetables are busy roasting, you can whip up this refreshing condiment. In a medium mixing bowl, combine 1 cup of thick Greek yogurt, which provides a wonderfully creamy base. It’s best to use full-fat Greek yogurt for the richest texture and flavor.
Next, add ½ of a large English cucumber. For the best texture, the cucumber should be cut into paper-thin slices. Using a mandolin slicer is highly recommended for achieving uniform, thin slices, but a very sharp knife and careful technique will also work. After the cucumber, stir in 2 tablespoons of finely chopped fresh dill. Dill is a quintessential herb in tzatziki, providing a distinct, fresh aroma and taste. Finally, drizzle in ¼ cup of good quality olive oil. The olive oil adds a subtle richness and helps to emulsify the sauce, creating a smoother consistency.
Stir all the ingredients together thoroughly until well combined. Taste and adjust seasoning if necessary, perhaps with a tiny pinch of salt or a squeeze of lemon if you prefer it tangier. The tzatziki should be thick, creamy, and bursting with fresh cucumber and dill flavor. Cover the bowl and refrigerate it until ready to assemble the bowls; the flavors will meld beautifully as it chills.
Step 5: Assembling Your Mediterranean Masterpiece
Now comes the exciting part: bringing all the beautifully prepared components together to create your stunning Mediterranean bowls. Start by dividing the fluffy, lemony quinoa evenly among six serving bowls or meal prep containers. Ensure each bowl has a generous base of quinoa, which serves as the perfect canvas for the vibrant toppings.
Next, artfully arrange the roasted vegetables and crispy chickpeas over the quinoa. Distribute the tender, slightly charred eggplant and sweet bell peppers, along with the crunchy cumin-roasted chickpeas, across each bowl. Don’t be afraid to create visual appeal; the colors of the vegetables will already make them look enticing. Add about 1 cup of pitted Kalamata or black olives to the bowls, scattering them among the other ingredients for their briny, savory punch.
Halve approximately 18 cherry tomatoes and distribute these juicy jewels into each bowl, adding a burst of freshness and a touch of sweetness. Then, spoon a generous dollop of creamy tzatziki sauce and a hearty portion of hummus into each bowl. These two elements provide essential creaminess and savory depth, tying all the flavors together. Finally, garnish each bowl with a sprinkle of chopped fresh parsley for a final touch of herbaceous brightness and visual appeal. Serve immediately and savor the delightful flavors.
Step 6: Serving and Enjoying Your Creation
These Mediterranean bowls are designed to be enjoyed immediately after assembly, allowing you to experience the full spectrum of textures and flavors at their peak. The warm quinoa, tender roasted vegetables, and crispy chickpeas create a delightful contrast with the cool, creamy tzatziki and hummus. The burst of freshness from the cherry tomatoes and olives adds another exciting dimension to each mouthful.
For an enhanced dining experience, consider serving these bowls with a side of warm pita bread or crusty baguette. The bread is perfect for scooping up any leftover tzatziki or hummus from the bowl. A simple side salad dressed with a light vinaigrette can also complement the richness of the bowls, adding a refreshing green element. The goal is to create a well-rounded meal that is both satisfying and delightful to the palate.
If you’ve prepared these bowls for meal prep, simply reheat them gently in the microwave or oven until warmed through, or enjoy them chilled for a refreshing take. The flavors often meld and deepen overnight, making them even more delicious the next day. This adaptability makes them a weeknight savior and a fantastic option for healthy lunches on the go. Enjoy the process and the delicious outcome!
Pro Tips for mediterranean bowl recipe
Master the Quinoa Ratio: Achieving perfectly fluffy quinoa is key, and the water-to-quinoa ratio is critical. Using 1 ¾ cups of water for 1 cup of quinoa is a tried-and-true measurement that prevents mushiness or dryness. Always rinse your quinoa to remove bitterness, and never skip the resting period after cooking; it allows the grains to steam themselves to perfection.
Dry Chickpeas are Crispy Chickpeas: This is a golden rule for roasted chickpeas. Pat them thoroughly dry with paper towels after draining. Any excess moisture will prevent them from crisping up in the oven, leaving you with a less satisfying texture. A well-dried chickpea will turn wonderfully golden and crunchy.
Don’t Overcrowd the Roasting Pans: Whether it’s the chickpeas or the vegetables, give them enough space on the baking sheet. Overcrowding leads to steaming rather than roasting, resulting in softer, less flavorful produce. If necessary, use two baking sheets to ensure everything gets direct contact with the hot air and develops that coveted roasted flavor and texture.
Taste and Adjust Seasoning: Always taste your components as you go, especially the tzatziki and the roasted vegetables. Does the tzatziki need more dill or a touch more salt? Are the vegetables flavorful enough? A quick taste test allows you to fine-tune the seasonings and ensure that every element is perfectly balanced before assembly. This attention to detail makes a significant difference.
Embrace the Meal Prep Method: For ultimate convenience, prepare all the components ahead of time. Let them cool completely before storing them in separate airtight containers in the refrigerator. This allows you to quickly assemble a bowl or grab a pre-portioned container for lunch or dinner during the week. The flavors often meld beautifully when stored, making for an even tastier meal later on.
Consider Fresh Herbs Generously: While the recipe calls for parsley and dill, don’t be afraid to be generous. Fresh herbs are what elevate Mediterranean cuisine, adding brightness and a fresh aroma. Consider adding a sprinkle of mint to the tzatziki, or a more abundant amount of parsley as a garnish. A bit of chopped chives can also add a lovely subtle oniony note.
Serving Suggestions for mediterranean bowl recipe
Decoration
Elevate the visual appeal of your Mediterranean bowls with thoughtful garnishes that enhance both their beauty and flavor. A final sprinkle of fresh, chopped parsley or cilantro adds a vibrant green contrast to the colorful ingredients below. For a creamy flourish, a swirl of extra tzatziki or a dollop of hummus can add height and visual interest to the center of the bowl. A few whole Kalamata olives placed strategically can also serve as elegant decorative elements, breaking up the textures and colors.
Side Dishes
While these bowls are a complete meal in themselves, they pair wonderfully with a few complementary side dishes to round out the dining experience. Warm, fluffy pita bread is an absolute must for scooping up any remaining tzatziki or hummus and adding a satisfying chew. A light and refreshing cucumber and tomato salad, perhaps with a lemon-herb vinaigrette, can offer an additional layer of crispness and acidity. For those seeking a heartier meal, a small portion of lemon-herb roasted potatoes or sweet potato wedges can add comforting substance.
Creative Serving Ideas
Transform your Mediterranean bowls into a delightful culinary experience with these creative serving ideas. Instead of individual bowls, arrange all the components on a large platter or serving board for a beautiful, shareable feast that guests can assemble themselves. This “build-your-own-bowl” style is interactive and allows everyone to customize their meal exactly to their liking. For a lighter lunch option, serve the components over a bed of fresh mixed greens or spinach, effectively turning it into a substantial salad.
Another fun approach is to deconstruct the bowl and serve the components separately with smaller appetizer-style portions, perfect for a party or gathering. Think individual cups with quinoa as a base, topped with smaller portions of the roasted vegetables, chickpeas, and a drizzle of tzatziki. You could also serve them warm, almost like a deconstructed pilaf, with the roasted elements as a topping, for a comforting evening meal.
Consider adding a surprise element, like a sprinkle of toasted pine nuts or slivered almonds for added crunch and nutty flavor. A drizzle of pomegranate molasses can introduce a sweet and tangy depth, offering a different dimension of Mediterranean flavor. For a more indulgent presentation, a warm, crusty bread served alongside for dipping into the various components is always a welcome addition that enhances the communal dining experience.
Preparation & Storage
Storing Leftovers
Properly storing leftovers is key to enjoying this Mediterranean bowl recipe for days to come. The best approach is to allow all the components of the bowl to cool down to room temperature completely before storing them. Once cooled, you have two excellent options: either assemble single-serve portions in airtight containers or keep each component stored separately in its own container. Separating the components helps prevent ingredients like the crispy chickpeas from becoming soggy and maintains the freshness of the vegetables and grains.
Seal the containers tightly to prevent air exposure, which can lead to spoilage and affect the texture and flavor. Store these containers in the refrigerator, where they will remain fresh and delicious for up to 4 days. This method ensures that you always have a healthy and satisfying meal ready to go, making it perfect for busy workdays or quick weeknight dinners. The vibrant flavors tend to meld and even deepen overnight, making leftovers often as good as, if not better than, the freshly made meal.
Freezing
While many components of this Mediterranean bowl can be frozen, it’s important to note that not all elements hold up equally well. The quinoa, roasted vegetables (eggplant and peppers), and chickpeas can generally be frozen successfully, though their textures might change slightly upon thawing. The tzatziki sauce, due to its yogurt base and fresh cucumber, is best kept refrigerated and not frozen, as freezing can alter its creamy consistency and separate the ingredients.
To freeze, cool all the desired components completely. Portion them into freezer-safe containers or heavy-duty freezer bags, removing as much air as possible to prevent freezer burn. Label each container with the contents and the date. These components can be stored in the freezer for up to 1-2 months. When ready to use, thaw them overnight in the refrigerator, and then reheat or reassemble as needed, perhaps adding a fresh batch of tzatziki for optimal flavor and texture.
Reheating
Reheating your Mediterranean bowl leftovers is straightforward and ensures you can enjoy them at their best. If you stored the components separately, you can reheat them individually. The quinoa and roasted vegetables can be gently reheated in a microwave for 1-2 minutes, or in a skillet over medium-low heat with a splash of water or olive oil until warmed through. The roasted chickpeas are best enjoyed at room temperature or can be crisped up slightly in a dry skillet or a toaster oven for a few minutes if you prefer them warm and crunchy, though they may not regain their initial crispness.
If you stored assembled bowls, you can reheat the entire bowl in the microwave. Start with 1-2 minutes, stir, and continue heating in short bursts until everything is warmed to your liking. Be mindful that the texture of the vegetables might become softer after reheating. For the best results with assembled bowls, consider adding a fresh dollop of tzatziki and a sprinkle of fresh parsley after reheating to revive the flavors and textures. Alternatively, you can opt to enjoy the bowl chilled, which is a refreshing option, especially during warmer weather.
Frequently Asked Questions
-
Can I prepare the components of the Mediterranean bowl in advance for meal prep?
Absolutely! This Mediterranean bowl recipe is exceptionally well-suited for meal preparation. You can cook the quinoa, roast the vegetables and chickpeas, and prepare the tzatziki sauce up to 3-4 days ahead of time. Store each component in separate airtight containers in the refrigerator. When you’re ready to eat, simply assemble your bowl with the pre-prepared ingredients, or for ultimate convenience, assemble individual portions in meal prep containers.
-
What are some good substitutes for quinoa in this recipe?
Quinoa provides a fantastic base, but you have several excellent substitutes if needed or desired. Brown rice, farro, barley, or even couscous would work wonderfully and offer a similar hearty texture. For a lighter or grain-free option, consider using cauliflower rice, a bed of mixed greens, or a blend of both. Each option will slightly alter the flavor profile and nutritional content, but all can create a delicious and satisfying bowl.
-
How can I make the chickpeas extra crispy?
Achieving super crispy chickpeas relies on two key factors: ensuring they are thoroughly dry and roasting them at a high enough temperature. After draining and rinsing the canned chickpeas, pat them extremely dry with paper towels or a clean kitchen towel. Any residual moisture will steam them rather than crisp them. Then, spread them in a single layer on a hot baking sheet (preheated oven to 425°F or 220°C is recommended) and roast for about 25 minutes, or until they reach your desired level of crispiness. Giving them a good toss halfway through can help with even browning and crisping.