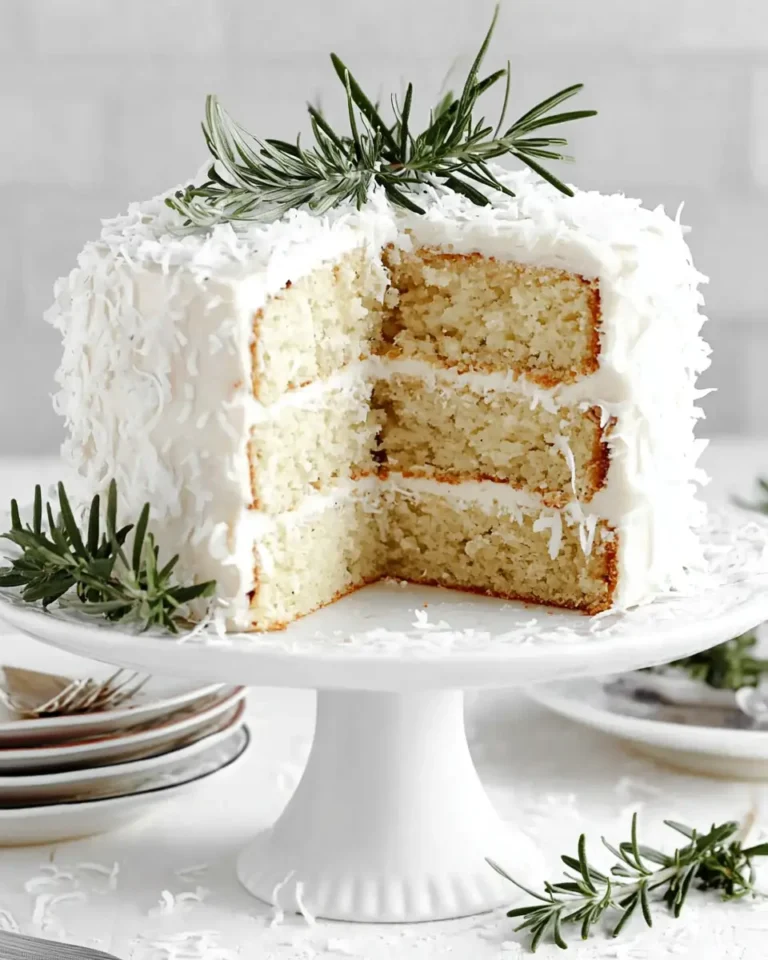
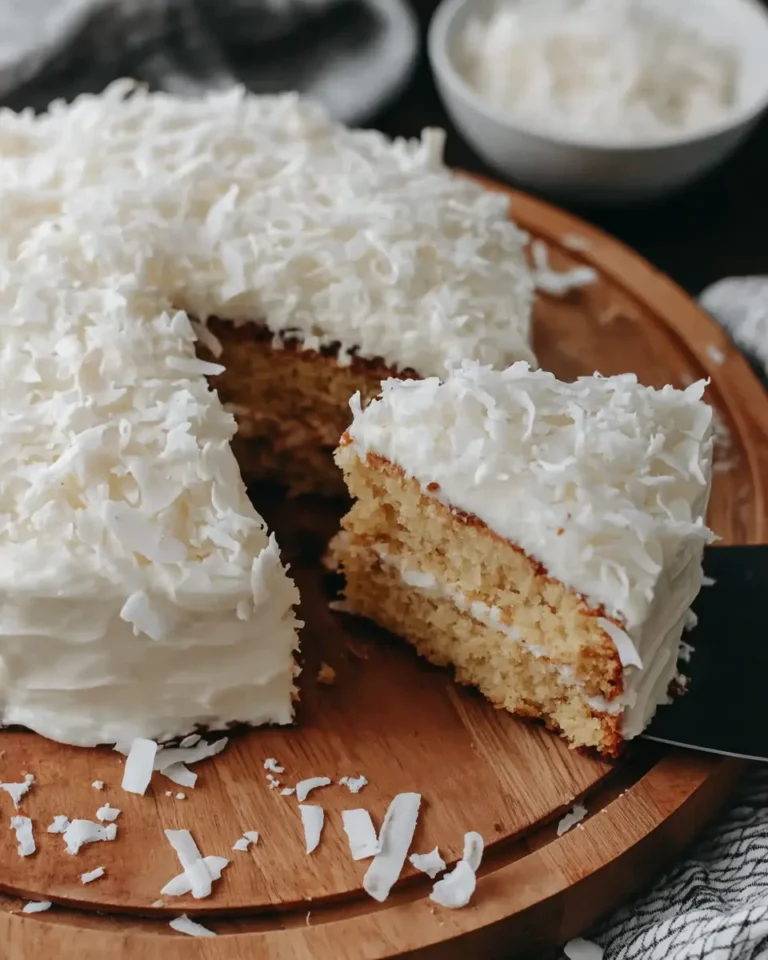
Soft Brazilian Coconut Cake
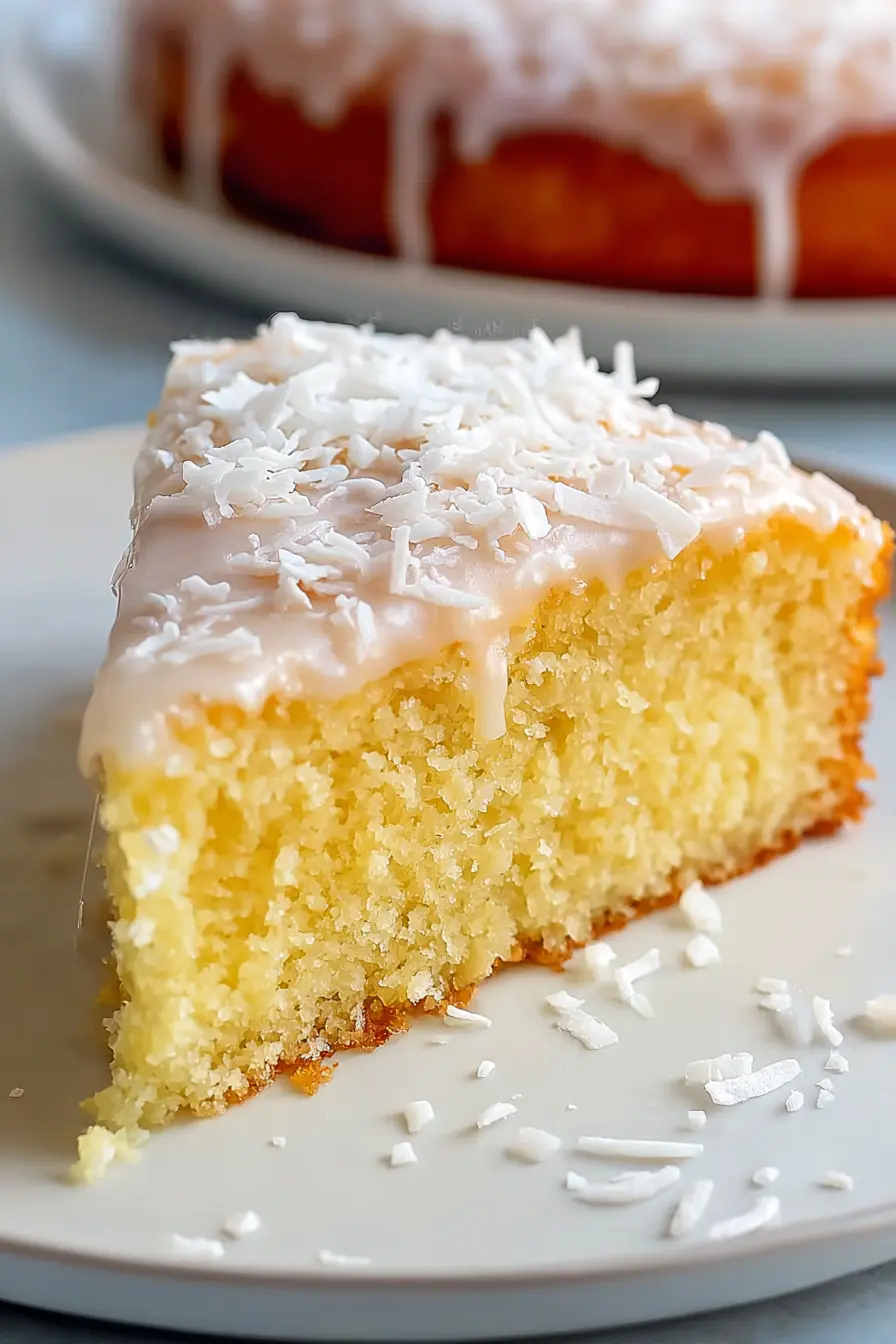
Brazilian Coconut Cake is a delightful dessert that offers a taste of the tropics with every moist, tender bite. It features a light, airy sponge cake that’s lovingly drenched in a sweet, creamy coconut glaze, creating a truly sensational eating experience. This cake is wonderfully suited for a variety of occasions, from casual coffee breaks to more special gatherings, offering both simplicity and a burst of delightful flavor.
What truly sets this cake apart is its unique texture and the way the simple ingredients come together to create something extraordinary. The glaze, a luscious blend of condensed milk and coconut milk, seeps into the cake’s porous structure, ensuring that each slice is supremely moist and utterly satisfying. It’s a testament to how uncomplicated baking can yield incredibly delicious results that are both comforting and impressive.
Why You Will Love This Recipe
- Effortless Elegance: This cake requires minimal fuss in the kitchen, yet its final presentation is undeniably sophisticated and inviting, perfect for impressing guests without stress.
- Incredible Moisture: The signature glaze, rich with coconut and condensed milk, saturates the cake, resulting in an exceptionally moist crumb that stays tender for days.
- Tropical Escape: With its prominent coconut flavor, this cake transports your taste buds to a sunny paradise, making it a refreshing change from more traditional desserts.
- Make-Ahead Marvel: Its unique soaking process means the cake actually improves with time, making it an ideal choice for preparing in advance for parties or busy weeks.
- Satisfying Simplicity: The beauty of this recipe lies in its straightforward approach, allowing home bakers of all skill levels to achieve professional-looking and tasting results with ease.
Ingredients You Need
Crafting this exquisite Brazilian Coconut Cake begins with selecting high-quality ingredients, as their freshness and flavor are paramount to the final outcome. The delicate sponge relies on pantry staples, while the signature soak draws its richness from dairy and tropical notes. Even the topping, simple shredded coconut, adds a crucial textural element that elevates the entire dessert experience.
Brazilian Coconut Cake
A light, airy Brazilian-style coconut cake soaked with a rich coconut and condensed milk glaze, then finished with a generous layer of shredded coconut for a moist and flavorful dessert.
- 1/2 cup unsweetened coconut milk
- 3/4 cup granulated sugar
- 1 teaspoon baking powder
- 4 large eggs (separated)
- 3/4 cup plain all-purpose flour
- 1 teaspoon vanilla essence
- 3/4 cup sweetened condensed milk
- 1/3 cup unsweetened coconut milk
- 3/4 cup sweetened shredded coconut
- 1Preheat the oven to 350°F (175°C). Lightly grease a 9x9-inch cake pan, or a pan of similar size.
- 2In a medium bowl, sift together the all-purpose flour and baking powder until evenly combined. Set aside.
- 3Separate the eggs, placing the yolks in a small bowl and the whites in a large mixing bowl or the bowl of a stand mixer. Beat the egg whites on medium-high speed until stiff peaks form.
- 4Reduce the mixer speed to low and gradually incorporate the yolks and sugar, alternating between one yolk and a portion of the sugar. With the final addition, mix in the vanilla essence. Continue beating until the sugar has dissolved and the mixture appears smooth.
- 5Add the sifted dry ingredients gradually to the egg mixture, mixing after each addition until the batter is uniform and free of lumps. Stir in the coconut milk until fully blended.
- 6Transfer the batter to the prepared pan and bake for 25 to 30 minutes, or until a toothpick inserted into the center comes out clean.
- 7While the cake bakes, prepare the glaze by stirring together the sweetened condensed milk and the coconut milk in a medium bowl until smooth.
- 8Once the cake is out of the oven, use a skewer or toothpick to poke holes all over the surface. Make plenty of holes so the glaze can soak in thoroughly.
- 9Pour the glaze evenly over the warm cake and allow it to absorb for at least 10 minutes at room temperature, or chill longer in the refrigerator for a more deeply soaked texture.
- 10When the cake has absorbed the glaze, scatter the shredded coconut evenly over the top. Slice and serve.
Keywords: Brazilian Coconut Cake, coconut cake, tropical cake, moist cake, make-ahead dessert
- unsweetened coconut milk: This provides a subtle, clean coconut essence to both the cake batter and the enriching glaze.
- granulated sugar: The foundation for sweetness in the cake, it also helps create the structure when combined with eggs.
- baking powder: Essential for giving the cake its light and airy lift, ensuring a delicate, tender crumb.
- large eggs (separated): The whites are beaten to stiff peaks for maximum volume, contributing to the cake’s signature airy texture.
- plain all-purpose flour: The primary dry ingredient that gives the cake its structure and soft, yielding texture.
- vanilla essence: A classic flavor enhancer that rounds out the tropical notes and adds a comforting warmth to the cake.
- sweetened condensed milk: The key ingredient for the ultra-moist and decadently sweet glaze that saturates the cake.
- unsweetened coconut milk: Used again in the glaze, it balances the sweetness of the condensed milk and amplifies the coconut flavor.
- sweetened shredded coconut: Sprinkled generously on top, this adds a delightful texture and a beautiful, snowy finish to the cake.
Quantities for each ingredient are detailed within the recipe card provided above for your convenience.
Variations
While the classic Brazilian Coconut Cake is utterly divine on its own, a world of creative variations awaits those looking to personalize this tropical delight. These adaptations can cater to different dietary needs or simply offer a new flavor profile to explore.
Vegan Adaptation: To transform this cake into a vegan masterpiece, the eggs can be substituted with a flax egg (one tablespoon of ground flaxseed mixed with three tablespoons of water, set aside to gel) for the cake batter. The dairy-based condensed milk in the glaze can be replaced with a rich, thick vegan condensed milk, often made from coconut or oats. Ensure your coconut milk is also plant-based, which is typically the case for unsweetened varieties. The texture may vary slightly, but the tropical essence will remain wonderfully intact.
Low-Carb Twist: For a keto-friendly version, all-purpose flour can be substituted with a blend of almond flour and coconut flour, which are naturally lower in carbohydrates. Granulated sugar can be swapped for a granular sugar substitute like erythritol or xylitol. The condensed milk in the glaze can be replaced with a sugar-free condensed milk alternative, often made with heavy cream and a sugar substitute, or a carefully crafted homemade version. This modification requires careful attention to sweetener ratios to achieve the desired sweetness and texture without excessive carbs.
Citrus Zest Infusion: Elevate the tropical theme by adding the zest of one lime or lemon to the cake batter. This bright citrus note will cut through the richness of the coconut and condensed milk, adding a refreshing tang that complements the sweetness beautifully. The zest can be incorporated along with the dry ingredients or gently folded in at the end of mixing. This simple addition provides a sophisticated layer of flavor without altering the cake’s fundamental moistness or texture.
How to Prepare Brazilian Coconut Cake
Step 1: Prepare Your Baking Environment and Pans
The initial steps for creating this exceptional Brazilian Coconut Cake are all about setting the stage for success. Begin by preheating your oven to the specified temperature, usually around 350°F (175°C). This ensures that the oven is at the optimal heat when the cake batter is ready to bake, promoting even cooking and a consistent rise. Simultaneously, take a moment to prepare your chosen baking pan; a standard 9×9 inch square pan works beautifully for this cake.
Lightly greasing the pan is crucial for preventing the cake from sticking, which can be particularly important for a cake that is meant to soak up a generous amount of glaze. You can use butter, a non-stick baking spray, or even a bit of coconut oil for this purpose. Afterward, consider dusting the greased pan with a thin layer of all-purpose flour or even a fine sprinkle of shredded coconut. This creates a non-stick barrier and also adds a subtle textural element to the cake’s exterior crust.
Proper pan preparation guarantees that when your delectable cake is ready, it will slide out cleanly or be easily sliced without any frustrating adherence. This attention to detail in the early stages ensures that your beautiful creation remains intact and appealing from the oven to the serving plate. It’s a small but significant detail that contributes greatly to the overall polished presentation of the finished dessert.
Step 2: Combine the Dry Ingredients with Precision
In a separate medium-sized bowl, the dry components of the cake batter are brought together. This typically includes the all-purpose flour and the baking powder. Sifting these ingredients is often recommended as it helps to aerate them, removing any lumps and ensuring a more uniform distribution throughout the batter. This step is vital for achieving the cake’s signature lightness and even texture.
The baking powder, as a leavening agent, needs to be thoroughly incorporated into the flour to ensure it activates properly during the baking process. An uneven distribution of baking powder can lead to pockets of denser cake or an inconsistent rise. Whisking the flour and baking powder together gently for about 30 seconds to a minute achieves this thorough blending. This ensures that every part of the cake batter receives the leavening power necessary for a perfect bake.
Once combined, this dry mixture is set aside. It will be incorporated into the wet ingredients later in the process. This organized approach to mixing ensures that the gluten development in the flour is managed appropriately, contributing to a tender crumb rather than a tough one. It’s a foundational step that contributes significantly to the cake’s final soft and airy structure.
Step 3: Whip the Egg Whites to Perfection
This is a pivotal moment in achieving the cake’s wonderfully airy and light sponge. Carefully separate the eggs, ensuring that absolutely no yolk contaminates the whites. Even a tiny speck of yolk can prevent the egg whites from reaching their full volume and stiff peak consistency. Place the clean egg whites into a large, dry, and grease-free mixing bowl, or the bowl of a stand mixer fitted with the whisk attachment.
Begin beating the egg whites on a medium-high speed. As they start to froth and become foamy, you will notice them gradually turning opaque. Continue beating until the mixture transforms into glossy, opaque white peaks that hold their shape when the whisk is lifted. These are known as stiff peaks. If you tilt the bowl, the egg whites should not slide out; they should stand firm and proud, indicating they are fully aerated and ready to contribute maximum lift to the cake batter.
This aeration process is what creates the cake’s characteristic spongy texture, distinguishing it from denser cakes. It’s a delicate balance of time and technique, so be patient and attentive during this stage. The volume created by these whipped whites is the primary source of the cake’s light and ethereal feel, making this step arguably the most critical for the desired outcome. Over-beating can make them dry and difficult to incorporate, while under-beating won’t provide enough structure.
Step 4: Gently Combine Yolks, Sugar, and Vanilla
With the egg whites whipped to perfection and set aside, attention turns to the egg yolks and sugar. In a separate bowl, or with the mixer on a low speed if using the same bowl (after carefully cleaning the whisk attachment), gradually add the egg yolks to the whipped whites. Follow this by slowly incorporating the granulated sugar. It is often beneficial to add the yolks and sugar alternately, or the sugar in a slow, steady stream, to ensure they are evenly distributed and properly emulsified.
Continue to mix on low speed. The goal here is twofold: to gently incorporate the yolks without deflating the precious air that has been whipped into the whites, and to dissolve the sugar. As the mixture continues to beat, it will become smoother, glossier, and take on a pale yellow hue. You can test if the sugar has dissolved by rubbing a small amount of the mixture between your fingers; it should feel smooth, not gritty.
Once the sugar is fully dissolved and the mixture appears smooth and airy, it’s time to add the vanilla essence. The vanilla not only adds a beautiful aroma but also enhances the overall flavor profile of the cake, complementing the coconut notes. Mix it in just until it’s fully incorporated. This careful combination of yolks, sugar, and vanilla enriches the batter with flavor and contributes to its smooth, cohesive texture without compromising the aeration achieved in the previous step.
Step 5: Fold in Dry Ingredients and Coconut Milk
Now, it’s time to bring the wet and dry components together to form the cake batter. Take the sifted dry ingredients (flour and baking powder) that you prepared earlier and add them to the egg mixture in stages. This usually means adding about a third of the dry ingredients at a time. Gently fold them into the batter using a spatula or a whisk with a light touch, or mix on the lowest speed of your mixer.
The key here is to avoid overmixing. Overworking the flour can develop the gluten too much, leading to a tougher, denser cake. Mix just until the dry ingredients are incorporated and no streaks of flour remain visible. Following this, it’s time to incorporate the unsweetened coconut milk. This liquid adds moisture and a subtle tropical flavor to the batter, contributing to the cake’s overall moistness and delicate coconut profile. Stir it in gently until the batter appears smooth and homogeneous.
The batter should be relatively thick but still pourable. The goal is to create a batter that is light and airy, thanks to the whipped egg whites, yet cohesive and well-blended. This careful folding and gentle mixing process preserves the airiness you’ve worked hard to achieve while ensuring all ingredients are perfectly married. A well-made batter at this stage is fundamental to the final cake’s tender crumb and delightful texture.
Step 6: Bake to Golden Perfection
Pour the prepared cake batter evenly into the pre-greased and floured (or coconut-dusted) 9×9 inch baking pan. Smooth the top gently with your spatula to ensure an even layer, which will promote uniform baking. Place the pan in the center of your preheated oven, ensuring it has adequate space around it for air circulation.
Bake for approximately 25 to 30 minutes. The exact baking time can vary depending on your oven, so it’s important to check for doneness towards the end of the baking period. The cake is ready when the top appears lightly golden brown, feels springy to the touch when gently pressed, and a toothpick or skewer inserted into the center comes out clean. A clean toothpick is the most reliable indicator that the cake is fully baked through and the internal structure has set properly.
Once baked, carefully remove the cake from the oven. Resist the urge to remove it from the pan immediately, as it needs a moment to cool slightly before the next crucial step. The warm cake is the perfect vehicle for absorbing the luscious glaze that will elevate it from a simple cake to a truly decadent dessert. The visual cues of a golden top and a clean toothpick confirm that your cake is on its way to becoming a tropical delight.
Step 7: Glaze and Finish the Cake
While the cake is still warm from the oven, it’s time to prepare and apply the signature coconut glaze. In a separate bowl, stir together the sweetened condensed milk and the remaining unsweetened coconut milk. Whisk them together until they are thoroughly combined and form a smooth, creamy mixture. The sweetness of the condensed milk combined with the subtle flavor of coconut milk creates a perfectly balanced glaze.
Using a skewer, toothpick, or even a fork, poke an abundance of holes all over the surface of the warm cake. Don’t be shy; the more holes you make, the more effectively the glaze will penetrate the cake’s crumb, ensuring every bite is wonderfully moist. Aim for holes distributed evenly across the entire surface, including the edges.
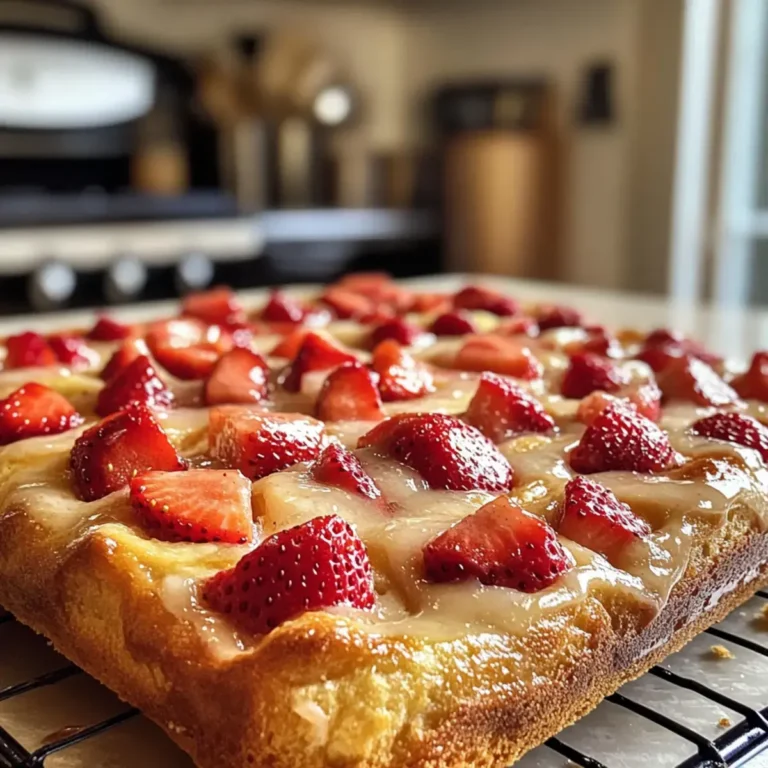
Slowly and deliberately pour the prepared glaze evenly over the entire surface of the warm, poked cake. Allow the glaze to soak into the cake for at least 10 to 15 minutes at room temperature. For an even more intensely soaked and moist cake, you can transfer it to the refrigerator to chill and absorb for a longer period, perhaps an hour or more. Once the glaze has had sufficient time to absorb and the cake is no longer visibly pooling with liquid, generously sprinkle the sweetened shredded coconut evenly over the top. This adds a delightful texture and visual appeal, completing the transformation into a classic Brazilian Coconut Cake.
Pro Tips for Brazilian Coconut Cake
Achieving the perfect Brazilian Coconut Cake often comes down to a few key techniques and mindful considerations during preparation and baking. These expert tips can elevate your cake from good to absolutely unforgettable, ensuring a moist texture and delightful flavor every time you bake.
Warm Cake, Warm Glaze: Always pour the glaze over the cake while it is still warm, fresh from the oven. The heat of the cake opens up its crumb structure, allowing the glaze to be absorbed more deeply and evenly. This is arguably the most critical factor in achieving that signature moistness that defines this dessert. If the cake has cooled too much, the glaze may just sit on the surface.
Generous Poking is Key: When creating the holes for the glaze, be thorough. Use a skewer, toothpick, or even the tines of a fork to make plenty of small holes distributed across the entire surface of the cake. Don’t just focus on the center; ensure the edges and corners also get their share of openings. This ensures the glaze saturates every inch of the cake, preventing dry spots and maximizing the moist, tender texture throughout.
Patience for Peak Flavor: While you can certainly enjoy the cake shortly after glazing, allowing it to rest and absorb more fully for at least a few hours, or even overnight in the refrigerator, significantly enhances both its flavor and texture. The flavors meld together beautifully, and the glaze continues to seep into the sponge, resulting in an even moister and more cohesive dessert. This make-ahead aspect is one of its greatest strengths.
Don’t Fear the Simplicity: This cake thrives on its uncomplicated nature. Resist the urge to add heavy frosting or complex decorations. The beauty of Brazilian Coconut Cake lies in its moist sponge, rich glaze, and simple coconut topping. Focus on the quality of your ingredients and the proper execution of the steps, and the cake will speak for itself with its delicious tropical charm.
Coconut Milk Quality Matters: For the best flavor, use a good quality unsweetened coconut milk. Full-fat versions often yield a richer, creamier result in both the batter and the glaze. Ensure you shake the can well before using, as the cream and liquid can separate. The subtle nuances of the coconut milk will play a significant role in the overall tropical essence of your finished cake.
Serving Suggestions for Brazilian Coconut Cake
Decoration
The topping of sweetened shredded coconut is the primary decorative element, providing a beautiful snowy appearance that contrasts with the moist cake beneath. Ensure it’s sprinkled evenly across the surface after the glaze has been absorbed for a consistent and visually appealing finish. For an extra touch, you could toast some of the shredded coconut lightly before sprinkling it on; this adds a subtle nutty depth and a slightly golden hue, creating a lovely visual texture.
If you desire a slightly more elaborate presentation without deviating too far from simplicity, consider using a stencil and a dusting of powdered sugar or a touch more toasted coconut to create a pattern on top. Alternatively, a few fresh edible flowers, like orchids or hibiscus if seasonally available and appropriate, can add a vibrant pop of color and an elegant tropical flair.
A drizzle of warmed honey or a very light caramel sauce could be artfully applied in a thin web over the coconut topping, adding another layer of visual interest and a complementary flavor. However, the charm of this cake often lies in its unfussy beauty, so let the natural appeal of the coconut topping be the star.
Side Dishes
Brazilian Coconut Cake pairs exceptionally well with simple, refreshing accompaniments that highlight its tropical flavors rather than compete with them. A small cup of strong, freshly brewed coffee is a classic pairing; its slight bitterness beautifully cuts through the sweetness of the cake, offering a balanced and satisfying experience.
Fresh tropical fruits are also ideal partners. Think of slices of ripe mango, pineapple chunks, or a medley of vibrant berries like raspberries and blueberries. Their natural sweetness and acidity provide a bright contrast to the rich cake, making each bite feel lighter and more refreshing, especially on a warm day. Consider a light fruit salad tossed with a hint of lime juice to enhance the tropical theme.
For a more dessert-oriented pairing, a dollop of softly whipped cream is a wonderful addition. It adds a creamy texture that complements the moistness of the cake without being overly sweet. Ensure the cream is lightly sweetened, or even unsweetened, to maintain the balance of flavors. A scoop of creamy coconut ice cream or a refreshing sorbet, such as passion fruit or lime, would also be a delightful and thematic choice.
Creative Serving Ideas
Elevate your serving of Brazilian Coconut Cake with a few creative touches that enhance the dining experience. Serving individual portions in elegant glass dishes or small ramekins can give it a more refined, restaurant-style presentation, especially if layered with a bit of whipped cream and fresh fruit.
Consider a deconstructed approach for a modern twist: serve a slice of the cake alongside a quenelle of coconut cream and a small mound of toasted coconut flakes. This allows guests to assemble their perfect bite, controlling the ratio of cake, cream, and crunch. For a festive occasion, individual cakes can be prepared in muffin tins, then glazed and topped with coconut, creating delightful, easy-to-handle cupcakes.
Another idea is to serve slices slightly chilled. The coolness can intensify the coconut flavor and make the glaze feel even more refreshing. A light dusting of edible glitter or gold leaf can add a touch of luxury for special celebrations, while a sprig of fresh mint or a candied lime peel offers an aromatic and visually appealing garnish that complements the tropical profile.
Preparation & Storage
Storing Leftovers
Due to the rich, milk-based glaze that saturates the cake, it is essential to store any leftovers properly to maintain their optimal texture and freshness. The best place for storing Brazilian Coconut Cake is in the refrigerator. The cool temperature helps to prevent the moist cake from spoiling and keeps the glaze from becoming too liquidy or running.
When storing, ensure the cake is covered tightly. You can use plastic wrap to cover the entire pan, or transfer individual slices into airtight containers. This prevents the surface of the cake from drying out and also stops it from absorbing any unwanted odors from other foods in the refrigerator. This careful storage ensures the cake remains delightfully moist and flavorful for several days.
The cake generally keeps well in the refrigerator for about 3 to 4 days. Interestingly, many find that the texture and flavor of this cake actually improve after a day or two, as the glaze has more time to fully meld with the cake’s crumb, creating an even more integrated and luscious dessert experience. So, don’t hesitate to make it ahead of time!
Freezing
Brazilian Coconut Cake freezes surprisingly well, making it a fantastic option for preparing a treat well in advance. To freeze the cake, it’s best to do so in individual portions. This makes thawing and serving much more convenient and helps to maintain the cake’s structure.
First, allow the cake to cool completely if it’s freshly baked and glazed. Then, wrap each slice snugly in plastic wrap, ensuring there are no gaps where air can enter. For an extra layer of protection against freezer burn, place the individually wrapped slices into a freezer-safe airtight container or a heavy-duty freezer bag. This double-layer approach is key to preserving the cake’s quality.
When properly frozen, slices of Brazilian Coconut Cake can be kept for up to 1 month. While the texture might change ever so slightly after thawing, particularly the fluffiness of the coconut topping, the overall flavor remains delicious and the cake is still wonderfully moist. The magic of this cake is quite resilient to the freezing process.
Reheating
Reheating Brazilian Coconut Cake is generally not necessary, as it is designed to be enjoyed at room temperature or slightly chilled. In fact, the moistness of the cake is often best appreciated when it hasn’t been heated, as reheating can sometimes alter the texture of the glaze and the sponge.
If you prefer a softer, warmer bite than what room temperature provides, the best approach is to let a slice sit out on the counter for about 10 to 15 minutes before serving. This allows it to come up to room temperature gently, softening the glaze and cake without compromising its integrity. Avoid microwaving the cake, as this can quickly lead to an undesirable rubbery texture.
If you have frozen slices, the recommended method is to thaw them overnight in the refrigerator. Once thawed, you can then allow them to sit at room temperature for a short period as described above to reach your desired serving temperature. This slow thawing process helps the cake retain its soft texture and ensures a delightful eating experience, whether it’s freshly made, a day old, or brought back from the freezer.
Frequently Asked Questions
-
Can I use pre-shredded sweetened coconut for the topping, or is flaked coconut better?
Both pre-shredded sweetened coconut and flaked coconut can work for the topping of your Brazilian Coconut Cake, but they offer slightly different textural experiences. Pre-shredded coconut is very fine and disperses easily, creating a smooth, blanket-like layer that is delightful and integrates well with the glaze. Flaked coconut, especially larger flakes, will provide a more pronounced crunch and a visually distinct texture. If you prefer a more rustic look and a chewier bite, flaked coconut is an excellent choice. For a softer, more uniform finish, the finely shredded variety is ideal. Ensure the coconut you choose is sweetened, as this contributes to the cake’s overall flavor profile.
-
What is the purpose of poking so many holes in the cake before adding the glaze?
Poking a multitude of holes across the warm cake’s surface is a crucial step in achieving the signature moistness of Brazilian Coconut Cake. The cake’s crumb acts like a sponge, and these holes serve as channels, allowing the rich, sweet glaze to penetrate deeply into the cake’s interior. Without sufficient holes, the glaze would likely pool on the surface, leading to a sticky top layer and a drier interior. The extensive network of small openings ensures that the glaze is absorbed evenly throughout the cake, saturating every bite with its delicious coconut and condensed milk flavor, and contributing to the cake’s tender, almost custardy texture.
-
My cake seems a bit dry, even after adding the glaze. What could I have done wrong?
A dry Brazilian Coconut Cake, despite the glaze, can stem from a few common issues during preparation. One primary reason could be overbaking; if the cake spent too long in the oven, it will have lost too much moisture. Always rely on the toothpick test (coming out clean) but also watch for visual cues like a golden-brown top and slightly pulling away from the sides of the pan. Another possibility is insufficient glaze absorption, which often points back to not poking enough holes or not pouring the glaze while the cake was sufficiently warm. The glaze is best absorbed by a warm, receptive crumb. Lastly, ensure you measured your flour accurately; scooping directly from the bag can lead to too much flour, resulting in a drier cake.