Homemade Granola Recipe – Make Your Own!
Embarking on the journey of creating your own homemade granola is a truly rewarding culinary adventure. It’s a chance to transform simple pantry staples into a delightful breakfast staple, bursting with flavor and customizable to your every whim.
This recipe is designed to bring you that perfect balance of sweetness and satisfying crunch, a far cry from the often over-processed and expensive store-bought varieties. Get ready to discover the joy of genuinely delicious, freshly baked granola that will elevate your mornings and satisfy your snack cravings.
Why You Will Love This Recipe
- Exceptional Crunch: Achieved through a careful low-and-slow baking process, this granola boasts an irresistible, satisfying crunch that holds up beautifully in milk or yogurt.
- Customizable Flavor Profile: This recipe serves as a fantastic canvas, allowing you to easily adapt it with your favorite dried fruits, nuts, seeds, and even spices, making each batch uniquely yours.
- Quick and Easy Preparation: While the oven does its magic, the active preparation time is remarkably short, meaning you can have a large batch ready in under 30 minutes of hands-on work.
- Cost-Effective: By using common ingredients found in most kitchens, you can produce a significantly larger quantity of superior-tasting granola for a fraction of the cost of buying it from a specialty store.
- Superior Freshness and Quality: Experience the vibrant flavors and textures that only come from homemade creations, free from artificial preservatives and unexpected additives.
Ingredients You Need
The secret to truly exceptional homemade granola lies in the quality and thoughtful selection of your ingredients. Opting for fresh, wholesome components will directly translate into a more flavorful and texturally superior final product. Every element plays a crucial role in achieving that perfect balance of sweet, nutty, and toasty notes that define classic granola.
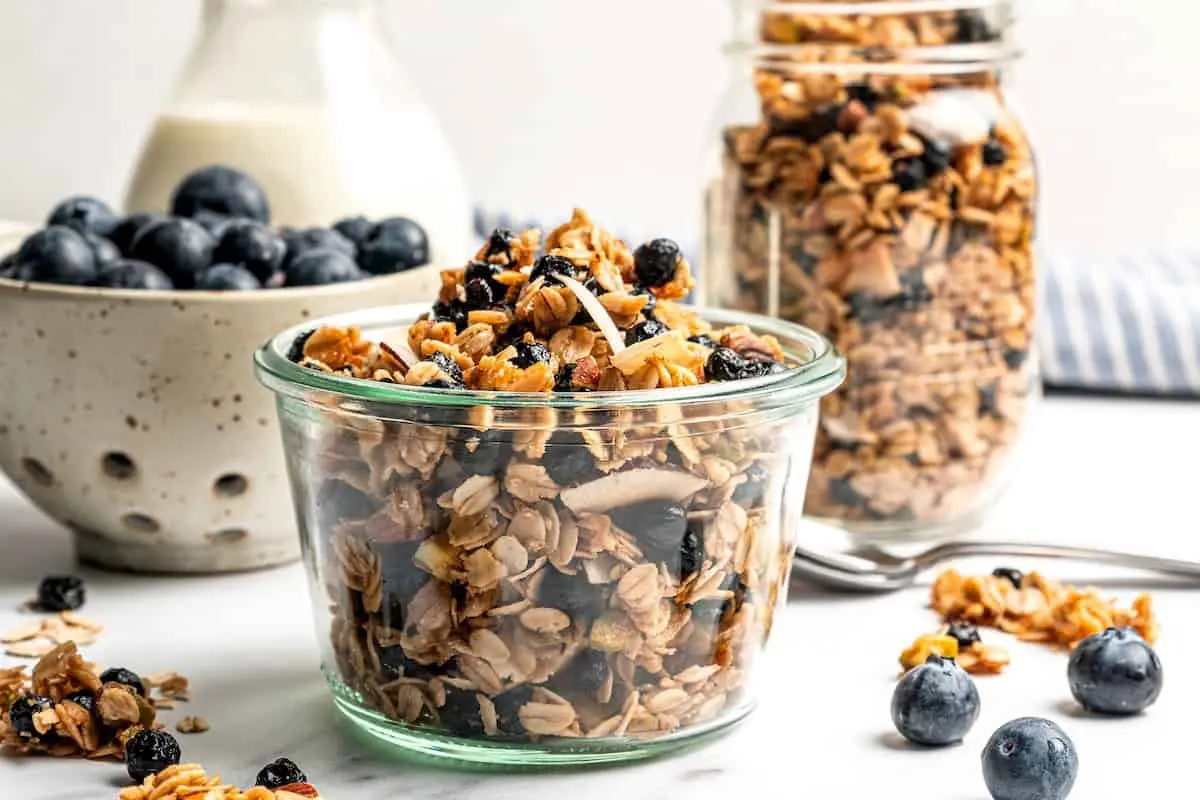
Homemade Granola Recipe
This homemade granola recipe is sweet, crunchy, and easy to prep in 5 minutes. Make a big batch in the oven and keep it in the pantry for weeks! It's made with rolled oats, nuts, and coconut, and sweetened with maple syrup and brown sugar.
- 2 tablespoons brown sugar
- 1 teaspoon pure vanilla extract
- 2 cups rolled oats
- 1 cup dried blueberries
- 1Preheat oven to 300°F (150°C). Line a large baking sheet with parchment paper.
- 2In a large bowl, whisk together the melted coconut oil, maple syrup, brown sugar, vanilla extract, and salt.
- 3Add the rolled oats, coconut flakes, chopped mixed nuts, and dried blueberries to the bowl. Stir well until everything is evenly coated.
- 4Spread the granola mixture evenly onto the prepared baking sheet. Press it down firmly with a spatula.
- 5Bake for 10 minutes. Remove from the oven, stir the granola, and press it down again.
- 6Bake for another 10 minutes. Remove from the oven, stir one last time, and press down with a spatula.
- 7Bake for an additional 5-7 minutes, or until golden brown.
- 8Let the granola cool completely on the baking sheet. It will harden as it cools.
- 9Serve with milk, yogurt, or as a snack. Store in an airtight container at room temperature for several weeks.
Keywords: granola, homemade granola, breakfast, snack, oats, nuts, dried fruit, baked granola
- coconut oil: melted, this forms the rich, toasty base for baking.
- maple syrup: a liquid sweetener that provides a deep, caramel-like sweetness.
- brown sugar: adds another layer of molasses-rich sweetness and helps with crisping.
- vanilla extract: enhances all the other flavors and adds a comforting aroma.
- salt: a small pinch balances the sweetness and brings out the nutty flavors.
- rolled oats: the heart of the granola, providing a chewy and sturdy texture.
- coconut flakes: adds a delightful tropical note and extra crispiness.
- mixed nuts: a blend of your favorites, chopped for even distribution and texture.
- dried blueberries: contribute bursts of chewy sweetness and vibrant color.
The precise quantities for these ingredients can be found within the recipe card, ensuring perfect ratios for that ideal granola outcome.
Variations
The beauty of homemade granola is its incredible versatility, allowing you to tailor it to specific dietary needs or flavor preferences. This recipe provides a foundational structure that can be creatively adapted in numerous ways, ensuring there’s a granola for every palate and lifestyle.
Vegan Delight: To make this recipe entirely vegan, ensure your brown sugar is certified vegan, as some refined sugars are processed with bone char. You can also explore using other liquid sweeteners like agave nectar or date syrup as a direct substitute for maple syrup if desired. These alternatives will impart their own subtle flavor nuances, adding another dimension to your granola.
Low-Carb Option: For those mindful of carbohydrate intake, consider substituting the rolled oats with a mix of chopped nuts like almonds and pecans, alongside unsweetened shredded coconut. For the sweeteners, a sugar-free syrup alternative or a blend of erythritol and stevia can be used sparingly. Ensure any added dried fruits are omitted or replaced with low-carb options like a few chopped dried unsweetened cranberries. This approach requires careful adjustment to achieve a pleasing sweetness and texture.
Fruity and Tropical Infusion: Elevate your granola with a tropical twist by swapping the dried blueberries for an assortment of dried tropical fruits. Think chunks of dried pineapple, mango, or even papaya. Banana chips, added towards the end of baking to prevent burning, can also offer a wonderfully sweet and chewy component. This variation brings a taste of the tropics right to your breakfast bowl or snack time.
Seed Power Boost: Enhance the nutritional profile and add interesting textures by incorporating a generous handful of seeds. Chia seeds, flax seeds (whole or ground), hemp seeds, sunflower seeds, or pepitas (pumpkin seeds) all work beautifully. They can be mixed in with the dry ingredients before baking, offering a subtle crunch and a boost of healthy fats and fiber. Consider toasting some of these seeds separately before adding for an intensified nutty flavor.
Chocolate Lover’s Dream: Indulge your sweet tooth by transforming this classic granola into a chocolatey masterpiece. Stir in a few tablespoons of unsweetened cocoa powder along with the dry ingredients before baking for a rich chocolate base. Alternatively, and for larger chocolate chunks, fold in your favorite chocolate chips or chopped chocolate once the granola has cooled completely. This prevents the chocolate from melting entirely into a greasy mess, preserving those delightful pockets of melted chocolate.
How to Prepare homemade granola recipe
Step 1: Prepare Your Baking Station and Preheat the Oven
Before you begin mixing any ingredients, it’s crucial to have your workspace organized and your oven ready. This ensures a smooth and efficient process, allowing you to move seamlessly from one step to the next. Clear a large area on your countertop where you can comfortably mix the ingredients without feeling cramped.
The very first action you need to take is to preheat your oven to 300°F (150°C). This moderate temperature is key to achieving the perfect bake for your granola, ensuring it crisps up beautifully without burning. Simultaneously, prepare a large baking sheet by lining it with parchment paper. This lining is essential for preventing the granola from sticking and makes cleanup significantly easier.
Make sure the parchment paper covers the entire surface of the baking sheet, extending slightly up the sides if possible. This creates a non-stick surface and also helps in forming cohesive granola clusters. Setting this up first allows you to focus entirely on the mixing process once the ingredients are gathered.
Step 2: Create the Sweet Liquid Base
In a generously sized mixing bowl, you will combine the wet ingredients that form the flavor foundation of your granola. This is where the sweetness and rich moisture are introduced, preparing the dry ingredients to meld together. Start by adding the melted coconut oil, ensuring it has cooled slightly from its liquid state so it doesn’t cook the other ingredients prematurely.
Next, pour in the maple syrup. Its viscous nature will coat the oats and nuts beautifully, contributing to that signature granola chewiness and caramelized flavor. Follow this with the brown sugar. As it dissolves, it will add a deeper, more complex sweetness and help create those delightful crunchy bits we all love in granola. Finally, add the pure vanilla extract and the pinch of salt.
The vanilla extract enhances the overall aroma and taste, while the salt is a critical component for balancing the sweetness and intensifying the nutty flavors. Whisk these ingredients together thoroughly until they are well combined and the brown sugar has begun to dissolve into the mixture.
Step 3: Combine Dry Ingredients with the Wet Mixture
Now it’s time to introduce the hearty components of your granola to the sweet liquid base you’ve just prepared. Begin by adding the rolled oats to the bowl. These old-fashioned oats are preferred for their texture and ability to hold their shape during baking, contributing to that satisfying chew. Ensure you’re using rolled oats, not instant or steel-cut, as their cooking properties are quite different.
Next, add the coconut flakes. These add a lovely textural contrast and a hint of tropical flavor. If you prefer larger chunks of coconut, opt for coconut chips. Then, fold in the chopped mixed nuts. A combination of walnuts, almonds, and pecans is classic, but feel free to use your favorites like cashews, hazelnuts, or even macadamia nuts. Ensure they are chopped into bite-sized pieces for even distribution.
Finally, gently stir in the dried blueberries. These add wonderful pops of chewy sweetness and vibrant color throughout the granola. If you’re using other dried fruits like cranberries or raisins, add them now as well. Stir everything together very gently but thoroughly, ensuring that every oat, nut, and piece of fruit is evenly coated with the sweet liquid mixture. Avoid overmixing, which can break down the oats too much.
Step 4: Spread and Begin the Baking Process
Carefully transfer the granola mixture from the bowl onto the prepared baking sheet lined with parchment paper. Use a spatula to spread the mixture out into an even layer across the entire surface of the baking sheet. This even distribution is crucial for ensuring that the granola bakes uniformly, preventing some areas from becoming burnt while others remain undercooked.
Once spread, use the back of your spatula to gently press down on the granola. This step is particularly important for encouraging the formation of larger, delightful clusters. The pressure helps to bind the ingredients together, creating those coveted clumps that are a hallmark of great homemade granola. Ensure the layer is not too thick, as this can hinder even cooking and crisping.
Place the baking sheet into your preheated oven. Set your timer for 10 minutes. During this initial baking period, the granola will begin to toast, and the sugars will start to caramelize, laying the groundwork for its eventual crunchiness. This first stage is about gently warming and setting the base.
Step 5: Stir, Press, and Continue Baking in Stages
After the initial 10 minutes of baking, it’s time to intervene and ensure even cooking. Carefully remove the baking sheet from the oven. Using your spatula, stir the granola around. This simple act redistributes the heat and moisture, preventing any hot spots from over-baking the mixture.
Once stirred, use the spatula again to gently press the granola mixture down into an even layer once more. This re-pressing is vital for reinforcing those clusters you started forming earlier and ensuring they can develop their crisp texture. Return the baking sheet to the oven and set your timer for another 10 minutes.
After this second 10-minute interval, remove the granola from the oven again. Stir it one final time and press it down with the spatula. Now, return it to the oven for a shorter duration of 5-7 minutes. This final baking period is to achieve the perfect level of crispness. It’s important to watch it closely during these last few minutes, as granola can go from perfectly toasted to burnt very quickly.
Step 6: Cool Completely for Ultimate Crunch
Once the final baking interval is complete and your granola has reached a beautiful golden-brown hue, remove the baking sheet from the oven. The granola may appear slightly soft at this stage, and this is perfectly normal. Resist the temptation to break it apart immediately or think it’s not done.
The magic of achieving that ultimate crunch happens during the cooling process. As the granola sits on the baking sheet and gradually cools down to room temperature, the sugars will solidify and crisp up. The moisture content will further reduce, leading to that satisfying, brittle texture that makes homemade granola so addictive. Allow the granola to cool completely on the baking sheet for at least one to two hours, undisturbed.
Once fully cooled, you can then break apart the larger clusters into your desired sizes. The granola should now be wonderfully crisp and ready to be enjoyed. Store it in an airtight container to maintain its freshness and crunch for weeks to come. This slow cooling is a non-negotiable step for the best texture.
Pro Tips for homemade granola recipe
The Importance of Low and Slow Baking: Baking your granola at a lower temperature, around 300°F (150°C), is paramount for achieving that perfect crunch. High heat can burn the oats and nuts quickly before they have a chance to thoroughly dry out and crisp. This gentle heat allows the sugars to caramelize slowly, creating a more complex flavor and a superior texture.
Don’t Skip the Pressing: Pressing the granola down with a spatula after each stirring interval is a game-changer for cluster formation. This action binds the ingredients together, encouraging larger, more satisfying chunks that hold up well in milk or yogurt. Without this step, your granola may end up being too crumbly.
Cooling is Key: The granola will continue to crisp up as it cools on the baking sheet. It might seem slightly soft when you take it out of the oven, but trust the process. Allowing it to cool completely undisturbed for at least an hour or two is crucial for achieving maximum crunchiness. Rushing this step will result in a less crispy texture.
Ingredient Quality Matters: Using fresh, high-quality ingredients will significantly impact the final taste of your granola. Opt for fresh rolled oats, good quality nuts that aren’t rancid, and pure vanilla extract. The better your base ingredients, the more delicious your homemade granola will be. Consider toasting your nuts lightly before adding them for an even deeper flavor.
Stirring for Even Browning: While it might be tempting to let the granola bake undisturbed, stirring it periodically (usually every 10 minutes) ensures even browning and prevents any sections from burning. This also helps to redistribute the moisture, contributing to overall crispiness. Just remember to press it down again after each stir.
Serving Suggestions for homemade granola recipe
Decoration
Elevate your homemade granola with a vibrant and enticing presentation. A scattering of fresh berries, such as raspberries, blueberries, or sliced strawberries, adds a burst of color and freshness. A drizzle of honey or a swirl of your favorite nut butter can introduce an additional layer of flavor and visual appeal. For a truly artisanal touch, consider garnishing with a few edible flowers or a sprinkle of toasted coconut flakes.
Side Dishes
Granola itself is a fantastic component, but it pairs wonderfully with a variety of side dishes. Creamy Greek yogurt or thick skyr makes a classic and healthy pairing, providing a tangy contrast to the granola’s sweetness. A side of fresh fruit salad, perhaps featuring melon, kiwi, and citrus segments, complements the granola’s texture and flavor profile. For a heartier breakfast, consider serving it alongside a fluffy omelet or a side of crispy bacon.
Creative Serving Ideas
Beyond the breakfast bowl, homemade granola can be used in numerous inventive ways. Layer it in parfait glasses with yogurt and fruit for an elegant dessert or breakfast option. Sprinkle it over smoothie bowls for added texture and visual appeal, transforming a simple smoothie into a substantial meal. It also makes a delightful topping for ice cream, frozen yogurt, or even baked apples, adding a satisfying crunch to sweet treats. You can even use it as a base for no-bake energy balls or as a crust for cheesecakes.
Preparation & Storage
Storing Leftovers
Once your delicious homemade granola has completely cooled, proper storage is key to maintaining its delightful crunch and flavor. Transfer the cooled granola into an airtight container, such as a glass jar with a tight-fitting lid or a quality food storage container. Ensure there is no residual moisture in the container, as this can lead to sogginess.
Store the container at room temperature in a cool, dry, and dark place, like your pantry. Avoid areas with high humidity or direct sunlight, as these can degrade the quality of the granola over time. When stored correctly, homemade granola can remain wonderfully fresh and crunchy for up to 2-3 weeks.
Freezing
For longer-term storage, freezing is an excellent option to preserve the quality of your homemade granola. Ensure the granola is completely cooled and any added ingredients, like chocolate chips, are solid. Transfer the cooled granola into freezer-safe bags or airtight containers, removing as much air as possible to prevent freezer burn.
Label the containers with the date to keep track of freshness. Granola can typically be stored in the freezer for up to 3-4 months. It’s best to freeze it in portions that you can easily use at one time, to minimize thawing and refreezing cycles.
Reheating
If your granola has lost some of its crispness due to humidity or is coming straight from the freezer, a quick reheating session can revive its delightful texture. Spread the granola in a single layer on a baking sheet lined with parchment paper. Reheat in a preheated oven at a low temperature, around 250°F (120°C), for 5-10 minutes.
Keep a close eye on it during this process, as it can burn quickly. The goal is simply to dry it out and re-crisp it, not to bake it further. Once removed from the oven, allow it to cool completely on the baking sheet again before storing or serving. This simple step can bring back that satisfying crunch and fresh flavor.
Frequently Asked Questions
-
Can I make this granola recipe nut-free?
Absolutely! If you have nut allergies or simply prefer a nut-free granola, you can easily adapt this recipe. The most straightforward approach is to simply omit the mixed nuts altogether. To maintain some textural interest and healthy fats, consider replacing the nuts with an equivalent amount of seeds such as pepitas (pumpkin seeds), sunflower seeds, or even a mix of chia and flax seeds. You could also increase the amount of coconut flakes or add other crunchy ingredients like puffed rice cereal (check for gluten-free options if needed) or hemp seeds for added texture and nutrition. Ensure that any seeds you choose are toasted lightly before adding them to the mixture for enhanced flavor, or simply stir them in with the other dry ingredients before baking.
-
What is the best way to achieve large, crunchy granola clusters?
Achieving those coveted large clusters is a combination of several factors, all aimed at ensuring the granola binds together and crisps up properly. Firstly, make sure your wet ingredients (maple syrup, brown sugar, oil) are well incorporated with the dry ingredients, coating everything evenly. Secondly, and critically, press the granola mixture down firmly onto the baking sheet with a spatula after spreading it, and again after each stirring during the baking process. This compacts the mixture, helping the sugars to meld and create those delightful clumps. Finally, avoid over-stirring the granola during baking; give it a gentle stir to ensure even cooking but don’t break up all the clumps. Crucially, allow the granola to cool completely on the baking sheet without disturbing it; it will crisp up significantly as it cools, solidifying those clusters.
-
How long will homemade granola stay fresh, and what are the best storage methods?
When stored correctly, your delicious homemade granola can maintain its optimal freshness and crunch for about 2 to 3 weeks. The key to longevity lies in ensuring it is stored in an absolutely airtight container. Glass jars with well-sealing lids or high-quality plastic food storage containers are ideal choices. It’s crucial to store the granola at room temperature, in a cool, dry, and dark location, such as a pantry. Avoid storing it in humid environments or where it might be exposed to direct sunlight, as these conditions can lead to staleness or affect its flavor profile. If you wish to store it for a longer period, up to 3-4 months, freezing is an excellent option. Ensure the granola is completely cooled before transferring it to freezer-safe bags or containers, squeezing out as much air as possible to prevent freezer burn.