Pupusas Recipe – Authentic Pupusas with Curtido!
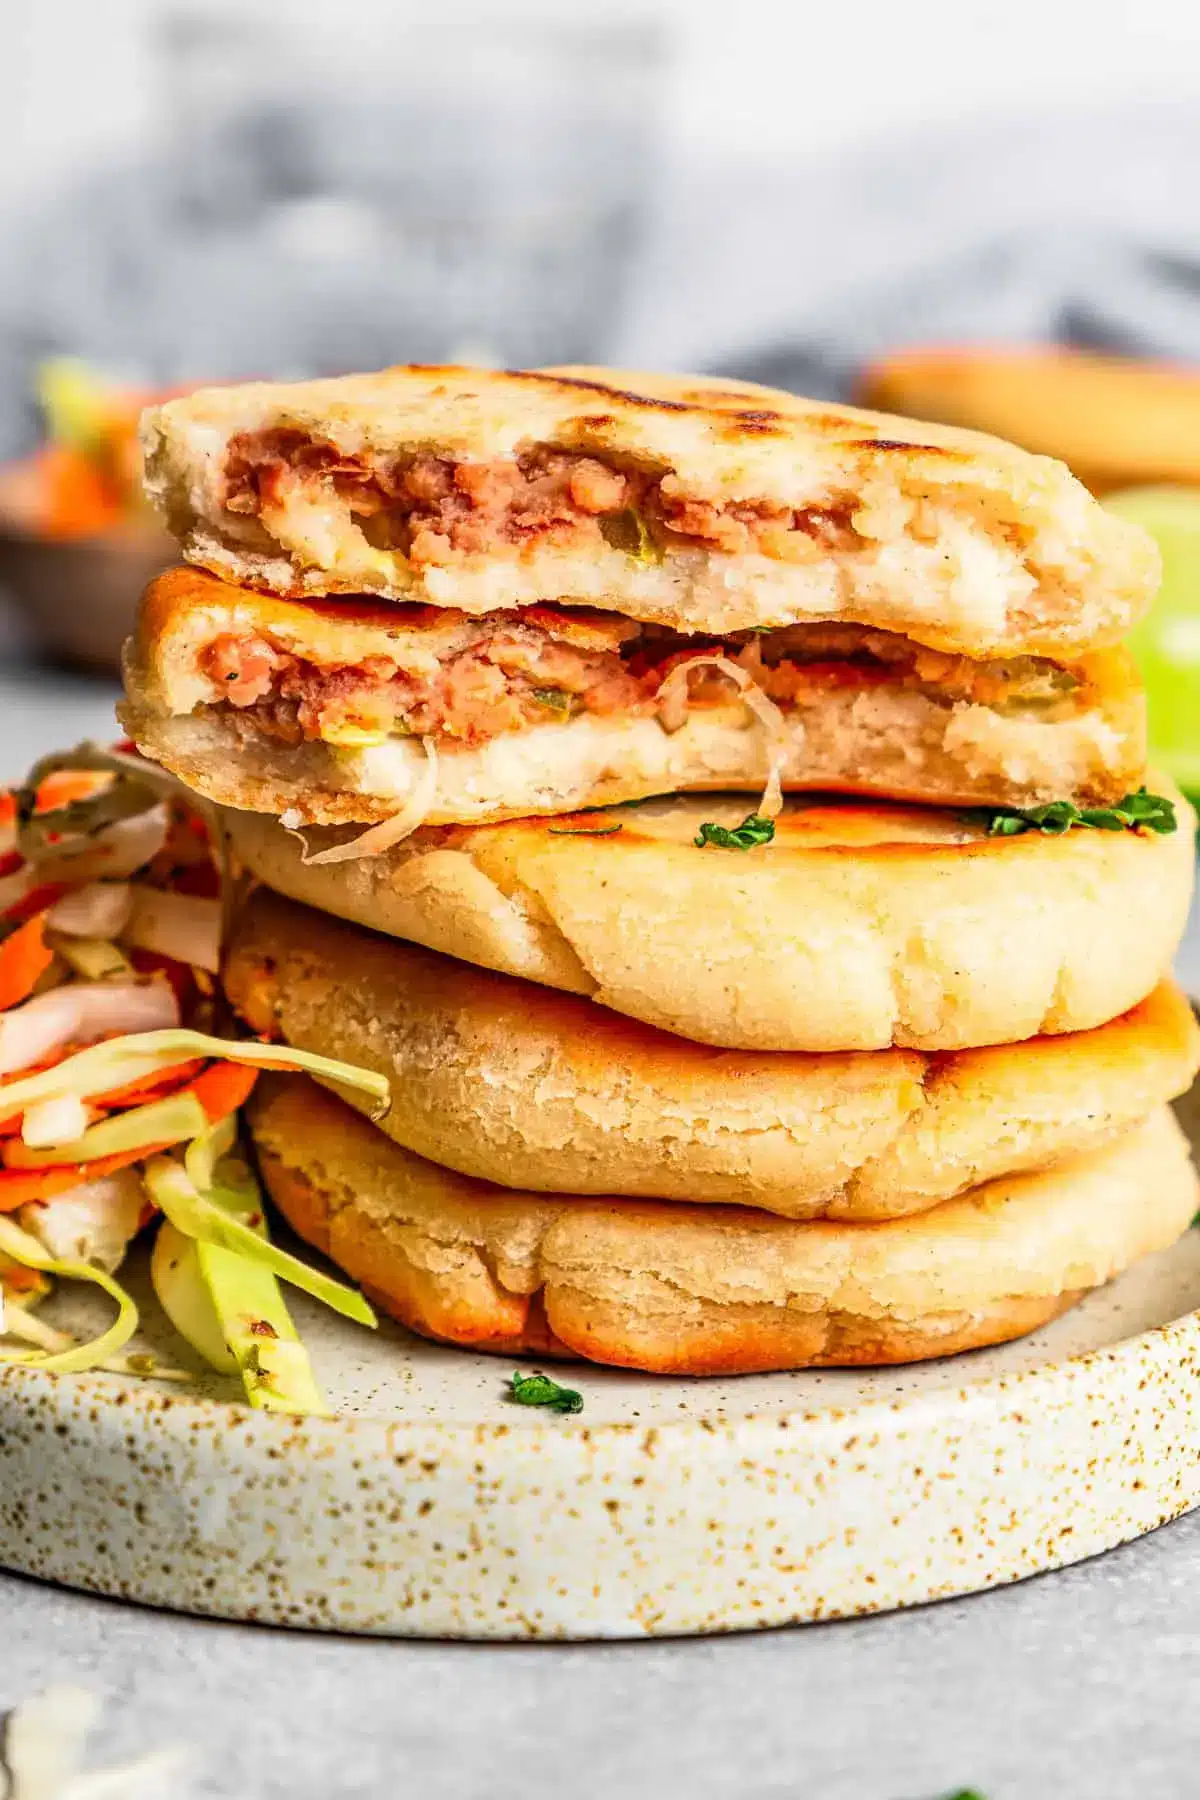
Embark on a culinary adventure to the heart of El Salvador with these authentic pupusas, a delightful street food experience that brings vibrant flavors right into your kitchen. These crispy stuffed masa cakes are more than just a meal; they’re a celebration of simple ingredients transformed into something truly special and satisfying.
Imagine biting into a warm, golden-brown exterior, giving way to a wonderfully soft interior brimming with savory refried beans, melted cheese, and a hint of tangy pickled jalapeños. Served alongside a bright, zesty cabbage slaw known as curtido, these pupusas offer a perfect balance of textures and tastes that will transport your senses with every bite.
Why You Will Love This Recipe
- Authentic Flavor: Made with traditional masa harina, these pupusas capture the genuine taste of El Salvador.
- Customizable Fillings: While refried beans, cheese, and jalapeños are classic, you can easily adapt the fillings to your personal preferences.
- Easy to Make: The shaping technique is straightforward and, with a little practice, you’ll be creating perfect pupusas in no time.
- Versatile Meal: Enjoy them as a satisfying snack, a light lunch, or a delightful appetizer before a larger Latin American feast.
- Perfect for Sharing: These hand-held delights are ideal for gatherings, parties, or a fun family cooking activity.
Ingredients You Need
The beauty of pupusas lies in their accessible ingredients, allowing you to create an authentic dish without needing hard-to-find items. We’ll focus on quality staples that build layers of flavor, from the masa dough to the fresh curtido topping. Remember that precise quantities are detailed within the accompanying recipe card for your convenience.
Pupusas Recipe
Authentic pupusas recipe at home! Pupusas are crispy stuffed masa cakes from El Salvador, filled with refried beans, pickled jalapeños, and melted cheese. Served with a side of curtido, a type of cabbage slaw. Makes a fun, easy snack or light dinner!
- For the Curtido:
- 1 cup shredded cabbage
- 1 small carrot, thinly sliced or grated
- 2 teaspoons dried oregano
- For the Pupusas:
- 1½ cups + 2 tablespoons masa harina
- 1⅓ cup water
- 1 teaspoon salt
- 1Make the Curtido: Combine shredded cabbage, carrots, and oregano in a bowl. In a separate bowl, whisk together apple cider vinegar, hot water, salt, and sugar until dissolved. Pour the dressing over the cabbage mixture and stir to combine. Cover and refrigerate for at least 4 hours, or preferably overnight.
- 2Make the Pupusas Dough: Combine masa harina, water, and salt in a bowl. Stir with a spatula until combined, then knead until a soft dough forms. Divide the dough into 8 equal parts and shape into balls.
- 3Fill the Dough: Wet your hands with water to prevent sticking. Flatten each dough ball into a ¼-inch thick disc. Place about ½ tablespoon of refried beans, mozzarella cheese, and finely chopped pickled jalapeños in the center of each disc.
- 4Seal and Shape: Lift and pinch the edges of the dough to enclose the filling, then gently reshape into a ball. Flatten the ball to about ½-inch thick. Repeat with the remaining ingredients.
- 5Fry the Pupusas: Heat 2 tablespoons of oil in a skillet over medium heat. Add the pupusas and cook for 4-5 minutes per side, until golden brown and crispy.
- 6Serve: Serve the pupusas warm with the prepared curtido on the side.
Keywords: pupusas, Salvadoran, masa harina, beans, cheese, jalapeños, curtido, side dish, snack, street food
Gathering these core ingredients will set you on the path to creating truly delicious pupusas, a testament to simple, wholesome cooking.
Variations
While the classic combination of refried beans, cheese, and jalapeños is undeniably delicious, the world of pupusas is vast and inviting for creative exploration. Don’t hesitate to experiment with different flavor profiles to discover your own signature pupusa.
Consider a delightful vegan version by substituting the cheese with a dairy-free shredded alternative or a flavorful cashew crema. For the beans, you can mash black beans with a hint of smoked paprika and cumin for a robust taste. Ensure your jalapeños are pickled without animal products, or opt for finely diced roasted bell peppers for a milder, sweeter filling.
For those following a lower-carbohydrate lifestyle, you can adapt the pupusa concept by using a blend of almond flour and coconut flour for the outer shell, though this will significantly alter the traditional texture and flavor. Alternatively, fill traditional masa dough with a hearty mixture of shredded, spiced chicken or pork, and finely chopped zucchini or spinach for added nutrients.
Another exciting variation involves embracing different regional flavors. Imagine stuffing your pupusas with a slow-cooked, shredded beef machaca, reminiscent of Northern Mexican cuisine. Or, infuse the masa with a touch of achiote for a subtle earthy flavor and vibrant color, then fill with seasoned shredded chicken tinga. The possibilities are truly endless, limited only by your imagination and pantry.
How to Prepare pupusas recipe
Step 1: Prepare the Curtido
The journey to perfect pupusas begins with the essential accompaniment: the curtido. This zesty Salvadoran cabbage slaw is crucial for balancing the richness of the stuffed masa cakes. It’s a simple yet essential component that adds a refreshing crunch and tangy counterpoint to every bite.
Start by finely shredding a head of fresh green cabbage. You can use a sharp knife, a food processor with a shredding disk, or even a mandolin for uniform slices. Grate or thinly julienne one small carrot to add a touch of sweetness and color. Finally, add a generous tablespoon of dried oregano, or if you have it on hand, fresh oregano finely chopped for an even more vibrant aroma.
In a separate bowl, prepare the dressing that will marinate and tenderize the vegetables. Whisk together a half cup of apple cider vinegar with a half cup of hot water. The heat helps to quickly dissolve the salt and sugar. Add a half teaspoon of salt to season the slaw and a half teaspoon of cane sugar, or your preferred sweetener, to round out the tartness of the vinegar.
Pour the vinegar mixture over the shredded cabbage, carrot, and oregano. Toss everything together thoroughly with your hands or tongs, ensuring all the vegetables are evenly coated with the dressing. The key to a truly delicious curtido is allowing it to marinate and develop its flavors. For the best results, cover the bowl tightly and refrigerate for at least 4 hours, or ideally, overnight.
This chilling period allows the cabbage to soften slightly, the flavors to meld beautifully, and the curtido to develop its characteristic tangy, slightly sweet, and herbaceous profile. You’ll notice the cabbage becoming tender yet retaining a pleasant crispness, making it the perfect counterpoint to the warm, soft pupusas.
Step 2: Make the Masa Dough
With the curtido chilling, it’s time to focus on the heart of the pupusa: the masa dough. This dough is remarkably simple to prepare, requiring just three core ingredients: masa harina, water, and salt.
In a medium-sized bowl, combine 1 and ½ cups plus 2 tablespoons of masa harina with 1 and ⅓ cups of lukewarm water. It’s important to use masa harina specifically designed for corn tortillas or tamales, as it has been nixtamalized, a process that improves its flavor, digestibility, and ability to bind.
Add 1 teaspoon of salt to the dry ingredients for flavor. Begin by stirring the ingredients together with a sturdy spatula or wooden spoon. This initial mixing helps to hydrate the masa harina evenly and prevents clumps from forming.
Once the mixture starts to come together into a shaggy mass, it’s time to get your hands in there. Knead the dough in the bowl for about 5 to 7 minutes. The goal is to achieve a very soft, pliable, and smooth dough that feels almost like a firm playdough. It should be moist enough to hold together but not sticky or wet.
If the dough feels too dry and crumbly, gradually add a tablespoon of water at a time until it reaches the desired consistency. Conversely, if it feels too sticky, you can add a little more masa harina, a tablespoon at a time, but be careful not to make it too dense.
After kneading, cover the bowl with a damp kitchen towel or plastic wrap and let the dough rest for about 10-15 minutes. This resting period allows the masa harina to fully absorb the water, resulting in a more workable and cohesive dough. You’ll notice it becomes even smoother and less likely to stick to your hands.
Once rested, divide the dough into 8 equal portions. Roll each portion into a smooth ball. This careful preparation ensures that each pupusa will have a uniform thickness and an even distribution of filling, leading to a consistently delicious outcome.
Step 3: Flatten and Fill the Dough
Now comes the fun part where the pupusas truly begin to take shape: flattening the masa balls and introducing the delicious fillings. This step requires a bit of technique and can be made easier by keeping your hands slightly moist.
Prepare a small bowl of water. Dip your fingertips lightly in the water and then pick up one of the masa balls. Gently flatten the ball between your palms, pressing it outwards to create a disc about ¼-inch thick. The edges should be slightly thinner than the center.
It’s crucial to work quickly but deliberately. If the dough starts to stick to your hands, simply dip your fingers in the water again. This simple trick prevents frustration and ensures smooth handling of the masa. Some people also find it helpful to coat their hands lightly with a neutral oil, like vegetable or canola oil, instead of water.
Once you have a flattened disc, it’s time to add the filling. Place about ½ tablespoon of refried beans in the center of the masa disc. Don’t overfill, as this can make it difficult to seal the pupusa properly. You want just enough to create a savory core.
Next, add a sprinkle of shredded mozzarella cheese over the refried beans. The cheese will melt beautifully during cooking, creating those satisfying cheesy strings. Finally, add a small amount of finely chopped pickled jalapeños. Adjust the amount based on your spice preference; a little goes a long way.
This is where the magic of stuffing happens. The combination of warm beans, gooey cheese, and zesty jalapeños creates a flavor explosion waiting to be enclosed within the tender masa. The careful layering ensures a balanced bite with every pupusa.
Step 4: Seal and Shape the Pupusas
Sealing the filling within the masa is a critical step for achieving perfectly formed pupusas. This technique ensures that your delicious ingredients stay contained during the cooking process, preventing any leaks and maximizing the enjoyment of each bite.
Gently bring the edges of the flattened masa disc up and around the filling. Pinch the edges together firmly, much like you would when sealing a dumpling or empanada. Ensure there are no gaps or openings where the filling could escape.
Once the edges are sealed, carefully roll the masa ball in your hands again to ensure a uniform shape. Then, with gentle pressure from your palms, flatten the ball into a disc approximately ½-inch thick. Aim for a consistent thickness throughout to ensure even cooking. Avoid pressing too hard, which could break the seal or make the pupusa too dense.
If you find the dough is becoming too sticky as you work, remember to re-wet your hands or use a touch of oil. The goal is to create a well-formed, slightly flattened disc that is ready for the skillet. Some cooks like to place the shaped pupusas on a piece of parchment paper or a lightly oiled surface while they work on the rest, which prevents them from sticking to the counter.
Take your time with this step. Each pupusa is a little handcrafted treasure. Repeating this process for all 8 portions ensures you have a beautiful batch ready for frying. The visual appeal of these uniformly shaped discs is the first hint of the delicious meal to come.
Step 5: Fry the Pupusas
The final cooking stage transforms the prepared masa discs into irresistible, golden-brown pupusas. Frying them to perfection is key to achieving that signature crispy exterior that contrasts beautifully with the soft, flavorful interior.
Heat 2 tablespoons of a neutral cooking oil, such as vegetable, canola, or corn oil, in a large, non-stick skillet or a well-seasoned cast-iron pan over medium heat. Allow the oil to heat up until it shimmers slightly, but be careful not to let it smoke.
Carefully place the shaped pupusas into the hot oil, ensuring not to overcrowd the pan. You should be able to fit about 2-3 pupusas at a time, depending on the size of your skillet. Overcrowding the pan will lower the oil temperature, leading to greasy pupusas instead of crispy ones.
Cook the pupusas for approximately 4 to 5 minutes per side. You’re looking for a rich, golden-brown color and a slightly firm texture. Use a spatula to gently flip them to ensure even cooking on both sides. Listen for a gentle sizzle as they fry, which indicates the oil is at the right temperature.
As each batch is cooked, remove the pupusas from the skillet and place them on a wire rack set over a baking sheet. This allows any excess oil to drain off, keeping them crisp. Placing them on a rack also prevents the bottoms from becoming soggy.
To keep the pupusas warm and crispy while you fry the remaining batches, you can place the baking sheet with the wire rack into a preheated oven set to a low temperature, around 200°F (95°C). This keeps them warm and ready to serve without compromising their texture.
Step 6: Serve and Enjoy
The moment you’ve been waiting for has arrived – serving your freshly fried pupusas! The aroma filling your kitchen is a testament to your delicious efforts, and the sight of the golden-brown discs is truly inviting.
Serve the pupusas immediately while they are still hot and wonderfully crispy. Their texture is at its absolute best right out of the pan, offering that satisfying crunch before you reach the warm, cheesy, and bean-filled center. The contrast between the hot pupusa and the cool, tangy curtido is what makes this dish so special.
Arrange the pupusas on a platter and serve the prepared curtido in a separate bowl alongside them. Encourage your guests to generously top their pupusas with the slaw. You can also offer additional accompaniments like a simple tomato salsa, a dollop of sour cream or crema Mexicana, or even a sprinkle of fresh cilantro.
The tactile experience of eating pupusas is part of their charm. You can either cut them in half to see the beautiful layers of filling or enjoy them whole. Their handheld nature makes them perfect for casual dining, parties, or a delightful appetizer. Watching people’s faces light up as they take their first bite is incredibly rewarding.
Don’t forget to pair these savory delights with a refreshing beverage. Traditional options include horchata or a simple agua fresca. The entire meal, from the preparation to the final bite, is a celebration of vibrant Latin American flavors and culinary tradition.
Pro Tips for pupusas recipe
To elevate your pupusa-making experience and ensure consistently delicious results, consider these expert tips. They address common challenges and offer insights into achieving that perfect texture and flavor.
Embrace the Stickiness: Masa dough can be quite sticky, especially when working with it. Keep a small bowl of water or a neutral oil nearby to lightly coat your hands between shaping each pupusa. This simple trick makes a world of difference and prevents frustration.
Don’t Overfill: While it’s tempting to pack your pupusas with generous amounts of filling, overfilling can make them difficult to seal and prone to bursting during cooking. A moderate amount of beans, cheese, and jalapeños is key for success.
Consistent Thickness is Key: Aim for an even thickness of about ½ inch for your flattened pupusas. Uneven thickness can lead to some parts being undercooked while others are overcooked, affecting the overall texture and taste.
Medium Heat is Your Friend: Frying pupusas on medium heat allows them to cook through to the center while developing a beautiful golden-brown, crispy crust on the outside. High heat will burn the exterior before the inside is properly heated, and low heat will result in greasy, soggy pupusas.
Resting the Curtido is Non-Negotiable: The curtido truly shines when it has ample time to marinate. While a few hours is the minimum, making it the day before allows the flavors to deepen and the cabbage to soften to the perfect consistency.
Consider a Cookie Scoop: For perfectly portioned dough balls, a 2-ounce cookie scoop can be incredibly helpful. It ensures consistency and saves time when dividing the masa.
Parchment Paper is a Lifesaver: After shaping your pupusas, place them on parchment paper. This prevents sticking to your work surface and makes it easy to transfer them to the skillet.
Serving Suggestions for pupusas recipe
Decoration
Pupusas are rustic by nature, and their charm lies in their simplicity. While elaborate decoration isn’t typically necessary, a few thoughtful touches can enhance their visual appeal. A generous dollop of the vibrant curtido atop each pupusa is the primary and most essential garnish.
For a burst of freshness, a scattering of finely chopped fresh cilantro over the curtido can add a lovely green contrast and an aromatic hint. If you’ve opted for a slightly spicier filling, a few thinly sliced rings of fresh jalapeño, placed artfully on the side or on top of the curtido, can signal the heat level to your diners.
A drizzle of crema Mexicana or a light swirl of sour cream can also add a visually pleasing creamy element, particularly if the pupusa filling isn’t inherently cheesy. The aim is to enhance, not overpower, the natural beauty of the pupusa and its accompaniments.
Side Dishes
Pupusas are wonderfully satisfying on their own, but they pair exceptionally well with a variety of complementary side dishes that enhance the Latin American dining experience. The curtido, of course, is the quintessential accompaniment, providing a crunchy, tangy balance.
A simple, fresh tomato salsa is another excellent choice. Made with diced tomatoes, onions, cilantro, and a squeeze of lime, it adds a bright, acidic counterpoint. For a heartier meal, consider serving them alongside a black bean soup or a small portion of flavorful rice, such as cilantro-lime rice.
If you’re serving pupusas as part of a larger meal, they make a fantastic appetizer before main courses like baked lemon chicken or a robust stew like sancocho Dominicano. Their versatility allows them to be a star or a supporting player in a diverse culinary spread.
Creative Serving Ideas
Move beyond the traditional by presenting pupusas in unexpected and delightful ways. For a fun appetizer spread, arrange small, bite-sized pupusas on a rustic wooden board alongside various dips like guacamole or a spicy pepper relish.
Consider a “pupusa bar” where guests can customize their fillings before the dough is cooked, or offer a variety of prepared fillings to add after frying. This interactive approach makes for a memorable dining experience, especially for parties or family gatherings.
Another creative idea is to serve pupusas as part of a tasting menu, perhaps paired with different types of curtido or salsas. You could even experiment with sweet pupusas for dessert, filled with ingredients like plantain or sweet potato, served with a drizzle of condensed milk or a sprinkle of cinnamon sugar.
Preparation & Storage
Storing Leftovers
Pupusas are undoubtedly best enjoyed fresh from the skillet, when their exterior is perfectly crispy and the interior is warm and melty. However, if you happen to have leftovers, proper storage is key to preserving their quality for later enjoyment.
Allow any leftover pupusas to cool completely at room temperature. Once cooled, transfer them to an airtight container. You can also place them in a resealable plastic bag. Ensure the container or bag is well-sealed to prevent air from entering, which can lead to them becoming stale or absorbing unwanted odors from the refrigerator.
Refrigerated pupusas will maintain their best quality for up to 2 to 3 days. While they won’t retain their original crispness, they will still be a delicious and satisfying option for a quick snack or meal.
Freezing
For longer storage, freezing is an excellent option for pupusas. This method is ideal if you’ve made a large batch and want to enjoy them at a later date without compromising flavor significantly.
The best way to freeze pupusas is to prepare them up to the point of frying, but do not cook them. Arrange the shaped, un-fried pupusas on a parchment-lined baking sheet, ensuring they do not touch each other. This prevents them from sticking together into a solid mass.
Place the baking sheet in the freezer and let the pupusas freeze until they are solid, which usually takes about 1 to 2 hours. Once frozen solid, transfer them to a freezer-safe airtight container or a heavy-duty resealable freezer bag. Remove as much air as possible from the bag before sealing.
Frozen pupusas can be stored for up to 3 to 4 months. When you’re ready to cook them, you can usually do so directly from frozen, adding a few extra minutes to the frying time.
Reheating
Reheating pupusas requires a method that aims to restore their crispness, as microwave heating tends to make them soft and somewhat rubbery.
The best method for reheating is to use a skillet. Place a small amount of neutral oil in a non-stick skillet over medium heat. Once the oil is shimmering, add the leftover pupusas and cook them for about 3 to 5 minutes per side, or until they are heated through and the exterior has regained some of its crispness. A well-seasoned cast-iron skillet also works beautifully for reheating.
Alternatively, you can reheat them in a toaster oven or a conventional oven preheated to around 350°F (175°C). Place the pupusas on a baking sheet and heat them for about 5 to 10 minutes, or until warmed through. This method also helps to re-crisp the exterior to some extent.
Avoid using the microwave if you want to preserve any semblance of crispness. The microwave heats food using steam, which is ideal for softening but not for reviving the satisfying crunch of a pupusa.
Frequently Asked Questions
-
What is the best type of masa harina to use for pupusas?
For authentic pupusas, it’s highly recommended to use masa harina specifically labeled for corn tortillas, tamales, or pupusas. This type of flour is nixtamalized, a process that involves soaking corn in an alkaline solution (like lime water), which breaks down its outer hull and makes it more digestible and easier to work with. Brands like Maseca or Bob’s Red Mill Masa Harina are excellent choices and widely available. Avoid using regular cornmeal or corn flour, as these lack the nixtamalization and will not yield the correct texture or flavor; the dough will be crumbly and won’t bind properly, making it very difficult to shape and cook.
-
Why are my pupusas sticking to my hands when I try to shape them?
The stickiness of masa dough is a common characteristic, but it can be managed effectively with a few simple techniques. The most common reason for excessive sticking is that the dough might be too wet or not properly kneaded. Ensure you’ve followed the recipe closely for the water-to-masa harina ratio. If the dough is still sticking, the easiest solution is to keep your hands slightly moist by dipping them in a bowl of water or coating them lightly with a neutral cooking oil (like vegetable or canola oil) before handling the masa. This creates a barrier that prevents the dough from adhering to your skin. Kneading the dough sufficiently also helps develop its elasticity, making it less sticky.
-
Can I make pupusas with fillings other than refried beans and cheese?
Absolutely! Pupusas are incredibly versatile, and the fillings can be customized to suit a wide range of tastes and dietary preferences. While refried beans and cheese (often mozzarella, queso fresco, or Oaxacan cheese) are traditional, many other delicious options exist. You can use seasoned, shredded meats like chicken tinga, pulled pork (carnitas or pernil), or ground beef seasoned with Mexican spices. For vegetarian options, consider fillings such as mashed sweet potato or butternut squash (often seasoned with cinnamon and spices), cooked and mashed black beans or white beans (seasoned with cumin and garlic), or sautéed spinach and mushrooms. Some people even enjoy pupusas filled with loroco, a Salvadoran edible flower, or a combination of cheeses and finely chopped vegetables. The key is to ensure your filling is not too wet, as excess moisture can make the pupusas difficult to seal and cook properly.