Mini Chocolate Chip Cookies – Easy Bite-Sized Recipe!
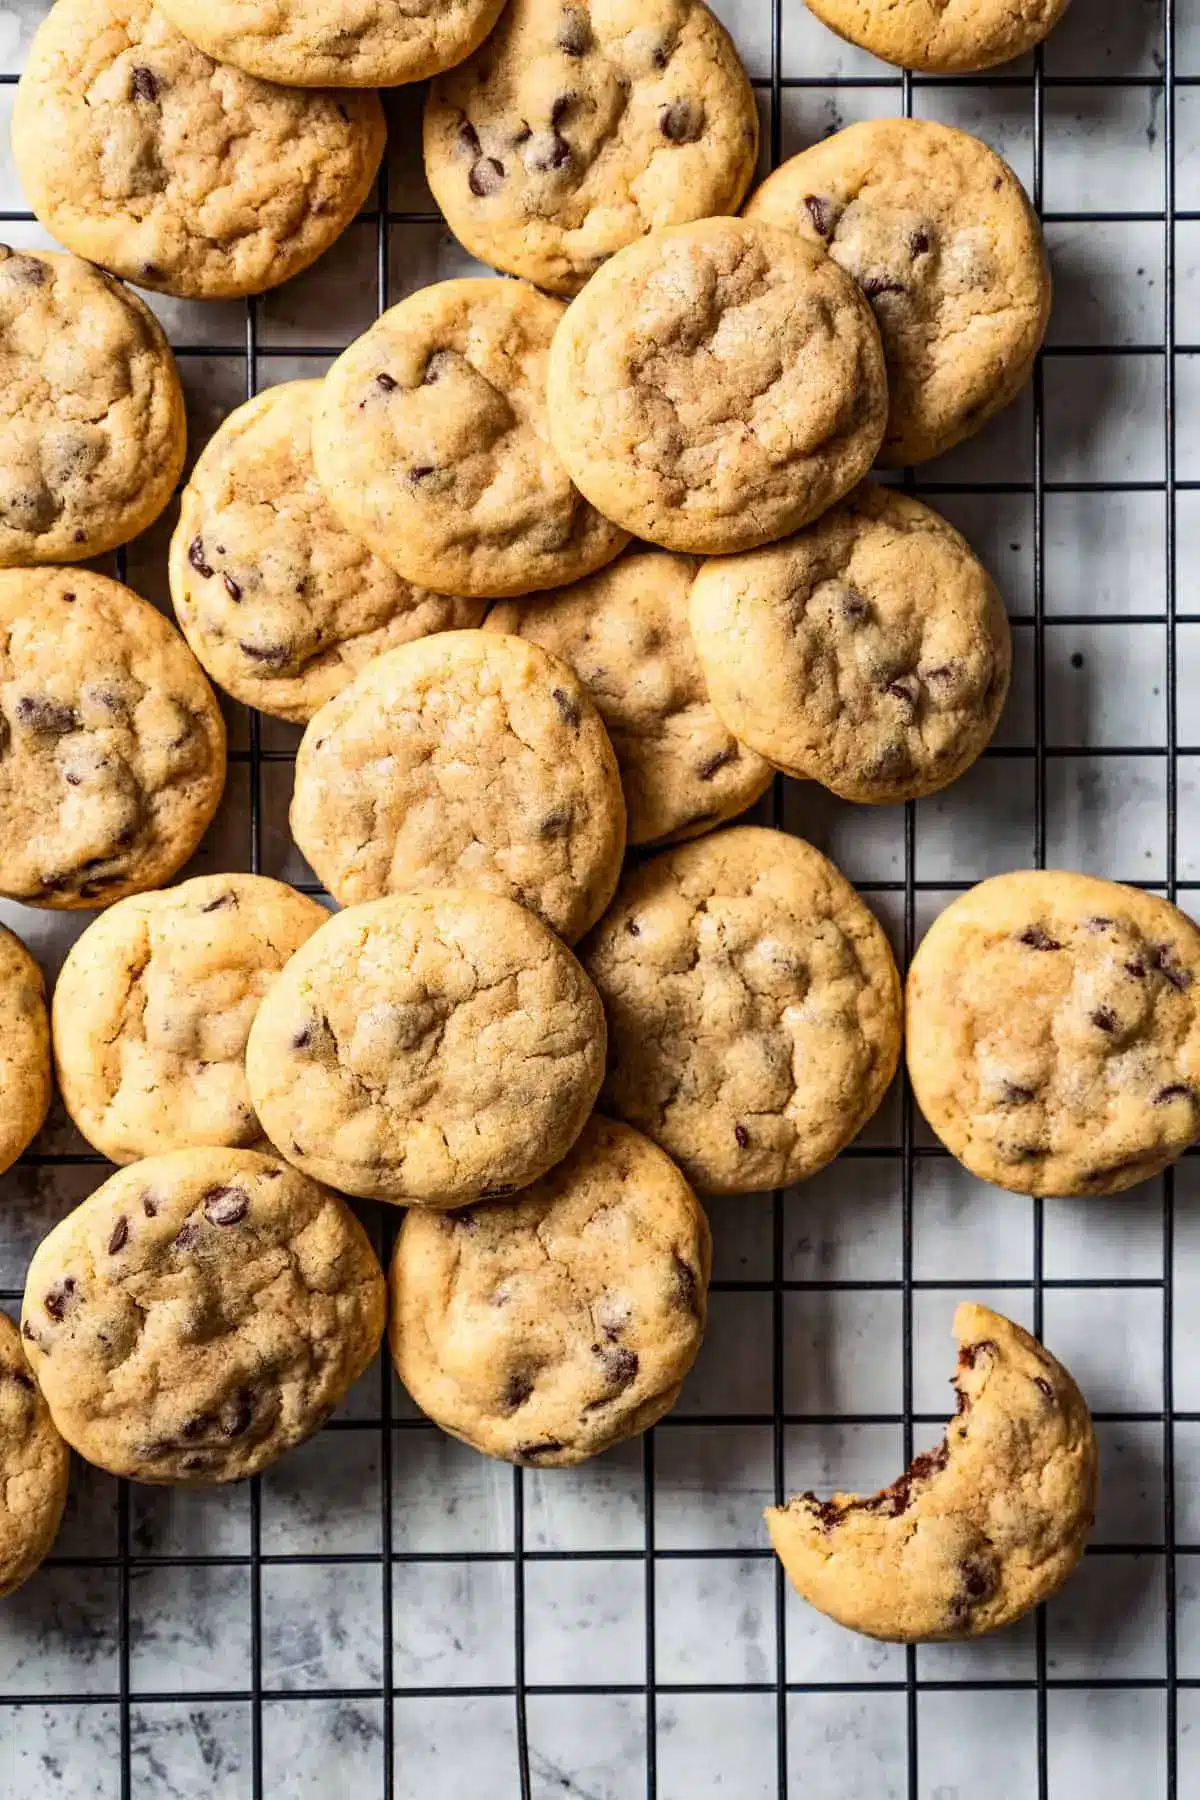
There’s a unique charm to miniature treats. They embody a delightful balance of portion control and intense flavor, making them perfect for any occasion, from casual snacking to elegant gatherings. These mini chocolate chip cookies capture that essence perfectly, offering all the beloved qualities of a classic cookie in a bite-sized package.
Imagine a warm, soft cookie, slightly crisp around the edges, bursting with molten chocolate chips. Now, picture that experience condensed into a perfect two-bite wonder. That’s precisely what this recipe delivers, promising a joyous indulgence that satisfies without overwhelming. It’s a simple pleasure, elevated.
Why You Will Love This Recipe
- Perfectly Portioned: These cookies are delightfully small, making them ideal for little hands, party favors, or when you desire just a hint of sweetness.
- Incredibly Quick: From mixing to baking, this recipe is designed for speed, allowing you to enjoy fresh cookies with minimal fuss and wait time.
- Customizable: While the classic chocolate chip is a timeless favorite, this base recipe is a fantastic canvas for your creativity, inviting various additions and flavor profiles.
- Irresistibly Chewy: The combination of sugars and the specific baking time ensures a wonderfully soft and chewy interior that cookie lovers adore.
- Crowd-Pleasing: Their universally appealing flavor and adorable size make them a guaranteed hit at any event or as a thoughtful homemade gift.
Ingredients You Need
Crafting exceptional mini chocolate chip cookies begins with selecting high-quality ingredients. Using fresh, premium components will elevate the flavor profile and texture of your final baked goods. Pay attention to the freshness of your leavening agents and the quality of your chocolate chips for the best results. These foundational elements are crucial for achieving that perfect balance of chewy, crisp, and chocolatey goodness.
Mini Chocolate Chip Cookies

These mini chocolate chip cookies are perfectly sized to satisfy a cookie craving! They're soft, chewy, and bursting with mini chocolate chips in bite-sized form.
- 1¼ cups all-purpose flour
- 1 large egg
- 1 teaspoon pure vanilla extract
- 1Preheat oven to 350˚F. Line one baking sheet with wax paper and line another baking sheet with Silpat or parchment paper. Set aside.
- 2In a mixing bowl, combine the flour, salt, baking powder, and baking soda; whisk until well combined and set aside.
- 3In your mixer's bowl, combine the butter, sugar, brown sugar, eggs, and vanilla; using your mixer, cream until smooth and creamy.
- 4Gently stir the flour mixture into the butter mixture; mix until thoroughly combined. Stir in the mini chocolate chips. At this point, you can continue with the recipe or store the cookie dough in the refrigerator or freezer (see notes).
- 5To continue, scoop out 1/2 teaspoon of cookie dough at a time and drop it onto the wax paper-lined baking sheet. Then, shape each cookie dough into a ball and transfer the cookie balls to the parchment paper-lined baking sheet, spacing them about 2 inches apart.
- 6Bake the cookies for 5 to 6 minutes or until the edges are light brown. The cookies should still feel soft in the middle and under-baked.
- 7Remove the mini chocolate chip cookies from the oven and let them cool on the baking sheet for 2 minutes; then, transfer to a wire rack to cool completely. Store the cookies in airtight containers.
Keywords: cookies, chocolate chip, mini, dessert, bake, easy, quick
- all-purpose flour: the structural backbone of your cookies, ensuring they hold their shape.
- salt: a flavor enhancer that balances the sweetness and brings out the chocolate’s richness.
- baking powder: contributes to the lift and lightness of the cookie dough.
- baking soda: aids in spreading and browning, crucial for that classic cookie texture.
- butter, softened: provides richness, moisture, and contributes to the cookie’s tender crumb.
- granulated sugar: offers sweetness and helps create crisp edges.
- dark brown sugar: imparts moisture, chewiness, and a subtle caramel note.
- large egg: acts as a binder, contributing to the structure and richness of the dough.
- pure vanilla extract: adds a warm, aromatic depth that complements the chocolate.
- mini chocolate chips: the star of the show, offering delightful bursts of chocolate in every bite.
Please refer to the recipe card for the exact quantities of each ingredient required to make these delightful mini chocolate chip cookies.
Variations
To infuse a delightful vegan twist, simply substitute the butter with a high-quality vegan butter alternative and the egg with a flax egg (1 tablespoon flaxseed meal mixed with 3 tablespoons water, let sit for 5 minutes) or a commercial egg replacer. Ensure your chocolate chips are also dairy-free. This adaptation maintains the delightful texture and flavor, making these cookies accessible to everyone.
For a low-carb or keto-friendly version, embrace alternative flours like almond flour or a coconut flour blend. Replace the granulated and brown sugars with a granulated erythritol or xylitol blend, and use sugar-free mini chocolate chips. The result is a guilt-free indulgence that satisfies those sweet cravings without the carbohydrate load. Adjusting baking times may be necessary due to the different flour properties.
Consider a delightful twist by adding finely chopped nuts such as walnuts or pecans for an added crunch and nutty flavor. Another exciting variation is to incorporate a touch of citrus zest, like orange or lemon, which can beautifully complement the chocolate. For an even more decadent experience, a pinch of sea salt sprinkled on top before baking enhances the chocolate’s depth.
How to Prepare mini chocolate chip cookies
Step 1: Prepare Your Baking Station
Before you even think about mixing ingredients, it’s essential to set up your workspace efficiently. This involves preheating your oven to the correct temperature, which for these mini cookies is typically around 350°F (175°C). This ensures an even and consistent baking environment right from the start. Having your oven at the optimal temperature is a foundational step for successful baking, preventing dough from spreading too quickly or not baking through.
Simultaneously, prepare your baking sheets. Lining one sheet with wax paper will be helpful for portioning the dough initially, allowing you to scoop and roll all your cookie balls before transferring them to their final baking surface. The second baking sheet should be lined with parchment paper or a silicone baking mat to prevent sticking and ensure easy cleanup. This dual-sheet approach streamlines the process, minimizing mess and maximizing your cookie-making flow.
Having all your ingredients measured and ready to go, a concept known as “mise en place” in culinary terms, is also incredibly beneficial. This means having your dry ingredients in one bowl, your wet ingredients ready in another, and your chocolate chips within easy reach. This organized approach not only saves time but also reduces the chances of errors or forgetting an ingredient mid-mix.
Step 2: Combine the Dry Ingredients
In a medium-sized mixing bowl, you’ll begin by whisking together the dry components of your cookie dough. This includes the all-purpose flour, which forms the structural base of your cookies. You’ll also add the salt, a crucial element for balancing sweetness and enhancing other flavors, alongside the baking powder and baking soda, which are your leavening agents responsible for the cookies’ rise and texture. Whisking these ingredients thoroughly ensures they are evenly distributed, preventing pockets of salt or leavening agents in your final cookies.
The goal here is a homogenous mixture. Ensure there are no visible clumps of flour or baking soda. A good whisking action aerates the flour slightly, which can contribute to a lighter cookie. This step is fundamental to achieving consistent results across every single cookie you bake. Think of it as laying the groundwork for a perfect cookie foundation.
Once combined, set this bowl of dry ingredients aside. It will be incorporated into the wet ingredients later in the process. This separation allows you to ensure the dry ingredients are perfectly blended before they meet the butter and sugar mixture, preventing overmixing later on.
Step 3: Cream the Butter and Sugars
In a separate, larger mixing bowl, or the bowl of your stand mixer, you will combine the softened butter with both the granulated sugar and the dark brown sugar. The butter should be at room temperature – soft enough to indent with your finger but not melted. This is critical for proper creaming. Using a mixer, whether a hand mixer or a stand mixer fitted with the paddle attachment, is highly recommended for this stage.
Creaming involves beating the butter and sugars together until the mixture becomes light in color and fluffy in texture. This process incorporates air into the dough, which is vital for creating a tender cookie with a good lift. Scrape down the sides and bottom of the bowl periodically to ensure all the butter and sugar are evenly creamed. This might take anywhere from 3 to 5 minutes of continuous beating.
The resulting creamed mixture should be pale yellow and have a significantly increased volume. This fluffy base is what gives cookies their characteristic chewiness and contributes to their overall pleasant mouthfeel. Do not rush this step; the quality of your creaming directly impacts the final cookie texture and appearance.
Step 4: Incorporate Wet Ingredients and Chocolate Chips
To the creamed butter and sugar mixture, you will now add the large egg and the pure vanilla extract. Mix these in on low speed until just combined. It’s important not to overbeat at this stage, as overmixing can develop the gluten in the flour too much, leading to tougher cookies. Ensure the egg is fully incorporated and no streaks of yolk or white remain visible.
Once the egg and vanilla are well integrated, it’s time to gently introduce the dry ingredients to the wet mixture. Add the bowl of whisked dry ingredients to the creamed mixture. Mix on the lowest speed of your mixer, or fold with a spatula, until the flour is just incorporated and no dry streaks remain. Again, resist the urge to overmix; a few small streaks of flour are acceptable as they will disappear when you add the chocolate chips.
Finally, gently fold in the mini chocolate chips. Stir them in with a spatula or wooden spoon until they are evenly distributed throughout the dough. The mini size is perfect for these small cookies, ensuring a good chocolate-to-dough ratio in every bite. If you prefer more chocolate, feel free to add a few extra chips, but be mindful not to overload the dough, which could affect baking consistency.
Step 5: Portion and Shape the Dough
Now comes the fun part of transforming your delicious cookie dough into perfectly sized mini cookies. Using a small cookie scoop, approximately 1/2 teaspoon in size, scoop out portions of the dough. This consistent scooping ensures that all your cookies will bake evenly and be roughly the same size, which is essential for that charming mini aesthetic. If you don’t have a small cookie scoop, you can use two small spoons to approximate the same portion size.
Once scooped, take each portion of dough and gently roll it between your palms to form a smooth ball. This rolling action helps to compact the dough slightly and creates a uniform shape. Place these dough balls onto the wax paper-lined baking sheet you prepared earlier. Ensure you leave about 2 inches of space between each dough ball, as they will spread slightly during baking. This spacing prevents the cookies from baking into one large sheet.
If you’re using the wax paper method, once you have all your dough balls portioned and rolled, you can then transfer them, one by one, onto the parchment-lined baking sheet. This two-step process of scooping onto wax paper and then transferring to parchment is an efficient way to manage the dough and keep your hands clean.
Step 6: Bake and Cool to Perfection
Carefully place the baking sheet with the shaped cookie dough balls into your preheated oven. Bake for approximately 5 to 6 minutes. The exact time will depend on your oven, so it’s crucial to keep a close eye on them. You are looking for the edges to be lightly golden brown, but the centers should still appear soft and slightly underbaked. This is the secret to achieving that desirable chewy texture; the cookies will continue to set up as they cool.
Overbaking is the most common mistake with mini cookies, as they can go from perfectly baked to dry and crumbly very quickly. Therefore, set a timer and be vigilant. If the centers look still quite wet, give them another minute, but err on the side of slightly underbaked. Pulling them out when they still look a bit soft is key to their chewy success.
Once removed from the oven, let the cookies cool on the baking sheet for about 2 to 3 minutes. This brief cooling period allows them to firm up enough to be moved without falling apart. After this short rest, carefully transfer the cookies to a wire cooling rack to cool completely. This allows air to circulate around them, preventing the bottoms from becoming soggy and ensuring an even cooling process. Resist the temptation to eat them all while they’re still warm; though they are delicious then, they are best enjoyed once fully cooled.
Pro Tips for mini chocolate chip cookies
Chill for Thickness: While this recipe is designed for immediate baking, if you prefer a thicker, more substantial cookie, chilling the dough is a game-changer. After mixing, cover the bowl tightly and refrigerate for at least 30 minutes, or even up to 24 hours. Chilling solidifies the butter, preventing excessive spreading and resulting in a puffier cookie.
The Power of a Small Scoop: Consistency is key when making mini cookies. Investing in a small cookie scoop, ideally around a 1/2 teaspoon size, will ensure each cookie is uniform. This not only makes for a visually appealing batch but also guarantees that all cookies bake at the same rate, avoiding under or overcooked treats.
Mind the Spacing: Don’t overcrowd your baking sheets. Leave at least 2 inches of space between each dough ball. This provides adequate room for the cookies to spread slightly as they bake. Baking in smaller batches if necessary will ensure better air circulation and even heat distribution, leading to superior results.
Watch, Don’t Wait: Mini cookies bake much faster than their larger counterparts. Keep a close eye on them during the final minutes of baking. They are ready when the edges are set and lightly golden, but the centers still look soft and slightly underbaked. They will continue to cook and firm up on the hot baking sheet after being removed from the oven.
Flavor Enhancements: Don’t be afraid to experiment with the dough. A pinch of cinnamon or nutmeg can add a warm, spiced note. A touch of espresso powder dissolved in the vanilla extract can deepen the chocolate flavor. Even a sprinkle of flaky sea salt on top just before baking can elevate the sweetness and chocolate intensity beautifully.
Serving Suggestions for mini chocolate chip cookies
Decoration
These mini chocolate chip cookies are so delightful on their own that extensive decoration is often unnecessary. However, a simple dusting of powdered sugar can lend an elegant touch, especially if serving them during the holidays. For a festive flair, consider a very light drizzle of melted white chocolate or dark chocolate over the tops of the cooled cookies. Tiny edible glitter or sprinkles can also add a pop of color and sparkle, making them even more appealing for parties and celebrations.
Side Dishes
When serving these miniature delights, consider pairing them with beverages that complement their sweet and chocolatey nature. A cold glass of milk is a classic and always-welcome accompaniment, cutting through the richness of the chocolate. For adult gatherings, a rich coffee or a sweet dessert wine can be excellent partners. If you’re hosting a brunch or a tea party, these cookies can be a lovely addition alongside scones or muffins, offering a sweet counterpoint to more savory baked goods.
Creative Serving Ideas
Transform these mini cookies into an ice cream sandwich base by sandwiching a small dollop of your favorite ice cream between two cookies. For a dessert platter, arrange them artfully with other small treats like mini brownies, fruit tarts, or candies. They also make an incredibly charming and thoughtful party favor; simply place a few in small cellophane bags tied with ribbon. Consider using them as edible garnishes for larger desserts, such as a pile of cookies adorning the side of a slice of cake or cheesecake.
Preparation & Storage
Storing Leftovers
To maintain the delightful texture of your mini chocolate chip cookies, store them in an airtight container at room temperature. Ensure the container is truly airtight to prevent the cookies from drying out or becoming stale. Adding a slice of bread to the container can help maintain softness by providing a slight source of moisture, although this method should be used with caution to avoid making the cookies soggy.
These cookies are best enjoyed within 3 to 4 days of baking. After this period, their texture may begin to change, becoming slightly harder or chewier. If you find they have become too hard, they can be briefly warmed in a low oven or microwave to soften them up before serving.
Avoid storing them in the refrigerator, as the cold, dry environment can accelerate staling and alter their desired chewy consistency. Proper storage is key to preserving the homemade goodness of these little treats for as long as possible.
Freezing
Mini chocolate chip cookies freeze exceptionally well, both as baked cookies and as unbaked dough. For baked cookies, ensure they are completely cooled before packaging them for freezing. Place them in a single layer on a baking sheet and freeze until solid, then transfer them to a freezer-safe bag or airtight container. This prevents them from sticking together.
To freeze the cookie dough, scoop and roll the dough balls as directed. Place these unbaked dough balls on a parchment-lined baking sheet and freeze until firm. Once frozen solid, transfer them to a freezer-safe bag or container. This method allows you to bake fresh cookies whenever a craving strikes. The dough can be stored in the freezer for up to 3 months.
When freezing baked cookies, they can be stored for up to 2 to 3 months. Freezing unbaked dough balls for up to 3 months is also an excellent make-ahead strategy. Properly packaged cookies and dough will maintain their quality and flavor for an extended period.
Reheating
If your baked mini chocolate chip cookies have become a bit hard or you simply prefer them warm and gooey, reheating is a simple process. For a few cookies, you can place them on a microwave-safe plate and heat them for 10-15 second intervals until they reach your desired warmth. Be cautious not to overheat, as this can cause them to become tough or melt the chocolate chips too much.
A more controlled method for reheating is in a conventional oven. Place the cookies on a baking sheet and warm them in a preheated oven at around 300°F (150°C) for about 3-5 minutes. This gently warms them through and can help restore some of their original soft texture. This is particularly effective if you’ve just pulled them from the freezer and want to bake them from a slightly chilled state.
If you’re reheating unbaked frozen dough balls, you can bake them directly from frozen. You might need to add an extra minute or two to the baking time mentioned in the recipe. Keep an eye on them to ensure they bake through without the edges becoming too dark. This method is perfect for satisfying a sudden cookie craving with minimal effort.
Frequently Asked Questions
- Can I use regular-sized chocolate chips instead of mini ones?
Yes, you absolutely can use regular-sized chocolate chips if that’s what you have on hand. The key difference will be the distribution of chocolate within each cookie. With regular chips, you might get fewer chocolate chunks per cookie, but the flavor intensity will still be present. If you choose to use larger chips, consider cutting them in half, especially if your cookie dough balls are very small, to ensure a better bite. The overall baking time might not change significantly, but keep an eye on them, as larger chocolate pieces can sometimes affect how evenly the cookie bakes by conducting heat differently. You may also find that fewer regular chips are needed to achieve a similar chocolate-to-dough ratio compared to mini chips. - Why are my mini chocolate chip cookies spreading too much?
Excessive spreading in cookies is often due to a few common culprits related to the ingredients and preparation. One major factor is the temperature of your butter; if it’s too soft or melted, it will cause the dough to spread uncontrollably. Ensure your butter is softened but not greasy. Another reason could be the ratio of sugar to flour; too much sugar or not enough flour can lead to a runnier dough. Also, overmixing the dough after adding the flour can develop gluten, which sometimes contributes to spreading. Finally, if your oven temperature is too low, the cookies won’t set properly before they spread out. Ensure your oven is accurately preheated and consider using a thermometer to verify the temperature. - How do I ensure my mini cookies are perfectly chewy and not dry?
Achieving that perfect chewy texture is all about controlling the moisture and baking time. The combination of granulated and brown sugar in this recipe is crucial; brown sugar, with its molasses content, adds significant moisture and chewiness. The most critical step, however, is to avoid overbaking. These mini cookies bake very quickly, and pulling them out of the oven when the centers still look slightly soft and underbaked is key. They will continue to cook and firm up on the hot baking sheet as they cool. If you’re unsure, it’s always better to underbake slightly than to overbake, as overbaked cookies will inevitably become dry and crumbly.