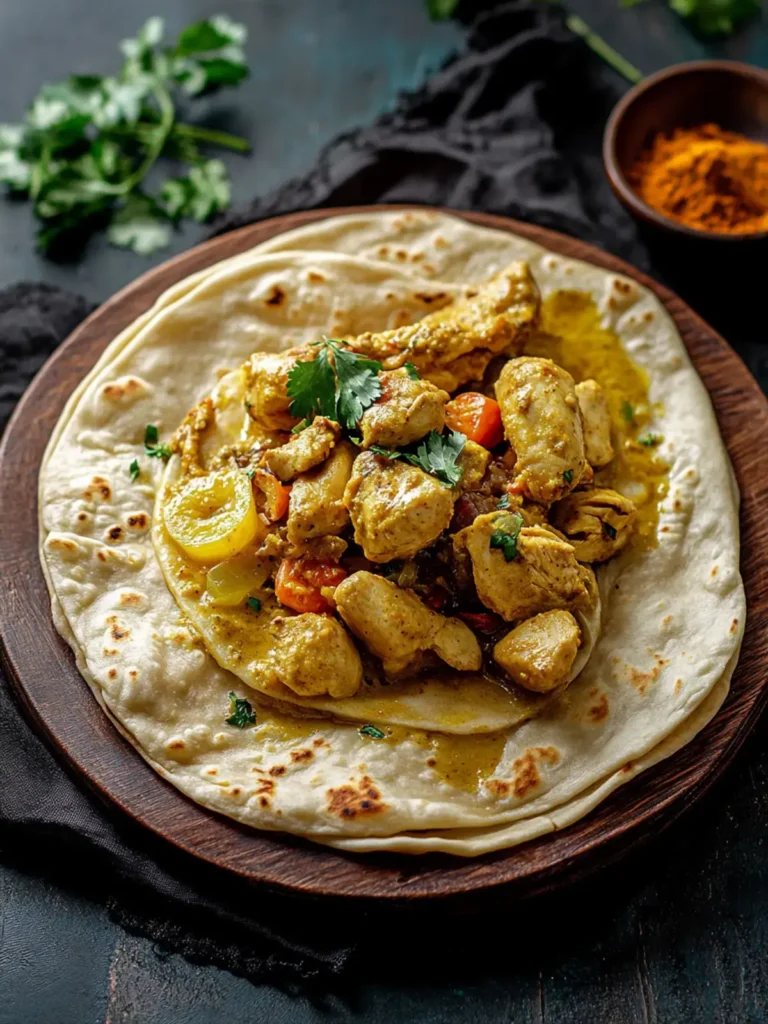
Grilled Lemon Chicken Recipe – The Best Lemon Marinade!
This juicy grilled lemon chicken has always been my family’s go-to grilled chicken recipe for summer. Bursting with fresh flavor and herbs, the garlicky lemon chicken marinade is quick and easy to make. It’s a dish that embodies the spirit of warm weather gatherings and simple, delicious food.
In honor of May Day, I’m marinating juicy chicken with plenty of lemon and tossing it onto the grill. May Day is basically European Labor Day, a celebration of spring and outdoor feasting. One whiff of this garlicky lemon chicken on the grill takes me right back to our holiday picnics in Macedonia, a time filled with laughter and delicious aromas.
Why You Will Love This Recipe
- Effortless Preparation: With just a few simple ingredients and a straightforward marinade, this recipe comes together with minimal fuss, making it perfect for busy weeknights or relaxed weekends.
- Incredible Flavor Infusion: The bright, zesty lemon and pungent garlic in the marinade penetrate the chicken beautifully, resulting in a remarkably flavorful and tender final dish that will have everyone asking for seconds.
- Versatile Serving Options: This grilled lemon chicken is incredibly adaptable; it pairs wonderfully with a wide array of side dishes, from hearty grains to fresh salads, allowing you to create a complete and satisfying meal for any occasion.
- Perfect for Outdoor Cooking: Designed for the grill, this recipe captures that essential smoky char and perfectly cooked exterior that defines great barbecue, making it an ideal centerpiece for any outdoor gathering.
- Family-Approved Taste: This recipe has been a consistent hit with my family for years, proving its enduring appeal through its delicious taste and crowd-pleasing nature.
Ingredients You Need
The beauty of this grilled lemon chicken lies in its simplicity, relying on a few high-quality ingredients to create an explosion of flavor. Using fresh, vibrant components will truly elevate the final dish. The bright acidity of the lemons, the pungent kick of garlic, and the freshness of parsley meld together to create a marinade that is both invigorating and deeply satisfying.
Grilled Lemon Chicken

This juicy lemon chicken is a go-to grilled chicken recipe for summer! The garlicky lemon marinade is bursting with fresh flavor and needs only 5 ingredients.
- 2 pounds boneless, skinless chicken breasts
- ⅓ cup olive oil
- zest of 2 lemons
- ⅓ cup fresh lemon juice (zest the lemons before juicing)
- 4 cloves garlic, minced
- ¼ cup chopped fresh parsley
- salt and fresh ground pepper, to taste
- 1 whole lemon, cut into slices
- 1In a large ziploc bag, combine chicken, olive oil, lemon zest, lemon juice, garlic, parsley, salt, and pepper. Seal the bag and shake it all up until well combined. Place the bag in the refrigerator and marinate for about 4 hours or overnight.
- 2Preheat the grill to about 375ºF to 400ºF. Brush the grill grates with olive oil.
- 3Remove the chicken breasts from the marinade and place them on the hot grill; cook without touching the grill until they start to get grill marks, about 5 minutes.
- 4Turn the chicken breasts over, cover the grill, and let them finish cooking, about 7 more minutes, depending on the thickness of the chicken. The chicken is done when a meat thermometer registers 165 degrees Fahrenheit.
- 5Remove chicken from grill; cover and let rest for 5 minutes before cutting and serving.
- 6Grill Pan Instructions: Preheat oven to 350ºF. Grease a grill pan with cooking spray and set it over medium-high heat.
- 7Add the chicken and cook for 4 minutes; flip, and continue to cook for 2 more minutes, or until lightly browned.
- 8Place the grill pan in the oven and cook for 18 to 20 minutes or until the chicken is cooked through. Remove from oven and let rest for 5 to 8 minutes before cutting and serving.
Keywords: grilled chicken, lemon chicken, summer recipe, easy chicken recipe, grilling, marinade
- olive oil: a good quality extra virgin olive oil provides a rich, herby base for the marinade, contributing to both flavor and moisture.
- lemons: fresh lemons are paramount, offering both the bright zest and the tangy juice that define this dish’s signature flavor profile.
- garlic: freshly minced garlic cloves are essential for that characteristic pungent depth, adding a robust aromatic quality.
- parsley: fresh, chopped parsley brings a burst of herbaceous freshness, cutting through the richness and adding a vibrant green note.
- salt and fresh ground pepper: these fundamental seasonings are crucial for enhancing all the other flavors and bringing the marinade into perfect balance.
- whole lemon: for serving, thin slices of fresh lemon add an extra visual appeal and a final touch of citrus brightness.
The precise quantities for these ingredients are readily available in the recipe card, ensuring your measurements are spot on for culinary success.
Variations
For those following a vegan lifestyle, this lemon chicken recipe can be brilliantly adapted. Consider using firm tofu or large portobello mushrooms as your base. Marinate them in the same lemon-garlic mixture, adjusting the marinating time as these ingredients absorb flavors differently than chicken. Grilling them will impart a similar smoky char, offering a delicious plant-based alternative.
If you’re aiming for a low-carb or ketogenic approach, this recipe remains an excellent choice. The chicken itself is naturally low in carbohydrates. You can enhance the low-carb aspect by serving it alongside a vibrant medley of grilled vegetables such as zucchini, bell peppers, asparagus, or cauliflower. Skip any starchy sides and focus on fresh, green accompaniments.
Another exciting variation involves infusing the marinade with other herbs or spices to create a unique flavor profile. Think about adding a pinch of red pepper flakes for a hint of heat, a sprig of fresh rosemary for an earthy note, or even a teaspoon of smoked paprika for an added layer of smoky depth. Experimentation is key to discovering your personal favorite twist on this classic.
You could also explore different cuts of chicken. While boneless, skinless breasts are convenient, chicken thighs offer a richer, more succulent result due to their higher fat content. Marinating and grilling chicken thighs using this lemon-garlic blend will yield incredibly tender and flavorful results. Just be mindful of the slight adjustment in grilling time.
For a truly Mediterranean twist, consider adding a few chopped Kalamata olives or some crumbled feta cheese to the grilled chicken just before serving. This simple addition will transport your taste buds to the sun-drenched shores of Greece, adding a salty tang and a delightful textural contrast to the tender chicken. It’s a small change that makes a big impact on the overall flavor experience.
How to Prepare grilled lemon chicken
Step 1: Marinate the Chicken
Begin by preparing the exquisite marinade that will imbue the chicken with its signature zesty flavor. In a large, resealable plastic bag or a non-reactive bowl, combine the olive oil, the zest of two fresh lemons, and the freshly squeezed juice from those same lemons. The zest provides a concentrated burst of lemon essence, while the juice adds that essential tangy brightness.
Next, mince four cloves of garlic until they are very fine; this ensures the garlic flavor is evenly distributed throughout the marinade without any overpowering chunks. Add the minced garlic to the lemon and oil mixture. Finally, stir in about a quarter cup of freshly chopped parsley, which will offer a beautiful herbaceous counterpoint to the citrus and garlic.
Season this aromatic blend generously with salt and freshly ground black pepper. The salt helps to tenderize the chicken and draw out its natural flavors, while the pepper adds a subtle warmth and complexity. Once all the marinade ingredients are combined, add your two pounds of boneless, skinless chicken breasts to the bag or bowl. Ensure each piece of chicken is thoroughly coated in the marinade, massaging it in gently if necessary.
Seal the bag tightly, pressing out as much air as possible to prevent oxidation and maintain freshness, or cover the bowl with plastic wrap. Place the marinated chicken in the refrigerator to allow the flavors to meld and penetrate the meat. For optimal flavor development, aim for a marinating time of at least four hours, or ideally, overnight. This extended period ensures that the chicken becomes incredibly tender and infused with the bright, garlicky lemon notes, setting the stage for a truly delicious grilled dish.
The importance of adequate marination cannot be overstated. It’s the foundation of a flavorful grilled lemon chicken. The acidic lemon juice begins to break down the proteins in the chicken, making it more tender and receptive to the flavors of the marinade. The olive oil helps to carry these flavors into the meat and also ensures the chicken remains moist during the grilling process. The garlic and parsley contribute their aromatic compounds, creating a complex and enticing aroma even before the chicken hits the grill.
When you are ready to proceed with grilling, take the chicken out of the refrigerator about 20-30 minutes prior to cooking. This allows the chicken to come closer to room temperature, promoting more even cooking on the grill. If you find yourself pressed for time, a shorter marination of 1-2 hours will still yield a decent flavor, but the depth and tenderness will be noticeably enhanced with a longer soak. Consider preparing the marinade and chicken the night before for the easiest grilling experience.
Step 2: Prepare the Grill
As your chicken finishes its flavor-infusing journey in the marinade, it’s time to ready your grill for action. For optimal results, preheat your grill to a medium-high heat, aiming for a temperature range of approximately 375°F to 400°F (190°C to 205°C). This temperature is crucial for achieving that desirable sear and char marks on the chicken while ensuring it cooks through without burning.
Achieving the correct grill temperature is key to success. Too low, and the chicken will steam rather than grill, lacking that desirable crisp exterior. Too high, and the outside will scorch before the inside is cooked, leaving you with dry, overcooked chicken. Use your grill’s built-in thermometer or an infrared thermometer to accurately gauge the heat.
Once the grill has reached the target temperature, it’s time to address the grates. Grates that are not properly cleaned and oiled can lead to the chicken sticking, which is incredibly frustrating and can ruin the presentation. Generously brush the grill grates with a high-heat cooking oil. Olive oil can be used, but an oil with a higher smoke point like canola oil or avocado oil is often preferred for grilling.
Use a sturdy brush or a folded paper towel secured with tongs to apply the oil. Do this carefully, as the grill is hot. You want to create a non-stick barrier that will allow the chicken to release easily after searing, leaving behind beautiful grill marks. Reapply oil as needed during the grilling process if you notice any sticking. Ensuring your grill is clean and well-oiled sets the stage for a smooth and successful grilling experience.
The act of preheating the grill also helps to sanitize the grates and burn off any residual debris from previous cooking sessions. A hot grill is a cleaner grill. Therefore, allowing it to heat up for a good 10-15 minutes before you start oiling and cooking is a vital step. If you are using a charcoal grill, ensure the coals are properly lit and covered in a gray ash before you begin the preheating process. This indicates they have reached the optimal temperature for grilling.
Remember that different grills can vary in their heat distribution. You might have hotter and cooler spots on your grill. Familiarize yourself with your specific grill’s quirks and adjust the placement of the chicken accordingly to ensure even cooking. If you’re using a gas grill, ensure all burners are set to medium-high. For charcoal, arrange the coals to create a direct heat zone for searing and potentially an indirect zone for finishing if the chicken is cooking too quickly.
Step 3: Grill the Chicken
Now comes the exciting part: grilling the marinated lemon chicken to perfection. Carefully remove the chicken breasts from the marinade bag or bowl, allowing any excess marinade to drip back. Discard the used marinade, as it should not be reused after contact with raw chicken.
Gently place the marinated chicken breasts onto the preheated grill grates. Resist the urge to move or press down on the chicken immediately. Allow it to cook undisturbed for approximately five minutes. This initial period of stillness is crucial for developing those coveted, beautiful grill marks and allowing a crust to form, locking in the juices.
After five minutes, you should see a distinct sear mark where the chicken has made contact with the grill. Carefully flip each chicken breast over using a pair of tongs. You want to ensure a clean release from the grill grates; if it feels stuck, give it a little more time, as it may not have developed enough of a crust yet.
Once flipped, cover the grill lid. This traps the heat and allows the chicken to cook through evenly from both sides. Let the chicken continue to cook for approximately seven more minutes. The exact cooking time will vary depending on the thickness of your chicken breasts and the precise temperature of your grill. The goal is to reach an internal temperature of 165°F (74°C).
Using an instant-read meat thermometer is the most reliable way to ensure the chicken is perfectly cooked. Insert the thermometer into the thickest part of the chicken breast, avoiding any bone if you were using bone-in pieces. If the thermometer reads 165°F, the chicken is safely cooked and ready to be removed from the grill. If it’s still lower, continue grilling in one-minute increments, checking the temperature frequently, until it reaches the safe internal temperature.
Overcooking is the enemy of tender grilled chicken, so keep a close eye on the temperature. The residual heat will continue to cook the chicken slightly even after it’s removed from the grill. Aiming for 160-163°F and then letting it rest will often result in a perfectly cooked 165°F breast. The char from the grill adds a delicious smoky flavor that complements the bright lemon marinade beautifully. This step is where the magic happens, transforming simple chicken into a culinary delight.
Step 4: Flip and Finish Cooking
After the initial five minutes of searing on the first side, it’s time to flip the chicken. Using a good pair of grilling tongs, carefully lift each chicken breast and turn it over. This action exposes the second side to the direct heat of the grill, allowing it to develop its own set of appetizing grill marks and a nicely browned exterior. Ensure that the chicken releases easily from the grill grates; if it seems to be sticking, a bit more time might be needed on the first side.
Once all the chicken pieces have been flipped, immediately place the lid back onto the grill. This step is crucial for trapping the heat and steam, which will ensure that the chicken cooks through evenly and remains moist. Imagine your grill as a convection oven at this point; the enclosed environment circulates the heat, cooking the chicken thoroughly from the inside out.
Let the chicken cook on the second side for approximately seven additional minutes. This is a general guideline, and the exact time can vary based on several factors. The thickness of your chicken breasts plays a significant role; thicker breasts will require a little more time than thinner ones. The ambient temperature and the actual heat of your grill also contribute to the cooking duration.
The most important indicator of doneness is the internal temperature. You are looking for the chicken to reach an internal temperature of 165°F (74°C) in the thickest part. For accuracy, it is highly recommended to use an instant-read meat thermometer. Insert the probe into the center of the thickest portion of a chicken breast, ensuring you don’t hit a bone if using bone-in cuts, though this recipe specifies boneless.
If the thermometer reads below 165°F, continue to cook the chicken for another 1-2 minutes per side, checking the temperature frequently. It’s better to cook in short intervals and check often to avoid overcooking, which can lead to dry chicken. Conversely, if the chicken is cooking very rapidly and reaching temperature quickly, you might need to move it to a cooler part of the grill (indirect heat zone) to finish cooking without burning the outside.
The char marks from the grill not only add visual appeal but also contribute a subtle smoky flavor that is characteristic of grilled dishes. This depth of flavor is one of the primary reasons people love grilled lemon chicken. The combination of the bright, acidic marinade and the smoky char creates a perfectly balanced and incredibly satisfying taste experience that is hard to replicate with other cooking methods.
Step 4: Rest the Chicken
Once the grilled lemon chicken has reached that perfect internal temperature of 165°F (74°C), it’s time for a crucial, yet often overlooked, step: resting. Carefully remove the chicken breasts from the grill using your tongs and transfer them to a clean plate or a cutting board. Resist the temptation to slice into it immediately!
This resting period is absolutely vital for ensuring that your chicken remains incredibly juicy and tender. When chicken cooks, the muscle fibers tighten up, forcing out moisture towards the center. If you were to cut into the chicken right away, all those delicious juices would simply run out onto the plate, leaving you with dry, less flavorful meat.
Cover the chicken loosely with aluminum foil. This helps to keep the chicken warm during the resting period without creating a steamy environment that could soften any desirable char you’ve developed. Let the chicken rest for at least five to ten minutes. For larger cuts or whole birds, a longer resting time of 10-15 minutes is even better.
During this resting time, the muscle fibers in the chicken begin to relax. This relaxation allows the juices to redistribute evenly throughout the meat, reabsorbing the moisture and ensuring that every bite is succulent and flavorful. It’s during this passive cooking phase that the chicken truly finishes its journey to peak juiciness and tenderness.
This step is non-negotiable for achieving the best possible texture and taste. It transforms a good grilled chicken breast into an exceptional one. The slight delay in serving is well worth the enhanced moistness and overall eating experience. Think of it as giving the chicken a chance to rehydrate and become its most delicious self before it reaches your plate. The patience exercised here will be rewarded with tender, juicy perfection.
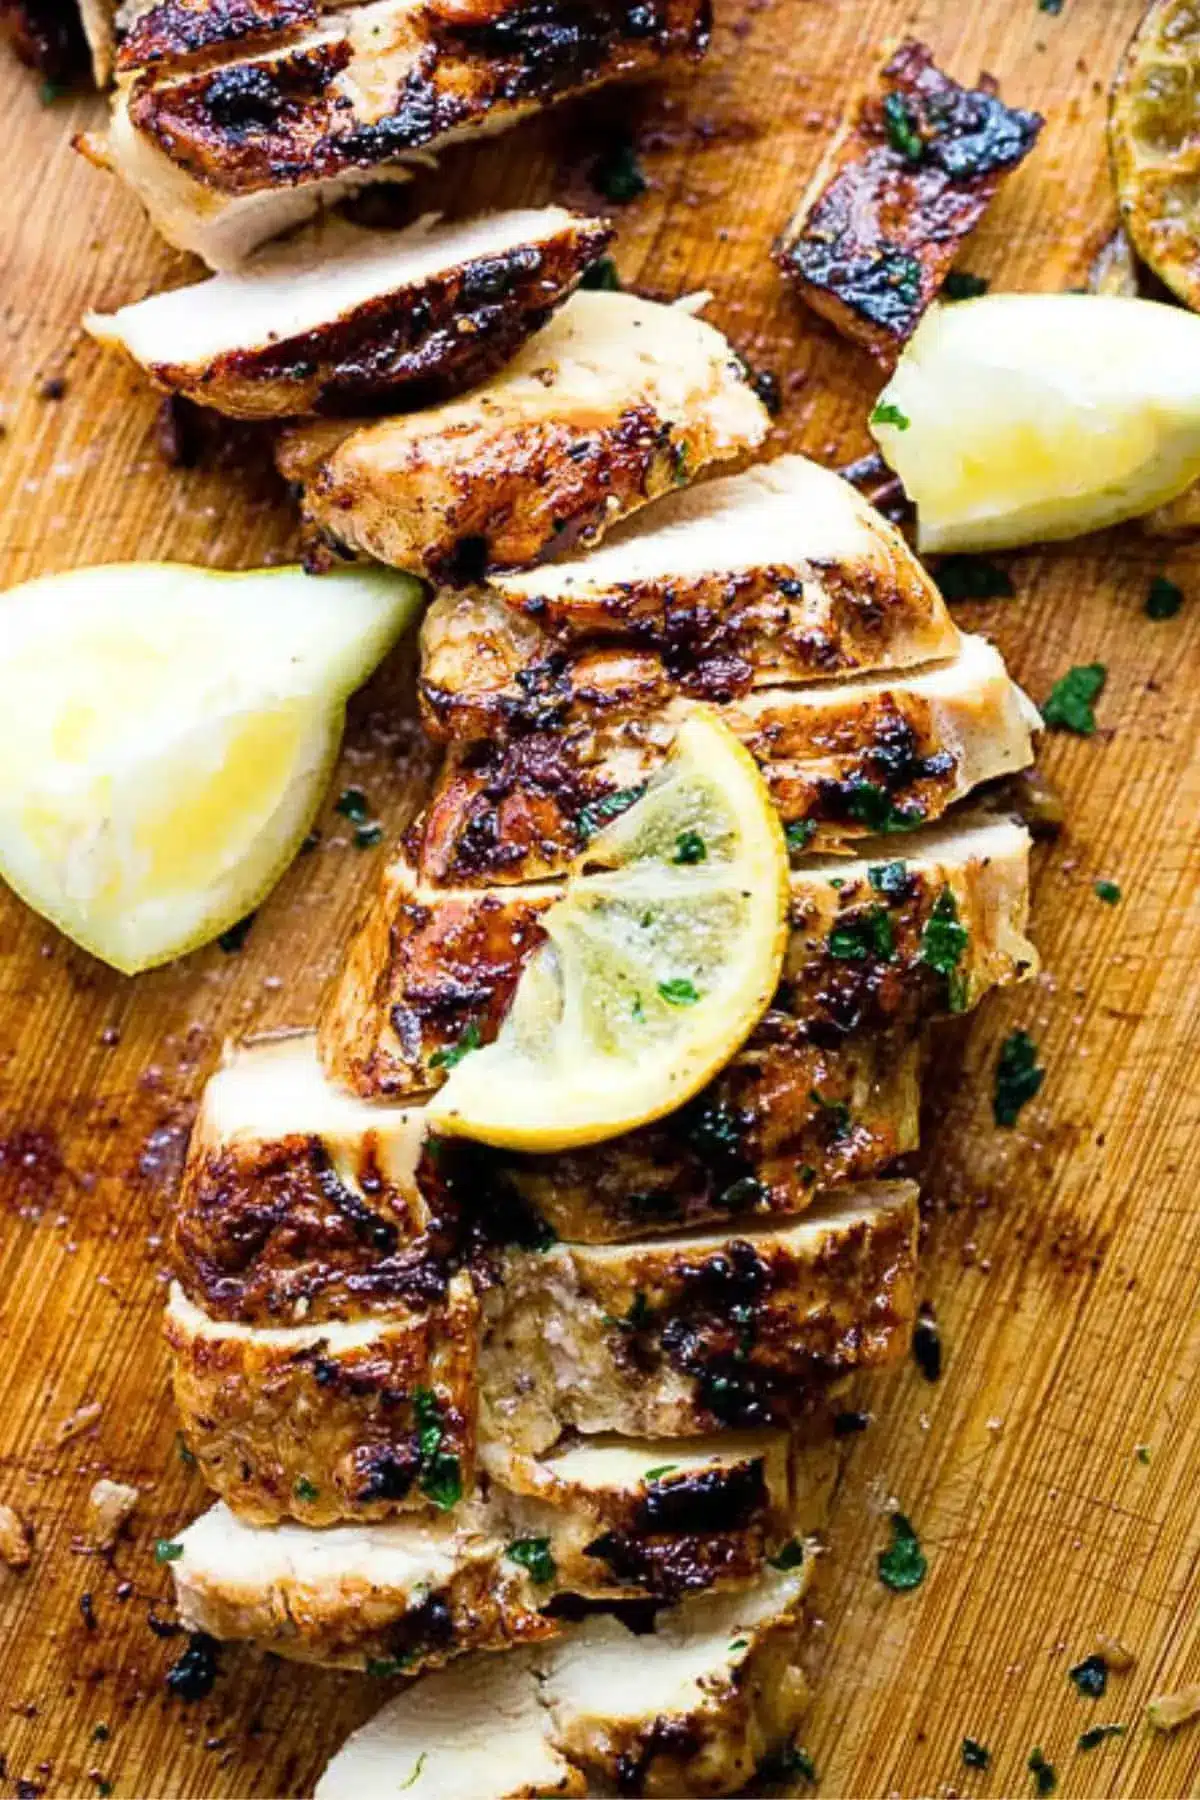
After the resting period is complete, the chicken is ready to be served. You can slice it thinly against the grain for a more tender texture, or serve the breasts whole. The visual appeal of the golden-brown, slightly charred exterior contrasted with the juicy, tender interior is simply irresistible. This simple step of allowing the chicken to rest is a testament to how small details can make a significant difference in the final outcome of your cooking.
Step 5: Serve and Enjoy
With the grilled lemon chicken perfectly cooked and beautifully rested, it’s time to present and savor this delightful dish. The aroma alone will have everyone eager to dig in. The vibrant, slightly charred exterior of the chicken promises a burst of citrusy, garlicky flavor with every bite.
Slice the chicken breasts against the grain into succulent strips or serve them whole, depending on your preference and the accompanying dishes. The juices released during the resting period will have permeated the meat, ensuring a wonderfully moist and tender experience. The subtle smoky notes from the grill will add an extra layer of complexity to the bright lemon and garlic flavors.
This versatile grilled lemon chicken pairs exceptionally well with a variety of side dishes. Consider serving it over a bed of fluffy Mediterranean rice or a savory brown rice pilaf, which will soak up any residual delicious juices from the chicken and marinade. Alternatively, a simple side of roasted potatoes or sweet potato wedges offers a hearty complement.
For a lighter, fresher meal, toss the sliced chicken into a vibrant salad. A Greek salad with olives and feta, a quinoa salad with fresh vegetables, or a classic mixed green salad would all be excellent choices. The tangy lemon chicken provides a delicious protein element that elevates any salad into a complete meal. The addition of fresh herbs like dill or mint to your salad can further enhance the Mediterranean theme.
Don’t forget about the garnish! A few extra lemon slices, a sprinkle of fresh parsley, or even a drizzle of good olive oil can add the finishing touches. If you’ve made a pan sauce from the drippings as suggested in some reviews, that would be a decadent addition. Embrace the versatility and enjoy the simple, profound pleasure of this perfectly grilled lemon chicken.
Pro Tips for grilled lemon chicken
Choose the Right Chicken Cuts: While boneless, skinless chicken breasts are commonly used and cook quickly, consider using boneless, skinless chicken thighs for an even more succulent and forgiving result. Thighs have a higher fat content, making them less prone to drying out during grilling. Ensure they are trimmed of excess fat before marinating for a cleaner flavor profile.
Don’t Skimp on Marinating Time: The marinade is where the magic happens. Allow the chicken to marinate for at least four hours, or preferably overnight. This extended period allows the lemon juice to tenderize the meat and the flavors of garlic and parsley to fully penetrate. Shorter marinating times will still yield good flavor, but the depth and tenderness will be significantly enhanced with more time.
Achieve the Perfect Sear: A hot grill is paramount. Ensure your grill is preheated to at least 375-400°F (190-205°C) before placing the chicken on it. A hot grill creates those beautiful, flavorful char marks and a crust that seals in the juices. Brush the grates with oil just before adding the chicken to prevent sticking. If using a grill pan, ensure it’s properly preheated and greased as well.
Resist the Urge to Overcrowd: When grilling, give each piece of chicken ample space on the grill. Overcrowding the grill will lower the temperature and prevent the chicken from searing properly, leading to steaming instead of grilling. Cook in batches if necessary to ensure even cooking and optimal charring. This allows hot air to circulate effectively around each piece.
Master the Resting Period: This is a critical step often skipped. Once the chicken is cooked, remove it from the grill and let it rest, loosely tented with foil, for at least 5-10 minutes. This allows the juices to redistribute throughout the meat, resulting in incredibly moist and tender chicken. Cutting too soon will cause all that precious moisture to escape, leaving you with dry poultry.
Experiment with Herbs and Spices: While parsley is classic, don’t be afraid to play with other fresh herbs like thyme, rosemary, or oregano in the marinade. A pinch of red pepper flakes can add a subtle kick of heat, or smoked paprika can impart an additional layer of smoky depth. These variations can lead to exciting new flavor profiles for your grilled lemon chicken.
Serving Suggestions for grilled lemon chicken
Decoration
Elevate the presentation of your grilled lemon chicken with simple yet effective garnishes. A final sprinkle of fresh, finely chopped parsley adds a vibrant green contrast and a burst of fresh aroma. Thin slices of fresh lemon, artfully arranged around the serving platter or tucked alongside the chicken, not only enhance the visual appeal but also offer an extra squeeze of citrus for those who desire it. A drizzle of high-quality extra virgin olive oil over the finished dish can add a beautiful sheen and a touch of richness.
Side Dishes
This grilled lemon chicken is incredibly versatile when it comes to accompaniments. For a complete Mediterranean-inspired meal, serve it with fluffy dinner rice, or a flavorful couscous pilaf. Roasted vegetables such as asparagus, bell peppers, zucchini, and red onions make for a colorful and nutritious pairing. Consider a classic Greek salad with feta cheese, olives, and cucumber, or a refreshing cucumber and tomato salad for a lighter option.
Heartier sides like creamy mashed potatoes or roasted sweet potato wedges also complement the chicken beautifully. For those seeking lighter fare, a simple side of steamed broccoli or a fresh mixed green salad dressed with a light vinaigrette provides a healthy balance. Even pasta dishes can be enhanced by this flavorful chicken, chopped and tossed into a creamy leek and mushroom pasta or a zesty lemon-herb pasta.
Creative Serving Ideas
Transform your grilled lemon chicken into a star ingredient for various culinary creations. Slice it thinly and add it to vibrant grain bowls, combining it with quinoa, roasted vegetables, and a tahini dressing for a healthy and satisfying lunch. It’s also fantastic as a topping for homemade pizzas, adding a bright, zesty protein element. Consider creating flavor-packed chicken wraps or pitas by layering the sliced chicken with hummus, crisp lettuce, and a sprinkle of sumac.
For a more elegant presentation, consider serving the chicken breasts whole atop a bed of creamy polenta or risotto. The rich textures of these sides provide a wonderful contrast to the tender, citrusy chicken. You could also dice the chicken and fold it into a flavorful pasta salad, perfect for picnics or potlucks. Another delightful option is to chop it finely and mix it with mayonnaise, celery, and herbs for a gourmet chicken salad sandwich filling.
Don’t forget the possibility of a “deconstructed” platter, where the grilled chicken is served alongside various dips and spreads like tzatziki, baba ghanoush, and a fresh salsa, allowing guests to assemble their own bites. This interactive approach is perfect for casual gatherings and encourages sampling of different flavor combinations.
Preparation & Storage
Storing Leftovers
Once your delicious grilled lemon chicken has cooled completely, it’s essential to store it properly to maintain its quality and safety. Transfer the cooled chicken to an airtight container. This prevents it from drying out in the refrigerator and protects it from absorbing any unwanted odors from other foods. You can store the chicken in the refrigerator for up to 3 to 4 days.
For optimal flavor and texture, it’s best to store the chicken whole or in larger pieces if possible. If you’ve sliced it, try to keep the pieces together as much as you can. This helps to retain moisture within the meat. Remember to always use clean containers and utensils when storing leftovers to avoid any cross-contamination. A quick visual inspection and sniff test before consuming are also good practices.
Many people find that leftover grilled lemon chicken is fantastic served cold. It’s perfect for adding to salads, sandwiches, or wraps the next day. The flavors can actually meld and deepen slightly overnight, making it a delicious and convenient option for a quick lunch or a light dinner. Consider chopping it up and mixing it with a little extra lemon juice and fresh herbs for a revived flavor profile.
If you plan on using the leftovers for a salad or sandwich, it’s perfectly acceptable to store them already sliced. However, if you intend to reheat them, storing them in larger pieces might lead to a more evenly heated final product. The key is to ensure the container creates a good seal to minimize air exposure, which is the primary culprit in food spoilage and degradation of texture.
Always label your containers with the date you stored the leftovers. This is a good habit for food safety and helps you keep track of how long items have been in your refrigerator. While this chicken is quite forgiving, it’s always better to err on the side of caution when it comes to consuming leftovers. If there’s any doubt about freshness, it’s best to discard it.
Freezing
Grilled lemon chicken freezes remarkably well, making it an excellent candidate for meal prepping or stocking up on delicious meals for future enjoyment. Ensure the chicken has cooled completely before you begin the freezing process. This is crucial to prevent ice crystal formation and condensation, which can degrade the quality of the chicken.
For best results, wrap individual portions of the grilled chicken tightly in plastic wrap, ensuring there are no air pockets. Then, place the wrapped portions into a heavy-duty freezer bag or an airtight freezer-safe container. This double-layer of protection is key to preventing freezer burn, which can make the chicken dry and unappetizing. Removing as much air as possible from the freezer bag before sealing will further enhance its longevity in the freezer.
Label the freezer bag or container clearly with the contents and the date of freezing. Properly frozen grilled lemon chicken can maintain its quality for up to 2-3 months. Beyond this timeframe, while still safe to eat if kept consistently frozen, its texture and flavor may begin to decline.
When you are ready to use your frozen chicken, it’s best to thaw it in the refrigerator overnight. This slow thawing process helps to retain the moisture and texture of the chicken. Avoid thawing at room temperature, as this can promote bacterial growth. Once thawed, it can be reheated and enjoyed as if it were freshly grilled.
Freezing is a fantastic way to ensure you always have a healthy, flavorful protein option on hand. It’s perfect for busy weeks when cooking from scratch isn’t feasible. Just remember that while the texture is generally well-preserved, it might be slightly softer than fresh after thawing and reheating. However, the delicious lemon-garlic flavor will remain vibrant and appealing.
Reheating
Reheating grilled lemon chicken requires a gentle approach to preserve its moisture and tenderness. The best methods involve either the microwave or the oven, as these allow for more even heating compared to stovetop methods which can sometimes scorch the edges.
Microwave Method: Place the leftover grilled lemon chicken in a microwave-safe dish. Add a tablespoon or two of water, broth, or even a splash of lemon juice to the dish. This helps to create steam, which keeps the chicken moist as it reheats. Cover the dish loosely with a microwave-safe lid or plastic wrap, venting one corner to allow steam to escape. Microwave on medium power (about 50%) in 30-second to 1-minute increments, checking for doneness after each interval. Avoid microwaving on high power, as this can lead to rubbery chicken.
Oven Method: For a more thorough and even reheating, the oven is an excellent choice. Preheat your oven to a moderate temperature, around 325-350°F (160-175°C). Place the leftover chicken in an oven-safe baking dish. You can add a small amount of liquid (water, broth, or lemon juice) to the bottom of the dish to help create steam. Cover the dish tightly with foil to trap moisture. Heat for about 10-15 minutes, or until the chicken is heated through. Thicker pieces may require a slightly longer reheating time.
Regardless of the method you choose, the goal is to heat the chicken gently until it reaches a safe internal temperature of 165°F (74°C). The key is to avoid overcooking, which will dry out the meat and diminish its appealing texture. Be patient and reheat incrementally, checking for warmth throughout the chicken.
If the chicken seems to be drying out during reheating, even with added liquid, you can always finish it with a quick sear in a hot pan or a brief return to a preheated grill to revive any crispness on the exterior. This is particularly useful if you want to recapture some of that grilled texture. Just be mindful of the cooking time to prevent overcooking.
Remember that chicken that has been previously cooked and then reheated is best consumed soon after reheating. While it can be stored again in the refrigerator if there are a few leftovers from the reheating process, it’s ideal to consume it all in one sitting after the second heating. This ensures the best quality and safety.
Frequently Asked Questions
-
Can I use boneless, skinless chicken thighs instead of breasts?
Absolutely! Boneless, skinless chicken thighs are an excellent alternative to chicken breasts for this grilled lemon chicken recipe. They tend to be more forgiving and stay incredibly moist due to their higher fat content. You will likely find they absorb the marinade beautifully and develop a wonderful tenderness when grilled. While the cooking time might be slightly longer or shorter depending on the size and thickness of the thighs compared to breasts, the overall process remains the same. Just ensure they reach an internal temperature of 165°F (74°C) for safe consumption. The rich flavor of thighs pairs exceptionally well with the bright lemon and garlic marinade, offering a slightly different but equally delicious outcome.
-
How long should I marinate the chicken for the best flavor?
For the best and most profound flavor infusion, it is highly recommended to marinate the chicken for at least four hours. Ideally, allowing it to marinate overnight in the refrigerator will yield the most tender and flavorful results. The acidic lemon juice in the marinade helps to break down the chicken’s proteins, making it more tender and allowing the aromatic flavors of garlic and parsley to penetrate deeply. While a shorter marinating time of 1-2 hours will still impart some flavor, it won’t achieve the same depth and succulence that comes from an extended marination period. The key is to ensure the chicken is fully submerged or coated in the marinade.
-
What if I don’t have an outdoor grill? Can I still make this recipe?
Yes, you can absolutely make this delicious grilled lemon chicken without an outdoor grill! The recipe includes excellent instructions for using a cast-iron grill pan on the stovetop, followed by finishing in the oven. Preheat the grill pan over medium-high heat, grease it well, and sear the marinated chicken for a few minutes per side to achieve those desirable grill marks. Then, transfer the grill pan with the chicken to a preheated oven (around 350°F or 175°C) to finish cooking until it reaches an internal temperature of 165°F (74°C). This method effectively mimics the results of outdoor grilling, providing a beautifully charred exterior and a succulent interior.