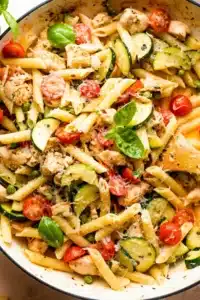
Easy Chicken Pasta Primavera – Quick Dinner Idea!

Juicy chicken and colorful vegetables are the stars of this Chicken Pasta Primavera, all brought together in a rich Parmesan sauce that is simply irresistible! It’s incredibly quick to prepare, making it an excellent choice for those busy weeknights when you crave a delicious meal without a long wait.
Prepare for empty plates and delighted smiles; this dish is a guaranteed crowd-pleaser that brings a vibrant touch to any mealtime. Get ready to fall in love with a pasta dish that perfectly balances creamy indulgence with fresh, crisp ingredients.
Why You Will Love This Recipe
- Speedy Preparation: This entire dish comes together in about 30 minutes, making it ideal for busy weeknights.
- Vibrant and Fresh: Packed with a colorful assortment of vegetables, it’s as visually appealing as it is delicious.
- Creamy and Flavorful: The rich Parmesan sauce provides a decadent yet balanced flavor profile that complements the chicken and vegetables beautifully.
- Family Favorite: This recipe strikes a perfect chord between indulgence and healthy ingredients, ensuring everyone at the table will enjoy it.
- Versatile Ingredients: Easily adaptable with seasonal vegetables or different pasta shapes, you can tailor it to your preferences.
Ingredients You Need
The foundation of any great dish lies in the quality of its ingredients, and this chicken pasta primavera is no exception. Opting for fresh, vibrant produce and good quality staples will elevate the final taste and texture significantly. Using fresh garlic and good Parmesan cheese will make a noticeable difference in the depth of flavor.
Chicken Pasta Primavera
Juicy chicken and colorful veggies star in this Chicken Pasta Primavera, all tossed in a rich Parmesan sauce that's just too good to resist! It's quick to whip up, making it a winning choice for busy nights when you want a tasty meal without the wait. Get ready for clean plates and happy faces!
- 8 to 10 ounces dry penne pasta
- 2 tablespoons olive oil
- 1 pound skinless boneless chicken breasts, cut into 1-inch cubes or long thin strips
- Salt and freshly ground black pepper
- 1 zucchini, sliced into thin half-moons
- 1 to 2 cups grape tomatoes, quartered
- 1 cup frozen peas
- ½ tablespoon dried basil
- 1 teaspoon dried rosemary
- 1 teaspoon dried parsley
- 4 cloves garlic, minced
- ¼ cup white wine
- ⅓ cup heavy whipping cream
- ¼ cup grated fresh parmesan cheese
- Chopped fresh basil, for garnish
- 1Cook pasta according to the directions on the package.
- 2In the meantime, heat oil in a large 14-inch skillet set over medium-high heat.
- 3Season the chicken pieces with salt and pepper, add the chicken to the hot oil, and cook for 5 minutes.
- 4Stir in the zucchini, tomatoes, and frozen peas; season with dried basil, rosemary, and parsley.
- 5Stir in garlic and continue to cook for 3 minutes, stirring occasionally.
- 6Stir in the wine and scrape up all the browned bits from the bottom of the pan. Add cream and cook for 1 minute.
- 7Drain the cooked pasta, then stir the pasta into the skillet. Taste for salt and adjust accordingly. Remove from heat.
- 8Top with parmesan cheese, garnish with basil, and serve.
Keywords: pasta, chicken, primavera, dinner, italian-inspired, weeknight, quick, easy, vegetable
- penne pasta: use your favorite variety, penne works wonderfully for holding the sauce.
- olive oil: a good quality extra virgin olive oil for sautéing the chicken and vegetables.
- boneless, skinless chicken breasts: cubed into bite-sized pieces for even cooking.
- salt and freshly ground black pepper: essential for seasoning the chicken and the overall dish.
- zucchini: thinly sliced into half-moons to add a tender bite.
- grape tomatoes: quartered to release their sweet juiciness into the sauce.
- frozen peas: a quick and easy way to add a pop of color and sweetness.
- dried basil: contributes an aromatic, slightly sweet herbaceous note.
- dried rosemary: adds a distinct piney, earthy flavor that pairs well with chicken.
- dried parsley: offers a fresh, clean flavor to complement the other herbs.
- fresh garlic: minced or pressed for a pungent, aromatic base to the sauce.
- dry white wine: adds depth and a subtle acidity to the sauce, though a substitute is provided.
- heavy whipping cream: creates a luxuriously smooth and rich sauce.
- freshly grated Parmesan cheese: melts into the sauce, adding a salty, umami-rich finish.
- fresh basil: for a final fragrant garnish that brightens the entire dish.
Specific quantities for these ingredients can be found within the recipe card.
Variations
This chicken pasta primavera is incredibly adaptable, allowing you to tailor it to various dietary needs and taste preferences. The core concept of pasta, fresh vegetables, and a creamy sauce can be easily modified.
Vegan Delight: For a delicious vegan twist, simply omit the chicken and dairy. Replace the chicken with firm tofu, pressed and cubed, then pan-seared until golden. For the creamy sauce, use a base of blended soaked cashews or a high-quality unsweetened plant-based milk thickened with a little cornstarch or arrowroot powder. Ensure all other ingredients, like the wine and any broth used as a substitute, are vegan-certified.
Low-Carb Option: To make this dish lower in carbohydrates, swap the traditional pasta for a spiralized vegetable alternative like zucchini noodles (zoodles) or spaghetti squash. Ensure the squash is roasted and shredded before adding it to the sauce. You can also increase the quantity of non-starchy vegetables like broccoli florets or asparagus spears to boost the fiber content and lower the overall carb count, making it a satisfying lunch or dinner option.
Gluten-Free Adaptation: If you’re seeking a gluten-free version, the primary substitution is straightforward. Use your favorite gluten-free pasta, which is readily available in many varieties like penne, fusilli, or rotini. Ensure that any store-bought broths or other processed ingredients you might use are also certified gluten-free. This makes the dish accessible for those with celiac disease or gluten sensitivities without compromising on flavor.
How to Prepare chicken pasta primavera
Step 1: Cook the Pasta
Begin by bringing a large pot of salted water to a rolling boil. This initial seasoning of the water is crucial for imparting flavor directly into the pasta itself. A common mistake is to forget this step, resulting in bland pasta that no amount of sauce can fully redeem.
Add your chosen pasta, typically penne for this recipe, to the boiling water. Cook the pasta according to the package directions until it is al dente, meaning it has a slight bite and isn’t mushy. Undercooking slightly is often preferable, as the pasta will continue to cook slightly when combined with the hot sauce later.
Once cooked to perfection, drain the pasta thoroughly in a colander. It’s important to reserve about a cup of the starchy pasta water before draining. This reserved water is a secret weapon for emulsifying and thinning the sauce, helping it cling beautifully to the pasta and vegetables.
Step 2: Cook the Chicken
While the pasta is cooking, prepare your chicken. If you haven’t already, cut one pound of boneless, skinless chicken breasts into uniform 1-inch cubes or long, thin strips. This ensures that the chicken cooks evenly and quickly.
Heat two tablespoons of olive oil in a large skillet over medium-high heat. Once the oil is shimmering but not smoking, carefully add the seasoned chicken pieces to the hot skillet. Season the chicken generously with salt and freshly ground black pepper before adding it to the pan.
Cook the chicken for approximately 5 minutes, stirring occasionally, until it is golden brown on all sides and cooked through. Avoid overcrowding the pan, as this can cause the chicken to steam rather than sear, resulting in a less desirable texture and color. If necessary, cook the chicken in batches.
Step 3: Add the Vegetables and Herbs
Once the chicken is cooked and removed from the skillet (or pushed to one side if you have a large enough pan), it’s time to introduce the vegetables and dried herbs. Add one thinly sliced zucchini and one to two cups of quartered grape tomatoes to the skillet. If using frozen peas, add them now as well.
Season these vibrant vegetables with a half tablespoon of dried basil, one teaspoon of dried rosemary, and one teaspoon of dried parsley. These dried herbs will bloom in the hot oil and release their aromatic flavors. Stir everything together to coat the chicken and vegetables evenly with the herbs and any rendered chicken juices.
Continue to cook for another 3 minutes, stirring occasionally. The goal here is to soften the vegetables slightly while still retaining some of their crispness. This ensures a pleasant texture contrast in the final dish and prevents them from becoming watery.
Step 4: Infuse with Garlic and Deglaze
Add four cloves of minced fresh garlic to the skillet. Garlic is a foundational aromatic that will significantly enhance the depth of flavor in your sauce. Cook the garlic for about 30 seconds to a minute, stirring constantly, until it becomes fragrant. Be careful not to burn the garlic, as this will impart a bitter taste.
Now, it’s time to deglaze the pan. Pour in a quarter cup of dry white wine. As you pour, use a wooden spoon or spatula to scrape up all the delicious browned bits that have stuck to the bottom of the skillet. This process, known as deglazing, captures all the intense flavor developed during the chicken and vegetable sautéing, incorporating it into your sauce base.
Let the wine simmer and reduce slightly for about a minute. This allows the alcohol to evaporate, leaving behind its subtle fruity and acidic notes that brighten the overall flavor profile of the dish. The pan will look much cleaner after this step.
Step 5: Create the Creamy Sauce
Pour in one-third cup of heavy whipping cream into the skillet. This is the key ingredient that will transform the pan juices and wine into a luxurious, velvety sauce. Stir the cream into the mixture, ensuring it is well combined with the wine and any remaining pan drippings.
Allow the sauce to simmer gently for another minute. This brief simmering time helps the cream thicken slightly and meld all the flavors together beautifully. You’re creating a rich foundation that will coat every strand of pasta and every piece of chicken and vegetable.
Taste the sauce at this point and adjust for salt and freshly ground black pepper as needed. This is your last opportunity to fine-tune the seasoning before combining everything. You want the sauce to be perfectly balanced to your liking, a testament to thoughtful cooking.
Step 6: Assemble and Serve
Add the drained, cooked pasta directly into the skillet with the creamy sauce, chicken, and vegetables. Gently stir everything together to ensure that every piece of pasta is coated in the luscious sauce. The reserved pasta water, if you used it earlier to thin the sauce, will help create a perfectly cohesive dish.
Toss the pasta and sauce for about a minute over low heat, allowing the pasta to absorb some of the sauce’s flavor and for everything to heat through evenly. This final mingling of ingredients is where the dish truly comes together, showcasing the vibrant colors and appealing textures.
Remove the skillet from the heat. Sprinkle a quarter cup of grated fresh Parmesan cheese over the top. Garnish generously with freshly chopped basil. Serve immediately, allowing everyone to enjoy the delightful aroma and exquisite taste of your homemade chicken pasta primavera, a true culinary delight perfect for any dinner.
Pro Tips for chicken pasta primavera
Don’t Skimp on Salting Pasta Water: Always season your pasta water generously with salt. Think of it as seasoning the pasta from the inside out; it’s much harder to adequately season pasta after it’s cooked, and this step is fundamental for flavor.
Perfectly Cooked Pasta is Key: Aim for al dente pasta. It should have a slight chew and firmness, not be soft or mushy. The pasta will continue to cook a bit when you toss it with the hot sauce, so taking it out a minute or two before package directions suggest is often a good strategy.
Embrace the Starchy Pasta Water: That cloudy water you drain from the pasta is liquid gold! It’s rich in starch and acts as a natural emulsifier, helping to bind the sauce to the pasta and create a smoother, silkier consistency. Always reserve at least a cup before draining.
Veggies at Their Peak: While frozen peas are convenient, consider using fresh or blanched spring vegetables like asparagus, snap peas, or broccoli florets when they are in season. Chop them into bite-sized pieces so they cook quickly and retain their vibrant color and crisp texture.
Quality Parmesan Matters: Whenever possible, use freshly grated Parmesan cheese rather than pre-shredded. Freshly grated cheese melts more smoothly and offers a richer, more complex flavor that truly elevates the finished sauce and the entire dish.
Serving Suggestions for chicken pasta primavera
Decoration
Garnish the finished Chicken Pasta Primavera generously with freshly chopped basil leaves. The vibrant green adds a beautiful pop of color against the creamy pasta and vegetables. A final dusting of freshly grated Parmesan cheese over the top before serving also adds visual appeal and extra flavor.
Side Dishes
A simple side salad with a light vinaigrette is a perfect accompaniment, offering a fresh contrast to the rich pasta dish. Consider a crisp garden salad or a more composed salad with cucumbers and tomatoes. Warm, crusty bread or garlic breadsticks are also excellent for sopping up any leftover sauce.
Creative Serving Ideas
For a slightly more elegant presentation, serve the Chicken Pasta Primavera in shallow bowls. You can also individualize servings by portioning the pasta and sauce into oven-safe ramekins, topping with extra Parmesan, and briefly broiling until the cheese is bubbly and golden brown. This adds a delightful textural element and an impressive finish.
Preparation & Storage
Storing Leftovers
To store any leftover Chicken Pasta Primavera, allow it to cool completely at room temperature before transferring it to an airtight container. Refrigerate the container within two hours of cooking to maintain freshness and prevent bacterial growth. Properly stored leftovers can typically be enjoyed for 2-3 days.
Freezing
This dish is generally not ideal for freezing, as the cream-based sauce can sometimes separate upon thawing, and the pasta texture may become mushy. If you must freeze it, do so with caution, ensuring it is cooled and stored in a freezer-safe airtight container for up to 1-2 months. However, fresh is always best for this recipe.
Reheating
When reheating leftovers, place the pasta in a skillet over low to medium-low heat. Add a tablespoon or two of milk or water to help loosen the sauce and prevent it from drying out. Stir gently and continuously until the pasta is heated through. Avoid high heat, which can cause the sauce to break or the pasta to overcook.
Frequently Asked Questions
-
Can I use different types of pasta?
Absolutely! While penne is a classic choice that holds the sauce beautifully, feel free to experiment with other pasta shapes like fusilli, rotini, farfalle, or even fettuccine. The key is to ensure the pasta is cooked al dente, as it will continue to cook slightly when tossed with the warm sauce.
-
What if I don’t have white wine? Can I substitute it?
Yes, you can definitely substitute the white wine. A good alternative is to use chicken broth or vegetable broth for deglazing the pan, adding a splash of lemon juice at the end to provide that necessary brightness and acidity that the wine would have offered. Some find a small amount of white grape juice to be a viable alternative as well, though it can add a touch more sweetness.
-
How can I make this recipe spicier?
To add a kick of heat, consider incorporating red pepper flakes along with the dried herbs in Step 3. You could also add a pinch of cayenne pepper to the sauce in Step 5. For a more complex spicy flavor, a Cajun or Creole seasoning blend stirred into the sauce would also work wonderfully and introduce a unique flavor profile.