Challah French Toast Recipe – Fluffy & Flavorful!

Embark on a culinary journey that transforms humble bread into a golden masterpiece of breakfast indulgence. This challah French toast recipe is designed to bring smiles to your table, offering a delightful blend of sweet, fluffy, and perfectly cooked goodness.
Prepare yourself for a breakfast experience that is both comforting and incredibly satisfying. We’ll guide you through each step, ensuring that your challah French toast turns out spectacularly, every single time. It’s more than just a meal; it’s a moment of pure, delicious joy.
Why You Will Love This Recipe
- Exceptional Texture: The use of stale challah bread is a game-changer, allowing it to absorb the rich custard beautifully without becoming soggy, resulting in a delightful contrast of crispy edges and a soft, custardy interior.
- Rich and Creamy Custard: Infused with real vanilla, a hint of honey, and freshly grated nutmeg, the custard coating creates a luxurious flavor profile that elevates the simple bread to gourmet status.
- Remarkably Easy Preparation: Despite its impressive taste and texture, this recipe is surprisingly straightforward, making it an ideal choice for busy mornings or when you want to impress without spending hours in the kitchen.
- Versatile Serving Options: Whether you prefer classic maple syrup and butter or a cascade of fresh berries and whipped cream, this challah French toast is a perfect canvas for your favorite toppings, allowing for endless customization.
- Comfort Food Perfection: There’s an undeniable warmth and coziness associated with French toast, and this challah version, with its enhanced richness and flavor, truly embodies the essence of comforting, soul-warming cuisine.
Ingredients You Need
The quality of your ingredients plays a pivotal role in the final outcome of this challah French toast. Opting for the freshest eggs and pure vanilla extract will undeniably enhance the depth of flavor in your custard. Using day-old challah is paramount, as it possesses the ideal texture for soaking up the rich batter without disintegrating.
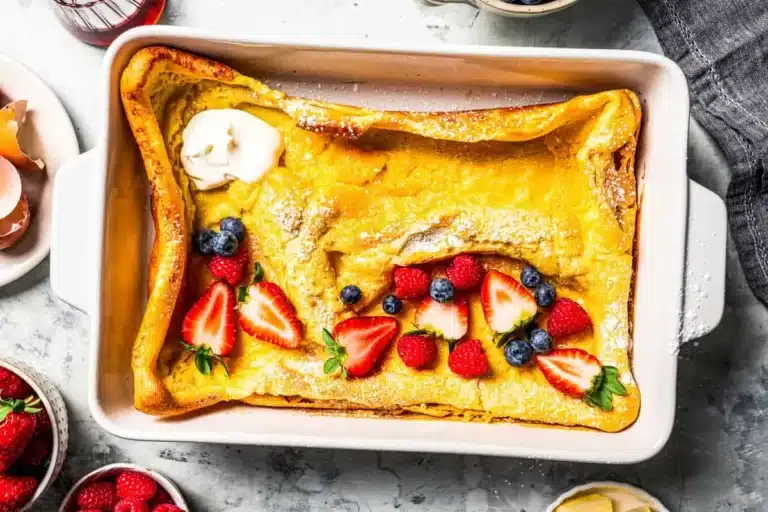
Challah French Toast

Thick, fluffy challah bread French toast soaked in an eggy custard with cinnamon, vanilla, and grated nutmeg. Using challah is an easy way to level up homemade French toast!
- 1 loaf of challah bread, stale
- 6 large eggs
- 2 cups half and half (milk or heavy cream are also okay to use)
- ¼ cup honey, poured into a microwave-safe bowl and heated in the microwave for 30 seconds
- ½ teaspoon kosher salt
- 2 teaspoons pure vanilla extract
- pinch of grated nutmeg
- pinch of ground cinnamon
- 3-4 tablespoons unsalted butter, for cooking
- French toast toppings of choice, such a maple syrup, whipped cream, fresh fruit, or confectioners' sugar
- 1Slice the bread and leave out overnight. If your challah is fresh, cut it into thick slices and lay them out on a cooling rack to dry overnight.
- 2Make the French Toast Prep your tools. Position a drying rack over a cookie sheet lined with parchment paper. Preheat your oven to 190ºF and place a separate oven-safe drying rack over a cookie sheet lined with parchment paper in the oven. (So you will need two sets of drying racks set over lined baking sheets.)
- 3Make the custard. In a medium bowl, whisk the eggs, half & half, warm honey, salt, vanilla, nutmeg, and cinnamon until thoroughly combined, then pour into a 9×9 baking dish.
- 4Add the bread. Soak the dried bread slices in the custard, 2 slices at a time, for about 2 minutes per side. Then set the soaked bread on the wire rack (the one outside the oven) so any extra custard can drip off before cooking. Sprinkle each slice with a pinch or two of cinnamon to taste.
- 5Cook. After soaking for about 3 to 4 minutes, cook the soaked bread on a greased griddle or pan, buttered with 1 tablespoon of butter, over medium heat. Don’t overcrowd the pan/griddle (I cook two slices at a time). Cook the bread slices on each side for about 2 minutes. Check for doneness judging by color. Each side should be golden brown. Make sure the slices cook through and evenly (rotate them around if your pan or griddle has hot spots). Add 1/2 tablespoon of butter to the griddle after each batch of French toast has cooked, and let it foam and subside before adding the next batch.
- 6Keep warm in the oven. This is optional, but a great way to serve your toast warm. Once they are cooked, place them on the rack that's inside the oven, batch by batch, to keep warm.
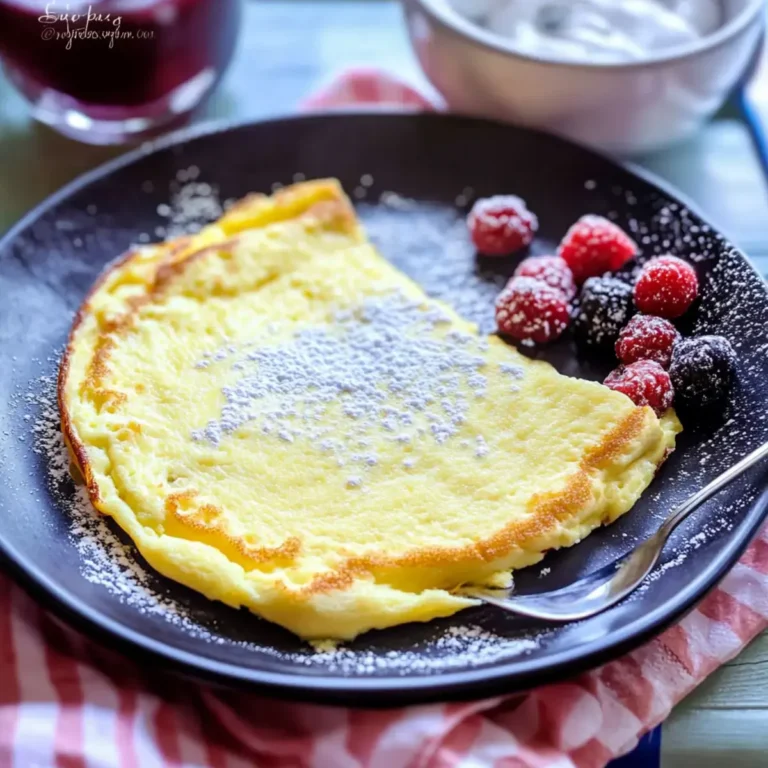
- 7Serve. I like to serve French toast with homemade whipped cream, maple syrup, and blueberries.
Keywords: French toast, challah, breakfast, brunch, sweet, eggy, custard, cinnamon, nutmeg, vanilla
- challah bread: a loaf of this slightly sweet, eggy bread is essential for its unique texture and flavor; ensure it’s at least a day old for optimal absorption.
- large eggs: these form the creamy base of your custard, providing richness and binding the ingredients together beautifully.
- half and half: this mixture of milk and cream creates a wonderfully decadent custard, though whole milk or heavy cream can be substituted for different richness levels.
- honey: a touch of sweetness is crucial; warming the honey slightly helps it incorporate seamlessly into the custard mixture, though maple syrup or agave are good alternatives.
- kosher salt: just a pinch enhances all the other flavors in the custard, preventing it from tasting flat.
- pure vanilla extract: this aromatic extract adds a classic, comforting warmth that is indispensable in any good French toast.
- grated nutmeg: freshly grated nutmeg offers a more vibrant and complex flavor than ground nutmeg, adding a distinctive spicy note to the custard.
- ground cinnamon: a sprinkle of cinnamon mixed into the custard and over the bread adds another layer of warm spice that complements the nutmeg perfectly.
- unsalted butter: this is used for pan-frying the French toast, providing a rich, golden crust and essential flavor, though a neutral oil can be used if preferred.
- french toast toppings of choice: this is where you can get creative, from classic maple syrup and powdered sugar to fresh fruits, whipped cream, or even nuts and chocolate sauce.
The precise quantities for each ingredient are detailed within the accompanying recipe card, ensuring you have everything you need for perfect execution.
Variations
For those seeking a delightful plant-based alternative, transforming this challah French toast into a vegan delight is entirely achievable. The secret lies in substituting the eggs and dairy with innovative vegan ingredients. A common approach involves using a mixture of plant-based milk, such as almond or soy milk, thickened with cornstarch or a flax egg. This creates a luscious custard that coats the bread beautifully, offering a similar richness and mouthfeel.
To cater to a low-carbohydrate lifestyle, consider using a sturdy, gluten-free bread or even thick slices of brioche, ensuring it’s adequately stale. The custard can be adapted by reducing or omitting the honey and opting for a sugar-free sweetener, like erythritol or stevia, to maintain sweetness without the carbs. A dash of almond extract can add an extra layer of flavor to compensate for any perceived sweetness reduction.
Another exciting variation involves infusing the custard with international flavors. Imagine a touch of cardamom and rosewater for a Middle Eastern twist, or perhaps a hint of matcha powder for a subtle earthy note. You could also introduce a citrus zest, like lemon or orange, into the custard for a brighter, more refreshing profile. Each variation offers a unique culinary adventure, proving the versatility of this beloved breakfast staple, making it suitable for a wide range of dietary preferences and flavor explorations, and ensuring there’s a perfect challah French toast for everyone.
How to Prepare challah french toast
Step 1: Preparing the Challah Bread for Soaking
The foundation of exceptional challah French toast begins with the bread itself. For the most delightful texture, it is crucial to use challah that is at least a day old. This slight staleness allows the bread to absorb the rich custard without becoming overly saturated and mushy, a common pitfall with fresh bread.
Begin by carefully slicing your loaf of challah bread into thick, uniform pieces. Aim for slices that are approximately 1 to 1.5 inches thick. Thinner slices tend to dry out too quickly or become soggy, so thicker is generally better for achieving that perfect balance of crisp exterior and tender, custardy interior.
Once sliced, arrange the bread pieces in a single layer on a wire cooling rack. Place this rack on top of a baking sheet to catch any potential drips. Allow the bread to air dry for several hours, or ideally, overnight. This drying process is non-negotiable for achieving that signature French toast texture.
If you find yourself short on time and haven’t dried the bread overnight, a quick method exists. Preheat your oven to a low temperature, around 300°F (150°C). Place the challah slices on a baking sheet and toast them in the oven for about 10-15 minutes, flipping them halfway through. The goal is to dry them out, not to brown or toast them significantly. The bread should feel slightly firm to the touch but not brittle.
Step 2: Crafting the Luxurious Custard
The heart of any fantastic French toast is its custard. This is where the magic happens, transforming simple eggs and dairy into a rich, flavorful coating for your bread. Start by gathering all your custard ingredients: eggs, half-and-half (or milk/cream), honey, salt, vanilla extract, and nutmeg.
In a medium-sized mixing bowl, crack the large eggs. Whisk them thoroughly until they are well combined and slightly frothy. This initial whisking is important for ensuring a smooth, homogenous custard without any streaks of egg white.
Next, pour in the half-and-half. Gently whisk it into the eggs until fully incorporated. This liquid base is what will allow the bread to soak up all the delicious flavors.
Now, add the honey, kosher salt, pure vanilla extract, and the pinch of grated nutmeg. Whisk everything together vigorously until the mixture is smooth and uniform. Warming the honey slightly in the microwave for about 30 seconds before adding it can help it dissolve more easily into the custard, preventing any clumping.
The consistency of the custard should be rich and slightly thick, indicative of the creamy half-and-half and eggs working together. Taste a tiny bit of the custard (if you’re comfortable doing so) to ensure the balance of sweetness and spice is to your liking before proceeding to soak the bread.
Step 3: The Art of Soaking the Challah
This step requires a delicate touch and careful timing to ensure the bread absorbs the custard without becoming waterlogged. Prepare a clean workspace where you can soak and then drain the bread slices. You’ll want one area for soaking and another for draining.
Pour the prepared custard into a shallow dish, such as a 9×9 inch baking dish or a wide, shallow bowl. This provides ample surface area for dipping the bread slices evenly. Ensure the dish is large enough to accommodate at least two slices of challah at a time without them overlapping significantly.
Carefully place two slices of your dried challah bread into the custard. Allow each slice to soak for approximately two minutes per side. The exact timing can vary slightly depending on the dryness of your bread; you want it to absorb the liquid but not to the point of becoming limp or fragile.
After the initial soak, gently lift the bread slices from the custard. It’s crucial to let any excess custard drip back into the dish. Immediately transfer the soaked bread to a waiting wire rack. This rack should be positioned over a baking sheet to catch any drips.
Allow the bread to rest on the drying rack for about 2-3 minutes. This draining period is essential for allowing the excess custard to drip away, preventing the French toast from becoming greasy or heavy during cooking. This process ensures that the bread is perfectly saturated, not soggy.
Step 4: The Perfect Golden Cook
Now, it’s time to transform the soaked challah into perfectly golden-brown French toast. Select your cooking vessel; a griddle or a large, non-stick frying pan is ideal for achieving even cooking. You’ll want to maintain a consistent medium heat throughout this process.
Melt about 1 tablespoon of unsalted butter in your chosen pan or griddle over medium heat. Allow the butter to melt and foam slightly before adding the bread. The butter not only prevents sticking but also contributes a wonderful golden color and rich flavor to the finished toast.
Carefully place 2-3 soaked challah slices onto the hot, buttered surface. Avoid overcrowding the pan, as this can lower the temperature and lead to uneven cooking. Leave ample space between each slice. You want each piece to have direct contact with the heat source for optimal browning.
Cook the French toast for approximately 2 to 3 minutes per side. The exact time will depend on your stove’s heat and the thickness of your bread. Watch for a beautiful, deep golden-brown color to develop on the first side before flipping.
Using a spatula, carefully flip each slice and cook the other side for another 2 to 3 minutes, or until it also achieves a similar golden-brown hue. Ensure that the bread is cooked through to the center. You can gently press down with the spatula to encourage even cooking.
As you finish each batch, you can keep the cooked French toast warm. If you have an oven-safe rack and baking sheet ready, place the cooked slices on it and keep them in a warm oven set to a low temperature (around 200°F or 95°C). This prevents them from cooling down while you cook the remaining slices.
Step 5: Repeating the Process with Flair
To ensure a consistent and delightful breakfast for everyone, you’ll need to repeat the soaking and cooking process for all the challah slices. Don’t rush this stage; patience is key to achieving excellent results with each piece.
Before adding the next batch of soaked bread to the pan, add another small amount of butter, about 1/2 tablespoon. This ensures that the surface remains adequately greased and that each new batch benefits from that fresh, buttery flavor and golden crispiness.
Allow the butter to melt and foam before introducing the next set of soaked challah slices. It’s beneficial to have your draining rack and baking sheet ready for the newly cooked French toast so you can transfer them efficiently.
Continue to cook each batch for the same duration, checking for that perfect golden-brown color on both sides. Observe the cooking closely; the edges should be delightfully crisp, while the center remains soft and custardy. This textural contrast is what makes challah French toast so irresistible.
As each batch is cooked to perfection, transfer it to the rack that is either in the warm oven or set aside. This allows any residual moisture to evaporate and keeps the already cooked pieces warm and ready to be served. Maintaining a consistent medium heat throughout is crucial for preventing the butter from burning and ensuring the French toast cooks evenly without becoming tough.
Step 6: The Grand Finale of Serving
The final step is the most exciting: presenting and enjoying your beautifully crafted challah French toast. Once all the slices have been cooked and kept warm, arrange them on a serving platter. Aim for an appealing presentation that hints at the deliciousness to come.
Consider dusting the warm French toast with a light, ethereal layer of powdered confectioners’ sugar. This adds a touch of sweetness and visual appeal without being overpowering. It’s a classic touch that complements the rich flavors beautifully.
Now, it’s time for the toppings! This is where personalization truly shines. Offer a selection of your favorite accompaniments. A generous drizzle of warm maple syrup or honey is a traditional and always welcome choice.
Fresh fruits add vibrant color, refreshing tang, and a healthy element. Think about a medley of berries like strawberries, blueberries, and raspberries, or sliced bananas. A dollop of fluffy whipped cream adds a touch of decadence and a lovely contrast in texture and temperature.
For those who enjoy a bit more crunch, a sprinkle of chopped nuts, such as pecans or walnuts, can be a delightful addition. If you’re feeling adventurous, consider a homemade fruit compote or even a drizzle of caramel sauce. The possibilities are truly endless, making each serving a unique and personalized experience.
Pro Tips for challah french toast
Embrace the Stale Bread: The absolute key to perfect challah French toast lies in using day-old, slightly stale bread. Fresh bread will absorb too much custard and become mushy. If your challah is fresh, slicing it and leaving it out overnight on a wire rack is the best method; alternatively, a brief stint in a low oven (300°F for 10-15 minutes) can dry it out sufficiently.
Don’t Over-Soak: While soaking is essential, overdoing it is a recipe for disaster. A soak of about 2 minutes per side is usually sufficient for day-old challah. The bread should feel saturated but still hold its shape. Allow it to drain on a wire rack for a few minutes after soaking to let excess liquid drip away.
Medium Heat is Your Friend: Cooking French toast over medium heat is critical for achieving that perfect golden-brown exterior without burning the inside. If the heat is too high, the outside will cook too quickly, leaving the center undercooked. If it’s too low, the toast may become greasy and lack that desirable crispness.
Butter is Better (in Moderation): Using unsalted butter for cooking adds a wonderful flavor and helps create a beautiful crust. However, be mindful of its smoke point. If the butter starts to brown or smoke excessively, consider adding a splash of neutral oil to the pan to raise the smoke point, or simply wipe out the pan and add fresh butter.
Keep it Warm Effectively: To serve a whole batch warm, preheat your oven to a low temperature (around 200°F or 95°C) and place a wire rack over a baking sheet inside. As each batch of French toast is cooked, transfer it to this rack in the oven. This keeps it warm and slightly crisp until serving time.
Serving Suggestions for challah french toast
Decoration
The visual appeal of challah French toast can be greatly enhanced with simple yet elegant decorative touches. A light dusting of powdered confectioners’ sugar provides an ethereal white finish that contrasts beautifully with the golden-brown toast. This classic decoration adds a touch of sweetness and sophistication without overwhelming the dish.
Consider adding a scattering of fresh berries for bursts of vibrant color. A few strategically placed raspberries, blueberries, or sliced strawberries can elevate the presentation significantly, making the dish look as appealing as it tastes. Edible flowers, if available and safe for consumption, can also add a delicate and charming flourish.
For an extra touch of indulgence, a delicate swirl or dollop of homemade whipped cream can serve as both a decoration and a delicious topping. A drizzle of caramel sauce or chocolate syrup can also create intricate patterns, transforming the plate into a work of art. The key is to add touches that complement the flavors and textures already present.
Side Dishes
Challah French toast pairs wonderfully with a variety of side dishes that create a complete and satisfying breakfast or brunch experience. Savory options provide a delightful counterpoint to the sweetness of the toast. A fluffy egg white frittata, light and airy, offers a protein-rich addition without being too heavy.
Consider serving with breakfast potatoes that are either crispy roasted or lightly fried. The savory, slightly salty crunch of well-prepared potatoes balances the richness of the French toast. A simple side of crispy bacon or savory sausage patties can also add a welcome meaty element to the meal.
For a lighter, brighter accompaniment, a fresh fruit salad is an excellent choice. Combining a variety of seasonal fruits offers a refreshing palate cleanser and adds natural sweetness and hydration. A small side of Greek yogurt with a drizzle of honey can also provide a creamy, tangy contrast.
Creative Serving Ideas
Beyond the traditional plating, challah French toast can be presented in several creative and engaging ways. Imagine transforming it into a “French Toast Board” or platter, where each guest can customize their own creation from a variety of toppings arranged attractively. This interactive approach makes breakfast a fun activity, especially for families or gatherings.
Another idea is to stack the French toast slices like mini pancakes, with a layer of whipped cream or a fruit compote between each slice. This layered approach adds height and a sense of grandeur to the presentation. A dusting of cinnamon sugar on the sides of the stack can add an extra textural element.
Consider serving individual portions in small ramekins or dessert glasses, topped with a specific theme. For instance, a “Berry Blast” version could feature layers of French toast, mixed berry compote, and whipped cream, served in a tall glass. For a more decadent option, a “Salted Caramel Dream” could include layers of French toast, caramel sauce, and crushed pretzels.
Preparation & Storage
Storing Leftovers
If you happen to have any leftover challah French toast, proper storage is key to maintaining its quality for future enjoyment. Once the French toast has cooled completely to room temperature, carefully transfer the slices into an airtight container. It is crucial that the container is truly airtight to prevent the toast from drying out or absorbing any unwanted odors from the refrigerator.
You can place parchment paper between layers of French toast if you are concerned about them sticking together, although if they are fully cooled, this is usually not a significant issue. Store the container in the refrigerator. Properly stored, challah French toast can typically remain fresh and delicious for up to 3 to 4 days.
It’s important to note that while leftovers can be stored, they may lose some of their initial crispness. The texture will become softer, more akin to a bread pudding, which is still quite enjoyable. However, for the best possible outcome, it’s always recommended to consume French toast fresh.
Freezing
For longer-term storage, freezing challah French toast is an excellent option. Ensure the French toast slices have cooled completely before proceeding with the freezing process. This prevents the formation of ice crystals, which can degrade the quality of the toast.
Arrange the cooled French toast slices in a single layer on a baking sheet lined with parchment paper. Place the baking sheet in the freezer for about 1 to 2 hours, or until the slices are firm and frozen solid. This “flash freezing” prevents the slices from clumping together in one large mass once they are transferred to a freezer bag or container.
Once frozen solid, carefully transfer the individual slices into a freezer-safe bag or an airtight freezer container. Remove as much air as possible from the bag before sealing it to minimize freezer burn. Properly frozen challah French toast can maintain its quality for up to 2 months.
Reheating
Reheating challah French toast requires a method that can restore its warmth and, ideally, some of its original texture. The best way to reheat is in a conventional oven or a toaster oven. Preheat your oven or toaster oven to around 350°F (175°C).
Place the chilled or thawed French toast slices on a baking sheet lined with parchment paper. If reheating from frozen, you can place them directly onto the baking sheet without thawing, but the reheating time will be longer. Bake for about 8-12 minutes for chilled toast, or 15-20 minutes for frozen toast, or until heated through and slightly crisped.
For a quicker, though less crispy, result, you can reheat the French toast in the microwave. Place the slices on a microwave-safe plate and heat in 30-second intervals until warm. Be cautious not to overheat, as this can make the toast rubbery. If you’ve thawed the French toast overnight in the refrigerator, it will reheat more quickly.
Frequently Asked Questions
- What is the best way to ensure my challah French toast is fluffy and not soggy?
Achieving fluffy, non-soggy challah French toast hinges on two primary factors: the bread and the soaking technique. Firstly, it is absolutely essential to use challah bread that is at least a day old. Stale bread has a firmer structure and is less absorbent than fresh bread, allowing it to soak up the custard without becoming overly saturated and dense. If your challah is fresh, you can dry it out by slicing it and leaving it on a wire rack overnight to air dry, or by placing the slices in a low oven (around 300°F or 150°C) for 10-15 minutes, flipping halfway through, until it feels firm but not toasted. Secondly, do not over-soak the bread. A soak of approximately two minutes per side is usually sufficient. After soaking, it’s vital to let the excess custard drip off the bread by placing it on a wire rack for a few minutes before cooking. This step allows for a perfectly saturated interior without a soggy exterior, leading to that desirable contrast of crisp outside and tender inside.
- Can I make the custard for challah French toast ahead of time, and if so, how should I store it?
Yes, you can absolutely prepare the custard for your challah French toast in advance, which can be a great time-saver, especially on busy mornings. Whisk all the custard ingredients together as per the recipe instructions – the eggs, half-and-half, honey, salt, vanilla extract, and nutmeg. Once thoroughly combined and smooth, pour the mixture into an airtight container. Glass containers are often preferred for storing dairy-based mixtures, as they don’t retain odors. Seal the container tightly to prevent any contamination or absorption of other kitchen smells. Store the prepared custard in the refrigerator. It is generally recommended to use the custard within 24 to 48 hours for optimal freshness and flavor. When you are ready to make the French toast, simply remove the custard from the refrigerator, give it a quick whisk to ensure it is homogenous, and proceed with soaking your challah slices as directed. This preparation step allows you to streamline the cooking process significantly.
- What are some common issues people encounter when making French toast, and how can I avoid them with this challah recipe?
Several common issues can arise when making French toast, but this challah recipe is designed to mitigate them. One frequent problem is French toast that is too pale or has unevenly cooked spots; this is usually due to inconsistent heat. To avoid this, maintain a steady medium heat on your griddle or pan and ensure you don’t overcrowd it, allowing each slice ample space to cook evenly. Another issue is a soggy interior, which, as discussed, is prevented by using stale bread and not over-soaking. A burnt exterior with a raw interior is also common, typically caused by heat that is too high; medium heat is crucial. Some people find their French toast lacks flavor; this is where the quality of your custard ingredients comes in – using pure vanilla extract and freshly grated nutmeg makes a significant difference. Finally, French toast that sticks to the pan can be frustrating; ensuring your pan is well-greased with butter or oil before each batch is added will prevent this. By following the specific guidance on bread preparation, custard consistency, soaking times, and cooking temperatures, you can significantly reduce the chances of encountering these common French toast pitfalls.