Coconut Cake with Chocolate Frosting
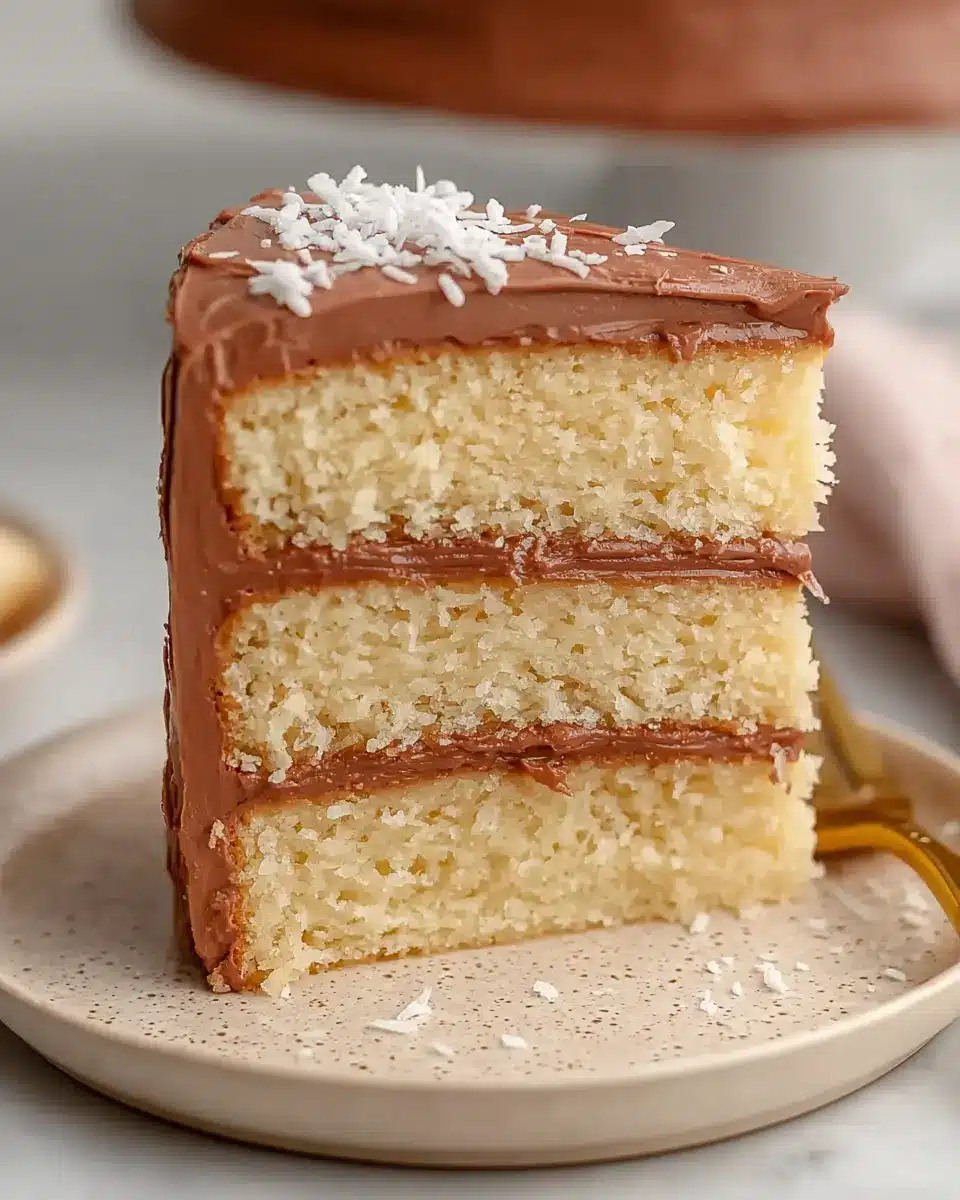
This Coconut Cake with Chocolate Frosting is a delightful journey into moist, tender layers infused with the subtle, sweet essence of coconut. It’s designed to mimic the charm of a bakery-style cake, offering a delicate crumb and a cloud-like texture that melts in your mouth with every bite.
The velvety smooth chocolate frosting is the perfect counterpoint, providing a rich, decadent finish that doesn’t overpower the gentle coconut notes. This cake is an absolute showstopper, perfect for any occasion that calls for a touch of sweetness and elegance, from birthday celebrations to simple weekend indulgence.
Why You Will Love This Recipe
- Exceptional Texture: The use of cake flour, combined with the creaming method and careful ingredient additions, results in an incredibly tender and fine crumb that feels luxurious.
- Balanced Flavors: This recipe strikes a perfect harmony between the delicate sweetness of coconut and the rich depth of chocolate, ensuring neither flavor dominates but rather complements the other beautifully.
- Approachable Elegance: While it looks sophisticated, the preparation steps are straightforward and manageable for home bakers, making it an achievable yet impressive dessert.
- Versatile Pan Options: Whether you prefer a taller, multi-layered cake using three 6-inch pans or a classic, wider presentation with two 8-inch pans, this recipe adapts beautifully to both, offering flexibility for your baking needs.
- Silky Smooth Frosting: The chocolate buttercream, made with a quick ganache base, achieves a remarkably smooth, spreadable, and intensely chocolatey consistency that elevates the entire cake.
Ingredients You Need
The success of any magnificent cake hinges on the quality of its components. Opting for fresh, high-quality ingredients ensures that the subtle nuances of coconut and the richness of the chocolate can truly shine through. Using good unsalted butter will provide a creamy base, while a premium vanilla extract will round out the aromatic profile.
Coconut Cake with Chocolate Frosting

A tender coconut cake prepared with coconut milk, coconut flavoring, and vanilla, then finished with a rich chocolate buttercream frosting. This layer cake bakes into a soft, delicate crumb and is suitable for either three 6-inch cake pans or two 8-inch cake pans.
- 1 tablespoon baking powder
- 1 teaspoon pure vanilla extract (such as Nielsen-Massey)
- 1 cup coconut milk (using only the thick cream portion)
- 1 teaspoon salt
- 3 cups cake flour
- 2 large eggs (brought to room temperature)
- 1 tablespoon coconut flavoring
- 1 cup unsalted butter (softened at room temperature)
- 1 1/2 cups granulated sugar
- 4 egg whites (at room temperature)
- 1 pinch salt
- 1/4 cup heavy cream
- 8 ounces dark chocolate chips (such as Ghirardelli)
- 1 tablespoon coconut flavoring
- 2 cups unsalted butter (slightly chilled)
- 6 cups confectioners’ sugar (sifted)
- 1Preheat the oven to 325 degrees F. Coat three 6-inch pans or two 8-inch pans with nonstick spray. Line the bottoms with parchment paper, spray the parchment, and set the pans aside.
- 2In a medium bowl, whisk together the cake flour, baking powder, and salt until the mixture is thoroughly blended. Reserve this dry mixture for later use.
- 3Place the softened butter and granulated sugar in the bowl of a stand mixer fitted with the paddle attachment. Beat on medium-high speed for about 2 minutes, until the mixture appears pale and fluffy.
- 4Add the egg whites and whole eggs gradually, scraping the sides and bottom of the bowl between additions. Once all of the eggs have been incorporated, continue mixing on medium-high speed for 2 minutes.
- 5Blend in the coconut flavoring and vanilla extract. Reduce the mixer speed to low, then add the dry ingredients and coconut milk in alternating additions, beginning and ending with the dry ingredients. Mix only until the batter is combined.
- 6Divide the batter evenly among the prepared pans. Bake for 20 to 25 minutes, or until a toothpick inserted into the center emerges with a few moist crumbs attached.
- 7Let the cakes rest in their pans for about 15 minutes. Turn them out onto cooling racks and allow them to cool completely.
- 8To make the frosting, place the butter in a clean stand mixer bowl fitted with the paddle attachment. Beat on medium-high speed for 1 to 2 minutes, until light and creamy.
- 9Warm the heavy cream in the microwave for about 1 minute. Pour it over the chocolate chips and stir until a smooth ganache forms.
- 10With the mixer running on medium-low speed, add the ganache to the whipped butter gradually, scraping the bowl as needed. Add the sifted powdered sugar little by little, then mix in the coconut flavoring and salt.
- 11Increase the mixer speed to medium and beat for 2 to 3 minutes, until the frosting is fluffy and spreadable. Stir through the frosting with a wooden spoon to remove excess air bubbles.
- 12Place the first cake layer right-side up on a cake plate or cake board. Spread about 2/3 cup frosting over the layer if using 6-inch cakes, or about 1 cup if using 8-inch layers.
- 13Set the next cake layer on top and repeat the frosting process. Position the final layer bottom-side up.
- 14Apply a thin crumb coat over the entire cake and place it in the freezer for 10 to 15 minutes, until the frosting is set. Finish frosting and decorating the cake with the remaining chocolate frosting.
Keywords: Coconut Cake, Chocolate Frosting, Layer Cake, Bakery Style, Coconut Flavor, Chocolate Buttercream, Birthday Cake, Dessert
The precise measurements for all these essential ingredients are detailed within the recipe card for your convenience.
Variations
This delightful Coconut Cake with Chocolate Frosting serves as a fantastic canvas for culinary creativity, allowing for delightful twists to suit various dietary needs and flavor preferences.
For a truly decadent vegan rendition, you can easily substitute the butter with a high-quality vegan butter alternative, ensuring it’s unsalted to control the overall sweetness. The eggs can be replaced using a flax egg (1 tablespoon ground flaxseed mixed with 3 tablespoons water, left to sit for 5 minutes) for each whole egg, and you would use additional liquid, like a vegan milk, to maintain batter consistency. The egg whites can be omitted or supplemented with aquafaba (the liquid from a can of chickpeas) whipped to soft peaks. The chocolate frosting can be made vegan by using vegan butter and a plant-based heavy cream or coconut cream, ensuring your chocolate chips are also dairy-free.
If you’re aiming for a lower-carbohydrate version, consider experimenting with almond flour or a coconut flour blend as a partial or full substitute for cake flour, though this may require adjustments to liquid content and baking times. For the frosting, a sugar-free dark chocolate and a sugar substitute like erythritol or stevia can be used, carefully adjusting for sweetness and texture. This modification will significantly alter the final texture and sweetness, so precise measurement and testing are key.
Another exciting variation involves infusing additional layers of flavor. You could fold in a cup of toasted shredded coconut into the cake batter itself for an even more pronounced coconut experience. Alternatively, a thin layer of raspberry or passion fruit jam between the cake layers before frosting would introduce a bright, tangy contrast to the rich chocolate and sweet coconut. These additions offer unique flavor profiles that can transform the cake into something truly custom and memorable.
How to Prepare Coconut Cake with Chocolate Frosting
Step 1: Oven Readiness and Pan Preparation
Begin by preheating your oven to the specified temperature, ensuring it reaches the correct heat for even baking. This initial step is crucial for the cake to rise properly and cook through without developing overly dry edges or an undercooked center. A well-heated oven is the foundation of a perfectly baked cake.
Next, meticulously prepare your cake pans. Generously grease the inside of each pan, paying close attention to the corners and edges to prevent sticking. This often involves using softened butter or a baking spray that contains flour to create a non-stick surface. Following this, cut rounds of parchment paper to fit the bottom of each pan perfectly. Place these parchment rounds inside the greased pans, and then grease the parchment paper itself. This double-layer of protection ensures that your delicate cake layers will slide out effortlessly after baking, saving you from any frustrating breakage or sticking issues during the critical assembly phase.
The Importance of Pan Prep: This seemingly simple step is one of the most vital for cake success. A well-prepared pan guarantees that your beautiful cake layers release cleanly, maintaining their structural integrity and appearance. Rushing this process can lead to torn layers that are difficult to assemble and frost attractively, detracting from the overall presentation of your finished dessert. Take your time and ensure thorough coverage; it will pay dividends when it’s time to assemble.
Step 2: Combining Dry Ingredients
In a separate mixing bowl, a medium-sized one will suffice, combine the cake flour, baking powder, and salt. Use a whisk to thoroughly mix these dry components together. The goal here is to ensure that the leavening agent (baking powder) and the salt are distributed as evenly as possible throughout the flour.
Even distribution is particularly important in delicate cakes, where a consistent rise across all layers is desired. If the baking powder is clumped in one area, you might end up with an unevenly risen cake or even some gummy textures in spots. This methodical approach to combining the dry ingredients sets the stage for a uniform cake structure and texture.
Why Whisk?: Whisking not only blends the ingredients but also aerates them slightly, which can contribute to a lighter cake. It breaks up any small lumps in the flour and ensures that the baking powder and salt are dispersed uniformly, preventing any pockets of concentrated saltiness or lack of leavening. This simple action contributes significantly to the overall success of the cake’s crumb and rise.
Step 3: Creaming Butter and Sugar
Place the softened unsalted butter and granulated sugar into the bowl of a stand mixer fitted with the paddle attachment. Begin by beating these two ingredients together on a medium-high speed. You are looking for the mixture to transform from its initial dense state into a pale, fluffy, and aerated mass that resembles creamy clouds.
This creaming process is fundamental to creating a light and tender cake. The friction between the sugar crystals and the butter cuts the butter into tiny pieces, creating air pockets. These air pockets will expand during baking, contributing significantly to the cake’s volume and its signature soft, airy texture. Don’t underestimate the power of proper creaming; it’s a cornerstone of many superior cake recipes.
The Magic of Aeration: The extended mixing time, typically around two minutes, is not just for show. It’s essential for incorporating as much air as possible into the butter and sugar mixture. This incorporated air is what gives the cake its lift and prevents it from becoming dense or heavy. The visual cue of a pale yellow, fluffy consistency is your sign that you’ve achieved the ideal base for your cake batter.
Step 4: Incorporating Wet Ingredients
Once the butter and sugar are perfectly creamed, it’s time to add the eggs. Introduce them gradually, one at a time, ensuring that each egg is fully incorporated into the mixture before adding the next. It is important to scrape down the sides and the bottom of the mixer bowl between each addition. This ensures that all the ingredients are evenly combined and prevents pockets of unincorporated egg from forming.
After the eggs have been thoroughly mixed in, it’s time to add the flavorings. Gently mix in the vanilla extract and the coconut flavoring. These extracts will perfume the batter with their delicious aromas, setting the stage for the cake’s distinctive taste. Ensure they are well combined before proceeding to the next stage of mixing.
Smooth Emulsification: Adding eggs gradually helps to create a stable emulsion between the fats (butter) and the water-based ingredients. If eggs are added too quickly, the mixture can curdle, leading to an undesirable texture in the final cake. Scraping the bowl is a simple yet crucial step to ensure a homogenous batter, so no ingredient is left behind or unevenly mixed.
Step 5: Alternating Dry and Wet Ingredients
Now, you will combine the dry ingredients (flour mixture) and the wet ingredients (coconut milk) with the creamed butter and sugar mixture. It’s important to do this in alternating additions, beginning and ending with the dry ingredients. This method helps to prevent overmixing the batter, which is a common pitfall that can lead to a tough cake.
Start by adding about one-third of the dry ingredients to the mixer bowl. Mix on low speed just until barely combined. Then, add about half of the coconut milk and mix again until just incorporated. Continue this pattern, adding another third of the dry ingredients, then the remaining coconut milk, and finally, the last of the dry ingredients. Always mix on low speed and only until the ingredients are just combined; do not overmix.
The “Don’t Overmix” Rule: Gluten, which develops from flour when mixed with liquid, provides structure to cakes. However, overdeveloping gluten can result in a tough, chewy cake. By alternating dry and wet ingredients and mixing only until just combined, you minimize gluten development, ensuring a tender crumb that is characteristic of a superior coconut cake.
Step 6: Baking the Cake Layers
Once the batter is ready, divide it evenly among the prepared cake pans. Use a kitchen scale for the most accurate distribution, ensuring that each layer bakes uniformly. If you don’t have a scale, visually divide the batter as equally as possible. Smooth the tops of the batter in each pan.
Place the filled pans into the preheated oven. Bake for the duration specified in the recipe, typically around 20-25 minutes for 6-inch pans. The cakes are done when a toothpick inserted into the center comes out with a few moist crumbs attached. Avoid overbaking, as this will result in dry layers. The cake will continue to set as it cools.
After baking, let the cakes cool in their pans on a wire rack for about 10-15 minutes. This brief cooling period in the pan helps the cakes to firm up slightly, making them easier to remove without breaking. Then, carefully invert the pans onto the wire racks, remove the parchment paper, and allow the cake layers to cool completely before you attempt to frost them. Ensuring they are thoroughly cooled is paramount to prevent the frosting from melting.
Step 7: Crafting the Chocolate Frosting
While the cake layers are cooling, you can prepare the decadent chocolate frosting. Begin by placing the softened unsalted butter in a clean stand mixer bowl fitted with the paddle attachment. Beat the butter on medium-high speed for one to two minutes until it becomes light, fluffy, and exceptionally creamy. This ensures a smooth and airy base for your frosting.
Next, prepare a quick chocolate ganache. Gently warm the heavy cream in a microwave-safe bowl for about a minute, or until it is steaming but not boiling. Pour the warm cream over the dark chocolate chips in a separate bowl. Let it sit for a minute to allow the chocolate to begin melting, then stir gently until a smooth, glossy ganache forms. If any chocolate pieces remain unmelted, you can warm the mixture very briefly in the microwave in 10-second intervals, stirring in between, until smooth.
Add this smooth ganache to the whipped butter in the stand mixer. With the mixer running on medium-low speed, gradually incorporate the ganache into the butter, scraping down the sides and bottom of the bowl as needed. Gradually add the sifted confectioners’ sugar, mixing until fully combined. Finally, mix in the coconut flavoring and a pinch of salt to balance the sweetness. Increase the mixer speed to medium and beat for an additional two to three minutes until the frosting is light, fluffy, and perfectly spreadable.
Step 8: Assembling and Frosting the Cake
Once your cake layers are completely cool, you can begin the assembly process. Place the first cake layer right-side up on your serving plate or cake stand. If you are using 6-inch pans, spread about 2/3 cup of the chocolate frosting evenly over this layer. If you are using 8-inch pans, you will need approximately 1 cup of frosting for this layer.
Carefully place the second cake layer on top of the frosting. Repeat the frosting process, spreading another generous layer of frosting over the second cake. For the final layer, position it bottom-side up on top of the second frosted layer. This creates a perfectly flat surface for the top of your cake.
Now, apply a thin, even coat of frosting over the entire cake – the top and the sides. This is known as a “crumb coat” and its purpose is to trap any loose crumbs, preventing them from appearing in your final, smooth layer of frosting. Once the crumb coat is applied, place the entire cake in the freezer for about 10 to 15 minutes. This chilling period allows the crumb coat to set firm, making the final frosting application much cleaner and easier.
After the cake has chilled, remove it from the freezer and apply the remaining chocolate frosting. Work from the center outwards on the top and then smooth the sides, ensuring a beautiful, professional finish. You can use an offset spatula or a bench scraper to achieve a perfectly smooth exterior, or create decorative swirls and textures as desired.
Pro Tips for Coconut Cake with Chocolate Frosting
- Room Temperature Eggs: Always use room-temperature eggs for your cake batter. They emulsify much more smoothly with the butter and sugar, preventing the batter from looking curdled. This leads to a more homogenous batter and a finer, more consistent cake crumb.
- Avoid Overbaking: The cake layers will continue to set slightly as they cool in the pans and on the wire rack. Pulling the cake out of the oven just as a toothpick emerges with moist crumbs attached is key to preserving that wonderfully soft, tender texture and preventing dryness.
- Stir the Frosting: Before you begin decorating, stir the finished chocolate frosting by hand for a few seconds with a wooden spoon. This simple technique helps to knock out larger air bubbles that may have been incorporated during whipping, resulting in a much smoother, more refined finish on your cake.
- Cooling is Key: Never attempt to frost a warm cake. The heat will cause the frosting to melt and slide off, creating a messy disaster. Ensure your cake layers are completely cool to room temperature before applying any frosting for the best results and easiest handling.
- Ganache Consistency: For the frosting, ensure your chocolate ganache has cooled to a smooth, fluid consistency but is not hot when you add it to the whipped butter. If it’s too hot, it can melt the butter. If it’s too cool, it might seize and create a grainy texture.
Serving Suggestions for Coconut Cake with Chocolate Frosting
Decoration
To elevate the visual appeal of your Coconut Cake with Chocolate Frosting, consider a few decorative flourishes. A simple dusting of shredded coconut, either toasted for added crunch and depth of flavor or left plain for a softer look, can beautifully enhance the cake’s theme. You could also pipe elegant rosettes or borders around the top and base of the cake using a star tip, showcasing the rich chocolate frosting.
For a touch of luxury, sprinkle a few edible gold or silver dragees onto the frosted surface, especially around the edges or as a focal point on top. Another idea is to arrange fresh, vibrant berries, such as raspberries or blueberries, artfully on top of the cake. Their bright colors offer a stunning contrast to the dark chocolate and the creamy white cake, adding both visual appeal and a refreshing burst of flavor.
If you’ve toasted some shredded coconut, a light sprinkling of that over the top can add a delightful texture and visual warmth. You might even consider creating chocolate curls or shavings using a chocolate bar and a vegetable peeler, then artfully arranging them on the cake. These small decorative touches can transform your already delicious cake into a true centerpiece.
Side Dishes
This luscious coconut cake pairs exceptionally well with a variety of complementary side dishes, each designed to enhance the overall dessert experience. Fresh berries, such as raspberries, strawberries, or blueberries, are a classic accompaniment. Their natural tartness and sweetness cut through the richness of the frosting and complement the coconut flavor beautifully, offering a refreshing balance to each bite.
For a more sophisticated pairing, consider serving thin slices with a scoop of high-quality vanilla bean ice cream or a dollop of freshly whipped cream. The cool, creamy texture of the ice cream or cream provides a delightful contrast to the cake’s tender crumb and rich frosting. A warm beverage is also an excellent companion; a strong cup of coffee, an espresso, or even a fragrant herbal tea can enhance the chocolate notes and provide a soothing end to a meal.
A small glass of dessert wine, such as a Moscato d’Asti or a Sauternes, could also be a surprisingly delightful pairing, its subtle sweetness and fruity notes harmonizing with the cake’s flavors. If you’re serving this at a brunch, a light fruit salad with melon, pineapple, and kiwi would provide a refreshing counterpoint. The goal is to offer something that either balances the sweetness or highlights the existing flavors without overpowering them.
Creative Serving Ideas
Beyond traditional slices, there are several creative ways to present and serve this Coconut Cake with Chocolate Frosting, making it memorable for any gathering. Consider transforming individual slices into elegant dessert parfaits by layering crumbled cake, frosting, and fresh berries in tall glasses. This layered approach offers a visually stunning presentation and allows for a delightful mix of textures and flavors in every spoonful.
Another fun idea is to serve deconstructed cake bites. Cut the cake into small cubes, pipe or dollop frosting alongside, and scatter some toasted coconut or berries around. This allows guests to assemble their own perfect bite, offering a playful and interactive dessert experience. For a more casual get-together, mini cupcakes made from the same batter and frosting can be a delightful and easily shareable treat.
For a truly special occasion, especially a birthday, consider creating a “cake smash” version for a baby’s first birthday or a fun photo opportunity. You can also make a simple syrup infused with a hint of coconut rum or orange liqueur and lightly brush it onto the cake layers before frosting for an adult-friendly twist. This adds an extra layer of moisture and a subtle, sophisticated flavor profile that guests are sure to appreciate.
Preparation & Storage
Storing Leftovers
Once your delicious Coconut Cake with Chocolate Frosting has been enjoyed, proper storage is key to maintaining its freshness and delightful texture. Because the frosting is a buttercream made with cream, it is best to store any leftover cake covered tightly in the refrigerator. This helps to prevent the frosting from becoming too soft or melting, and also keeps the cake layers from drying out too quickly.
When stored correctly in an airtight container or well-covered with plastic wrap and then aluminum foil, the cake should remain delicious for about 4 to 5 days. Ensure the container is large enough to accommodate the cake without squishing the frosting. If the cake is in a display case, wrap it thoroughly with plastic wrap, making sure to seal all edges to minimize air exposure.
Reviving Cold Cake: For the best tasting experience, it is highly recommended to take slices of refrigerated cake out and let them sit at room temperature for about 30 minutes before serving. This brief resting period allows the cake to soften to its optimal texture and the frosting to become creamy and spreadable again, rather than firm and cold. This step makes a significant difference in the enjoyment of the cake.
Freezing
Leftover Coconut Cake with Chocolate Frosting freezes remarkably well, making it a perfect make-ahead dessert. You can freeze individual slices or even an entire frosted cake. To ensure the best quality upon thawing, it’s crucial to wrap the cake very thoroughly to protect it from freezer burn and odors.
Start by tightly wrapping the cake in several layers of plastic wrap, ensuring there are no gaps. Follow this with a layer or two of heavy-duty aluminum foil. For extra protection, you can place the foil-wrapped cake in a freezer-safe airtight container or a large freezer bag. Label the package with the date of freezing.
When properly frozen, this cake can be stored for up to 2 months. The quality will be best within this timeframe. Freezing is an excellent option if you’ve made the cake for a special event well in advance or if you simply want to ensure you have a delicious treat readily available for a future craving. Proper wrapping is the most critical step for successful freezing.
Reheating
While this cake is typically enjoyed at room temperature or slightly chilled, there are instances where a gentle reheating might be considered, though it’s usually not necessary or recommended for the frosting. If you’ve frozen the cake, the primary method of “reheating” is actually thawing. This is best done overnight in the refrigerator. Once thawed in the fridge, remove the cake from its wrapping and allow it to come to room temperature for at least 30 minutes to an hour before serving.
However, if you have a slice that is still slightly too firm from the refrigerator and you want to speed up the softening process, you can very gently warm it. Place a slice on a microwave-safe plate and heat it in the microwave on the lowest power setting for very short intervals, perhaps 10-15 seconds at a time. The goal is to slightly warm the cake layers, not melt the frosting. Overheating will definitely melt the frosting and can make the cake gummy. For the best texture, room temperature thawing is always preferred over any form of active reheating.
Caution with Frosting: Be extremely mindful that the chocolate frosting contains butter and cream, which are sensitive to heat. Applying direct heat, especially in a microwave, can cause the frosting to melt, split, or become oily. Therefore, any reheating should be approached with extreme caution and minimal duration, focusing on slightly warming the cake crumb rather than the frosting itself. Often, simply letting it sit at room temperature is the safest and most effective method.
Frequently Asked Questions
-
Can I make the cake layers ahead of time?
Absolutely. The cake layers can be baked up to a day in advance. Once they have cooled completely on a wire rack, wrap them tightly in plastic wrap to prevent them from drying out. You can then store them at room temperature if you plan to frost them the next day, or refrigerate them if you need to store them for a bit longer. Baking the layers ahead of time can significantly reduce the stress of assembly on the day you plan to serve the cake, making it a more manageable process, especially for parties or special occasions.
-
Why use both whole eggs and egg whites in the cake recipe?
The combination of whole eggs and egg whites is a strategic choice to achieve a superior cake texture. Whole eggs contribute richness, moisture, and a fuller flavor to the cake batter due to their yolks. Egg whites, on the other hand, are primarily protein and water; when whipped, they incorporate air, which helps to create a lighter, more delicate, and airy crumb structure. By using both, you get the best of both worlds: the depth of flavor and moisture from whole eggs, and the ethereal lightness and tender crumb from the added egg whites, resulting in a cake that is both moist and beautifully structured.
-
Can I use two 8-inch pans instead of three 6-inch pans for this recipe?
Yes, you most certainly can use two 8-inch pans instead of three 6-inch pans. The batter is formulated to work well in either configuration. Using two 8-inch pans will result in slightly wider and potentially shorter layers compared to the taller, multi-tiered cake that three 6-inch pans would produce. The baking time might need a slight adjustment; the 8-inch layers may take a few minutes longer to bake through, so keep an eye on them and test for doneness with a toothpick. Both pan sizes will yield a delicious cake, just with a different final presentation.