Coconut Cream Cake Roll
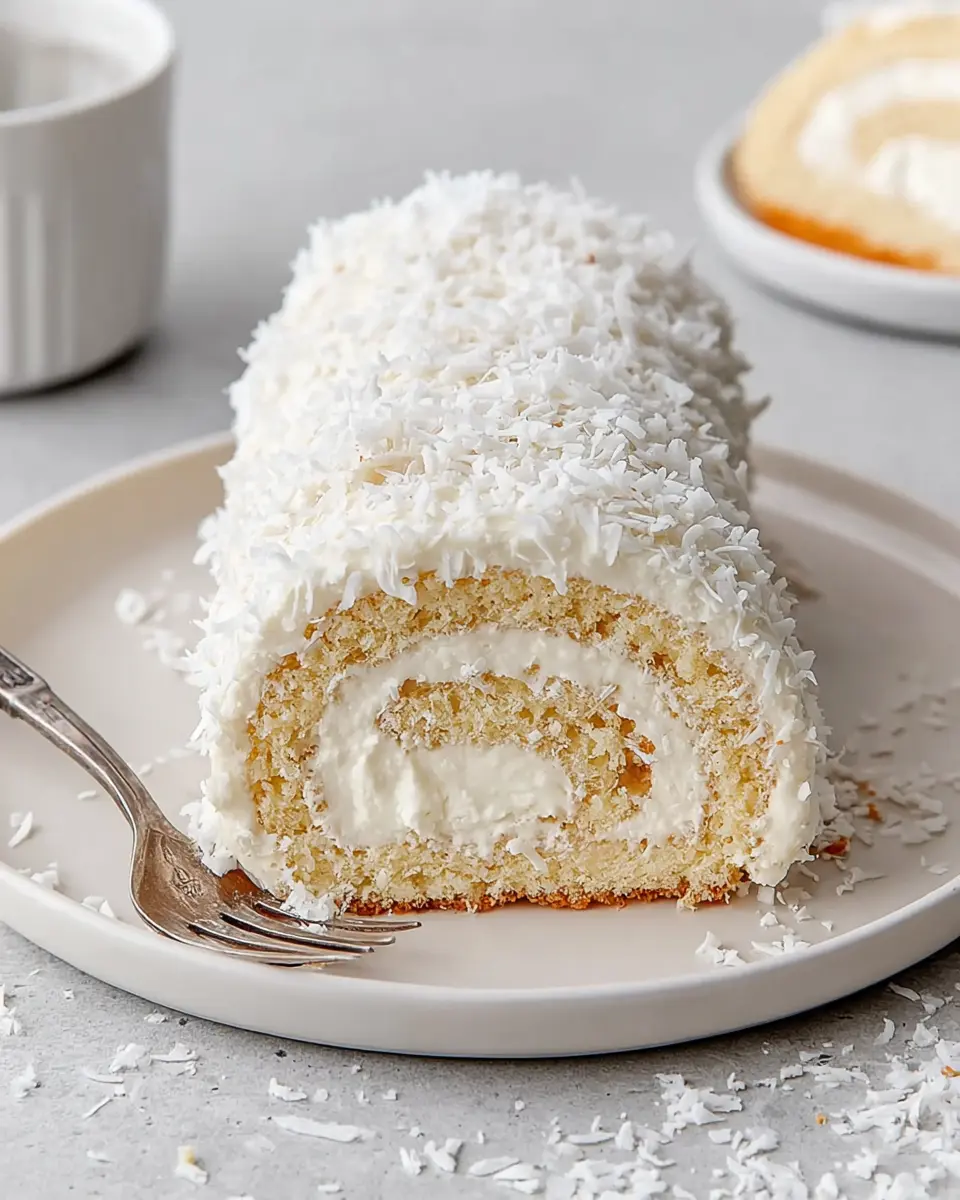
Coconut Cake Roll is a delightful dessert that masterfully balances a tender, light sponge with a luxuriously creamy coconut cream cheese filling. It’s a make-ahead marvel, perfect for impressing guests or simply indulging in a moment of sweet perfection. The elegant spiral and generous coconut coating make it a showstopper, yet its preparation is surprisingly accessible for any home baker. This dessert truly embodies sophistication without unnecessary complexity.
What truly sets this Coconut Cake Roll apart is its texture and flavor profile. The cake itself is baked to a delicate lightness, designed to be flexible enough for rolling without cracking. This essential pliability allows it to embrace the rich, decadent filling, creating a harmonious bite every time. The interplay between the soft cake and the smooth, tangy cream cheese filling, enhanced by the subtle sweetness and satisfying crunch of coconut, makes each slice an exquisite experience.
Why You Will Love This Recipe
- Effortless Elegance: This cake roll offers a stunning presentation that belies its straightforward preparation, making it ideal for any occasion.
- Perfectly Balanced Flavors: The delicate sponge is beautifully complemented by a rich yet not overly sweet coconut cream cheese filling, creating a harmonious taste.
- Make-Ahead Convenience: Prepare this dessert in advance, allowing the flavors to meld and the structure to set, ensuring a perfect slice every time.
- Versatile Appeal: It’s a crowd-pleaser that appeals to a wide range of palates, satisfying cravings for something light, creamy, and subtly tropical.
- Satisfying Texture Combination: The soft cake, smooth filling, and the delightful chew of grated coconut combine to offer a wonderfully varied and enjoyable mouthfeel.
Ingredients You Need
The success of any great dessert hinges on the quality of its ingredients. For this Coconut Cake Roll, selecting fresh, high-quality components will elevate the final taste and texture. From the eggs that form the airy sponge to the rich cream cheese and fragrant coconut, each element plays a crucial role in creating this delightful treat. Ensuring your ingredients are at the correct temperature, as specified, is also key to achieving the desired consistency and structure.
Coconut Cake Roll
A light sponge cake filled with a creamy coconut cream cheese filling and coated in shredded coconut. This make-ahead dessert is elegant yet simple to prepare for any occasion.
- For the cake:
- 4 room-temperature eggs
- 1 teaspoon coconut flavoring
- 1 cup granulated sugar
- 2 tablespoons whole milk or coconut milk
- 1 cup all-purpose flour
- 1/4 teaspoon salt
- 1 teaspoon baking powder
- 1/4 cup powdered sugar (for rolling)
- For the filling and topping:
- 16 ounces cream cheese (softened slightly)
- 1 1/2 cups cold heavy whipping cream
- 1 cup granulated sugar
- 1 teaspoon coconut flavoring
- 1/8 teaspoon salt
- 2 1/2 cups unsweetened grated coconut
- 1/4 to 1/2 cup powdered sugar (as needed)
- 1Preheat oven to 375°F (190°C). Grease and line a 15x10x1-inch baking pan with parchment paper, then lightly coat the parchment with nonstick spray.
- 2In a large bowl, beat eggs for 3 minutes until foamy. Gradually add granulated sugar and beat for 6-10 minutes until tripled in volume and ribbon-like. Mix in milk and coconut flavoring.
- 3Sift flour, baking powder, and salt over the egg mixture. Gently fold until just combined, being careful not to deflate the batter.
- 4Spread batter evenly into the prepared pan. Bake for 13-16 minutes, or until the cake springs back lightly when touched. Loosen edges with a knife.
- 5Dust a clean kitchen towel with powdered sugar. Invert the hot cake onto the towel, remove the pan, and peel off parchment paper. Roll the cake up with the towel from the short end and cool completely on a wire rack.
- 6For the filling, beat softened cream cheese, granulated sugar, salt, and coconut flavoring in a mixer until smooth.
- 7With the mixer on low, slowly pour in cold heavy cream. Increase speed and whip until thick, creamy, and holds firm peaks.
- 8Once the cake is cooled, gently unroll it. Spread filling over the surface, leaving a 1-inch border. Sprinkle 1 cup of grated coconut over the filling.
- 9Roll the cake back up carefully. Coat the outside with the remaining filling and cover with the remaining grated coconut. Place seam-side down on a serving platter.
- 10Cover and refrigerate for 1-2 hours before serving.
Keywords: Coconut Cake Roll, Cake Roll, Coconut Cream Cheese, Dessert, Baking, German
The precise quantities for each ingredient are detailed within the recipe card, ensuring you have everything you need for a perfect bake. It’s always a good idea to measure your ingredients carefully, especially for delicate bakes like cake rolls, to guarantee the best results.
Variations
While the classic Coconut Cake Roll is undeniably delicious, there are countless ways to personalize this delightful dessert. Experimenting with different flavors and textures can lead to exciting new versions that cater to specific dietary needs or simply offer a novel twist on a beloved recipe.
For those seeking a vegan alternative, the sponge can be adapted using a flax egg or commercial egg replacer, and the filling can be made with a base of silken tofu or cashew cream, sweetened and flavored similarly to the original. Unsweetened coconut milk and a plant-based cream cheese substitute would complete the dairy-free transformation. The result is a wonderfully rich and satisfying vegan dessert that captures the essence of the original.
A low-carb rendition is also achievable. The sponge could be made using almond flour or coconut flour, sweetened with a sugar substitute like erythritol or xylitol. For the filling, cream cheese would remain, but it would be sweetened with your preferred sugar-free sweetener, and heavy cream would still be the star for achieving that luscious texture. The exterior coconut coating would remain, offering that essential textural contrast.
Another creative avenue is to infuse the cake or filling with complementary flavors. Consider adding a hint of lime zest to the filling for a tropical tang that cuts through the richness, or perhaps a touch of cardamom for an aromatic depth. You could also experiment with different types of coconut, such as toasted shredded coconut for a nuttier flavor profile on the exterior.
How to Prepare Coconut Cake Roll
Step 1: Preparing the Pan and Oven
The foundation of a perfectly rolled cake lies in its preparation, starting with the baking vessel. Preheat your oven to the specified temperature, usually around 375°F (190°C), ensuring it’s evenly heated for consistent baking. A standard jelly roll pan, typically measuring 15×10 inches with 1-inch sides, is ideal for this recipe. It provides the necessary surface area for a thin, even cake layer that bakes quickly and rolls easily.
Lining the pan with parchment paper is a non-negotiable step for a successful cake roll. This creates a barrier between the cake batter and the pan, preventing sticking and making it incredibly easy to release the delicate sponge. After lining the pan, lightly grease the parchment paper itself. This offers an extra layer of insurance against any potential sticking, ensuring the cake lifts away cleanly once baked.
Ensuring the pan is properly prepared before you even begin mixing the batter saves time and prevents the delicate batter from sitting too long. This attention to detail in the initial stages is crucial for achieving that signature spiral without cracks or tears, setting you up for a beautifully finished dessert.
Step 2: Whipping Eggs for Maximum Volume
The heart of any sponge cake, especially a roll cake, is its airy structure, which is achieved through the careful whipping of eggs. Begin by placing the room-temperature eggs in a large, clean mixing bowl. Room temperature eggs whip up to a greater volume than cold eggs, which is essential for the light, flexible texture needed for rolling. Start beating the eggs on medium-high speed using an electric mixer.
Once the eggs are foamy and have increased slightly in volume, begin gradually adding the granulated sugar. Continue to beat the mixture rigorously for an extended period, typically 6 to 10 minutes. This prolonged beating is what transforms the eggs and sugar into a pale, thick, ribbon-like consistency. When you lift the beaters, the mixture should fall back into the bowl in thick ribbons that momentarily hold their shape before slowly sinking back into the batter. This stage is critical for incorporating air, which provides the cake’s lift and delicate crumb.
This ribbon stage signifies that you’ve achieved maximum volume and stability. The sugar dissolves fully into the eggs, creating a stable foam that will support the cake’s structure. Taking your time here ensures a tender, moist cake that is far less likely to crack when rolled, making this step paramount to the overall success of your Coconut Cake Roll.
Step 3: Incorporating Wet and Dry Ingredients
With the egg mixture at its peak volume, it’s time to gently introduce the remaining wet and dry ingredients. First, carefully mix in the milk (or coconut milk for an intensified coconut flavor) and the coconut flavoring. This adds essential moisture and the distinct tropical aroma that defines the dessert. Be thorough but gentle, ensuring these liquids are fully incorporated without deflating the voluminous egg base you’ve worked so hard to create.
Next, it’s time for the dry ingredients: all-purpose flour, baking powder, and salt. Sift these ingredients together over the egg mixture. Sifting serves a dual purpose: it aerates the flour, preventing lumps, and ensures a more even distribution throughout the batter, contributing to a smoother texture. The baking powder will provide a subtle lift, while the salt balances the sweetness and enhances all the other flavors.
The key to this step is the folding technique. Using a broad, flexible spatula, gently fold the dry ingredients into the wet mixture. Work from the bottom of the bowl upwards, turning the batter over on itself until just combined. The goal is to incorporate the flour until no dry streaks remain, but it is crucial to stop mixing the moment the flour disappears. Overmixing at this stage can develop the gluten in the flour, leading to a tougher, less flexible cake that is prone to cracking.
Step 4: Baking the Delicate Sponge
Once your batter is perfectly mixed, it’s time to carefully spread it into the prepared jelly roll pan. Use your spatula to spread the batter evenly, ensuring it reaches all the corners and creates a uniform thickness across the entire surface. A consistent layer is vital for even baking; thick spots will take longer to cook, and thin spots might overbake, both of which can compromise the cake’s ability to roll. The batter should be light and airy, so handle it with care to preserve that precious volume.
Place the pan in the preheated oven on the center rack. Bake for a relatively short period, typically 13 to 16 minutes. The exact baking time will depend on your oven, so it’s important to watch for visual cues rather than relying solely on the timer. The cake is ready when it springs back lightly when gently touched in the center. This indicates that the cake has set but remains moist and flexible.
It is absolutely critical not to overbake the cake. An overbaked sponge will become dry and brittle, making it far more susceptible to cracking when you attempt to roll it. Immediately after removing it from the oven, run a thin knife or offset spatula around the edges of the cake to gently loosen it from the pan. This small but important step ensures that when you invert the cake, it will release cleanly from the sides of the pan without sticking.
Step 5: The Crucial Warm Roll
This is perhaps the most defining step in creating a successful cake roll: rolling the cake while it is still warm. As soon as the cake has been loosened from the pan, prepare a clean kitchen towel. Generously dust this towel with powdered sugar. This sugary layer acts as a non-stick surface and also adds a hint of sweetness to the exterior of the cake as it cools.
Carefully invert the hot cake directly onto the prepared, powdered-sugar-dusted towel. Gently remove the baking pan that was previously attached to the cake. Then, slowly and carefully peel away the parchment paper from the bottom of the cake. This requires a delicate touch, as the cake is still quite fragile at this stage.
Once the parchment is removed, immediately begin rolling the cake. Start from one of the shorter ends of the rectangular cake. Roll it up snugly, using the towel to help guide and support the cake as you go. This initial warm roll sets the cake’s structure and creates the characteristic spiral shape. Rolling it while it’s still pliable and warm is what prevents it from cracking. Once rolled, place the cake seam-side down on a wire rack to cool completely. This allows the cake to set in its rolled shape while preventing the bottom from becoming soggy.
Step 6: Preparing the Luscious Filling
While the rolled cake is cooling completely on the wire rack, it’s the perfect time to prepare the decadent coconut cream cheese filling. In the bowl of a stand mixer fitted with the whisk attachment, combine the softened cream cheese, granulated sugar, salt, and coconut flavoring. The cream cheese should be slightly softened, but not entirely melted; it should be cool enough to whip up properly but pliable enough to blend smoothly.
Beat these ingredients together briefly until the mixture is smooth and free of any lumps. It’s important to scrape down the sides and bottom of the bowl with a spatula as needed to ensure everything is incorporated evenly. This creates a smooth, tangy base for your filling, infused with the sweet notes of sugar and coconut.
Once the cream cheese mixture is smooth, begin to gradually add the cold heavy whipping cream. Start the mixer on a low speed as you pour in the cream to prevent splashing. As the cream incorporates, gradually increase the mixer speed. Continue to whip the mixture until it becomes thick, creamy, and forms firm peaks. This means that when you lift the whisk attachment, the filling will hold its shape without drooping. This firm, whipped consistency is crucial for a filling that will stay put within the cake roll.
Step 7: Assembling the Cake Roll
With the cake roll completely cooled and the filling perfectly whipped, it’s time for the assembly. Gently unroll the cooled cake. You may notice a slight cracking, which is usually minimal if the cake was baked and rolled correctly. Carefully lay the cake flat on your work surface, with the seam from the initial roll facing upwards.
Using an offset spatula or a knife, spread a generous and even layer of the prepared coconut cream cheese filling over the entire surface of the cake. It’s important to leave a small border, about 1 inch, uncovered around the edges. This border prevents the filling from oozing out excessively when you re-roll the cake, ensuring a cleaner finish.
Next, sprinkle about one cup of the unsweetened grated coconut evenly over the filling. This layer adds an extra burst of coconut flavor and a delightful texture to the inside of the cake. Ensure the coconut is distributed as uniformly as possible so that every slice gets a bit of that textural goodness. This step transforms the simple filling into a truly coconut-infused delight.
Step 8: The Final Roll and Chilling
Now comes the moment of truth: re-rolling the cake. Starting from the same short end you began with during the initial warm roll, gently roll the cake back up. This time, you are rolling the cake around the filling and the inner layer of coconut. Take your time and be as gentle as possible to minimize any further cracking. If small cracks do appear, don’t worry; the frosting and exterior coconut will help disguise them.
Once the cake is re-rolled, place it seam-side down on your serving platter or a suitable plate. This ensures that the seam is hidden on the bottom, presenting a smooth, clean appearance from the top and sides. This placement also helps the cake hold its shape more securely.
Generously frost the entire outside of the rolled cake with the remaining coconut cream cheese filling. Use your spatula to create a smooth, even coating over the top and sides. Finally, press the remaining grated coconut over the frosted exterior. This creates the iconic coconut-coated finish, adding both visual appeal and a delightful textural contrast to the soft cake and creamy filling. Once coated, cover the cake loosely with plastic wrap or place it in a cake carrier. Refrigerate for at least 1 to 2 hours, or until the roll is firm enough to slice cleanly. This chilling period allows the filling to set properly and the flavors to meld, resulting in a beautifully structured and delicious dessert.
Pro Tips for Coconut Cake Roll
Achieve Maximum Volume: When whipping the eggs and sugar, aim for a mixture that is not just pale and thick, but truly “ribbon-like.” This extensive aeration is the sole leavening agent for your sponge, ensuring a tender, flexible crumb that rolls without cracking. Patience in this step yields a superior cake texture.
Temperature Control is Key for Filling: For the cream cheese filling, ensure your cream cheese is softened but still cool to the touch. Overly warm cream cheese will result in a runny filling that won’t hold its shape. Conversely, the heavy cream must be very cold to whip effectively. This temperature balance is crucial for a stable, luscious filling.
Strategic Filling Border: When spreading the filling onto the cooled cake, intentionally leave a border of about an inch around the edges. This is a small but vital step that prevents the creamy filling from being squeezed out too aggressively during the final roll, leading to a much neater and more professional-looking finish.
Gentle Handling Prevents Cracks: Treat the sponge cake with the utmost care throughout the process, especially during the rolling stages. Work deliberately and avoid forcing the cake. If minor cracks do occur, remember that the outer frosting and coconut coating will cleverly camouflage them, ensuring your cake still looks spectacular.
The Power of a Clean Towel: Always use a clean, soft kitchen towel for rolling the warm cake. Dusting it liberally with powdered sugar is essential to prevent any sticking. The towel supports the cake during the initial roll, helping it to set its shape as it cools, which is fundamental to the success of a cake roll.
Serving Suggestions for Coconut Cake Roll
Decoration
The Coconut Cake Roll is often self-decorative, with its exterior generously coated in shredded coconut. For an extra touch of elegance, you can pipe some of the remaining filling around the edges or create small swirls on top before adding the coconut. A light dusting of powdered sugar can mimic a gentle snowfall, especially fitting for holiday occasions. Fresh edible flowers, like violas or pansies, can add a pop of color and sophistication if you want to make it truly special.
Side Dishes
This cake pairs beautifully with fresh fruit. A medley of bright berries, such as strawberries, raspberries, and blueberries, offers a delightful contrast in both flavor and color. Their slight tartness cuts through the richness of the cream cheese filling, creating a balanced and refreshing bite. A small dollop of lightly sweetened whipped cream alongside a slice can add another layer of creamy indulgence without being overpowering.
Creative Serving Ideas
For a more casual presentation, you can slice the cake into smaller, bite-sized pieces and serve them in small cups or on individual dessert spoons, making them perfect for parties or dessert buffets. Consider serving it alongside a cup of coffee or tea; the slight bitterness of a good coffee or the warmth of a fragrant tea can wonderfully complement the sweet, coconutty flavors of the cake. Another idea is to serve a warm sauce, like a light caramel or a white chocolate drizzle, alongside for guests to add as they please.
Preparation & Storage
Storing Leftovers
Because this delicious Coconut Cake Roll features a cream cheese filling, it is essential to store any leftovers properly to maintain its quality and safety. Always refrigerate the cake. Cover the entire cake loosely with plastic wrap or aluminum foil, or transfer individual slices to an airtight container. Properly stored in the refrigerator, the cake should remain fresh and delicious for up to 3 to 4 days.
Freezing
If you find yourself with an abundance of this delightful dessert, or if you wish to prepare it even further in advance, freezing is an excellent option. Ensure the cake is completely chilled and firm before attempting to freeze it. Wrap the entire roll or individual slices tightly in plastic wrap, followed by a layer of aluminum foil, or place them in a freezer-safe airtight container. Frozen cake rolls can be stored for up to 1 to 2 months.
Reheating
This Coconut Cake Roll is best served chilled or at cool room temperature, so reheating is generally not necessary or recommended. The cream cheese filling is designed to be firm and creamy when cold. If the cake has been refrigerated, allowing it to sit at room temperature for about 15 to 30 minutes before serving can soften the filling slightly, enhancing its texture and releasing the full flavor profile. Avoid any form of heating, as this could melt the filling and compromise the cake’s structure.
Frequently Asked Questions
-
Can I make the Coconut Cake Roll entirely ahead of time?
Absolutely! This Coconut Cake Roll is an ideal make-ahead dessert. In fact, many find that the flavors meld and deepen beautifully when the cake has had ample time to chill. After assembling and frosting the cake, refrigerate it for at least 2 hours, or ideally overnight, before slicing and serving. This extended chilling period allows the filling to firm up completely, making the cake easier to slice and ensuring a stable, delicious dessert. For longer storage, the assembled and chilled cake can be frozen, extending its lifespan significantly.
-
My cake cracked when I rolled it. What went wrong, and can I fix it?
Cake cracking during the rolling process is a common concern, often stemming from a few key factors. The most frequent culprits are overbaking the sponge, which makes it too dry and brittle, or waiting too long after baking to roll it, allowing it to cool and lose its flexibility. Insufficiently whipping the eggs and sugar can also lead to a less resilient cake structure. If you do experience minor cracks, don’t despair! The filling and the exterior coconut coating are excellent at camouflaging small imperfections. Ensure you are gentle during the rolling process, and focus on creating a smooth, even coat of filling and coconut on the outside to hide any surface flaws.
-
How can I ensure my cream cheese filling is thick and holds its shape?
Achieving a thick, stable cream cheese filling is crucial for a successful cake roll. The most important factors are ingredient temperature and proper whipping technique. Ensure your cream cheese is softened but still cool to the touch; if it’s too warm, the filling will be too soft. Critically, your heavy whipping cream MUST be very cold – straight from the refrigerator is best. Begin mixing on low speed and gradually increase to medium-high. Whip until firm peaks form, meaning the mixture holds its shape when the beaters are lifted. If the filling still seems too soft after whipping, you can try adding a tablespoon or two more of powdered sugar and continuing to whip, as sugar helps to stabilize the mixture. Avoid over-whipping, as this can cause the filling to break down.
This delightful Coconut Cake Roll offers a perfect balance of textures and flavors, making it a versatile and impressive dessert for any occasion. Its light, airy sponge cake encases a rich, creamy coconut cream cheese filling, all finished with a generous coating of shredded coconut. Whether you’re preparing it for a special celebration or simply treating yourself to something sweet, this recipe is sure to become a favorite.
The charm of this dessert lies in its elegant presentation and its make-ahead convenience. It’s a testament to how simple ingredients can be transformed into something truly extraordinary with a little care and technique. Enjoy baking and sharing this wonderful treat!