Antipasto Salad with Grilled Chicken – Easy Summer Salad Recipe!
Embark on a culinary journey that transports you straight to the sun-drenched shores of Italy with this vibrant Antipasto Salad featuring succulent grilled chicken. This dish is more than just a salad; it’s a celebration of fresh, bold flavors and delightful textures, designed to impress both as a refreshing starter and a hearty main course.
Imagine tender, marinated chicken grilled to perfection, nestled amongst a medley of classic Italian antipasto delights, all brought together by a zesty, homemade basil pesto vinaigrette. This recipe is a testament to simple ingredients harmonizing beautifully to create an unforgettable dining experience, perfect for those warm evenings or anytime you crave a taste of Mediterranean sunshine.
Why You Will Love This Recipe
- Vibrant Italian Flavors: Bursting with the fresh taste of tomatoes, creamy mozzarella, tangy pepperoncini, and aromatic basil pesto, this salad captures the essence of authentic Italian cuisine in every bite.
- Versatile Meal Option: Whether you’re looking for a sophisticated appetizer to kick off a dinner party or a satisfying, healthy main course for a light lunch or dinner, this antipasto salad effortlessly fits the bill.
- Quick and Easy Preparation: With a straightforward approach that leverages a combined marinade and dressing, you can assemble this impressive salad in minimal time, making it ideal for busy weeknights.
- Customizable Ingredients: The beauty of antipasto lies in its adaptability; feel free to add your favorite cured meats, cheeses, or pickled vegetables to personalize this salad and make it uniquely yours.
- Healthy and Refreshing: Packed with fresh vegetables, lean protein, and a light vinaigrette, this salad offers a guilt-free indulgence that is both nourishing and incredibly delicious, perfect for a balanced meal.
Ingredients You Need
The success of any dish hinges on the quality of its components, and this antipasto salad is no exception. Opting for the freshest produce and premium Italian staples will elevate the final taste significantly, creating a truly authentic and memorable culinary creation. Each ingredient plays a vital role in building the complex layers of flavor that define this exceptional salad.
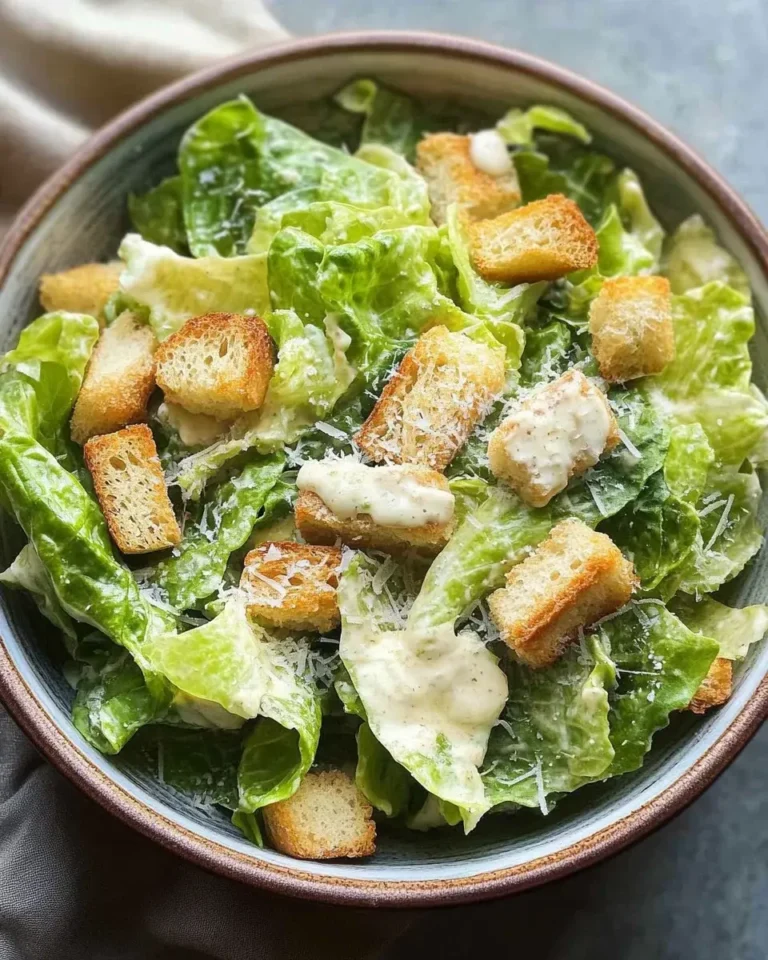
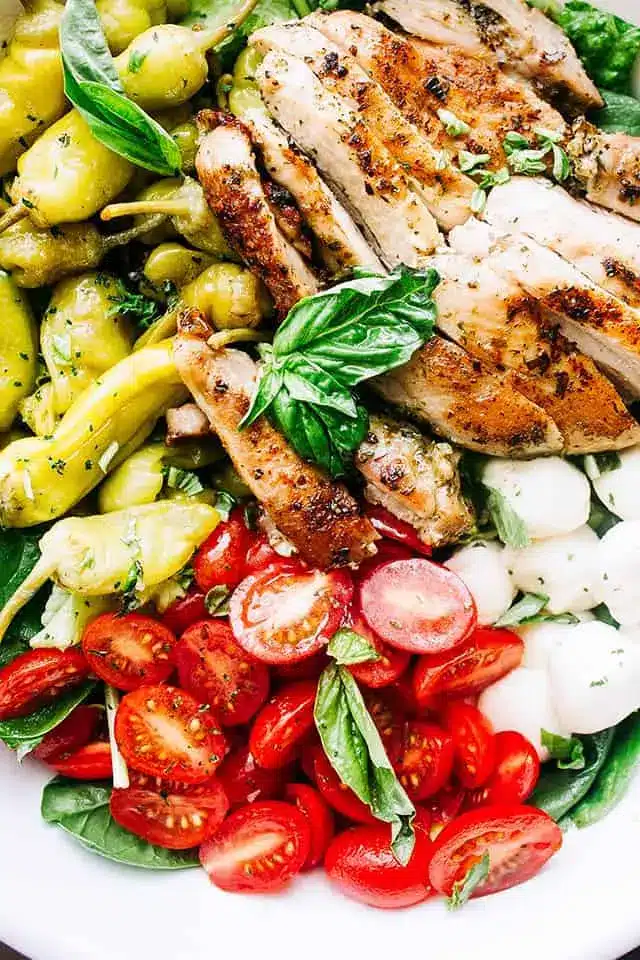
Italian Antipasto Salad With Grilled Chicken

This fresh and delicious antipasto salad is packed with grilled chicken, mozzarella cheese, tomatoes, and pepperoncini, tossed in a homemade vinaigrette.
- For the Vinaigrette Dressing: 1/2 cup store-bought Basil Pesto, 1/4 cup extra virgin olive oil, 3 tablespoons white wine vinegar, 1 tablespoon fresh lemon juice, Salt and fresh ground pepper, to taste
- For the Chicken: 1 pound (4 pieces) boneless skinless chicken breasts
- For the Salad: 4 cups chopped Romaine lettuce, 1 cup cherry tomatoes, halved, 8 ounces fresh mozzarella cheese balls, 1 cup pickled pepperoncini
- 1Make the dressing: In a bowl, combine pesto, olive oil, vinegar, and lemon juice; add salt and pepper to taste, and whisk until combined. Pour half of the dressing into a ziploc bag. Place the other half in the fridge.
- 2Marinate the chicken: Add the chicken breasts to the ziploc bag, seal it, and shake it all up until well combined. Place the chicken in the fridge for 30 minutes, or for up to 2 hours.
- 3Prepare to grill: When you're ready to cook your chicken, preheat the grill to 400ºF. Brush grill grates with olive oil.
- 4Grill the chicken: Remove the chicken breasts from the marinade and place them on the hot grill. Cook without touching until the chicken breasts start getting some grill marks, about 5 minutes. Turn the chicken breasts over, cover the grill, and let them finish cooking, about 7 more minutes, depending on the thickness of the chicken. Chicken is done when a meat thermometer registers 165ºF.
- 5Rest: Remove the chicken from the grill. Cover and let it rest for 5 minutes before slicing.
- 6Assemble the Salad: In the meantime, prepare the salad and transfer the chopped lettuce to a large salad bowl. Next, top the lettuce with tomatoes, cheese, and pepperoncini. Cut the chicken breasts into strips and add them to the salad.
- 7Dress the salad: Pour the remaining basil pesto dressing over the salad; toss to combine.
- 8Serve.
Keywords: antipasto, salad, grilled chicken, Italian, pesto, mozzarella, tomatoes, pepperoncini, summer salad
- basil pesto: store-bought or homemade for a vibrant herbal base.
- extra virgin olive oil: for a smooth, fruity foundation to the dressing.
- white wine vinegar: providing a bright, tangy counterpoint.
- fresh lemon juice: adding a zesty lift and acidity.
- salt and fresh ground pepper: essential for seasoning and bringing out all the flavors.
- boneless, skinless chicken breasts: the lean protein star, perfect for grilling.
- romaine lettuce: crisp and sturdy, it holds up well to the substantial toppings.
- cherry tomatoes: sweet and juicy, halved for easy eating.
- fresh mozzarella cheese balls: creamy, mild, and delightful in every bite.
- pickled pepperoncini: offering a signature tangy and slightly spicy kick.
The precise quantities for each ingredient are detailed within the recipe card, ensuring you have everything needed for a perfect execution.
Variations
To cater to diverse palates and dietary preferences, this antipasto salad is wonderfully adaptable. Imagine transforming it into a completely Vegan Delight by omitting the chicken and mozzarella. Instead, consider adding marinated artichoke hearts, roasted red peppers, Kalamata olives, and perhaps some grilled firm tofu or a sprinkle of toasted pine nuts for crunch. A heartier vegan option could involve adding roasted chickpeas or cannellini beans for added protein and texture.
For those following a Low Carb Lifestyle, the foundation of the salad remains perfect. Simply ensure your additions align with your carb goals. Focus on the array of non-starchy vegetables like cucumbers, bell peppers (in moderation), and various greens. Swap the mozzarella pearls for small cubes of provolone or a sprinkle of grated Parmesan cheese. For the protein, grilled chicken or shrimp are excellent low-carb choices. Ensure your dressing ingredients, particularly vinegar and lemon juice, are used in moderation if strict carb counting is a priority.
Consider a Seafood Spin for a sophisticated twist. Grilled shrimp or perfectly seared scallops can replace the chicken, bringing a touch of the ocean to your antipasto. Perhaps a generous portion of flaked crab meat or chunks of lobster would also be a decadent substitution. Ensure these delicate proteins are cooked just right to maintain their exquisite texture and flavor, complementing the briny notes of olives and capers if you choose to add them.
How to Prepare antipasto salad with grilled chicken
Step 1: Crafting the Exquisite Basil Pesto Vinaigrette
Begin your culinary adventure by preparing the vibrant basil pesto vinaigrette, a dual-purpose marvel that will both marinate your chicken and dress your salad. In a medium-sized bowl, combine the generous half-cup of store-bought basil pesto with a quarter-cup of high-quality extra virgin olive oil. This forms the rich, herbaceous heart of your dressing. To this, add three tablespoons of crisp white wine vinegar, which introduces a delightful tanginess that cuts through the richness of the pesto and oil.
Next, incorporate one tablespoon of freshly squeezed lemon juice. The brightness of the lemon further enhances the zestiness and adds a refreshing counterpoint. Now, season the mixture generously with salt and freshly ground black pepper to your personal taste. Whisk these ingredients together vigorously until they are thoroughly combined into a smooth, emulsified dressing. Taste and adjust the seasoning as needed, ensuring a perfect balance of herbaceous, tangy, and savory notes.
This initial step is crucial for developing the foundational flavors of the dish. Once your vinaigrette is perfectly balanced, carefully pour half of this exquisite mixture into a resealable plastic bag. This portion is designated for marinating the chicken, infusing it with the pesto’s aromatic goodness. The remaining half of the vinaigrette should be transferred to a small container and placed in the refrigerator. This reserved portion will be used later to lightly dress the assembled salad, ensuring every component is coated in its delightful flavor.
Step 2: Marinating the Chicken to Perfection
With your flavorful basil pesto vinaigrette ready, it’s time to impart its delicious essence onto the chicken breasts. Take your pound of boneless, skinless chicken breasts and add them directly into the resealable plastic bag that already contains half of the prepared vinaigrette. Ensure the chicken breasts are well-coated by sealing the bag securely and then gently shaking it. This action allows the marinade to evenly distribute and cling to the surface of the chicken.
Once the chicken is thoroughly coated, place the sealed bag into the refrigerator. It’s essential to allow the chicken to marinate for at least 30 minutes. This duration is sufficient for the flavors to penetrate the meat, making it more tender and savory. However, it is advisable not to marinate the chicken for much longer than two hours. The acidity present in the vinegar and lemon juice, while beneficial for flavor, can begin to break down the chicken’s proteins excessively if left for too extended a period, potentially leading to a mushy texture.
While the chicken is marinating, you can use this time to prepare other components of your salad, such as chopping vegetables or gathering your antipasto selections. This strategic timing ensures that when the chicken is ready, the entire salad can be assembled efficiently, maximizing freshness and flavor. The marinating process is a key step in ensuring the chicken is not merely an addition but an integral, flavorful part of the antipasto salad experience, harmonizing beautifully with the other ingredients.
Step 3: Preparing the Grill for Optimal Chicken Cooking
As your chicken nears the end of its marinating time, it’s imperative to prepare your grill to achieve perfectly cooked, juicy chicken breasts. Begin by preheating your grill to a consistent temperature of 400°F (200°C). This medium-high heat is ideal for searing the outside of the chicken while allowing the inside to cook through without drying out. Achieving the correct temperature ensures a beautiful char and prevents the chicken from sticking.
Once the grill has reached the desired temperature, it’s time to oil the grates. Use a paper towel dipped in a little high-heat oil, such as canola or vegetable oil, and carefully wipe the grates. This step is critical to prevent the marinated chicken from adhering to the grill, which can result in tearing and loss of those delicious browned bits. Properly oiled grates ensure a clean release of the chicken, leaving behind attractive grill marks.
Having the grill ready and the grates oiled signifies that you are moments away from cooking the chicken. This preparatory stage is as important as the cooking itself. It ensures that the chicken is placed onto a hot, prepared surface, which is fundamental for achieving that perfect sear and even cooking. This attention to detail in preparation lays the groundwork for beautifully grilled chicken that will be the star of your antipasto salad.
Step 4: Grilling the Marinated Chicken
Now for the star of the show: grilling the marinated chicken breasts. Carefully remove the chicken breasts from the marinating bag, allowing any excess marinade to drip off briefly. Place the chicken breasts onto the preheated and oiled grill grates. It is crucial at this stage to resist the urge to move or press the chicken. Let it cook undisturbed for approximately 5 minutes.
During this initial period, the chicken will begin to develop beautiful grill marks and a nice sear on the first side. After the 5 minutes have passed, and you can clearly see those desirable marks, it’s time to flip the chicken. Using a pair of tongs, turn each chicken breast over to cook the second side. Close the grill lid to help maintain an even cooking temperature.
Continue to cook the chicken for an additional 7 to 10 minutes, depending on the thickness of the breasts. The chicken is done when it reaches an internal temperature of 165°F (74°C) when tested with a meat thermometer inserted into the thickest part. Overcooking can lead to dry chicken, so it’s important to monitor the temperature closely. Properly grilled chicken should be juicy and tender, with a slightly charred exterior that complements the fresh ingredients of the salad.
Step 5: Resting and Slicing the Chicken
Once the chicken has reached the perfect internal temperature of 165°F, immediately remove it from the grill. Transfer the cooked chicken breasts to a clean cutting board. It is absolutely vital to let the chicken rest for at least 5 minutes before slicing. This resting period allows the juices within the chicken to redistribute throughout the meat. If you slice it too soon, all those delicious, moist juices will simply run out onto the cutting board, leaving you with drier chicken.
Covering the chicken loosely with foil during the resting period can help retain warmth and moisture. After the resting time has elapsed, you can proceed to slice the chicken breasts. For this antipasto salad, slicing the chicken into strips or bite-sized pieces is ideal. This makes it easier to distribute evenly throughout the salad and ensures each forkful contains a balanced combination of chicken and other ingredients. The tender, juicy strips of chicken will now be ready to be added to the assembled salad.
This resting and slicing step is often overlooked but is instrumental in achieving a superior texture and juiciness in your grilled chicken. It ensures that the effort put into marinating and grilling results in the most delicious outcome possible, ready to elevate your antipasto salad to a new level of culinary satisfaction. The anticipation builds as the perfectly cooked chicken is now prepared to be the centerpiece of your creation.
Step 6: Assembling the Antipasto Salad
With all components prepared and ready, it’s time to bring your antipasto salad together. Start by taking a large, attractive salad bowl. Add the four cups of chopped Romaine lettuce as the base of your salad. The sturdy leaves of Romaine provide a robust foundation that can hold up to the substantial ingredients that will follow. Ensure the lettuce is thoroughly washed and dried to prevent a watery salad.
Next, artfully arrange the antipasto elements over the bed of lettuce. Scatter the halved cherry tomatoes across the greens, their vibrant red color adding visual appeal. Distribute the eight ounces of fresh mozzarella cheese balls evenly. These creamy pearls of cheese will provide delightful pockets of mild flavor and texture throughout the salad. Finally, add the cup of pickled pepperoncini, ensuring they are well-drained; their tangy and slightly spicy notes are key to the authentic antipasto flavor profile.
Once the antipasto ingredients are in place, it’s time to add the star protein. Take your rested and sliced grilled chicken breasts and arrange them attractively over the top of the salad. Finally, retrieve the reserved basil pesto vinaigrette from the refrigerator. Drizzle this flavorful dressing generously over the entire salad. Toss everything gently to combine, ensuring that all the ingredients are lightly coated in the delicious vinaigrette. Serve immediately to enjoy the peak freshness and flavors.
Pro Tips for antipasto salad with grilled chicken
Choose High-Quality Pesto: The flavor of your basil pesto is paramount, as it forms the backbone of both the marinade and the dressing. Opt for a good quality store-bought pesto or, for an even more exceptional flavor, consider making your own basil pesto from fresh basil leaves, pine nuts, Parmesan cheese, garlic, and olive oil. This can be done well in advance, adding another layer of homemade goodness.
Don’t Skip the Resting Time: Allowing the grilled chicken to rest for at least five minutes after cooking is a non-negotiable step for ensuring juicy, tender meat. This crucial period permits the muscle fibers to relax and reabsorb their juices, preventing them from escaping onto the cutting board. Patience here directly translates to a more succulent chicken experience in your salad.
Balance Your Antipasto Elements: While the core ingredients are fantastic, consider the variety of textures and flavors you’re adding. Incorporate a mix of salty (olives, cured meats), briny (pepperoncini, capers), and creamy (mozzarella, burrata) components. This careful selection ensures each bite offers a complex and satisfying taste sensation, truly embodying the spirit of antipasto.
Dress Just Before Serving: To maintain the crispness of your lettuce and other salad components, it’s best to add the dressing and toss the salad right before you plan to serve it. This prevents the ingredients from becoming soggy, ensuring a fresh and appealing presentation and texture. A lightly dressed salad is often more enjoyable.
Make Components Ahead: For even faster assembly, you can prepare several elements in advance. Grill the chicken the day before and store it in an airtight container in the refrigerator. Make the pesto vinaigrette up to two days ahead and keep it refrigerated. Wash and chop your greens and other vegetables, storing them separately. This prep work makes assembling the salad a breeze when you’re ready to eat.
Serving Suggestions for antipasto salad with grilled chicken
Decoration
Elevate the visual appeal of your antipasto salad with thoughtful garnishes. A sprinkle of fresh basil leaves, roughly chopped or torn, adds a burst of vibrant green and an extra layer of aroma. Consider adding a few extra mozzarella pearls or cherry tomatoes strategically placed on top for a polished look. A light drizzle of high-quality extra virgin olive oil or a scattering of toasted pine nuts can also enhance both the aesthetics and the flavor profile of the dish, making it truly restaurant-worthy.
Side Dishes
This antipasto salad is wonderfully self-contained, but it pairs beautifully with a few simple accompaniments. Crusty Italian bread, perfect for soaking up any leftover vinaigrette, is an excellent choice. A side of simple garlic bread or focaccia would also complement the Mediterranean flavors. For a lighter option, a small bowl of marinated olives or a simple green salad with a lemon vinaigrette can round out the meal without overpowering the main star.
Creative Serving Ideas
Transform this salad into an elegant appetizer by serving individual portions in small glasses or bowls, layering the ingredients for a visually stunning presentation. Another creative idea is to serve it as a “build-your-own” antipasto bar at a gathering, allowing guests to customize their salads with a variety of additional toppings like cured meats, roasted vegetables, and different types of olives. For a rustic touch, serve the salad family-style in a large wooden bowl, allowing everyone to dig in and share.
Preparation & Storage
Storing Leftovers
If you find yourself with leftover antipasto salad, proper storage is key to maintaining its freshness and quality. It’s best to store any undressed components separately from the dressed salad. If the salad has already been dressed, transfer it to an airtight container and refrigerate promptly. The aim is to minimize the time the salad spends at room temperature to prevent wilting and spoilage.
The grilled chicken can be stored separately in its own airtight container. The vinaigrette should also be kept in a sealed container in the refrigerator. While the salad components are best enjoyed fresh, leftovers can typically be kept for up to 2-3 days. However, be aware that the textures of the lettuce and other vegetables may soften over time, especially if already dressed.
When storing, try to keep the ingredients as intact as possible. For instance, don’t chop all the tomatoes if you anticipate leftovers; store them whole and halve them just before serving. This simple step can help preserve the integrity of the ingredients, leading to a more enjoyable experience when you revisit your delicious creation.
Freezing
Due to the fresh nature of the ingredients, particularly the lettuce, mozzarella, and tomatoes, this antipasto salad is not well-suited for freezing. Freezing and subsequent thawing would likely result in a mushy texture for the vegetables and a significant loss of quality in the cheese. The grilled chicken, however, can be frozen separately once cooked and cooled, but the overall salad composition is best enjoyed fresh.
If you have a large batch of grilled chicken that you won’t use immediately for the salad, it can be frozen for later use in other dishes. Ensure the chicken is completely cooled, then wrap it tightly in plastic wrap or aluminum foil, or place it in a freezer-safe bag or container. Frozen chicken typically retains good quality for up to 2-3 months.
The pesto vinaigrette also has limited freezing potential due to the oil and vinegar base, which can separate and alter the texture upon thawing. It’s generally best to make the dressing fresh or store it in the refrigerator for short-term use. Therefore, for the best possible experience, plan to consume this vibrant antipasto salad within a few days of preparation.
Reheating
Reheating this antipasto salad is generally not recommended, as it is designed to be served cold or at room temperature. The fresh greens and vegetables will not hold up well to reheating, and the intended crispness and texture would be lost. The grilled chicken, however, can be gently reheated if desired, but it’s often best served at room temperature or even chilled.
If you must reheat the chicken, do so very carefully to avoid drying it out. You can place the chicken strips on a baking sheet and warm them in a low oven (around 275°F / 135°C) for a few minutes until just heated through. Alternatively, you could briefly microwave it on a lower power setting, checking frequently. The goal is to warm it without cooking it further.
For the assembled salad, the best approach is to serve it chilled or at room temperature immediately after preparation. If you have leftovers, simply retrieve them from the refrigerator and serve them as is. You might consider adding a few fresh greens or a touch more dressing if the original dressing has been absorbed, to liven it up before serving again.
Frequently Asked Questions
-
Can I make this antipasto salad ahead of time?
While it’s best to assemble the salad just before serving for optimal freshness, you can definitely prepare components in advance. The grilled chicken can be cooked and chilled a day ahead, and the basil pesto vinaigrette can be made up to two days in advance and stored in the refrigerator. You can also wash and chop the vegetables and store them separately in airtight containers. This way, you can quickly assemble the salad when you’re ready to eat, saving you time and effort during meal preparation.
-
What if I don’t have a grill? Can I still make the chicken?
Absolutely! If you don’t have access to a grill or prefer not to use one, you can adapt the chicken preparation method. You can pan-sear the marinated chicken breasts in a skillet over medium-high heat until cooked through and nicely browned on both sides, similar to the grilling process. Another excellent option is to bake the marinated chicken in a preheated oven at 400°F (200°C) for about 20-25 minutes, or until it reaches an internal temperature of 165°F (74°C). Ensure the chicken is cooked thoroughly, regardless of the method used, and allow it to rest before slicing.
-
How can I make this salad spicier or milder?
Adjusting the spice level of this antipasto salad is quite simple. For a spicier kick, you can add a pinch of red pepper flakes to the vinaigrette or sprinkle them over the finished salad. You could also include a few slices of jalapeño or other chili peppers among the antipasto toppings. Conversely, if you prefer a milder salad, reduce or omit the pepperoncini, or opt for sweet red peppers instead. Tasting and adjusting the vinaigrette’s acidity and saltiness will also help balance any perceived heat or lack thereof.