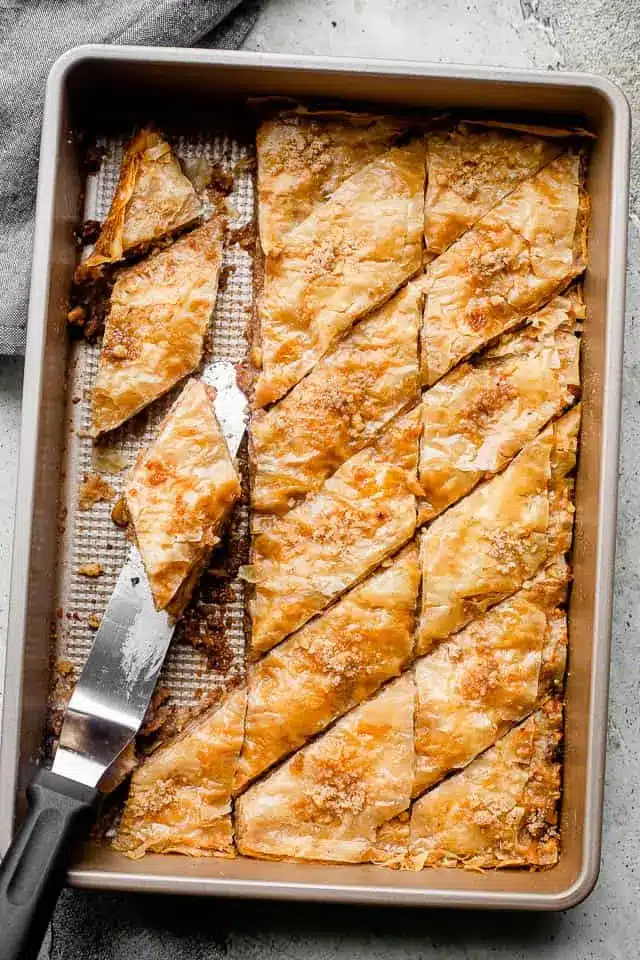
My Family's Traditional Baklava Recipe – How to Make Baklava!
This sweet and crispy baklava recipe is a true testament to the art of layered pastry and aromatic spices. Imagine delicate, buttery sheets of phyllo dough, baked to golden perfection, cradling a generous filling of finely chopped walnuts, all harmoniously united by a luscious, lemony simple syrup.
Baklava, with its signature flaky texture and intensely sweet, nutty core, has captivated dessert lovers for centuries. It’s a masterpiece of contrasting elements – the satisfying crunch of the baked phyllo against the tender, spiced nuts, all brought together by the rich syrup that permeates every layer. This is more than just a dessert; it’s an experience, a journey into traditional flavors that evoke warmth and celebration.
Why You Will Love This Recipe
- Authentic Family Recipe: Passed down through generations, this baklava offers a taste of tradition and home-cooked love, perfect for special occasions or a comforting treat.
- Incredibly Flavorful: The combination of toasted walnuts, warm cinnamon, bright lemon zest, and a perfectly balanced sweet syrup creates a complex and utterly delicious flavor profile.
- Impressive Presentation: The golden-brown, diamond-cut layers of baklava look absolutely stunning, making it a show-stopping dessert that’s sure to impress guests.
- Satisfyingly Crispy Texture: Each bite delivers a delightful crunch from the perfectly baked phyllo, which is then beautifully softened by the luscious syrup.
- Versatile Nut Filling: While walnuts are traditional, this recipe is a fantastic base for experimenting with other nuts like pistachios or almonds, allowing you to customize the taste and texture to your preference.
Ingredients You Need
The magic of exceptional baklava lies in the quality and balance of its ingredients, where simple components are transformed into something truly extraordinary. Choosing fresh, high-quality nuts and ensuring your phyllo dough is handled with care will elevate this dessert to its full potential.
Traditional Baklava Recipe

This sweet and crispy baklava recipe is prepared with buttery and flaky sheets of phyllo dough layered with walnuts and topped with a sweet, lemony, simple syrup. Baklava, with its flaky, gooey sweetness, seems to be a universal favorite. Its combination of flavors and textures, especially the contrast between the crisp phyllo sheets and the syrupy walnuts, is simply irresistible.
- For the Simple Syrup
- 1 cup water
- 1 cup sugar
- 1 tablespoon fresh lemon juice
- For the Baklava
- 4 cups walnuts, finely chopped
- 1 cup granulated sugar
- 1 teaspoon ground cinnamon
- 1 cup unsalted butter, melted
- 16 ounces phyllo dough (about 40 sheets), thawed according to directions on the package
- 1For the Simple Syrup: Combine water, sugar, and lemon juice in a saucepan. Set the saucepan over medium-high heat and bring the mixture to a simmer; simmer, occasionally stirring, until the sugar has completely dissolved. Continue to simmer for 5 more minutes. Remove from heat; set aside and let cool down completely.
- 2For the Baklava: Preheat oven to 325˚F. In a large bowl combine chopped walnuts, sugar, lemon zest, and cinnamon. Set aside. Brush the bottom of a 9x13 baking pan with melted butter. Unroll the phyllo sheets; as you work with them, keep the stack covered with a damp paper towel so they don’t dry out while you’re working. You can also use plastic wrap to cover the stack.
- 3Arrange 10 layers of phyllo sheets into the prepared baking pan, one sheet at a time, brushing each sheet with butter before adding the next. So, layer 1 sheet, brush with butter, then layer the next, brush with butter, and so on.
- 4After buttering the tenth phyllo sheet, sprinkle about ¾ cup of the walnut mixture over the phyllo.
- 5Continue to layer 5 more phyllo sheets, brushing each sheet with butter before adding the next.
- 6Then, sprinkle with a layer of ¾ cup walnut mixture. Repeat this 4 more times.
- 7Finish the baklava with a layer of 10 phyllo sheets and brush the top with more butter.
- 8Cut the baklava into diamond or square shapes; cut through the baklava and down to the bottom of the pan using a sharp knife. You can cut it vertically into 4 long rows and then cut diagonally to make diamond shapes or cut straight across to make square shapes.
- 9Bake for 55 minutes to 1 hour or until the top of the Baklava is golden and crisp. Remove from the oven and pour the cooled syrup evenly over the entire Baklava.
- 10Let the Baklava cool completely in a dry and cool place. For best results, let Baklava sit overnight.
Keywords: baklava, phyllo, walnuts, syrup, dessert, sweet, pastry, german
The full list of ingredients and their precise quantities can be found in the recipe card below, ensuring you have everything you need for this delightful creation.
Variations
While the classic walnut baklava is undeniably divine, the beauty of this dessert lies in its adaptability. You can easily customize the flavors and ingredients to suit different dietary preferences or simply to explore new taste sensations.
For a delightful vegan twist, a few simple substitutions can be made. Instead of using unsalted butter to brush the phyllo layers, opt for a good quality plant-based butter alternative or a combination of olive oil and a touch of coconut oil. The nut filling can remain largely the same, and the simple syrup is naturally vegan. This adaptation ensures everyone can enjoy the delightful crunch and sweetness of baklava.
A low-carb or keto-friendly version is also achievable with a bit of creativity. The primary carb source in traditional baklava is the sugar in the syrup and the phyllo dough itself. For a low-carb filling, you can use finely chopped almonds or pecans and sweeten them with a sugar-free sweetener like erythritol or xylitol, perhaps adding a touch of almond extract for depth. The biggest challenge is the phyllo; for a truly low-carb option, you might explore almond flour-based pastry sheets or a nut-based crust, though this will significantly alter the texture from traditional baklava.
Exploring different nut combinations can also lead to exciting variations. Pistachios offer a vibrant green hue and a distinct, slightly floral flavor that pairs beautifully with the syrup. Almonds provide a classic, subtle nuttiness and a pleasing texture. You could even create a sophisticated blend using a mix of walnuts, pistachios, and almonds for a multi-layered flavor experience. Some enthusiasts also enjoy adding a sprinkle of cardamom to the nut mixture for an extra aromatic dimension, reminiscent of Middle Eastern desserts.
How to Prepare baklava recipe
Step 1: Crafting the Lemony Simple Syrup
The foundation of truly exceptional baklava is a perfectly balanced simple syrup, which not only sweetens but also helps to meld the layers together and achieve that signature moistness. This step is crucial for infusing the dessert with its characteristic syrupy embrace.
Begin by combining one cup of water with one cup of granulated sugar in a medium saucepan. The ratio of water to sugar is key here, ensuring a syrup that is neither too thin nor too thick. Add one tablespoon of fresh lemon juice to this mixture; the lemon juice is essential for cutting through the sweetness, providing a bright, zesty counterpoint that prevents the syrup from becoming cloying and adds a delightful aromatic lift.
Place the saucepan over medium-high heat and bring the mixture to a gentle simmer, stirring occasionally. The goal is to dissolve the sugar completely, ensuring a smooth, clear syrup. Once the sugar has fully dissolved and the mixture is simmering, continue to let it simmer for an additional five minutes. This brief simmering period helps to slightly thicken the syrup and develop its flavor. Be careful not to over-boil, as this can lead to a crystallized or overly thick consistency.
After the simmering time has elapsed, remove the saucepan from the heat. Allow the syrup to cool down completely before you plan to use it. This is a critical step; pouring hot syrup over hot baklava can cause the delicate phyllo layers to become soggy and lose their crispness. A thoroughly cooled syrup will be absorbed more evenly and will contribute to the ideal texture of the finished dessert. This patient cooling process ensures the syrup has the right consistency to soak into the baklava without compromising its structure.
Step 2: Preparing the Aromatic Nut Filling
The heart of the baklava lies in its rich, nutty filling, a fragrant blend that promises warmth and depth with every bite. This mixture provides the delightful texture and the complex flavor profile that makes baklava so irresistible.
In a large mixing bowl, combine four cups of finely chopped walnuts. The fineness of the chop is important for ensuring the filling disperses evenly throughout the phyllo layers. If you prefer a slightly coarser texture, you can chop them slightly larger, but aim for consistency to avoid large clumps. For a richer flavor, you can lightly toast the walnuts in a dry skillet or in the oven for a few minutes before chopping, allowing their natural oils to release and their aroma to intensify.
To the chopped walnuts, add one cup of granulated sugar. This sugar will caramelize slightly during baking, adding to the sweetness and binding the nuts together. Next, incorporate half a tablespoon of lemon zest. The zest provides a wonderful aromatic brightness, a citrusy lift that cuts through the richness of the nuts and butter, balancing the overall flavor profile beautifully. Ensure you are using just the zest and not the bitter white pith underneath.
Finally, add one teaspoon of ground cinnamon to the mixture. Cinnamon is a classic spice pairing with walnuts, bringing a warm, comforting depth that is essential to traditional baklava. You can adjust the amount of cinnamon to your preference; a pinch of nutmeg can also be added for an extra layer of complexity if desired. Gently toss all the ingredients together until they are thoroughly combined. This simple yet flavorful mixture is now ready to be layered within the delicate phyllo dough.
Step 3: Assembling the Phyllo Layers
This is where the true artistry of baklava assembly takes place, a meticulous process of layering delicate phyllo sheets with generous brushing of butter and fragrant nut filling. Patience and attention to detail are key to achieving that signature flaky perfection.
Preheat your oven to 325°F (160°C). This moderate temperature is ideal for allowing the baklava to bake through evenly without burning the delicate phyllo. Lightly brush the bottom and sides of a 9×13 inch baking pan with some of your melted unsalted butter. This initial buttering prevents the bottom layer of phyllo from sticking and provides a subtle richness from the base.
Carefully unroll the 16 ounces of phyllo dough, which typically contains around 40 sheets. As you work with the phyllo, it’s crucial to keep the unused stack covered with a clean, slightly damp paper towel or a clean tea towel. This prevents the extremely thin dough from drying out and becoming brittle, which would make it difficult to work with and could lead to breakage. Alternatively, plastic wrap can also be used to keep the phyllo moist.
Begin the layering process by arranging ten sheets of phyllo dough into the prepared baking pan. Place one sheet at a time, and after each sheet is placed, generously brush it with melted unsalted butter. This is not the stage to be shy with the butter; each layer of phyllo needs to be thoroughly coated to achieve that incredible crispness and golden hue. Ensure the butter reaches the edges of the dough.
Once you have layered and buttered the tenth sheet of phyllo, it’s time to add the first layer of your nut mixture. Sprinkle approximately ¾ cup of the prepared walnut filling evenly over the buttered phyllo. Gently spread it out to cover the entire surface, ensuring an even distribution of nuts for consistent flavor in every bite.
Following the nut layer, continue by layering five more sheets of phyllo dough, again brushing each sheet thoroughly with melted butter. After the fifth sheet in this group, sprinkle another ¾ cup of the walnut mixture evenly over the surface. This alternating pattern of phyllo, butter, and nuts is repeated four more times. Each repetition builds up the layers, creating the characteristic structure of baklava.
For the final top layer, place ten more sheets of phyllo dough, buttering each one meticulously. The very top layer should also be brushed generously with melted butter, ensuring it will turn a beautiful golden-brown during baking. This final buttering is crucial for achieving that irresistible crispy, caramelized top.
Step 4: Precision Cutting for Perfect Portions
The act of cutting the baklava before baking is essential for ensuring that the syrup can penetrate all the way through to the bottom layers and for creating neat, appealing servings. This step requires a steady hand and a sharp knife.
Using a very sharp knife, begin to cut the assembled baklava into your desired shapes. Traditional baklava is often cut into diamond shapes, but squares are also common and equally delicious. The key is to cut all the way through the layers, down to the very bottom of the baking pan. This ensures that when the syrup is poured over, it can reach every single piece and soak into the phyllo.
To create diamond shapes, you can first make four long, parallel cuts lengthwise down the pan, dividing it into four long strips. Then, make diagonal cuts across these strips. The angle of these diagonal cuts will determine the size and shape of your diamonds. For square shapes, simply make parallel cuts both lengthwise and widthwise across the pan, creating a grid.
Take your time with this step, ensuring your cuts are clean and precise. A dull knife can drag and tear the delicate phyllo layers, making the final presentation less appealing. If the phyllo seems to be sticking to the knife, you can try dipping the tip of the knife in a little bit of warm water or wiping it with a damp cloth between cuts, although this is less ideal if your butter hasn’t fully set.
Once the baklava is fully cut, it’s ready to be baked, and the anticipation for the golden-brown, crispy layers to emerge from the oven can begin. This pre-cutting step is vital for the overall success of the dessert, ensuring each piece is perfectly portioned and ready to absorb that glorious syrup.
Step 5: Baking to Golden Perfection
The baking process is where the magic truly happens, transforming the assembled layers of phyllo and nuts into a beautifully golden and crispy masterpiece. This step requires careful monitoring to ensure the baklava cooks evenly and achieves its characteristic texture.
Place the pan containing the cut baklava into the preheated oven at 325°F (160°C). The moderate temperature is crucial here. It allows the butter to slowly render and crisp the phyllo layers without burning them before the interior is cooked through. A too-high temperature would result in a burnt exterior and an undercooked interior, compromising both texture and flavor.
Bake the baklava for approximately 55 minutes to 1 hour. The exact baking time can vary depending on your oven and the thickness of your baklava layers. You will know the baklava is ready when the top is a rich, golden-brown color and the edges appear visibly crisp. If you notice some areas browning faster than others, you can rotate the pan halfway through the baking time to ensure even cooking.
Keep a close eye on the baklava during the final stages of baking. The phyllo can go from perfectly golden to slightly too dark very quickly. Look for a consistent golden hue across the entire surface, with slightly darker, caramelized edges. The aroma wafting from the oven should be rich and nutty, a sure sign that the baklava is nearing completion.
Once the baklava has reached the desired golden-brown color and crispness, carefully remove the pan from the oven. The intense heat from the oven has worked its magic, making the phyllo layers wonderfully flaky and creating a beautiful texture. Now, it’s time for the next crucial step: pouring the cooled syrup over this hot, freshly baked creation.
Step 6: The Syrup Soak and Overnight Rest
This final, crucial step is where the transformation from crispy pastry to succulent, syrupy delight is completed. The interaction between the hot, freshly baked baklava and the cool, sweet syrup is what gives the dessert its signature moistness and depth of flavor.
As soon as you remove the golden-brown baklava from the oven, take your completely cooled simple syrup and pour it evenly over the entire surface. You should hear a satisfying sizzle as the cool syrup meets the hot pastry, and you’ll see it begin to seep into the carefully cut lines. Ensure the syrup covers the baklava from edge to edge, reaching into all the crevices created by your cuts.
The syrupy goodness will immediately begin to be absorbed by the hot, porous layers of phyllo and nuts. This is an essential part of the baklava-making process, as it is this syrup that softens the crispness of the baked phyllo and infuses the entire dessert with sweetness and moisture. Resist the urge to touch or disturb the baklava at this stage; allow the syrup to do its work.
Once the syrup has been poured, the baklava needs time to cool completely in a dry and cool place. This cooling period is not just about temperature; it’s about allowing the flavors to meld and the syrup to fully permeate the layers. For the absolute best results, and to allow the syrup to fully soften and integrate into the phyllo, it is highly recommended to let the baklava sit and rest overnight at room temperature.
This overnight rest is a critical element in achieving the perfect texture and flavor. The phyllo layers will absorb the syrup, becoming tender yet still retaining a subtle chewiness, while the flavors will deepen and become more complex. When the baklava is finally served after its overnight slumber, it will have achieved its ultimate delicious potential, a testament to patience and proper technique.
Pro Tips for baklava recipe
Be Generous with the Butter: Don’t skimp on the butter when brushing the phyllo sheets. Each layer needs to be thoroughly coated to ensure it bakes up crisp and golden. This is where the characteristic flaky texture and rich flavor of baklava are truly developed.
Handle Phyllo Gently and Quickly: Phyllo dough dries out very quickly. Keep the stack covered with a damp cloth or plastic wrap as you work, and have all your butter and nut mixture ready before you start assembling. Work efficiently to prevent the delicate sheets from becoming brittle and tearing.
Ensure Syrup is Completely Cool: Pouring hot syrup onto hot baklava can make the pastry soggy. Always ensure your simple syrup has cooled down to room temperature, or even chilled slightly, before pouring it over the freshly baked dessert. This temperature contrast is key to achieving the desired texture.
Let it Rest Overnight: While tempting to dive in immediately, allowing the baklava to rest overnight at room temperature is crucial. This resting period allows the syrup to fully penetrate all the layers, softening the phyllo and melding the flavors for the ultimate taste and texture experience. The patience here is rewarded tenfold.
Use a Sharp Knife for Cutting: A very sharp knife is essential for cutting the baklava cleanly before baking. This ensures that the syrup can penetrate all the way to the bottom layers and that your servings will be neat and appealing. Wiping the knife with a damp cloth between cuts can help prevent sticking.
Serving Suggestions for baklava recipe
Decoration
For an exquisite finishing touch, consider a light dusting of finely chopped pistachios over the top of the baklava after the syrup has been poured and absorbed. The vibrant green of the pistachios provides a beautiful visual contrast against the golden-brown baklava, hinting at the nutty richness within. A few edible flowers, like candied rose petals or violets, can also add an elegant and fragrant flourish, elevating the dessert’s presentation to gourmet levels.
Side Dishes
While baklava is a rich dessert meant to be savored on its own, it pairs wonderfully with a simple, palate-cleansing beverage. A small cup of strong, unsweetened Turkish coffee or a fragrant mint tea can provide a delightful counterpoint to the intense sweetness of the baklava, offering a moment of aromatic refreshment. A dollop of thick, unsweetened Greek yogurt or a small scoop of subtle vanilla bean ice cream can also offer a creamy, cool contrast to the warm, syrupy dessert.
Creative Serving Ideas
Elevate your baklava serving by presenting individual portions on small, elegant dessert plates, perhaps adorned with a tiny sprig of mint or a delicate edible flower. For a more informal gathering, arrange pieces on a beautiful tiered stand, showcasing the golden layers and inviting guests to help themselves. You could also incorporate small baklava pieces into a larger dessert board, alongside fresh fruits like figs or dates, and a selection of cheeses, creating a delightful sweet and savory tasting experience.
Preparation & Storage
Storing Leftovers
To keep your delicious baklava fresh and delightful, store it in an airtight container at room temperature. It’s important to ensure the container is truly airtight to prevent the phyllo from becoming stale or absorbing unwanted moisture from the air. Baklava is famously long-lasting under these conditions; typically, it will remain deliciously enjoyable for about 10 to 14 days.
Avoid refrigerating baklava unless absolutely necessary, as the humidity in the refrigerator can negatively affect its crisp texture, making the phyllo layers soft and potentially gummy. If you live in a very humid climate, placing a small food-safe desiccant packet inside the airtight container can help absorb excess moisture, preserving the integrity of the pastry.
When ready to serve leftovers, simply take them out of the container. If the baklava has been stored for a longer period and you desire a slight crispness, you can briefly warm it in a low oven (around 250°F or 120°C) for a few minutes, then let it cool completely again before serving. This careful storage ensures you can enjoy this sweet treat for days to come.
Freezing
Freezing baklava is an excellent option for making ahead or preserving its deliciousness for an extended period. The best approach is to freeze the baklava *before* baking it. This allows the delicate phyllo layers to remain pristine until you’re ready to cook and ensures the syrup is absorbed at the optimal time.
Assemble the baklava completely as per the recipe instructions, but do not bake it. Once assembled, cover the entire pan tightly with multiple layers of plastic wrap, ensuring no air can escape. Follow this with a layer or two of heavy-duty aluminum foil, again wrapping it securely to create a good seal. This double-layer of protection is vital for preventing freezer burn.
Once properly wrapped, you can store the unbaked baklava in your freezer for up to 3 months. When you are ready to bake it, remove it from the freezer and place it directly on the kitchen counter to thaw completely. Do not attempt to bake it while it is still frozen. Once thawed, proceed with the baking instructions as outlined in the recipe, ensuring it bakes to a beautiful golden-brown perfection.
Reheating
Reheating baklava is usually done to revive any crispness that might have been lost during storage, particularly if it’s been a few days since it was baked or if it was refrigerated. The goal is to gently warm it without overcooking or burning the delicate pastry.
The most effective way to reheat baklava is by using a low oven setting. Preheat your oven to a modest 250°F (120°C). Place the pieces of baklava on a baking sheet. This low and slow method allows the heat to gently penetrate the layers, crisping up the phyllo without drying out the syrup or burning the nuts.
Bake for approximately 5 to 10 minutes, or until the baklava feels slightly warmed through and you notice a subtle increase in crispness. Keep a watchful eye on it, as the sugar in the syrup can caramelize and burn quickly at even these low temperatures. Once it has reached your desired level of warmth and crispness, remove it from the oven and let it cool for a few minutes before serving.
Avoid reheating baklava in the microwave, as this method tends to make the phyllo soft and rubbery, which is the opposite of the desired texture. The oven is your best friend for achieving a pleasant reheat that brings back some of that original delightful crunch.
Frequently Asked Questions
-
What is the best way to prevent my phyllo dough from drying out while I’m assembling the baklava?
The key to keeping phyllo dough pliable is to minimize its exposure to air. As soon as you unroll the phyllo sheets, keep the stack you’re not actively using covered with a clean, slightly damp paper towel or a tea towel. You can also use plastic wrap as an additional layer of protection. Work efficiently through each sheet, and have all your other ingredients prepped and within easy reach so you can move from buttering to layering to filling without extended pauses. If a sheet does become slightly dry and brittle, don’t force it; try to gently work with it or even discard it if it’s too difficult to handle, as it can compromise the final texture.
-
Why is my baklava not as crispy as I expected, or why did it turn out soggy?
Several factors can lead to a less-than-crispy baklava. Firstly, ensure you are being generous with the butter between each phyllo layer; insufficient butter is a primary culprit for a lack of crispness. Secondly, the syrup application is critical: make sure your syrup is completely cooled before pouring it over the hot, freshly baked baklava. Pouring hot syrup over hot pastry can steam the layers, making them soggy. Additionally, ensure your baklava is baked long enough to achieve a deep golden-brown color and crisp edges. Finally, proper storage is essential; if left uncovered or in a humid environment, the baklava will absorb moisture and lose its crispness over time. Allowing it to cool and rest overnight in a dry place is also crucial for optimal texture.
-
Can I substitute the walnuts in the recipe for other nuts, and if so, which ones work best?
Absolutely! While walnuts are traditional and offer a wonderful flavor and texture, baklava is wonderfully versatile when it comes to nuts. Pistachios are an excellent choice, offering a beautiful vibrant green color and a slightly sweeter, more delicate flavor that pairs beautifully with the syrup. Almonds are another fantastic option, providing a classic nutty taste and a satisfying crunch, and they can be used whole, slivered, or finely chopped. You can also create a delightful blend using a combination of walnuts, pistachios, and almonds for a more complex flavor profile and varied texture. Some bakers also enjoy adding pecans or even hazelnuts for a different twist. When substituting, aim for a similar quantity and chop them finely to ensure they distribute evenly within the phyllo layers.