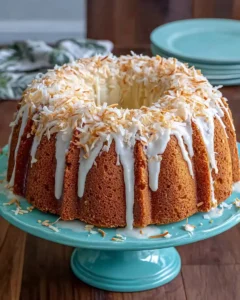
Old-Fashioned Coconut Bundt Cake
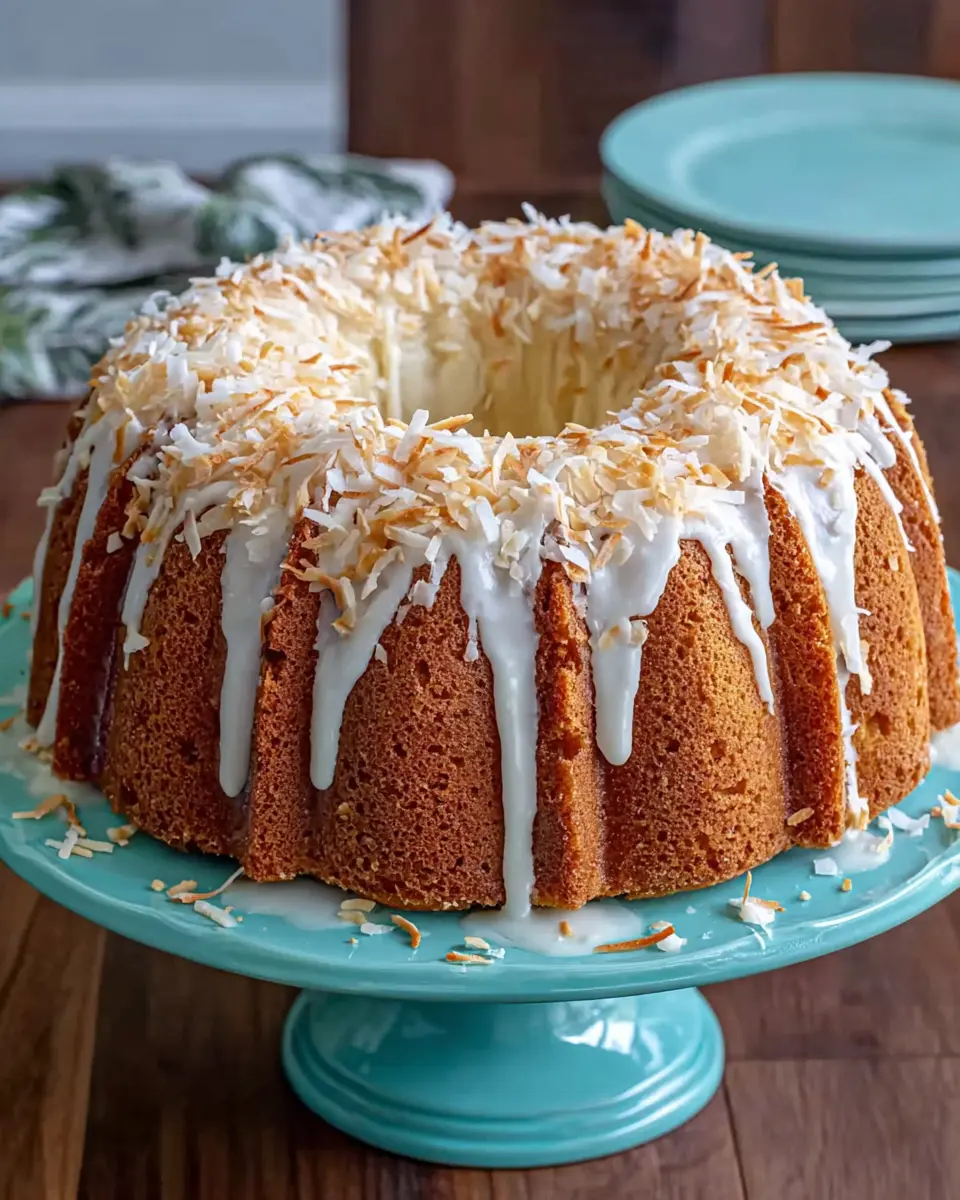
Rich Old Fashioned Coconut Bundt Cake is a buttery, dependable dessert with a tender crumb, true coconut flavor, and a smooth glaze that makes it ideal for holidays, brunches, gifting, or any time you want a make-ahead cake that still feels special.
This is the kind of cake that looks elegant on the table without asking much from you in the kitchen. The batter is straightforward, the flavor is classic, and the toasted coconut on top gives every slice a little extra texture.
Why You Will Love This Recipe
- Classic Flavor Profile: Enjoy the comforting and familiar taste of buttery cake infused with delightful coconut essence, a true crowd-pleaser for any occasion.
- Tender, Moist Crumb: This recipe is specifically designed to yield a luxuriously soft and moist interior, ensuring every bite is a delight.
- Elegant Presentation: The beautiful Bundt shape, paired with a luscious glaze and toasted coconut topping, creates a visually stunning dessert that impresses without requiring elaborate decorating skills.
- Make-Ahead Convenience: Bake this cake in advance and store it properly, making it a perfect stress-free option for busy hosts or for enjoying a homemade treat on short notice.
- Versatile Enjoyment: Whether served for a special holiday, a casual brunch, or simply as an afternoon pick-me-up, this coconut Bundt cake fits seamlessly into any celebration or quiet moment.
Ingredients You Need
Choosing high-quality ingredients is paramount to achieving the signature rich flavor and perfect texture of this Old Fashioned Coconut Bundt Cake. The foundation of this cake relies on fresh, wholesome components that work harmoniously to create a truly memorable dessert experience. Ensuring your butter is at the correct temperature and your coconut is fresh will make a noticeable difference in the final outcome.
Rich Old Fashioned Coconut Bundt Cake
A classic coconut Bundt cake with a rich, buttery crumb, fragrant coconut flavor, and a smooth coconut glaze. Sweetened shredded coconut is folded into the batter for added texture, while a finishing layer of toasted coconut brings extra character and depth.
- 2 1/4 cups all-purpose flour
- 1 cup unsalted butter, softened to room temperature
- 1 teaspoon vanilla extract
- 1/2 teaspoon salt
- 4 large eggs, at room temperature
- 1 cup sweetened shredded coconut
- 2 teaspoons coconut extract
- 1 teaspoon baking powder
- 1/2 cup whole milk
- 2 1/2 cups granulated sugar
- 2 tablespoons unsalted butter, melted
- 1 teaspoon coconut extract
- 2 tablespoons whole milk, with more as needed for consistency
- 1 1/2 cups confectioners’ sugar, sifted
- 2/3 cup sweetened shredded coconut, toasted
- 1Preheat the oven to 325°F and place a rack in the center position. Grease and lightly flour two 6-cup Bundt pans thoroughly so the cakes release cleanly after baking.
- 2In a medium bowl, whisk the flour, baking powder, and salt together until evenly blended. Set the dry mixture aside.
- 3In a large mixing bowl, beat the softened butter and granulated sugar on medium speed until pale and fluffy. Add the eggs, vanilla extract, and coconut extract, then continue beating until the mixture is smooth and well incorporated.
- 4Reduce the mixer speed to low and pour in the milk, mixing only until combined. Add the flour mixture and beat just until no dry streaks remain, then gently fold in the shredded coconut.
- 5Divide the batter evenly between the prepared Bundt pans. Bake for 50 to 55 minutes, or until the tops are golden, the edges are lightly browned, and a toothpick inserted into the center comes out with a few moist crumbs attached.
- 6Place the pans on a wire rack and allow the cakes to cool for about 15 minutes. Set a cooling rack over each pan, carefully invert, and release the cakes. If needed, tap the pans lightly with a wooden spoon to help loosen them.
- 7Leave the cakes on the racks until they are completely cool before glazing. This helps the topping set properly rather than melting into the surface.
- 8To prepare the glaze, combine the melted butter, sifted confectioners’ sugar, whole milk, and coconut extract in a small bowl. Whisk until smooth and pourable. The finished glaze should fall from a spoon in a steady white ribbon. Add a little more milk to thin it, or additional confectioners’ sugar to thicken it as needed.
- 9Spoon or drizzle the glaze over the cooled cakes, allowing it to run naturally down the sides. Finish by scattering the toasted coconut over the top.
- all-purpose flour: provides the essential structure for the cake, ensuring it holds its shape beautifully in the Bundt pan while maintaining a tender crumb.
- unsalted butter: creates a rich, classic base, contributing to the buttery aroma and the wonderfully tender texture that defines old-fashioned cakes.
- granulated sugar: sweetens the cake to perfection and plays a crucial role in the creaming process, incorporating air for a lighter, fluffier cake.
- large eggs: add richness, provide stability to the batter, and contribute to a smooth, cohesive texture when properly incorporated.
- vanilla extract: rounds out the overall flavor profile, adding a layer of warm sweetness that complements the primary coconut notes.
- coconut extract: this is your secret weapon for an intense, authentic coconut flavor that permeates the entire cake and glaze.
- baking powder: works diligently to give the cake a reliable and even rise, ensuring a light and airy crumb that avoids being dense or heavy.
- salt: a small but mighty ingredient that enhances all the other flavors, especially the sweetness and the distinct coconut notes, preventing the cake from tasting flat.
- whole milk: brings the batter to the perfect consistency, ensuring it is fluid enough to bake evenly and contributing to the overall moistness of the finished cake.
- sweetened shredded coconut: folded into the batter, this adds delightful texture and pockets of chewy coconut goodness throughout each slice, enhancing the coconut theme.
- confectioners’ sugar: the primary ingredient for the smooth, glossy glaze, it dissolves easily to create a sweet, delicate topping that is both beautiful and delicious.
- melted butter for the glaze: enriches the glaze, making it smoother, glossier, and slightly more decadent than a simple sugar-and-liquid mixture.
The precise quantities for each ingredient are detailed within the recipe card, ensuring you have all the necessary measurements for success.
Variations
While this Old Fashioned Coconut Bundt Cake is wonderful as is, its classic base readily accepts creative twists to suit different dietary needs or flavor preferences. Consider transforming it into a delightful vegan treat by substituting the butter with a good quality vegan butter alternative and using a plant-based milk, such as almond or soy milk, ensuring the eggs are replaced with a flax egg or commercial egg replacer for binding. The result is a cake that retains its tender crumb and lovely flavor profile, making it suitable for a wider audience without compromising on taste.
For those seeking a lower-carbohydrate option, the cake can be adapted by using a blend of almond flour and coconut flour in place of all-purpose flour, and substituting granulated sugar with a granular erythritol-based sweetener or a monk fruit sweetener. Adjusting the liquid content might be necessary as these flours behave differently. The result will be a satisfying, keto-friendly dessert that still delivers that comforting coconut essence, perfect for enjoying guilt-free.
Introducing complementary flavors is another exciting avenue for variation. You could gently fold in some fresh lime zest along with the coconut into the batter for a tropical “Pina Colada” inspired cake, or perhaps add a handful of finely chopped toasted macadamia nuts for a delightful crunch and nutty undertone that pairs beautifully with coconut. These subtle additions can elevate the cake’s complexity and offer a new dimension to its beloved flavor.
How to Prepare Old Fashioned Coconut Bundt Cake
Step 1: Preparing the Pans and Oven
Begin by preheating your oven to a moderate 325°F (160°C), ensuring it reaches the correct temperature before you plan to bake. This consistent heat is crucial for even baking, preventing the outside from over-baking while the inside remains uncooked. A properly heated oven is the first step towards achieving that perfect, tender crumb.
Next, prepare your Bundt pans with meticulous care. A generous coating of grease, using either butter or a baking spray, is essential to prevent the delicate cake from sticking. Ensure every nook and cranny of the intricate design is coated. Follow this with a light dusting of all-purpose flour, tapping out any excess, which creates a barrier that guarantees a clean release of the beautifully shaped cake.
The importance of thorough pan preparation cannot be overstated for Bundt cakes. Unlike simpler cake shapes, the elaborate curves and channels of a Bundt pan present more surface area for the cake to potentially adhere to. A well-greased and floured pan is your best defense against a cake that breaks upon unmolding, ensuring your efforts result in an intact, visually appealing masterpiece ready for glazing.
Step 2: Combining the Dry Ingredients
In a medium-sized mixing bowl, whisk together the all-purpose flour, baking powder, and salt. The action of whisking serves a dual purpose: it aerates the flour, contributing to a lighter cake, and it ensures that the leavening agent (baking powder) and the salt are evenly distributed throughout the flour mixture. This even distribution is vital for consistent rising and balanced flavor in the final cake.
This simple step of whisking the dry ingredients together before combining them with the wet ingredients helps to prevent clumps and ensures that each particle of flour is coated with the other dry components. A uniform mixture of dry ingredients leads to a homogenous batter, which in turn bakes into a cake with a uniform texture and flavor from edge to center.
Setting this bowl of combined dry ingredients aside while you prepare the wet ingredients allows you to focus on each stage of the batter preparation without interruption. It’s a small but significant step in the overall process of creating a well-structured and delicious Old Fashioned Coconut Bundt Cake, laying the groundwork for a perfect crumb.
Step 3: Creaming Butter and Sugar
In a large mixing bowl, combine the softened, room-temperature unsalted butter and the granulated sugar. Using softened butter is critical; it should yield slightly to the touch but not be melted or greasy. This stage is where you begin to build the cake’s structure and texture by incorporating air.
Beat the butter and sugar mixture together using an electric mixer on medium speed. Continue beating until the mixture becomes noticeably lighter in color, appearing pale yellow, and has a fluffy, creamy consistency. This process, known as creaming, is essential for developing a fine, tender crumb because it whips tiny air bubbles into the fat, which will expand during baking, contributing to the cake’s lift and delicate texture. This step typically takes several minutes.
The visual cue of a pale and fluffy mixture signifies that enough air has been incorporated. This air is what allows the cake to rise beautifully, providing that desirable old-fashioned, tender texture that is characteristic of a great Bundt cake. Do not rush this step; it is one of the most important for achieving the desired result.
Step 4: Incorporating Wet Ingredients
Add the large eggs one at a time to the creamed butter and sugar mixture, beating well after each addition. Allow the mixer to fully incorporate each egg before adding the next. This gradual incorporation helps to emulsify the batter, creating a stable mixture that will bake evenly and contribute to the cake’s richness and structure. Following the eggs, add the vanilla extract and the coconut extract, beating again until everything is smooth and thoroughly combined.
Reduce the mixer speed to low. Gradually pour in the whole milk, mixing only until it is just incorporated into the batter. Overmixing at this stage can develop the gluten in the flour too much, leading to a tougher cake. The goal is to combine the milk without overworking the batter, maintaining its tender qualities.
Once the milk is incorporated, it’s time to add the dry ingredients you prepared earlier. Add them in two or three additions, mixing on low speed until just combined, and being careful not to overmix. The batter should look smooth and free of any dry streaks, indicating that the ingredients are well-blended and ready for the final addition.
Step 5: Folding in Coconut and Final Batter Preparation
After the dry ingredients have been incorporated, add the sweetened shredded coconut directly into the batter. Use a rubber spatula or a wooden spoon to gently fold in the coconut by hand. This manual folding technique is preferred over using the mixer, as it helps to distribute the coconut evenly throughout the batter without overworking it or knocking out the air that was incorporated during the creaming stage. The goal is to have visible flecks of coconut dispersed within the batter.
The folding process should be done carefully and just until the coconut is evenly distributed. Overworking the batter at this final stage can lead to a dense cake, so be mindful of your movements. The batter should still feel light and airy, with the coconut adding a delightful textural element to the overall cake structure.
Once the coconut is folded in, your batter is ready to be divided into the prepared Bundt pans. The batter should have a smooth, thick consistency, with the shredded coconut providing visible texture throughout. This careful preparation ensures that the final cake will have a beautiful crumb, infused with coconut flavor and studded with delightful chewy pieces.
Step 6: Baking and Cooling the Cakes
Carefully divide the prepared batter evenly between the two greased and floured 6-cup Bundt pans. Smooth the tops of the batter with a spatula to ensure an even surface for baking. Place the filled pans on a baking sheet, which can help catch any potential drips and makes transferring them in and out of the oven easier.
Bake for approximately 50 to 55 minutes, or until the tops of the cakes are golden brown and a toothpick inserted into the center comes out with a few moist crumbs attached. A few moist crumbs indicate that the cake is perfectly baked – moist but not undercooked. Avoid overbaking, as this can lead to a dry cake.
Once baked, remove the Bundt pans from the oven and place them on a wire cooling rack. Allow the cakes to cool in the pans for about 10 to 15 minutes. This brief resting period allows the cakes to firm up slightly, making them easier to release without breaking. After this initial cooling, carefully invert the pans onto the wire rack to release the cakes completely. Let the cakes cool entirely on the wire rack before proceeding to glaze them; a warm cake will melt the glaze, preventing it from setting properly.
Step 7: Glazing and Topping
Once the cakes have cooled completely on the wire rack, it’s time to prepare the luscious glaze. In a small bowl, whisk together the melted butter, sifted confectioners’ sugar, whole milk, and the remaining coconut extract. The key here is to achieve a smooth, pourable consistency. The glaze should fall from a spoon in a steady, thick ribbon without being too runny or too stiff.
If the glaze is too thick, you can thin it out by adding a teaspoon of milk at a time until the desired consistency is reached. Conversely, if it’s too thin, add a tablespoon of sifted confectioners’ sugar at a time, whisking until it’s thick enough to coat the cake beautifully. The goal is a glaze that will elegantly drip down the sides of the Bundt cake, creating a beautiful visual effect.
Spoon or drizzle the prepared glaze generously over the cooled cakes, allowing it to cascade naturally down the sides. The beautiful white glaze provides a stunning contrast to the golden cake. Immediately after glazing, scatter the toasted sweetened shredded coconut over the top of the still-wet glaze. The toasted coconut adds a delightful crunch, a beautiful aroma, and an extra layer of coconut flavor that perfectly complements the cake and its glaze, giving it a polished, bakery-style finish.
Pro Tips for Old Fashioned Coconut Bundt Cake
Toast the coconut topping judiciously: When toasting the coconut for the topping, aim for a light golden brown color. Over-toasting can quickly turn the coconut bitter, which will detract from the cake’s sweet, delicate flavor profile. Keep a close eye on it as it toasts, as it can go from perfect to burnt in a matter of seconds.
Ensure ingredients are at room temperature: For the cake batter, using softened, room-temperature butter and eggs is crucial. This allows them to emulsify properly, creating a smooth, cohesive batter that bakes into a tender, evenly textured cake. Cold ingredients can lead to a denser, less refined crumb.
Do not overmix the batter: Once the flour is added, mix the batter only until just combined. Overmixing develops the gluten in the flour, which can result in a tough, chewy cake instead of the desired soft, tender texture. Gentle folding of the coconut at the end further emphasizes the importance of minimal mixing.
Grease and flour the Bundt pan thoroughly: This classic tip is especially important for Bundt cakes with their intricate designs. A thorough coating of grease and flour ensures that the cake releases cleanly, preserving its beautiful shape and detail without sticking. Taking your time with this step prevents frustrating imperfections.
Allow cakes to cool completely before glazing: Glazing a warm cake will cause the glaze to melt and slide off, creating a mess and preventing a smooth finish. Patience is key here; let the cakes cool entirely on a wire rack to allow the glaze to set properly and adhere to the cake’s surface.
Serving Suggestions for Old Fashioned Coconut Bundt Cake
Decoration
The classic decoration for this Old Fashioned Coconut Bundt Cake involves a generous drizzle of the smooth coconut glaze, allowing it to cascade artfully down the sides of the intricately shaped cake. As soon as the glaze is applied, sprinkle the top generously with toasted sweetened shredded coconut. The toasted coconut not only adds a beautiful textural contrast and appealing visual appeal but also intensifies the coconut aroma and flavor of the cake. For an extra touch of elegance, consider adding a few edible flowers or a dusting of powdered sugar over the glaze before the coconut adheres, if you desire a slightly different aesthetic.
Side Dishes
This rich Bundt cake pairs beautifully with simple accompaniments that complement its sweet, buttery, and coconutty profile. A classic pairing is a cup of hot, strong black coffee or a robust tea; the slight bitterness of the beverage beautifully balances the sweetness of the cake and its glaze. Fresh berries, such as ripe strawberries, raspberries, or blueberries, offer a burst of tartness and vibrant color that cuts through the richness of the cake, providing a refreshing contrast on the plate.
For a more dessert-oriented presentation, consider a small scoop of high-quality vanilla bean ice cream or a dollop of lightly sweetened whipped cream. The cool creaminess of the ice cream or whipped cream provides a delightful textural interplay with the tender cake. If serving alongside other desserts, keep the accompaniments simple so the Old Fashioned Coconut Bundt Cake remains the star of the show.
Creative Serving Ideas
Beyond the standard slice, get creative with how you present this versatile cake. Consider slicing it into individual mini Bundt cakes for a charming presentation at parties or brunches, making them easy for guests to grab and enjoy. Another idea is to hollow out the center of the Bundt cake just slightly and fill it with fresh berries or a light coconut cream to create a stunning centerpiece for a dessert table.
You could also transform individual slices into a more elaborate dessert by gently warming them and serving them with a warm caramel sauce or a drizzle of chocolate ganache, alongside a scoop of coconut sorbet for an intense tropical flavor experience. For a festive touch, especially around holidays, incorporate edible glitter or shimmering pearl sprinkles into the glaze for added sparkle and festivity. Exploring these options can elevate the cake from a simple treat to a memorable culinary experience.
Preparation & Storage
Storing Leftovers
This Old Fashioned Coconut Bundt Cake keeps exceptionally well at room temperature, making it an ideal choice for gatherings where leftovers are anticipated. To maintain its optimal moisture and flavor, store the cake loosely covered on your countertop. Avoid sealing it in an airtight container immediately after baking or glazing, as this can trap moisture and potentially make the glaze sticky or soft. A cake dome or a loosely tented piece of aluminum foil works perfectly.
At room temperature, the cake can typically be enjoyed for 3 to 4 days. During warmer weather or if your kitchen is quite warm, refrigerating the cake is a better option to prevent spoilage. Stored in the refrigerator, it will remain fresh for up to 5 days. However, for the best texture and flavor, it is highly recommended to bring refrigerated slices back to cool room temperature before serving, allowing the buttery richness to fully emerge.
Freezing
For longer storage, the Old Fashioned Coconut Bundt Cake freezes beautifully, whether whole or cut into individual slices. Ensure the cake is completely cooled before wrapping it tightly. Use a layer of plastic wrap directly against the cake to create a moisture barrier, followed by a robust layer of aluminum foil or a freezer-safe airtight container. This double layer of protection is vital to prevent freezer burn and maintain the cake’s delicate crumb.
A fully wrapped or contained cake can be stored in the freezer for up to 2 months. When you’re ready to enjoy it, the best method is to thaw it slowly. Transfer the frozen cake or slices from the freezer to the refrigerator overnight. This gradual thawing process helps to prevent condensation from forming on the cake’s surface once it returns to room temperature, which is especially important if the cake is glazed. Alternatively, you can let it thaw at cool room temperature for a few hours.
Reheating
Reheating this Old Fashioned Coconut Bundt Cake is generally not recommended, as warming can negatively impact its texture and appearance. The primary reason is that the butter within the cake and glaze will melt when heated, potentially causing the glaze to become runny and seep into the cake, diminishing its visual appeal and the delightful textural contrast. The crumb itself can also become overly soft or even mushy when reheated.
Instead of reheating, the best way to enjoy this cake is at cool room temperature. This allows the flavors to be most pronounced and the buttery richness to be experienced at its best. If the cake has been refrigerated, simply allow it to sit out on the counter for an hour or two until it reaches a pleasant, slightly cool temperature. This approach preserves the integrity of the glaze and ensures the cake’s crumb remains perfectly tender and delicious, just as the recipe intended.
Frequently Asked Questions
-
Can I make this Bundt cake ahead of time?
Absolutely! This Old Fashioned Coconut Bundt Cake is an excellent make-ahead dessert. You can bake it up to two days in advance and store it at room temperature, loosely covered, to retain its moisture. For longer storage, it freezes exceptionally well for up to two months when properly wrapped. Thaw it in the refrigerator overnight or at room temperature for a few hours before serving. This makes it a perfect choice for busy holiday preparations or when you need a reliable dessert ready on short notice.
-
What is the best way to ensure my Bundt cake doesn’t stick to the pan?
The key to a non-stick Bundt cake lies in thorough preparation of the pan. Before adding any batter, grease every crevice of the Bundt pan meticulously with softened butter or a good quality baking spray. Ensure you get into all the nooks and crannies of the intricate design. Following the greasing, lightly dust the entire interior of the pan with all-purpose flour, tapping out any excess. This creates a protective barrier that allows the cake to release cleanly after baking. Additionally, allowing the cake to cool in the pan for 10-15 minutes before inverting it also helps it set and release more easily.
-
Why does my coconut Bundt cake taste bland, or not coconutty enough?
If your coconut Bundt cake lacks flavor, several factors could be at play. First, ensure you are using good quality coconut extract; some brands are more potent than others. Folding shredded coconut into the batter and toasting it for the topping significantly boosts flavor and texture, so don’t skip these steps, and make sure your shredded coconut is fresh. The salt in the recipe also plays a crucial role in enhancing sweetness and all flavors, so ensure it’s included as directed. Finally, proper creaming of butter and sugar incorporates air and distributes fat and sugar evenly, which contributes to a better overall flavor distribution and cake texture.