Texas Roadhouse Rolls – Easy Copycat Recipe!
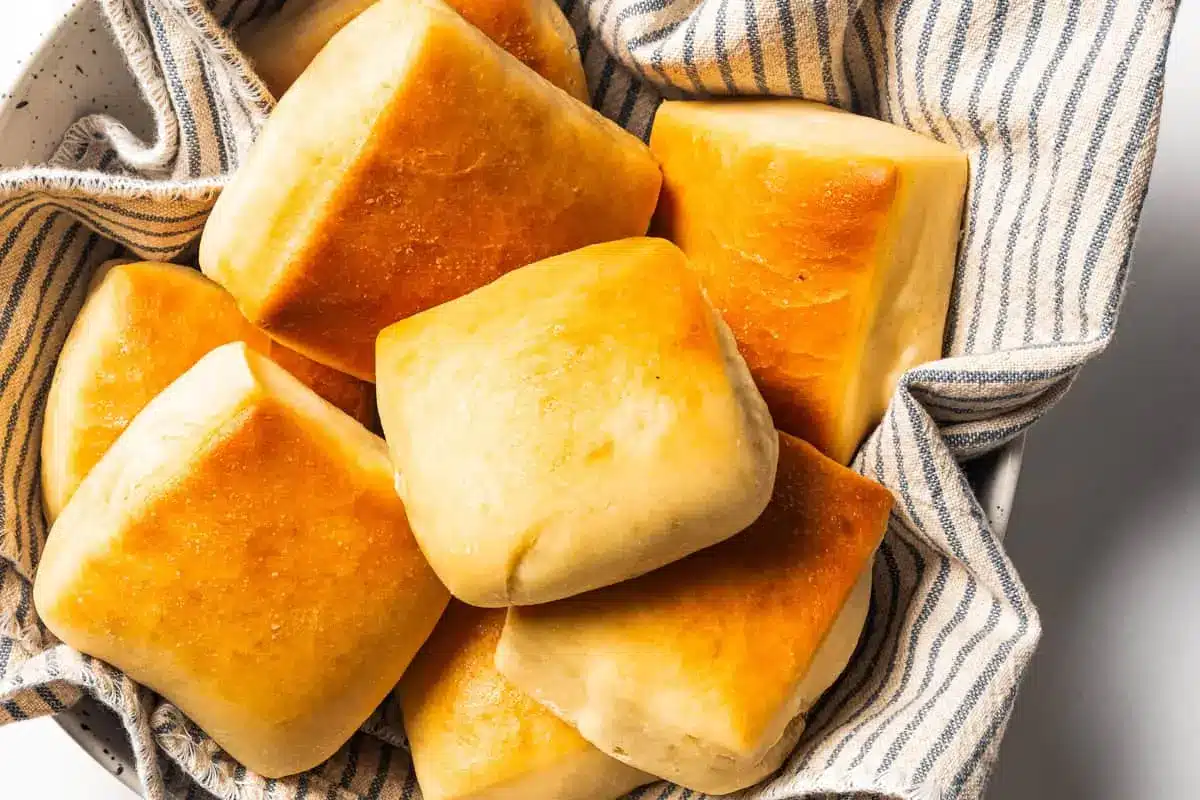
If you’ve ever savored the unbelievably soft and slightly sweet rolls served at Texas Roadhouse, you’re in for a treat. Imagine replicating that exact melt-in-your-mouth experience right in your own kitchen, filling your home with the comforting aroma of freshly baked bread. This recipe is your golden ticket to achieving that restaurant-quality deliciousness, ensuring every bite is a warm, fluffy hug.
These aren’t just any dinner rolls; they are a testament to how simple ingredients can transform into something truly extraordinary. Perfect for family dinners, holiday gatherings, or just a casual Tuesday evening, these rolls are guaranteed to be a showstopper. Get ready to impress yourself and your loved ones with this incredibly rewarding baking adventure that’s surprisingly straightforward.
Why You Will Love This Recipe
- Incredible Softness: These rolls boast a pillowy texture that is utterly irresistible, making each bite a delightful experience.
- Simple Ingredients: You likely have most of the necessary components in your pantry already, making this recipe accessible and budget-friendly.
- Remarkable Flavor: The subtle sweetness, combined with the rich butteriness, creates a flavor profile that perfectly complements any meal.
- Easy to Make: Despite their gourmet taste and texture, the preparation is straightforward, suitable even for beginner bakers.
- Versatile Serving: Whether paired with sweet cinnamon butter or savory spreads, these rolls adapt beautifully to any culinary theme.
Ingredients You Need
The magic of these Texas Roadhouse rolls lies in their ability to be created with a few humble yet essential ingredients. Focusing on quality, like using fresh yeast and good butter, will elevate your final product. These components work in harmony to create a dough that is both rich and airy, promising a delightful texture and a deeply satisfying flavor profile.
Texas Roadhouse Rolls

These copycat Texas Roadhouse rolls are soft and fluffy, and you can serve them warm with homemade cinnamon butter as a side with any meal.
- 2 teaspoons active dry yeast
- 1 cup milk (lukewarm, about 105˚F)
- 2 tablespoons unsalted butter (melted and cooled)
- 1 large egg
- 1 teaspoon salt
- 3¾ cup all purpose flour
- Additional: 1½ tablespoons unsalted butter (melted and cooled)
- To serve with: cinnamon butter
- 1Bloom the yeast: Add the active dry yeast and the sugar to a bowl. Add the warm water and stir. Cover the yeast and set it aside for 5-10 minutes, or until it's foamy.
- 2Add the wet ingredients: Add the warm milk, melted butter, and yeast mixture to the bowl of a stand mixer. Add the egg and salt and mix until well combined.
- 3Add flour: Attach the dough hooks and gradually add the flour to the milk mixture while mixing. The dough should start to pull away from the sides of the bowl as it comes together. If the dough is still sticky and not coming together, add a little more flour as needed.
- 4Rise the dough: Transfer the dough to a slightly oiled bowl and cover it with a clean kitchen towel. Let the dough rise for 1½ hours or until doubled in size.
- 5Roll out the dough: Punch down the dough and roll it to ½-inch thickness rectangle. Line a large baking sheet with parchment paper.
- 6Cut out the dough: Cut your dough into 15 squares or rectangles. Transfer the square rolls to the parchment paper-lined baking sheet. Cover them with a clean kitchen towel and let them rise until doubled in size, about 30 to 45 minutes.
- 7Baking time: Preheat your oven to 350ºF. Then, bake the rolls for 20 minutes.
- 8Serve: Once baked, remove the dinner rolls from the oven and immediately brush them with melted butter. Let them cool for about 5 to 10 minutes. Serve as desired or with cinnamon butter.
Keywords: rolls, bread, dinner rolls, side dish, copycat, Texas Roadhouse
You’ll find all the specific quantities and measurements detailed within the provided recipe card, ensuring accuracy for a perfect bake every time.
Variations
While the classic Texas Roadhouse roll is undeniably perfect as is, there’s always room for delightful culinary exploration. Consider infusing your dough with a hint of warmth and spice for a unique twist that will tantalize your taste buds with an exciting new dimension of flavor. This subtle addition can transform a familiar favorite into something entirely unexpected and memorable.
For those following a specific dietary path, these rolls can be adapted with great success. A vegan rendition can be achieved by substituting dairy milk with a creamy plant-based alternative like almond or oat milk, and using a vegan butter spread instead of traditional butter. The resulting rolls will still possess that coveted tender crumb and satisfying chew, proving that deliciousness knows no bounds.
Another exciting variation involves embracing a low-carb lifestyle without sacrificing the joy of freshly baked bread. While traditional flour is the base, experimenting with a blend of almond flour and coconut flour, along with a touch of psyllium husk for binding, can yield surprisingly good results. This alternative approach allows for the indulgence of warm, comforting rolls, even when managing carbohydrate intake, making them a versatile treat for many.
How to Prepare Texas Roadhouse Rolls
Step 1: Bloom the Yeast
Begin by gathering a small bowl and gently combining the active dry yeast, a pinch of granulated sugar, and the warm water. This initial step is crucial for awakening the yeast, ensuring it’s active and ready to work its magic on the dough. The sugar acts as a food source for the yeast, providing the energy it needs to produce the gas that will make your rolls rise to magnificent heights.
Give this mixture a gentle stir and then let it sit undisturbed for approximately five to ten minutes. During this resting period, you should observe a foamy, bubbly layer forming on the surface of the liquid. This visible sign of activation indicates that your yeast is alive and potent, ready to contribute to the airy structure of your soon-to-be-baked rolls.
If, after ten minutes, you see no signs of foaming or bubbling, it’s a clear indication that your yeast may be expired or has been rendered inactive by water that was too hot. In such a scenario, it’s best to discard the mixture and start again with a fresh packet of yeast to ensure the success of your baking endeavor. This simple step is the foundation for achieving those signature fluffy rolls.
Step 2: Combine the Wet Ingredients
In the spacious bowl of your stand mixer, or a large mixing bowl if you’re kneading by hand, begin by pouring in the lukewarm milk. It’s essential that the milk is indeed lukewarm, ideally around 100-105°F, to provide a comfortable environment for the yeast without harming it. This gentle warmth is key to encouraging the dough to develop its structure and rise beautifully.
Next, add the melted and slightly cooled unsalted butter to the milk. Ensure the butter isn’t too hot, as extreme temperatures can negatively impact the yeast’s activity. A smooth, consistent texture here is what you’re aiming for, allowing the richness of the butter to be evenly distributed throughout the dough for a tender crumb and lovely flavor.
To this liquid base, incorporate the activated yeast mixture that you prepared in the previous step. Finally, crack in the large egg and add the teaspoon of salt. Give everything a good, thorough whisk or stir until all the wet ingredients are well combined into a harmonious blend, ready to embrace the dry components of the recipe.
Step 3: Incorporate the Flour
Now, it’s time to introduce the flour, the structure-building hero of our bread recipe. If you’re using a stand mixer, attach the dough hooks to begin the kneading process. Gradually add the all-purpose flour, a cup at a time, allowing the mixer to incorporate it into the wet ingredients.
As you continue to mix, you’ll notice the dough beginning to transform from a wet, sticky mass into a more cohesive ball. The goal is for the dough to start pulling away from the sides of the mixer bowl, indicating that it has absorbed enough flour and developed its gluten structure. This process is where the elasticity and chewiness of your final rolls are born.
If, at any point, the dough seems excessively sticky and refuses to come together, don’t hesitate to add a little more flour, one tablespoon at a time, until it reaches the desired consistency. Conversely, if it appears too dry, a tiny splash more milk can help. Patience during this stage ensures the perfect dough texture for light and airy rolls.
Step 4: The First Rise
Once your dough has successfully come together and has a smooth, elastic texture, it’s time to let it rest and grow. Lightly oil a clean, large bowl – this prevents the dough from sticking as it expands. Carefully transfer the ball of dough into this prepared bowl, turning it gently to coat all sides with a thin layer of oil.
Cover the bowl snugly with a clean kitchen towel or plastic wrap. This protective layer helps to maintain a consistently warm and humid environment, which is ideal for yeast fermentation. Think of it as creating a cozy microclimate for your dough to thrive in, encouraging it to double in size.
Find a warm, draft-free spot in your kitchen to place the covered bowl. This could be near a slightly warmed oven (turned off, of course), on top of your refrigerator, or simply in a sunny windowsill. Allow the dough to rise for about 1.5 hours, or until it has visibly doubled in volume, a testament to the yeast’s hard work.
Step 5: Shape and Second Rise
With your dough gloriously doubled, gently punch it down to release the accumulated gases. This action redistributes the yeast and sugars, preparing the dough for its final shape and another rise. Lightly flour your work surface to prevent sticking and turn the dough out onto it.
Roll the dough into a rectangle, aiming for a thickness of about half an inch. This uniform thickness is important for ensuring all your rolls bake evenly. Prepare a large baking sheet by lining it with parchment paper; this makes cleanup a breeze and prevents any potential sticking.
Using a sharp knife or a pizza cutter, slice the rolled-out dough into approximately 15 equal squares or rectangles. Carefully transfer these individual dough pieces onto the prepared baking sheet, leaving a little space between them for their final expansion. Cover them once more with a clean kitchen towel and let them rise again for about 30 to 45 minutes, or until they appear puffy and have nearly doubled in size.
Step 6: Bake to Golden Perfection
As your rolls complete their second rise and puff up beautifully, it’s time to preheat your oven. Set your oven temperature to 350°F (175°C). Ensuring the oven is at the correct temperature before placing the rolls inside is critical for achieving that perfect golden-brown crust and thoroughly cooked interior.
Once the oven is preheated and the rolls are ready, carefully place the baking sheet into the center rack. Bake for approximately 20 minutes. Keep a close eye on them during the last few minutes of baking, as oven temperatures can vary, and you want to avoid overbaking.
As soon as the rolls emerge from the oven, golden and fragrant, take the extra melted butter. Brush a generous amount over the tops of the hot rolls. This simple step adds an extra layer of richness, moisture, and a beautiful sheen. Allow them to cool on the baking sheet for about 5 to 10 minutes before serving, allowing them to set slightly while still remaining wonderfully warm and soft.
Pro Tips for Texas Roadhouse Rolls
Proofing the Yeast Correctly: Always ensure your water and milk are at the right temperature – between 100°F and 110°F for water, and around 105°F for milk. Water that is too hot will kill the yeast, while water that is too cold won’t activate it sufficiently. A kitchen thermometer is your best friend here.
Don’t Overwork the Dough: While kneading is essential for developing gluten, over-kneading can lead to tough rolls. Mix until the dough is smooth and elastic, pulling away from the sides of the bowl, and then let it rest and rise. Listen to the dough; it will tell you when it’s ready.
The Power of a Warm Environment: Yeast thrives in warmth. If your kitchen is cool, consider using the “oven trick” mentioned in the tips: heat your oven to 200°F for 2 minutes, then turn it off and place the covered dough inside. The residual heat creates a perfect proofing environment.
Achieving a Soft Crust: Brushing the rolls with melted butter immediately after they come out of the oven is a game-changer. It adds moisture, flavor, and a beautiful sheen. Don’t skip this step for that signature Texas Roadhouse finish.
Measure Flour Accurately: Using a kitchen scale to measure flour (around 450 grams) is the most accurate method. If using cups, spoon the flour into your measuring cup and level it off with a straight edge without packing it down. Too much flour results in dense, dry rolls.
Serving Suggestions for Texas Roadhouse Rolls
Decoration
While these rolls are beautiful in their simplicity, a light brush of melted butter after baking provides a lovely sheen and enhances their golden-brown appearance. For an extra touch of savory elegance, consider a very light sprinkle of finely chopped fresh parsley or chives over the melted butter just before serving. This adds a subtle herbaceous note and a pop of color, making the rolls even more visually appealing without overpowering their delicate flavor.
Side Dishes
These warm, fluffy rolls are the ultimate companion to a hearty bowl of soup or chili. Imagine dipping a soft roll into a rich, savory lobster bisque, a robust beef stew, or a comforting bowl of slow-cooker chili. They are also perfectly suited to accompany saucy main courses where their absorbent texture can soak up every last drop of delicious gravy or sauce, making dishes like Salisbury steak or smothered chicken even more satisfying.
Creative Serving Ideas
Elevate your brunch game by serving these rolls alongside a delightful spread of breakfast items. They can be transformed into mini breakfast sandwiches, layered with scrambled eggs, cheese, and a slice of bacon for a delightful start to the day. Alternatively, they make a fantastic accompaniment to a classic steak dinner, providing a soft, comforting counterpoint to the richness of the meat. For a fun, family-style meal, consider serving them with a variety of flavored butters beyond cinnamon, such as garlic herb butter or a spicy cowboy butter for a Southwestern flair.
Preparation & Storage
Storing Leftovers
To keep your delicious homemade Texas Roadhouse rolls fresh for as long as possible, store them at room temperature. Ensure they are completely cooled before sealing them in an airtight container or a resealable plastic bag. This method will help to preserve their softness and prevent them from drying out, making them enjoyable for up to 3-4 days.
Freezing
If you find yourself with more rolls than you can eat within a few days, freezing is an excellent option. Wrap each cooled roll tightly in plastic wrap, ensuring no air can penetrate. For added protection against freezer burn, you can then place the individually wrapped rolls into a heavy-duty freezer bag or an airtight container. They can be stored in the freezer for up to 3 months, maintaining their quality.
Reheating
To enjoy frozen rolls, allow them to thaw completely at room temperature. Once thawed, you can gently reheat them to bring back that fresh-from-the-oven warmth and softness. A quick stint in a 300°F (150°C) oven for about 5-10 minutes, or until heated through, works wonderfully. Alternatively, a few seconds in the microwave can also revive them, though be mindful not to overheat, which can make them tough.
Frequently Asked Questions
- What makes Texas Roadhouse rolls so uniquely soft and fluffy?
The signature softness and fluffiness of Texas Roadhouse rolls are achieved through a combination of key ingredients and baking techniques. The recipe typically uses a significant amount of milk, which contributes to a tender crumb, along with enriched dough elements like butter and egg. The careful balance of flour and liquid, combined with proper yeast activation and rising times, allows for the development of a light, airy texture. The gentle kneading process ensures the gluten is developed sufficiently to hold air but not so much that the rolls become tough. Finally, the application of melted butter immediately after baking adds a final layer of richness and moisture, enhancing the overall tender and yielding quality that diners adore.
- Can I make these rolls ahead of time, and how should I store them?
Yes, you can absolutely make these rolls ahead of time, and they store quite well. For short-term storage, allow the baked rolls to cool completely, then place them in an airtight container or a resealable plastic bag at room temperature. They will remain soft and delicious for up to 3-4 days. If you need to store them for a longer period, freezing is the best option. Wrap each cooled roll tightly in plastic wrap and then place them in a freezer-safe bag or container. Properly stored, they can last in the freezer for up to 3 months. When you’re ready to serve them, simply thaw them at room temperature and gently reheat.
- What is the best way to ensure my yeast is active and my dough rises properly?
Ensuring your yeast is active is paramount to achieving well-risen dough. Always use fresh yeast and check the expiration date. When activating the yeast with warm water and sugar, the temperature of the water is critical – it should be between 100°F and 110°F (38°C-43°C). Too hot will kill the yeast, and too cold will not activate it. After mixing the yeast, sugar, and water, let it sit for 5-10 minutes; it should become foamy and bubbly. If it doesn’t, your yeast is likely dead, and you should start over with new yeast. For the dough rising process, choose a warm, draft-free location. If your kitchen is cool, using the residual heat from a briefly warmed oven (turned off) can create an ideal proofing environment. Covering the dough helps maintain the necessary humidity and warmth for optimal yeast activity and expansion.