Mediterranean Bowl Recipe – A Meal Prep Favorite

This Mediterranean bowl recipe is a vibrant explosion of fresh flavors and wholesome ingredients, designed to be both incredibly satisfying and remarkably easy to prepare. It’s the kind of dish that can transform your weeknight dinners or elevate your packed lunches to gourmet status.
Imagine a base of fluffy, lemon-infused quinoa, topped with perfectly roasted vegetables, crispy seasoned chickpeas, and a dollop of creamy homemade tzatziki sauce. This isn’t just a meal; it’s a culinary journey to the sun-drenched shores of the Mediterranean, right in your own kitchen.
Why You Will Love This Recipe
- Flavorful Combination: Each spoonful offers a delightful mix of textures and tastes, from the earthy roasted vegetables to the bright, tangy lemon and the savory olives.
- Nutrient-Rich: Packed with plant-based protein from quinoa and chickpeas, healthy fats, and essential vitamins from the abundance of fresh vegetables.
- Highly Customizable: This recipe serves as a fantastic canvas for your favorite Mediterranean flavors and ingredients, making it endlessly adaptable.
- Excellent for Meal Prep: The components hold up beautifully when prepared in advance, making it an ideal choice for busy individuals or families needing healthy, ready-to-go meals.
- Visually Appealing: The colorful array of ingredients creates a stunning presentation that is as delightful to the eyes as it is to the palate.
Ingredients You Need
The beauty of this Mediterranean bowl lies in its use of fresh, high-quality ingredients, many of which are pantry staples. Opting for the freshest produce and good quality olive oil will significantly enhance the final taste and texture of your dish. Don’t hesitate to explore different types of olives or even consider adding a sprinkle of feta cheese if you desire an extra layer of authentic Mediterranean zest.
Mediterranean Bowl Recipe
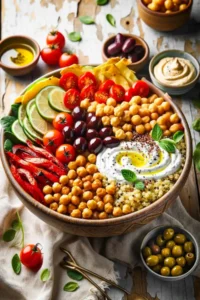
This Mediterranean bowl recipe is perfect for meal prep, made with quinoa, chickpeas, roasted veggies, homemade tzatziki, hummus, tomatoes, and olives. It's flavorful, nutritious, and easy to assemble, making it an ideal grab-and-go lunch or quick dinner.
- 1 cup quinoa
- 1¾ cups water
- ½ teaspoon sea salt
- 2 tablespoons olive oil
- 2 tablespoons lemon juice
- ½ cup chopped fresh parsley
- 15 ounce can chickpeas, drained and dried with a paper towel
- 1 tablespoon olive oil
- 1 teaspoon Sea salt
- 1 teaspoon ground cumin
- 1 eggplant, cut into ½ inch cubes
- 3 red bell peppers, cut into thin strips
- 2 tablespoons olive oil
- 1½ teaspoons sea salt
- 1 teaspoon freshly ground black pepper
- 1 cup Greek yogurt
- ½ large English cucumber, cut into paper-thin slices
- 2 tablespoons chopped fresh dill
- ¼ cup olive oil
- 1 cup pitted olives, Kalamata or black
- 18 cherry tomatoes, halved
- ¾ cup hummus
- ½ cup chopped fresh parsley
- 1For the quinoa: In a small pot, place the quinoa, water, and sea salt. Bring to a boil, then reduce heat to low, cover, and simmer for 15 minutes. Remove from heat and let sit for 10 minutes. Fluff with a fork and stir in olive oil, lemon juice, and chopped fresh parsley.
- 2For the toasted chickpeas: Preheat oven to 425°F and line a baking sheet with aluminum foil. In a bowl, combine chickpeas, olive oil, sea salt, and cumin. Toss to combine, spread on the baking sheet, and bake for 25 minutes.
- 3For the roasted veggies: Line a baking sheet with aluminum foil. Spread eggplant and red bell peppers on the sheet. Drizzle with olive oil, season with salt and pepper, toss to coat, and roast at 425°F for 25 minutes.
- 4For the tzatziki: While other components are cooking, combine Greek yogurt, cucumber, dill, and olive oil in a mixing bowl. Stir to incorporate.
- 5To assemble: Divide the quinoa among 6 bowls. Top with chickpeas, roasted veggies, olives, and cherry tomatoes. Spoon tzatziki and hummus over each bowl and garnish with fresh parsley.
Keywords: Mediterranean, Quinoa, Chickpeas, Roasted Vegetables, Tzatziki, Hummus, Meal Prep, Healthy, Lunch, Dinner, Vegetarian
The precise quantities for each ingredient are detailed within the recipe card, ensuring perfect balance and flavor in every bowl.
Variations
To truly personalize your Mediterranean bowl, consider these exciting variations that cater to different dietary needs and flavor preferences. These simple swaps can dramatically alter the profile of the dish while maintaining its core appeal.
Vegan Delight: For a completely plant-based experience, swap the Greek yogurt in the tzatziki for a thick, unsweetened plant-based yogurt, such as coconut or cashew. Ensure your hummus is also dairy-free. This adaptation maintains the creamy texture and tangy notes that are essential to the bowl’s character.
Low-Carb Alternative: If you’re watching your carbohydrate intake, simply replace the quinoa with cauliflower rice. Roast the cauliflower florets with the other vegetables, or sauté them separately. This substitution keeps the dish light and refreshing while significantly reducing the carb count.
Protein Powerhouse: Amp up the protein by adding grilled halloumi cheese, falafel, or even some succulent grilled chicken or lamb skewers. These additions not only boost the protein content but also introduce new textures and complementary flavors that enhance the overall meal.
How to Prepare Mediterranean Bowl
Step 1: Preparing the Quinoa Base
The foundation of your Mediterranean bowl is the quinoa, a nutrient-dense grain that cooks quickly and absorbs flavors beautifully. To start, thoroughly rinse one cup of quinoa under cold running water using a fine-mesh sieve. This crucial step removes any saponins, a natural coating that can impart a bitter taste.
In a small saucepan, combine the rinsed quinoa with 1 ¾ cups of water and ½ teaspoon of sea salt. Bring this mixture to a rolling boil over medium-high heat. Once boiling, immediately reduce the heat to low, cover the pot tightly with a lid, and let it simmer undisturbed for precisely 15 minutes.
After the simmering time has elapsed, remove the saucepan from the heat and allow it to sit, still covered, for an additional 10 minutes. This resting period allows the quinoa to steam and fully absorb any remaining moisture, resulting in perfectly fluffy grains. Finally, gently fluff the cooked quinoa with a fork and stir in 2 tablespoons of olive oil, 2 tablespoons of fresh lemon juice, and ½ cup of chopped fresh parsley. This infusion of lemon and herbs elevates the plain quinoa into a zesty and aromatic base, ready to be adorned with other delicious components.
Step 2: Roasting the Chickpeas to Crispy Perfection
Crispy roasted chickpeas add a delightful crunch and a savory, spiced element to your Mediterranean bowl. Begin by preheating your oven to 425°F (220°C) and lining a baking sheet with aluminum foil for easy cleanup. Take a 15-ounce can of chickpeas, drain them thoroughly, and then spread them out on a paper towel to dry them as much as possible; moisture is the enemy of crispiness.
In a medium bowl, toss the dried chickpeas with 1 tablespoon of olive oil, 1 teaspoon of sea salt, and 1 teaspoon of ground cumin. Ensure each chickpea is evenly coated with the oil and spices. The cumin provides a warm, earthy aroma that complements the nutty flavor of the chickpeas beautifully.
Spread the seasoned chickpeas in a single layer on the prepared baking sheet. It’s important to avoid overcrowding the pan, as this can lead to steaming rather than roasting, hindering their crisping potential. Bake for approximately 25 minutes, or until they are golden brown and satisfyingly crispy. Give the baking sheet a gentle shake halfway through the cooking time to ensure even browning.
Step 3: Roasting the Mediterranean Vegetables
The roasted vegetables bring a tender sweetness and a slightly smoky depth to the bowls, forming a colorful and nutritious component. Start by preparing your vegetables: cut one eggplant into ½-inch cubes and slice three red bell peppers into thin strips. You can use any color of bell peppers you prefer; red, yellow, or orange peppers will add beautiful vibrancy.
Arrange the cubed eggplant and sliced bell peppers in a single layer on another foil-lined baking sheet. Drizzle them generously with 2 tablespoons of olive oil, ensuring all the pieces are lightly coated. Season them evenly with 1½ teaspoons of sea salt and 1 teaspoon of freshly ground black pepper.
Toss the vegetables on the baking sheet to ensure they are well-coated with the oil and seasonings. Roast these vegetables in the preheated 425°F (220°C) oven for about 25 minutes, or until they are tender and slightly caramelized. Stir them once halfway through the roasting time for even cooking. The vegetables should be soft enough to easily pierce with a fork but still retain their shape.
Step 4: Crafting the Creamy Tzatziki Sauce
A homemade tzatziki sauce is the perfect cooling and tangy counterpoint to the warm, roasted elements of the Mediterranean bowl. While the quinoa, chickpeas, and vegetables are roasting, you can prepare this essential condiment. Grate or finely chop ½ large English cucumber; if using a box grater, use the large holes. It’s beneficial to squeeze out as much excess moisture from the grated cucumber as possible, either by hand or by wrapping it in a clean kitchen towel and wringing it out, as excess water can make the tzatziki too thin.
In a medium mixing bowl, combine 1 cup of Greek yogurt with the prepared cucumber. Add 2 tablespoons of chopped fresh dill, which provides that signature fresh, herbaceous flavor, and ¼ cup of olive oil for richness and smooth consistency. Stir all the ingredients together until they are thoroughly incorporated and the tzatziki is smooth and creamy.
Taste the tzatziki and adjust seasoning if necessary; you might want a little more salt, lemon juice, or dill depending on your preference. Cover the bowl and refrigerate the tzatziki until you’re ready to assemble the bowls. The flavors will meld and deepen as it chills, making it even more delicious.
Step 5: Assembling Your Mediterranean Masterpiece
Now comes the satisfying part: bringing all the prepared components together to create your visually stunning and incredibly delicious Mediterranean bowls. Divide the fluffy lemon-herb quinoa evenly among six serving bowls or airtight containers, creating a generous base for each portion. This step ensures each bowl has a substantial and flavorful foundation.
Next, artfully arrange the other prepared elements over the quinoa. Distribute the crispy cumin-roasted chickpeas, the tender roasted eggplant and bell peppers, and the halved cherry tomatoes evenly among the bowls. Don’t forget to add the pitted Kalamata or black olives, scattering them to provide bursts of briny flavor.
Finally, complete each bowl with a generous dollop of the homemade tzatziki sauce and a spoonful of creamy hummus. The contrast between the cool tzatziki, the rich hummus, and the warm components below is simply divine. Garnish each bowl with a sprinkle of chopped fresh parsley for a final touch of freshness and color. This vibrant assembly is ready to be savored immediately or stored for future enjoyment.
Step 6: The Final Flourish and Serving
The final presentation of your Mediterranean bowl can elevate it from a simple meal to a culinary delight. Ensuring each component is distributed aesthetically makes the dish more inviting and appealing. Take a moment to arrange the roasted vegetables and crispy chickpeas thoughtfully, perhaps in alternating sections around the bowl.
A generous spoonful of hummus and a dollop of the creamy tzatziki sauce are crucial finishing touches that add both flavor and a creamy texture. These sauces act as natural dressings, unifying all the diverse elements within the bowl. The vibrant green of the parsley garnish adds a pop of freshness and visual appeal.
Serve the Mediterranean bowls immediately to enjoy the contrasting temperatures and textures. If you’ve prepared them for meal prep, you can gently reheat the quinoa and vegetables if desired, or enjoy them at room temperature, with the tzatziki and hummus added just before serving to maintain their freshness.
Pro Tips for Mediterranean Bowl
Quality Ingredients Matter: For the best flavor, use good quality olive oil and fresh herbs. The brightness of fresh lemon juice is also key to making the quinoa sing.
Don’t Skip Rinsing Quinoa: Rinsing quinoa removes saponins, which can leave a bitter aftertaste. A thorough rinse under cold water is essential for a clean flavor profile.
Dry Chickpeas Thoroughly: For extra crispy chickpeas, ensure they are as dry as possible after draining and rinsing. Patting them with paper towels is highly recommended.
Roast Veggies in a Single Layer: Overcrowding the baking sheet can cause vegetables to steam rather than roast, preventing them from achieving that desirable caramelization and tender-crisp texture.
Squeeze Cucumber for Tzatziki: Removing excess moisture from the grated cucumber is vital for a thick, creamy tzatziki. A well-drained cucumber prevents a watery sauce.
Taste and Adjust Seasoning: Always taste your components, especially the tzatziki, before assembling the bowls. Adjust salt, pepper, and acidity (lemon juice) as needed to suit your palate.
Serving Suggestions for Mediterranean Bowl
Decoration
Garnish your Mediterranean bowls with a generous sprinkle of fresh chopped parsley or cilantro for a vibrant pop of color and freshness. A few toasted pine nuts or slivered almonds can add a lovely crunch and nutty flavor. If you enjoy a bit of spice, a drizzle of your favorite hot sauce or a pinch of red pepper flakes can provide a welcome kick.
Side Dishes
While these bowls are a complete meal on their own, they can be complemented by a light, crisp side salad dressed with a simple lemon vinaigrette. Warm, crusty pita bread is perfect for scooping up any leftover tzatziki or hummus. For a more substantial meal, consider serving a small portion of lentil soup alongside the bowls.
Creative Serving Ideas
Transform these bowls into elegant appetizers by serving them in small martini glasses or ramekins, layering the ingredients attractively. For a picnic or potluck, assemble the bowls in individual mason jars for easy transport and portion control. You can also present all the components separately buffet-style, allowing guests to build their own personalized Mediterranean masterpieces.
Preparation & Storage
Storing Leftovers
Properly storing leftovers is key to maintaining the quality and freshness of your Mediterranean bowls. Once the components have cooled to room temperature, you can store them in airtight containers in the refrigerator. You have two main options: either assemble individual portions in separate containers, ready to grab and go, or keep each component stored in its own container. This latter method is ideal if you prefer to assemble your bowl fresh each time.
Stored correctly, leftovers can be kept in the refrigerator for up to 4 days. This makes the Mediterranean bowl an excellent candidate for weekly meal preparation, ensuring you have healthy and delicious meals readily available throughout the week. Ensure the containers are well-sealed to prevent any air from entering, which can accelerate spoilage.
Freezing
Freezing Mediterranean bowls is possible, but it requires some consideration for the different components. The quinoa, roasted vegetables, and chickpeas generally freeze well. However, the tzatziki and hummus are best kept separate and stored fresh in the refrigerator, as their creamy texture can change significantly upon thawing.
If you choose to freeze components, allow them to cool completely. Place them in freezer-safe containers or heavy-duty freezer bags, removing as much air as possible. Label and date the containers. It’s advisable to freeze the components separately to prevent them from becoming soggy. The quinoa and roasted vegetables can typically be frozen for up to 2-3 months.
Reheating
Reheating your Mediterranean bowls depends on whether the components have been stored together or separately. If you’ve stored them assembled, it’s often best to reheat gently. You can warm the quinoa, vegetables, and chickpeas in a microwave on medium power in 30-second intervals, stirring in between, until heated through. Be cautious not to overheat, which can make the quinoa mushy.
Alternatively, you can reheat them in a skillet over medium-low heat with a tablespoon of water or olive oil, stirring occasionally. If you stored the components separately, you can reheat the quinoa and vegetables as described. It’s generally recommended to add the tzatziki and hummus fresh after reheating, as these are best served cold or at room temperature.
Frequently Asked Questions
-
Can I make the components of the Mediterranean bowl ahead of time?
Absolutely! The beauty of this Mediterranean bowl is its suitability for meal prep. The quinoa can be cooked and stored in the refrigerator for up to 4 days. Roasted vegetables and crispy chickpeas also hold up very well when stored separately in airtight containers in the fridge for a similar duration. The tzatziki and hummus are best made fresh, but can be refrigerated for 2-3 days. Assembling the bowls just before serving or storing assembled bowls for up to 2 days in advance are both excellent options.
-
What are some good substitutes for quinoa?
While quinoa is an excellent base, you have several delicious alternatives. Brown rice or wild rice can be used, though they may require longer cooking times. For a gluten-free option that’s lower in carbs, cauliflower rice is a fantastic choice; simply roast or sauté it until tender. Couscous, bulgur wheat, or even farro are also wonderful grain options that would complement the Mediterranean flavors beautifully. Each substitution will offer a slightly different texture and flavor profile, allowing for endless customization.
-
How can I make my roasted chickpeas extra crispy?
Achieving crispy chickpeas involves a few key steps. First, ensure they are thoroughly dried after rinsing and draining; excess moisture is the primary enemy of crispiness. Pat them dry with paper towels or a clean kitchen towel until they feel very dry to the touch. When roasting, spread them in a single layer on the baking sheet, ensuring they are not crowded, as this can lead to steaming. Roasting at a sufficiently high temperature, like the 425°F (220°C) specified, also helps create that desirable crunch. You can also consider rinsing the canned chickpeas, then letting them air dry for an hour or two before seasoning and roasting for maximum crispiness.