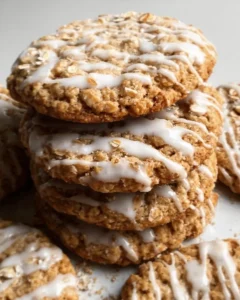
Brown Butter Iced Oatmeal Cookies Recipe – Irresistible Comfort Treats

These Brown Butter Iced Oatmeal Cookies are a sublime fusion of comforting textures and deeply satisfying flavors. They promise a chewy, soft interior encased in a rich, nutty aroma from the meticulously browned butter, making each bite an unparalleled experience.
Topped with a delicate vanilla glaze, these cookies offer a visually appealing contrast and an extra layer of sweetness that perfectly complements the warm spice notes within. They are destined to become a cherished recipe, perfect for elevating any occasion, from festive holidays to intimate family gatherings.
Why You Will Love This Recipe
- Deeply Rich Flavor: The browning of the butter is a game-changer, imparting a complex, toasted nuttiness that transforms the entire cookie experience and makes them utterly irresistible.
- Effortless Elegance: Despite their sophisticated taste, these cookies are surprisingly straightforward to prepare, requiring only basic baking techniques and readily available ingredients.
- Versatile Delight: Whether served at a special event, shared during a casual get-together, or simply enjoyed with a cup of tea, their comforting nature makes them suitable for any moment.
- Eye-Catching Presentation: The smooth, glossy vanilla icing creates a beautiful finish that adds a touch of sophistication, ensuring these cookies are as delightful to behold as they are to devour.
- Cozy Spice Profile: A harmonious blend of cinnamon and nutmeg infuses each cookie with a warm, inviting aroma that evokes feelings of home and comfort, especially during cooler months.
Ingredients You Need
Crafting these exceptional cookies begins with selecting high-quality ingredients that will form the foundation of their exquisite taste and texture. Using fresh, well-stored components ensures that the rich brown butter flavor and the chewy oatmeal base truly shine through. The careful selection and measurement of each element are crucial for achieving that perfect balance of sweetness, spice, and chewiness that defines these delightful treats.
Brown Butter Iced Oatmeal Cookies
Indulge in the warm, nutty flavors of Brown Butter Iced Oatmeal Cookies. These delightful treats combine a soft, chewy texture with a sweet vanilla glaze, making them perfect for any occasion—from holiday celebrations to cozy family nights. The addition of brown butter creates a rich depth of flavor that elevates these cookies beyond the ordinary. With comforting spices like cinnamon and nutmeg, they are not only visually appealing but also a joy to eat.
- 1 1/4 cups (282 g) unsalted butter
- 2 cups (190 g) old fashioned oats
- 2 cups, plus 4 tablespoons (280 g) all-purpose flour, spooned and leveled
- 2 teaspoons baking soda
- 2 teaspoons ground cinnamon
- 1/2 teaspoon ground nutmeg
- 1 1/2 teaspoons salt
- 1 cup (200 g) light brown sugar, packed
- 1 cup (200 g) granulated sugar
- 2 large eggs, room temperature
- 2 teaspoons vanilla
- 2 tablespoons molasses (not blackstrap)
- 2 cups powdered sugar, sifted
- 3 tablespoons milk or heavy cream
- 1/4 teaspoon vanilla
- 1Brown the unsalted butter in a saucepan until golden and nutty; set aside to cool.
- 2In a bowl, whisk together flour, baking soda, cinnamon, nutmeg, and salt.
- 3Beat browned butter with sugars until fluffy; add eggs one at a time, mixing well after each addition, then add vanilla and molasses.
- 4Gradually mix dry ingredients into wet mixture; fold in oats gently.
- 5Preheat oven to 350°F (175°C). Drop rounded tablespoons of dough onto parchment-lined baking sheets; bake for 10-12 minutes until edges are golden.
- 6Make icing by mixing powdered sugar with milk and vanilla until smooth; drizzle over cooled cookies.
Keywords: oatmeal cookies, brown butter, iced cookies, holiday cookies, fall baking, dessert, cookies, spiced cookies
The specific quantities for each ingredient are detailed within the recipe card above, ensuring you have precisely what you need for success.
Variations
For those seeking to adapt these delightful Brown Butter Iced Oatmeal Cookies to different dietary needs or flavor preferences, several exciting variations are easily achievable. These modifications allow you to cater to a wider audience or simply explore new taste dimensions.
A fantastic option for a vegan twist involves substituting the butter with a high-quality vegan butter alternative and using a flax egg or commercial egg replacer. Ensure your sugar sources are also vegan-friendly, as some refined sugars are processed with bone char.
To create a low-carb version, you would typically replace the all-purpose flour with a blend of almond flour and coconut flour. The sugars would need to be substituted with a zero-calorie sweetener like erythritol or stevia, and you might adjust the oats or omit them entirely, depending on your carbohydrate tolerance goals.
Another exciting avenue is to incorporate additional mix-ins for varied textures and tastes. Consider adding chopped walnuts or pecans for an extra crunch and complementary nutty flavor, or folding in dark chocolate chips for a decadent, gooey contrast. A sprinkle of sea salt on top of the icing just before it sets can also add a sophisticated sweet-and-salty dimension.
How to Prepare Brown Butter Iced Oatmeal Cookies
Step 1: Mastering the Brown Butter
The foundation of these exceptional cookies lies in the art of browning the butter. Begin by placing your measured unsalted butter into a light-colored saucepan over medium heat. It is crucial to use a lighter pan so you can easily monitor the butter’s color transformation. As the butter melts, it will begin to foam; stir it constantly with a whisk or spatula, ensuring the milk solids at the bottom do not scorch.
You will notice the foam subsiding, and the butter will transition from pale yellow to a golden hue. Continue stirring until you achieve a rich, amber-brown color and a distinct, fragrant aroma that resembles toasted nuts fills your kitchen. This nutty scent is the unmistakable sign that your butter is perfectly browned. Immediately remove the saucepan from the heat to prevent further cooking and burning.
Carefully pour the browned butter into a heat-safe bowl to halt the cooking process. It’s important to let this liquid gold cool slightly for about 10-15 minutes before proceeding with the recipe. This cooling period is essential because hot butter can melt the sugars prematurely and affect the cookie’s texture, leading to flatter, spread-out cookies. The slight cooling allows the browned butter to thicken just enough to integrate beautifully with the other ingredients without compromising the dough’s structure.
Step 2: Harmonizing the Dry Ingredients
In a separate, medium-sized mixing bowl, gather all the dry components that will contribute to the cookie’s structure and leavening. This ensemble includes the all-purpose flour, baking soda, ground cinnamon, ground nutmeg, and salt. The precise measurement of flour, spooned and leveled, is vital for ensuring the cookies have the right consistency, not too dense and not too cakey.
Baking soda is the primary leavening agent here, working with the acidic components in the dough to create lift and a tender crumb. The warm spices, cinnamon and nutmeg, are the soul of the cookie, infusing it with that classic comforting aroma and flavor that is so characteristic of oatmeal cookies. Salt plays a critical role in balancing the sweetness and enhancing the overall flavor profile of all the ingredients, making them more pronounced and enjoyable.
Once all these dry ingredients are in the bowl, use a whisk to thoroughly combine them. Whisking ensures that the leavening agents and spices are evenly distributed throughout the flour. This even distribution is paramount because it guarantees that every bite of your cookie will have the same delightful balance of flavor and the desired rise. It also helps to break up any small lumps that might be present in the flour or spices, contributing to a smoother final dough consistency.
Step 3: Creaming for Cloud-Like Texture
In the bowl of a stand mixer fitted with the paddle attachment, or using a large mixing bowl with an electric hand mixer, begin by combining the slightly cooled browned butter with both the light brown sugar and granulated sugar. The combination of brown sugar, with its molasses content, and granulated sugar provides both moisture and structure, contributing to the cookie’s signature chewy texture and sweetness.
Beat these ingredients together on medium speed until the mixture becomes exceptionally light, fluffy, and pale in color. This creaming process incorporates air into the dough, which is crucial for the cookies’ texture and rise; it can take several minutes. Scrape down the sides and bottom of the bowl periodically to ensure everything is evenly incorporated.
Next, add the large eggs, one at a time, beating well after each addition until fully integrated. Allowing each egg to incorporate properly before adding the next helps to emulsify the mixture, creating a stable base for the dough. Finally, stir in the vanilla extract and molasses. The molasses contributes a subtle depth of flavor and extra chewiness, enhancing the overall complexity of the cookie. Ensure these are thoroughly mixed in, creating a homogenous, rich, and aromatic wet ingredient base ready for the dry components.
Step 4: Bringing Dough Together
With the mixer on low speed, or by hand using a spatula, gradually add the whisked dry ingredients from Step 2 to the wet ingredients from Step 3. Mix just until the flour streaks begin to disappear. It is critically important not to overmix the dough at this stage; overmixing can develop the gluten in the flour too much, resulting in tough and dense cookies instead of the desired chewy texture.
Once the flour mixture is mostly incorporated, switch to a folding motion using a sturdy spatula. Gently fold in the old-fashioned oats until they are evenly distributed throughout the dough. Old-fashioned oats, also known as rolled oats, are preferred over quick oats because they hold their shape better during baking, providing a more satisfying chew and textural contrast. Ensure the oats are distributed evenly so every cookie has that signature oatmeal goodness.
The resulting dough should be thick and slightly sticky, holding its shape reasonably well when scooped. If the dough seems excessively wet or sticky, you can chill it for about 15-30 minutes, which will make it easier to handle and also help the flavors meld. However, if the ingredients were measured accurately and the butter was cooled properly, the dough should be at an ideal consistency for scooping and baking.
Step 5: Baking to Golden Perfection
Preheat your oven to 350°F (175°C). Prepare your baking sheets by lining them with parchment paper or silicone baking mats. This step is essential for preventing the cookies from sticking to the pan and ensuring they bake evenly without browning too quickly on the bottom. It also makes for effortless cleanup.
Using a rounded tablespoon or a medium cookie scoop, drop portions of the cookie dough onto the prepared baking sheets, leaving about two inches of space between each cookie. This spacing allows the cookies to spread slightly as they bake without merging into one giant cookie. Aim for consistent size for even baking.
Bake for 10-12 minutes, or until the edges of the cookies are lightly golden brown and the centers still appear slightly soft. It’s important not to overbake them, as they will continue to cook slightly on the hot baking sheet after being removed from the oven. They should look set but not firm. Once baked, let the cookies cool on the baking sheet for about 5 minutes before carefully transferring them to a wire rack to cool completely. This cooling period allows them to firm up properly.
Step 6: Crafting the Luscious Glaze
While the cookies are cooling on the wire rack, it’s the perfect time to prepare the sweet vanilla icing that will crown these delightful treats. In a medium-sized bowl, combine the sifted powdered sugar with the milk or heavy cream. Sifting the powdered sugar is a crucial step; it removes any lumps, ensuring a silky-smooth glaze that will look professional and elegant on your cookies.
Add the vanilla extract to the mixture. Vanilla extract not only adds its own distinct flavor but also enhances the sweetness of the powdered sugar and complements the warm spices in the cookie. Whisk everything together vigorously until the glaze is smooth, glossy, and free of lumps. The consistency should be thick enough to coat the back of a spoon but thin enough to drizzle easily.
If the glaze appears too thick, you can gradually add a tiny bit more milk or cream, just a teaspoon at a time, whisking continuously until you achieve the desired drizzling consistency. Conversely, if it’s too thin and runny, add a little more sifted powdered sugar, a tablespoon at a time, until it thickens up. Achieving the perfect glaze consistency is key for both ease of application and the final aesthetic appeal of your Brown Butter Iced Oatmeal Cookies.
Step 7: The Final Flourish
Once the cookies have cooled completely on the wire rack, it is time for the final, beautiful step: applying the vanilla glaze. Ensure the cookies are thoroughly cooled; applying glaze to warm cookies will cause it to melt and slide off, making a mess and ruining the finish. A completely cooled cookie provides a stable surface for the icing.
You can apply the glaze in several ways, depending on your preference and desired aesthetic. For a rustic, charming look, simply use a spoon to drizzle the glaze back and forth over the tops of the cookies. This method is quick and creates lovely, organic patterns. For a more uniform or decorative finish, you can transfer the glaze into a piping bag fitted with a small round tip and pipe thin lines or swirls onto each cookie.
Alternatively, you can dip the tops of the cookies directly into the bowl of glaze, letting any excess drip back into the bowl before placing them on a clean parchment-lined surface to set. Whatever method you choose, allow the glaze to set completely before serving or storing the cookies. This typically takes about 30-60 minutes, depending on the humidity and thickness of the glaze. The result will be a batch of stunning, delicious cookies ready to be savored.
Pro Tips for Brown Butter Iced Oatmeal Cookies
Room Temperature Ingredients: For the most uniform and well-emulsified dough, ensure your butter and eggs are at room temperature. This allows them to cream together more effectively, incorporating more air which leads to a lighter, chewier cookie. Cold ingredients can result in a dense, greasy dough and uneven baking.
Don’t Skip Browning the Butter: While it might seem like an extra step, browning the butter is absolutely essential for the signature nutty flavor that makes these cookies so special. Watch it carefully, as it can go from perfectly browned to burnt very quickly. The aroma is your best guide.
Chill the Dough: If time permits, chilling the cookie dough in the refrigerator for at least 30 minutes before baking can make a significant difference. It allows the flavors to meld together more deeply, and it helps to control the spread of the cookies, resulting in thicker, chewier cookies with a better shape. This is especially helpful if your kitchen is warm.
Accurate Flour Measurement: Spoon your flour into the measuring cup and level it off with a straight edge, rather than scooping directly from the bag. Scooping can compact the flour, leading to too much flour in the recipe, which can result in dry, crumbly cookies. Precision here is key for that perfect chewy texture.
Watch Baking Time Closely: Ovens can vary, so it’s important to monitor your cookies during the last few minutes of baking. They should be golden brown around the edges but still look slightly soft and underdone in the center. They will continue to firm up as they cool on the baking sheet, so pulling them out at this stage prevents them from becoming hard or dry. The cookies should retain a slight chewiness.
Serving Suggestions for Brown Butter Iced Oatmeal Cookies
Decoration
The vanilla glaze itself provides a beautiful, simple decoration for these cookies. For added flair, consider sprinkling the still-wet glaze with a few edible gold or silver nonpareils for a festive touch, especially during holidays. You could also finely chop some toasted pecans or walnuts and press them gently into the glaze before it sets for extra texture and visual appeal.
Side Dishes
These cookies are delightful on their own, but they pair wonderfully with a variety of accompaniments. A warm mug of spiced apple cider or a rich hot chocolate makes for a perfect comforting pairing, especially during autumn and winter months. For a lighter contrast, a simple side of fresh berries, like raspberries or blueberries, can offer a refreshing tartness against the cookie’s sweetness.
Creative Serving Ideas
Elevate your dessert presentation by arranging these cookies on a tiered stand alongside other cookies and small cakes for a charming afternoon tea or dessert buffet. They also make a wonderful addition to a cheese board, offering a sweet counterpoint to savory cheeses. For a thoughtful gift, package them in a decorative tin or box, perhaps tied with a festive ribbon, making them a welcome present for friends, family, or colleagues.
Preparation & Storage
Storing Leftovers
Proper storage is key to maintaining the delightful texture of your Brown Butter Iced Oatmeal Cookies. Once they have completely cooled and the glaze has set, store them in an airtight container at room temperature. If you are stacking the cookies, it is a good practice to place a layer of parchment paper or wax paper between them. This prevents the glaze from sticking to the cookie above and helps preserve their individual appeal.
In an airtight container, these cookies can typically stay fresh and delicious for about 5 to 7 days. Ensure the lid is sealed tightly to prevent air exposure, which can lead to staleness or a loss of their chewy texture. They are often even better on the second or third day as the flavors continue to meld.
Avoid storing them in areas with high humidity or direct sunlight, as this can affect their quality. If your environment is particularly warm, consider storing them in a slightly cooler part of your home. The goal is to maintain a stable, dry environment to keep them at their best.
Freezing
For longer storage, freezing these cookies is an excellent option. Before freezing, ensure the cookies are fully baked, cooled, and the glaze has completely hardened. Freezing them while the glaze is still soft can lead to a messy, unappealing result.
To freeze, arrange the cookies in a single layer on a baking sheet lined with parchment paper. Place the baking sheet in the freezer for about 1-2 hours, or until the cookies are firm and solid. This initial freezing step, known as flash freezing, prevents the cookies from sticking together in a large clump.
Once they are solidly frozen, transfer the cookies to a freezer-safe airtight container or heavy-duty freezer bag. Remove as much air as possible from the bag before sealing it to prevent freezer burn. Properly stored, Brown Butter Iced Oatmeal Cookies can maintain their quality in the freezer for up to 2 to 3 months.
Reheating
When you are ready to enjoy your frozen or even just previously stored cookies, a gentle reheating can often bring them back to their delightful best, especially if you prefer them slightly warm. For a quick refresh, you can use your oven or a microwave.
To reheat in the oven, preheat it to a low temperature, around 300-325°F (150-160°C). Place the cookies on a baking sheet lined with parchment paper and warm them for about 5-7 minutes. This gentle heat helps to soften them and bring out their comforting aroma, making them taste almost freshly baked.
If you’re in a hurry, the microwave can also be used, though it requires more caution to avoid overcooking. Place a cookie on a microwave-safe plate and heat it in short bursts of about 10-15 seconds. Check the cookie after each interval until it reaches your desired warmth and softness. Be careful not to overheat, as microwave-warmed cookies can sometimes become a bit chewy or tough if heated for too long.
Frequently Asked Questions
- Can I use quick oats instead of old-fashioned oats in the Brown Butter Iced Oatmeal Cookies Recipe?
Yes, you can certainly use quick oats if old-fashioned oats are not available, but be aware that they will affect the final texture of the cookies. Quick oats are processed differently and tend to break down more during baking, resulting in a softer, less chewy cookie with a finer texture. Old-fashioned rolled oats, on the other hand, retain more of their shape and provide that signature hearty chew that is characteristic of this recipe. If you opt for quick oats, the cookies might spread a bit more and have a more tender crumb, which can still be delicious but will differ from the intended texture.
- How do I make these cookies gluten-free?
To transform these Brown Butter Iced Oatmeal Cookies into a gluten-free delight, the primary substitution involves the flour. You will need to replace the all-purpose flour with a high-quality gluten-free all-purpose flour blend that contains xanthan gum. Ensure the blend is suitable for baking. It’s also important to check that your oats are certified gluten-free, as oats are often processed in facilities that also handle wheat, leading to cross-contamination for those with celiac disease or severe gluten sensitivities. The brown butter, sugars, eggs, spices, and other ingredients are typically gluten-free, but it’s always wise to verify labels.
- What should I do if my glaze is too thick or too thin?
Achieving the perfect glaze consistency is often a matter of slight adjustment. If your vanilla glaze turns out too thick and difficult to drizzle, the solution is simple: gradually add more liquid. Start by adding milk or heavy cream, just one teaspoon at a time, whisking thoroughly after each addition until you reach a smooth, drizzly consistency that flows easily from a spoon or piping bag. Conversely, if your glaze is too thin and runny, making it difficult to coat the cookies properly, you can thicken it by adding more sifted powdered sugar. Add it a tablespoon at a time, whisking well, until the glaze becomes thick enough to cling to the cookies without completely running off. This fine-tuning ensures a beautiful finish for your cookies.