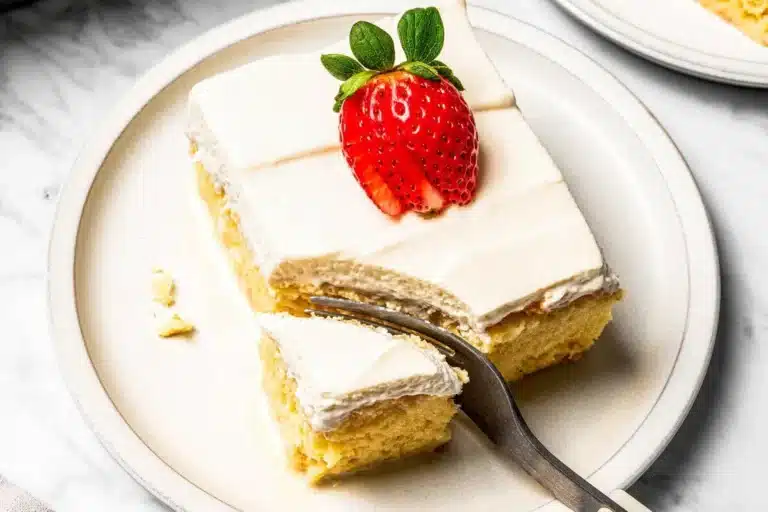
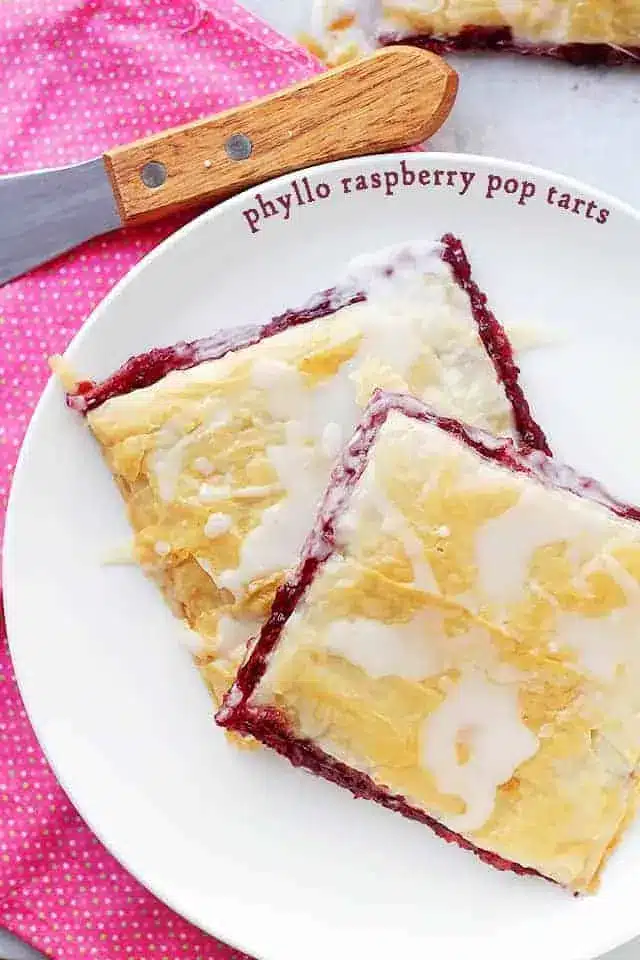
Phyllo Raspberry Pop Tarts with Vanilla Glaze | Homemade Pop Tarts

Discover a delightful twist on a beloved classic with these incredibly easy Phyllo Pop Tarts. Imagine flaky, golden layers encasing a sweet burst of raspberry jam, all topped with a delicate vanilla glaze. This recipe offers a shortcut to homemade goodness, perfect for busy mornings or a charming afternoon treat.
Forget the hours of dough preparation; these pop tarts are all about speed and simplicity, leveraging the magic of phyllo dough. They deliver that satisfying crunch and sweet filling that everyone adores, reinvented with minimal fuss and maximum flavor. Get ready to impress yourself and your loved ones with this wonderfully accessible dessert.
Why You Will Love This Recipe
- Incredible Flakiness: Phyllo dough provides an unparalleled crisp and flaky texture that elevates these pop tarts beyond the ordinary, offering a gourmet experience with minimal effort.
- Lightning-Fast Preparation: With a prep time that’s truly impressive, these tarts are achievable even on the most hectic mornings or when a sweet craving strikes unexpectedly.
- Customizable Filling: While raspberry jam is featured, the sweet canvas is perfect for your favorite fruit preserves, allowing for endless flavor combinations and personal touches.
- Simple Glaze Finish: The easy-to-make vanilla glaze adds a touch of elegance and sweetness, hardening just enough to provide that classic pop tart appeal without complicating the process.
- Kid-Approved & Adult-Enjoyed: This recipe strikes a perfect balance, appealing to children with its fun format and to adults with its sophisticated texture and refined flavors.
Ingredients You Need
The beauty of these phyllo pop tarts lies in their simplicity, using readily available ingredients that combine to create something truly special. Opting for high-quality jam and fresh phyllo sheets will undoubtedly enhance the final taste and texture of your delightful creation. Remember that the exact quantities and specific types of ingredients are detailed in the accompanying recipe card for your convenience.
Phyllo Raspberry Pop Tarts
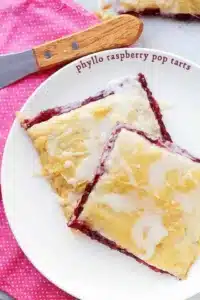
These Phyllo Raspberry Pop Tarts are the easiest homemade pop tart recipe ever! Layers of phyllo sheets filled with raspberry jam and topped with a sweet vanilla glaze.
- 4 tablespoons butter, melted
- 10 phyllo sheets, divided
- 1 cup powdered sugar
- 1 teaspoon pure vanilla extract
- 2 to 3 tablespoons water
- 1Preheat oven to 400°F. Line a baking sheet with foil.
- 2Layer 5 pieces of Phyllo sheets on the prepared baking sheet, brushing each sheet with the melted butter before adding the next.
- 3Brush the 5th sheet with butter and spread the raspberry jam, leaving a 1-inch empty border around the edges.
- 4Layer the remaining 5 Phyllo sheets, brushing each sheet with butter before adding the next.
- 5Brush the top layer with butter and cut the pastry into 8 rectangles. A pizza-cutter works best.
- 6DO NOT remove or separate the pastries, yet.
- 7Bake for 12 to 15 minutes, or until golden brown. Remove from oven and let slightly cool.
- 8Make the glaze. Meanwhile, in a small mixing bowl whisk together powdered sugar, vanilla and 2 tablespoons water; whisk until smooth and thoroughly combined. If the glaze is too thick for your liking, add 1 more tablespoon water and whisk until smooth.
- 9Drizzle each pop tart with vanilla glaze. Glaze will harden as it stands.
- 10Serve.
Keywords: Pop Tarts, Phyllo, Raspberry, Jam, Dessert, Breakfast, Easy, Homemade
From the buttery richness of melted butter to the delicate layers of phyllo and the sweet fruitiness of raspberry jam, each component plays a vital role. The powdered sugar and vanilla extract for the glaze bring a perfect finishing touch of sweetness and aroma. Ensure you have these few essentials on hand to whip up these treats in no time.
Variations
The inherent versatility of these phyllo pop tarts allows for exciting variations that cater to different dietary preferences and taste profiles. Consider exploring these creative avenues to make them your own.
For a delightful vegan adaptation, simply substitute the butter with a plant-based alternative like vegan butter or melted coconut oil. Ensure your chosen jam is also vegan-certified. The phyllo dough itself is typically vegan, but it’s always wise to check the packaging for confirmation. This simple swap maintains the incredible flakiness and sweetness, making them suitable for a wider audience.
Craving a low-carb option? While traditional pop tarts are high in sugar, you can adapt this phyllo version by focusing on a low-sugar jam alternative. Look for sugar-free berry preserves or even a homemade reduction using a low-carb sweetener like erythritol or stevia. The phyllo itself has some carbohydrates, but focusing on a lower-carb filling is the key here for a more carb-conscious treat.
Experiment with different fruit fillings beyond the classic raspberry. A tart cherry jam offers a sophisticated, slightly more complex flavor profile. Apricot preserves provide a lovely bright sweetness, while a mixed berry blend can create a vibrant and multi-layered taste experience. Each fruit will bring its own unique character and color to the delicate phyllo pockets.
How to Prepare phyllo pop tarts
Step 1: Prepare Your Workspace and Oven
Begin by preheating your oven to a moderately high temperature of 400°F (200°C). This initial high heat is crucial for achieving that signature crispness in the phyllo dough, ensuring it bakes up beautifully golden and flaky. Have a baking sheet ready and line it with parchment paper or aluminum foil for easy cleanup, a small but important step in streamlining the baking process.
A well-preheated oven ensures that the phyllo sheets begin to crisp immediately upon entering the heat, rather than steaming. This even heat distribution is fundamental to the success of delicate pastries like these pop tarts. Think of it as setting the stage for a perfectly baked treat, where every layer contributes to the final delightful texture.
Step 2: Build the Phyllo Foundation
Carefully unroll your phyllo dough sheets and cover them with a slightly damp kitchen towel to prevent them from drying out while you work; phyllo is notoriously sensitive to air. Arrange five of these delicate sheets on your prepared baking sheet, ensuring they lie as flat as possible. As you layer each sheet, brush it generously with melted butter, paying special attention to the edges and corners to ensure even crisping.
The butter acts as both a binder and a crisping agent, creating distinct, flaky layers within the dough. Don’t be shy with the butter; it’s the key to that authentic, shatteringly crisp texture that makes phyllo so desirable. This meticulous layering and buttering process is what transforms simple sheets into a luxurious pastry crust.
Once the five buttered layers are in place, you’ll have a sturdy yet delicate base. This foundation is ready to receive its sweet filling, setting the stage for the deliciousness to come. The careful application of butter ensures each of the five initial layers will puff and separate during baking, creating that characteristic flaky structure.
Step 3: Add the Luscious Jam Filling
Now it’s time to introduce the star of the show: your chosen jam. Spread approximately half a cup of raspberry jam evenly over the topmost phyllo sheet. It’s important to leave about a one-inch border clear around the entire perimeter of the dough. This border is essential; it prevents the jam from oozing out excessively during baking and helps to create a sealed pocket for the filling.
The raspberry jam, with its vibrant color and sweet-tart flavor, is the heart of these pop tarts. Ensure it’s spread relatively thinly and evenly to avoid creating pockets of moisture that could make the phyllo soggy. A thin, consistent layer allows the jam to heat through and become wonderfully jammy without overwhelming the delicate pastry.
This step is where the magic truly begins to happen, transforming simple pastry and jam into a recognizable treat. The contrast between the crisp, buttery phyllo and the warm, sweet fruit filling is what makes these pop tarts so irresistible. Take a moment to appreciate the simple elegance of this combination before moving on to the next crucial layering stage.
Step 4: Complete the Phyllo Layers and Shape
Gently place the remaining five phyllo sheets on top of the jam-filled layer, continuing the process of brushing each individual sheet with melted butter. Just like the bottom layers, each of these top sheets needs a light coating of butter to ensure they crisp up and separate beautifully. This creates a balanced pastry structure, with layers of crispiness both above and below the jam filling.
Once all ten layers are stacked and buttered, carefully brush the very top layer with a final coat of melted butter. This outermost layer is critical for achieving that desirable golden-brown finish. A well-buttered top surface will bake to a perfect crisp, providing a beautiful visual appeal and an inviting crunch.
With the pastry perfectly layered, it’s time to shape your pop tarts. Using a sharp knife or a pizza cutter, carefully score the entire layered pastry into eight equal rectangular portions. It’s crucial to score through all the layers but not cut all the way through the bottom to ensure the pop tarts hold their shape. Do not separate the rectangles at this stage; they need to remain connected until after baking to maintain their structure and prevent the filling from escaping.
Step 5: Bake to Golden Perfection
Transfer the scored pastry directly into your preheated 400°F (200°C) oven. Bake for approximately 12 to 15 minutes, or until the phyllo dough achieves a beautiful, deep golden-brown color and looks wonderfully puffed and crisp. Keep a close eye on them during the final minutes of baking, as phyllo can brown very quickly due to its delicate nature and butter content.
The scent of toasting phyllo and warm jam filling your kitchen is a sure sign of success. The high heat quickly evaporates moisture, causing the butter between the layers to steam and puff the dough outwards, creating those delightful airy pockets. This rapid baking process is key to achieving the signature crispy texture of authentic pop tarts.
Once they are perfectly golden and crisp, carefully remove the baking sheet from the oven. Allow the pop tarts to cool on the baking sheet for a few minutes. This brief cooling period helps them set slightly, making them easier to handle and preventing the glaze from melting too much when applied. Resist the urge to separate them immediately; let them cool enough so they are firm.
Step 6: Prepare and Apply the Vanilla Glaze
While the pop tarts are cooling slightly, prepare the simple yet delicious vanilla glaze. In a small mixing bowl, whisk together one cup of powdered sugar with one teaspoon of pure vanilla extract. Start by adding two tablespoons of water and whisk vigorously until the mixture is smooth and well combined, achieving a thick but pourable consistency.
The key to a perfect glaze is its texture; it should be thick enough to coat the tarts but fluid enough to drizzle easily. If the glaze seems too thick and difficult to work with, gradually add another tablespoon of water, whisking thoroughly after each addition until your desired consistency is reached. Be careful not to add too much liquid, or the glaze will become too thin and runny, losing its desirable coating effect.
Once the glaze is the perfect consistency, it’s time for the final artistic touch. Using a spoon or a piping bag with a fine tip, drizzle the vanilla glaze generously over the tops of each cooled pop tart. Aim for a decorative pattern, creating zig-zags or swirls. The glaze will begin to set as it stands, hardening into a sweet, crisp shell that perfectly complements the flaky pastry and fruity filling.
Pro Tips for phyllo pop tarts
Work Quickly with Phyllo: Phyllo dough is highly sensitive to air and can dry out very rapidly. Keep the sheets you are not actively working with covered under a slightly damp, clean kitchen towel. This simple step prevents the delicate layers from becoming brittle and difficult to handle, ensuring they remain pliable for layering.
Generous Butter Application: Don’t skimp on the melted butter between the phyllo layers. It’s the secret ingredient that creates that incredible flaky texture and golden-brown crispness. Each layer needs its own brush of butter to ensure proper separation and puff during baking. This is where the characteristic shatteringly crisp texture originates.
Scoring, Not Cutting: When shaping the tarts, ensure you score the dough deeply enough to mark the eight rectangles, but do not cut all the way through the bottom layer. This technique is vital for keeping the pop tarts intact during baking. They will separate easily after cooling, but this pre-baking score ensures structural integrity.
Jam Border is Key: Always leave a clear one-inch border around the edges of the dough when spreading the jam. This border acts as a seal, preventing the sweet filling from bubbling out and making a mess in your oven. It helps contain the delicious jam filling within its flaky phyllo casing.
Watch Baking Closely: Phyllo dough browns very quickly. Keep a close eye on the pop tarts during the last few minutes of baking and remove them as soon as they reach a beautiful golden-brown color. Overbaking can lead to a burnt taste and overly brittle pastry, so vigilant observation is rewarded.
Serving Suggestions for phyllo pop tarts
Decoration
The simple vanilla glaze provides a beautiful canvas for further decoration. Consider adding a sprinkle of edible glitter for a touch of sparkle, or a few colorful nonpareil sprinkles for a playful, festive look. For a slightly more sophisticated touch, a light dusting of powdered sugar can be added before the glaze fully sets. You can also use a toothpick to create swirls or patterns in the glaze as it begins to harden, adding a personalized artistic flair.
Side Dishes
These phyllo pop tarts are delightful on their own but can also be paired with a simple glass of milk or a hot cup of coffee for a classic breakfast or snack experience. A small side of fresh berries, like blueberries or strawberries, can add a refreshing contrast to the sweetness of the tart. For a more substantial brunch, consider serving them alongside a light yogurt parfait or a small fruit salad.
Creative Serving Ideas
Serve these warm for an extra-gooey jam filling and the most tender phyllo texture. Arrange them artfully on a platter for a delightful brunch centerpiece or a charming addition to a dessert buffet. They make for an impressive yet easy treat when entertaining guests, offering a gourmet feel without the fuss. Imagine them as a delightful surprise in a packed lunchbox, bringing a touch of homemade joy to an ordinary day.
Preparation & Storage
Storing Leftovers
Once cooled completely, any leftover phyllo pop tarts can be stored in an airtight container at room temperature for up to 2 days. While the phyllo will lose some of its crispness over time, they will still be quite enjoyable. For best results, try to consume them within 24 hours to retain as much of their original texture as possible. Avoid storing them in the refrigerator, as this can make the phyllo soft and gummy.
Freezing
These pop tarts freeze exceptionally well, making them a fantastic make-ahead treat. Once completely cooled and the glaze is set, you can freeze them individually wrapped in plastic wrap, then placed together in a freezer-safe bag or container. They can be stored in the freezer for up to 1-2 months. Ensure they are well-sealed to prevent freezer burn and maintain their quality.
Reheating
To reheat frozen pop tarts, remove them from the freezer and let them thaw at room temperature for about 30 minutes. For a slightly crisper texture, you can reheat them in a toaster oven or a conventional oven set to a low temperature (around 300°F or 150°C) for 5-8 minutes, or until warmed through and slightly crisped. Microwaving is not recommended, as it will make the phyllo soggy.
Frequently Asked Questions
-
Can I use a different type of jam or filling for these phyllo pop tarts?
Absolutely! The beauty of these phyllo pop tarts lies in their versatility. While raspberry jam is classic and delicious, feel free to experiment with your favorite fruit preserves. Strawberry, blueberry, apricot, or even cherry jam all work wonderfully. For a more savory twist, you could even try a thin layer of chocolate-hazelnut spread or a dollop of lemon curd. Ensure that whatever filling you choose is not too wet, as excess moisture can affect the crispness of the phyllo. A thicker jam or a reduced fruit puree tends to work best to maintain that signature flakiness and prevent sogginess.
-
How can I ensure my phyllo dough stays crisp after baking and during storage?
The key to maintaining crispness is twofold: proper baking and proper storage. During baking, ensure your oven is at the correct temperature and that you don’t underbake the pastries, as insufficient heat can leave them soft. Once baked and completely cooled, store them in an airtight container at room temperature. Avoid refrigerating them, as the humidity will make the phyllo lose its crispness. If you need to store them for longer than a couple of days, freezing is your best bet; when thawed and gently reheated in a low oven, they can regain much of their original crunch.
-
What is the best way to get a clean cut and distinct layers in my phyllo pop tarts?
Achieving clean cuts and distinct layers starts with careful handling of the phyllo dough. Always keep unused phyllo covered with a damp cloth to prevent drying. When layering, ensure each sheet is brushed thoroughly with melted butter to allow the layers to separate during baking. For shaping, use a very sharp knife or a pizza cutter and press down firmly in a single motion to score through all the layers. Avoid sawing back and forth, which can drag the dough and create ragged edges. Remember to only score, not cut all the way through the bottom layer, to keep the tarts intact until they are ready to be served or separated after baking.