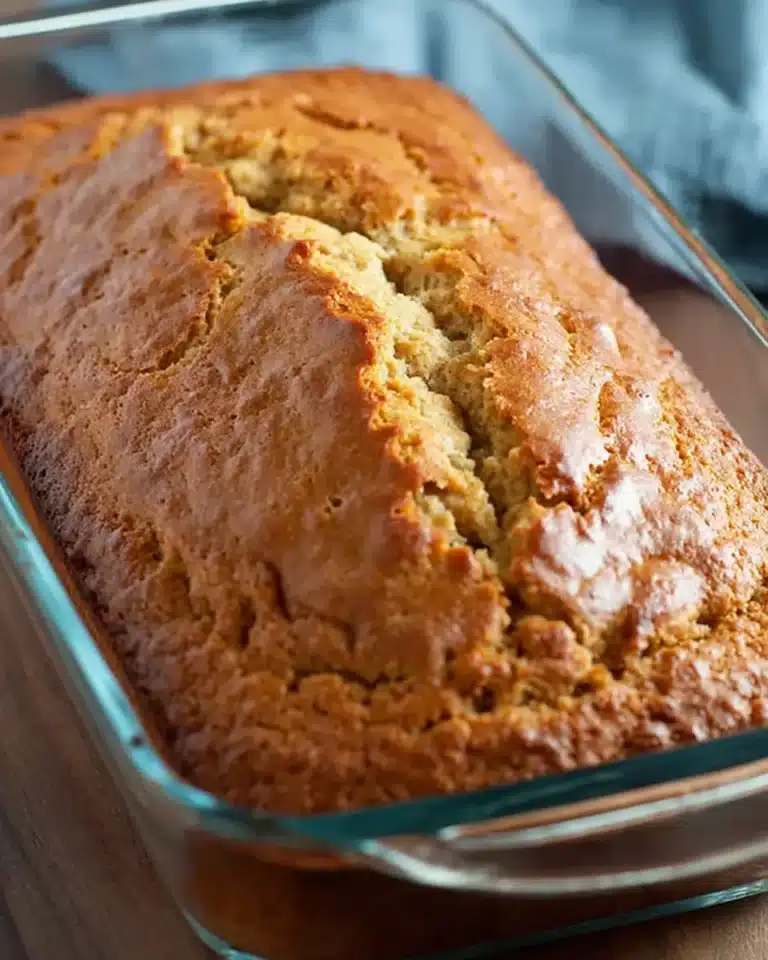
Buttery Pineapple Loaf Cake

Quick, tender, and full of bright fruit flavor, Pineapple Loaf Cake is a simple bake that delivers a soft crumb, juicy pineapple pieces, and a buttery brown sugar topping with caramelized appeal. It is a great make-ahead dessert for brunch spreads, snack tables, or casual weekend baking.
This is the kind of loaf cake that feels familiar right away, and the batter is straightforward with a manageable ingredient list. The pineapple brings both sweetness and moisture without making the cake feel heavy.
Why You Will Love This Recipe
- Effortless Preparation: The batter comes together with minimal fuss, making it an ideal choice for busy bakers.
- Bursting with Flavor: Sweet pineapple juice and chunks infuse every bite with tropical goodness.
- Perfect Texture: A soft, tender crumb is complemented by a wonderfully crumbly, caramelized brown sugar topping.
- Versatile Appeal: This loaf cake is a delightful addition to breakfast, brunch, or as an afternoon treat.
- Make-Ahead Magic: It bakes beautifully ahead of time, making serving a breeze for any occasion.
Ingredients You Need
The quality of your ingredients will significantly impact the final outcome of this delicious pineapple loaf cake. Opting for fresh, vibrant pineapple will certainly enhance the natural sweetness and moisture content. Using good quality butter will contribute to a richer flavor and a more tender crumb in both the cake and the topping.
Pineapple Loaf Cake
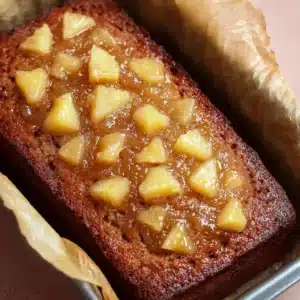
A tender, fruit-filled loaf cake prepared with pineapple juice and diced pineapple, then finished with a buttery brown sugar topping for added texture and caramelized sweetness. It is a great make-ahead dessert for brunch spreads, snack tables, or casual weekend baking.
- For the cake:
- 3/4 cup granulated sugar
- 1/4 cup pineapple juice
- 1 cup all-purpose flour
- 2 large eggs
- 1/4 teaspoon salt
- 1/4 cup milk
- 3/4 teaspoon baking powder
- 1/2 cup diced pineapple
- 1/4 cup unsalted butter, melted and slightly cooled
- 1/4 teaspoon baking soda
- For the topping:
- 1/4 cup all-purpose flour
- 1/4 cup lightly packed brown sugar
- 1/2 cup diced pineapple
- 1/8 cup cold unsalted butter, cut into small pieces
- 1Preheat the oven to 350°F (175°C). Line a 9x5-inch loaf pan with parchment paper, leaving enough excess on the sides to lift the cake out easily after baking.
- 2In a mixing bowl, whisk together the flour, baking powder, baking soda, sugar, and salt until the dry ingredients are evenly combined.
- 3Add the melted butter, milk, eggs, and pineapple juice to the dry mixture. Stir until the batter becomes smooth and fully incorporated.
- 4Fold in the diced pineapple gently so the fruit is distributed evenly throughout the batter.
- 5Transfer the batter to the prepared loaf pan and spread the top evenly. Bake for 30 minutes.
- 6While the cake is in the oven, prepare the topping. In a small bowl, combine the brown sugar and flour. Cut in the cold butter with a fork or pastry cutter until the mixture resembles coarse crumbs, then stir in the diced pineapple.
- 7After the initial 30 minutes of baking, remove the loaf pan carefully from the oven and scatter the topping evenly over the surface of the cake.
- 8Return the pan to the oven and continue baking for 25 to 30 minutes more, or until the top is golden and a toothpick inserted into the center comes out clean.
- 9Remove the loaf from the oven and let it rest in the pan for several minutes. Lift it out using the parchment overhang and transfer it to a wire rack to cool completely before slicing and serving.
Keywords: Pineapple Loaf Cake, Fruit Cake, Easy Bake, Make-Ahead Dessert, Brunch, Snack Cake
The precise quantities for each ingredient are detailed in the recipe card below for your convenience.
Variations
For a delightful dessert experience with a tropical twist, consider transforming this classic into a vibrant vegan treat. To achieve this, you can substitute the eggs with a flax egg (one tablespoon of ground flaxseed mixed with three tablespoons of water, let to sit for five minutes) or a commercial egg replacer, and use a plant-based milk such as almond or oat milk. Ensure your butter is a high-quality vegan alternative, and the result will be a moist and flavorful cake that everyone can enjoy.
If you’re aiming for a lower carbohydrate option, this pineapple loaf cake can be adapted with a few smart substitutions. You could experiment with a blend of almond flour and coconut flour for the base, which will offer a similar texture while significantly reducing the carbohydrate count. Sweeten the cake using a sugar substitute like erythritol or stevia, and for the topping, a mix of almond flour, shredded unsweetened coconut, and a sugar-free sweetener can create a wonderfully crunchy crust without the added sugar.
To elevate this simple loaf into something truly special for a celebration, think about infusing it with complementary flavors. A hint of ginger, either fresh grated or powdered, can add a warm, spicy note that pairs exceptionally well with pineapple. You might also consider adding a touch of lime zest to the batter for an extra burst of citrus brightness, or folding in a handful of toasted macadamia nuts for added crunch and a complementary tropical flavor profile.
How to Prepare Pineapple Loaf Cake
Step 1: Oven Preparation and Pan Lining
Begin by preheating your oven to a moderate 350 degrees Fahrenheit (175 degrees Celsius). This consistent temperature is crucial for even baking, ensuring your loaf cake develops a beautiful golden-brown crust while remaining wonderfully moist inside. Taking the time to get the temperature just right will set the stage for a perfect bake.
Next, prepare your standard loaf pan, which is typically around 9×5 inches. It’s highly recommended to line this pan with parchment paper, ensuring you leave enough overhang on both sides. This overhang acts as convenient handles, allowing you to easily lift the entire baked loaf out of the pan once it’s ready, preventing any sticking and making the process much cleaner.
This careful preparation of the pan ensures that the delicate crumb of the cake, especially around the edges which can sometimes become sticky, is protected. It also greatly simplifies the removal of the cake, particularly after the buttery topping has baked on, making the whole process from baking to serving a more enjoyable experience.
Step 2: Combining Dry Ingredients
In a generously sized mixing bowl, commence by whisking together all your dry ingredients. This typically includes the all-purpose flour, baking powder, baking soda, granulated sugar, and salt. The act of whisking is not merely for combining; it’s to aerate these ingredients and ensure they are perfectly distributed.
This thorough distribution is key because it guarantees that the leavening agents, baking powder and baking soda, are evenly spread throughout the flour mixture. Proper dispersion means the cake will rise evenly, resulting in a consistent texture and a loaf that is not dense in one area and airy in another. It’s a foundational step for achieving that desirable, tender crumb.
Ensuring the dry ingredients are well combined before introducing any wet components helps to prevent lumps and creates a smooth, homogenous batter. This meticulous approach to the dry ingredients lays the groundwork for a perfectly structured and delightfully textured loaf cake, setting the stage for the moist pineapple flavors to shine.
Step 3: Incorporating Wet Ingredients
Now, it’s time to introduce the wet ingredients to your well-mixed dry components. This typically includes melted butter, milk, eggs, and the crucial pineapple juice, which infuses the cake with its signature tropical essence and moisture. Gently add these to the bowl containing the dry mixture.
Using a whisk or a spatula, stir the ingredients together just until the batter becomes smooth and fully incorporated. The goal here is to achieve a cohesive batter, but it’s critically important not to overmix. Overmixing can develop the gluten in the flour too much, which would lead to a tougher, denser cake rather than the tender, soft crumb we are aiming for.
The batter should look uniform, with no pockets of dry flour visible, but it doesn’t need to be vigorously beaten. This careful handling of the batter ensures that the cake’s texture remains delicate and light, allowing the subtle sweetness of the pineapple and the richness of the butter to be the stars of the show, creating a wonderfully moist and enjoyable loaf.
Step 4: Gently Folding in Pineapple
With the batter smooth and ready, it’s time to incorporate the diced pineapple. This ingredient is what gives the loaf cake its characteristic bursts of juicy sweetness and delightful texture. Add the well-drained diced pineapple directly into the prepared batter.
Using a gentle folding motion with a spatula or a large spoon, carefully work the pineapple pieces throughout the batter. The objective is to distribute the fruit evenly without crushing the pineapple chunks. Preserving the integrity of the pineapple pieces ensures that each slice of the loaf cake offers distinct pockets of refreshing fruit flavor and a pleasing textural contrast.
Taking this extra step to fold gently ensures that the pineapple pieces remain whole and unbruised within the batter. This careful incorporation contributes significantly to the overall appeal of the finished cake, guaranteeing delightful surprises of fruit in every bite and enhancing the moistness of the crumb without making the cake overly wet.
Step 5: Initial Baking and Topping Preparation
Carefully transfer the prepared batter into the lined loaf pan, spreading the top evenly to ensure consistent baking. Once the batter is settled in the pan, place it into the preheated oven to begin its initial baking phase. This first baking period is important for setting the structure of the cake.
While the loaf is in the oven for this initial stretch, it’s time to prepare the delightful topping. In a separate small bowl, combine the ingredients for the topping, which typically include all-purpose flour, lightly packed brown sugar, and cold unsalted butter cut into small pieces. You’ll also add the remaining diced pineapple to this mixture.
The key to this topping is the cold butter; you’ll want to rub or cut it into the dry ingredients until the mixture resembles coarse crumbs. This initial baking stage helps the cake batter to firm up slightly, providing a stable base to support the topping, preventing it from sinking too deeply into the batter and ensuring it bakes into a beautifully crumbly, golden layer.
Step 6: Applying the Topping and Final Bake
After the initial baking period, carefully remove the partially baked loaf from the oven. The cake should have started to set and might be lightly golden on top at this point. This is the critical moment to add the prepared topping evenly over the surface of the cake.
Gently scatter the crumbly mixture, incorporating the diced pineapple, across the entire top of the loaf. Ensure an even distribution for a consistent texture and flavor in every slice. This technique ensures the topping bakes into a deliciously crisp and caramelized layer, rather than becoming soggy or falling off.
Return the pan with the topped loaf back into the oven to continue baking. The second phase of baking will allow the topping to turn golden brown and fully set, while the cake itself finishes baking through. Bake until a toothpick inserted into the center comes out clean or with only a few moist crumbs, indicating a perfectly cooked and deliciously finished pineapple loaf cake.
Step 7: Cooling and Resting
Once the pineapple loaf cake is baked to perfection, with a gorgeously golden and fragrant top, remove it from the oven. It’s important to let the cake rest in the loaf pan for a few minutes before attempting to remove it. This short resting period allows the cake to firm up slightly, making it more stable for handling.
Using the parchment paper overhang you strategically left earlier, carefully lift the entire loaf out of the pan. This step is made significantly easier by the parchment, preventing any sticking or damage to the tender crumb or the delightful topping. Place the lifted loaf onto a wire cooling rack.
Allow the cake to cool completely on the wire rack. This cooling process is essential; it allows the internal structure of the cake to fully set and the flavors to meld beautifully. Slicing a warm cake can result in a crumbly mess, whereas a fully cooled cake will slice cleanly, showcasing its beautiful texture and making it ready to enjoy.
Pro Tips for Pineapple Loaf Cake
Drain Pineapple Thoroughly: Always ensure that your diced pineapple, whether fresh or canned, is drained exceptionally well before adding it to the batter or the topping. Excess moisture can lead to a gummy or undercooked center in the loaf, and it can prevent the topping from becoming nicely crisp and caramelized. Blotting the pineapple with paper towels after draining is an excellent extra step.
Don’t Overmix the Batter: Once the wet ingredients are added to the dry, mix only until just combined. Overmixing develops the gluten in the flour, which can result in a tough, chewy loaf instead of the desired tender and soft crumb. A few small lumps are perfectly acceptable and are preferable to overmixing.
Monitor Browning: Keep an eye on the loaf during the latter stages of baking. If the topping begins to brown too quickly before the cake is fully cooked through, you can loosely tent the loaf with aluminum foil. This will protect the topping from burning while allowing the interior of the cake to finish baking evenly.
Room Temperature Ingredients: For the best texture and emulsification, ensure your eggs and milk are at room temperature before starting. This allows them to incorporate more smoothly into the batter, contributing to a more uniform and tender crumb. If you forget to take them out in advance, you can quickly warm eggs by placing them in a bowl of warm water for a few minutes.
Achieve Perfect Crumb Topping: When making the topping, using cold butter that is cut into small pieces is essential for creating that desirable crumbly texture. Rubbing or cutting the butter into the flour and sugar with your fingertips or a pastry blender helps to create small pockets of butter that melt during baking, resulting in a beautifully crisp and flavorful topping.
Serving Suggestions for Pineapple Loaf Cake
Decoration
For a simple yet elegant touch, a light dusting of powdered sugar can offer a classic finish. Alternatively, a drizzle of pineapple glaze, made by mixing powdered sugar with a bit of pineapple juice until a pourable consistency is achieved, can add an extra layer of sweetness and visual appeal. Fresh pineapple wedges or maraschino cherries can also be artfully placed on top for a pop of color and a hint of freshness.
Side Dishes
This pineapple loaf cake pairs wonderfully with a variety of accompaniments that complement its tropical sweetness. A dollop of freshly whipped cream or a scoop of vanilla bean ice cream provides a delightful creamy contrast. For a brunch setting, it is excellent served alongside a fresh fruit salad, perhaps featuring berries or melon, or with a side of crispy bacon.
Creative Serving Ideas
Consider transforming slices of this loaf cake into delightful bread pudding. Cube the cooled cake, soak it in a mixture of milk, eggs, and sugar, and then bake until set for a decadent dessert. For a more elaborate presentation, you could create mini pineapple loaf cakes or use cookie cutters to shape slices into fun forms for a children’s party. A warm slice served with a steaming mug of coffee or a fragrant cup of tea is also a perfect afternoon treat.
Preparation & Storage
Storing Leftovers
Once the pineapple loaf cake has cooled completely, it can be stored at room temperature for up to two days. Ensure it is kept in an airtight container or well-wrapped in plastic wrap to maintain its freshness and prevent it from drying out. If your kitchen tends to be warm, or if you anticipate needing to store it for longer than two days at room temperature, refrigerating it is a safer option.
Freezing
For long-term storage, this pineapple loaf cake freezes exceptionally well. It’s best to freeze the loaf either whole or in individual slices for convenience. Wrap the cake or slices tightly in plastic wrap, then in aluminum foil, or place them in a freezer-safe bag or container. Properly stored, it can maintain its quality in the freezer for up to two months.
Reheating
To enjoy your pineapple loaf cake at its best after refrigeration or freezing, a gentle reheat is recommended. A slice can be warmed in the microwave for approximately 10 to 15 seconds. This short period is usually sufficient to soften the crumb and bring back some of that delightful buttery aroma without overcooking or drying out the cake. If reheating from frozen, allow it to thaw in the refrigerator overnight first.
Frequently Asked Questions
-
Can I use canned pineapple for this loaf?
Absolutely! Canned pineapple is a perfectly suitable substitute for fresh pineapple in this recipe and is often more convenient. The most crucial step, regardless of whether you use fresh or canned, is to drain the pineapple extremely well. Excess liquid from canned pineapple can add too much moisture to the batter, potentially leading to a dense or soggy cake, and it can also inhibit the topping from achieving its desired crispness. After draining, you might even want to lightly pat the pineapple pieces with paper towels to remove any remaining surface moisture before incorporating them into the batter and the topping for the best results.
-
Why is the topping added halfway through baking?
Adding the topping halfway through the baking process is a strategic technique designed to ensure its optimal texture and appearance. If the topping were added at the beginning, the butter and sugar mixture would likely melt and sink into the cake batter, becoming absorbed rather than forming a distinct, crumbly layer. By waiting until the cake batter has started to set, the topping has a more stable surface to rest upon. This allows the butter in the topping to melt gradually, creating pockets of delicious richness, and the flour and sugar to bake into a wonderfully golden, caramelized, and crunchy crust that beautifully contrasts with the soft cake underneath.
-
How do I know when the loaf is done baking?
You can determine if your pineapple loaf cake is ready by observing a few key indicators. The top of the cake should be a lovely golden-brown color, and when gently pressed in the center, it should spring back lightly. The most reliable method is to insert a toothpick or a thin skewer into the thickest part of the loaf, avoiding any large pieces of pineapple. If the toothpick comes out clean or with only a few moist crumbs attached, the cake is perfectly baked; if there is wet batter, it needs more time in the oven. Remember that pineapple naturally adds moisture, so don’t be alarmed if a few moist crumbs cling to the toothpick; this is normal for this recipe.