My Family's Traditional Baklava Recipe – How to Make Baklava!

The aroma of warm spices, the delicate crunch of toasted nuts, and the sweet embrace of syrup – these are the hallmarks of a truly exceptional baklava. This iconic dessert, with its rich history and intricate layers, is a testament to the art of pastry-making and the simple joy of shared indulgence.
While it might appear daunting at first glance, mastering the creation of this classic sweet treat is an achievable and deeply rewarding culinary adventure. Get ready to transform humble ingredients into a golden masterpiece that will captivate your senses and impress your guests.
Why You Will Love This Recipe
- Authentic Flavor Profile: Experience the true taste of traditional baklava, boasting a perfect balance of nutty sweetness and delicate spice, all enveloped in a rich, syrupy glaze.
- Satisfyingly Crispy Texture: Each bite offers a delightful contrast between the impossibly flaky, buttery phyllo dough layers and the hearty, chopped walnut filling.
- Visually Stunning Dessert: With its golden-brown hue and precisely cut diamond shapes, this baklava is a feast for the eyes, perfect for any special occasion or festive gathering.
- Generous Yield: This recipe is designed to produce a substantial pan of baklava, ensuring there are plenty of delectable pieces to share with family and friends.
- Make-Ahead Potential: Baklava often tastes even better the next day, making it an ideal dessert to prepare in advance, reducing stress on entertaining days.
Ingredients You Need
The magic of this baklava recipe lies in its carefully selected ingredients, each playing a crucial role in achieving that signature texture and flavor. Opting for fresh, high-quality components will undoubtedly elevate the final product, turning a good dessert into an unforgettable one. The combination of finely chopped nuts, fragrant spices, and the crispiness of phyllo dough creates a symphony of taste and texture that is simply divine.
Baklava
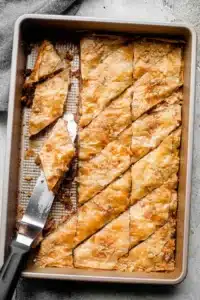
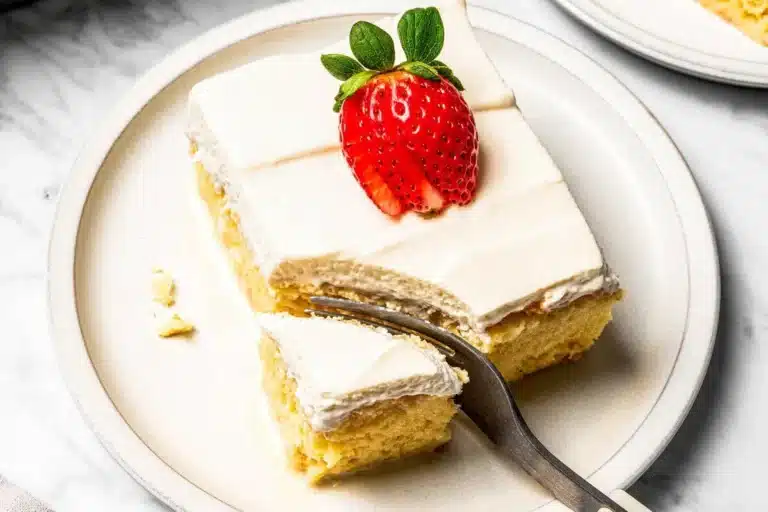
This sweet and crispy baklava recipe is prepared with buttery and flaky sheets of phyllo dough layered with walnuts and topped with a sweet, lemony, simple syrup. Baklava, with its flaky, gooey sweetness, seems to be a universal favorite. Its combination of flavors and textures, especially the contrast between the crisp phyllo sheets and the syrupy walnuts, is simply irresistible.
- For the Simple Syrup: 1 cup water, 1 cup sugar, 1 tablespoon fresh lemon juice
- For the Baklava: 4 cups walnuts, finely chopped; 1 cup granulated sugar; ½ tablespoon lemon zest; 1 teaspoon ground cinnamon; 1 cup unsalted butter, melted; 16 ounces phyllo dough (about 40 sheets), thawed according to directions on the package
- 1For the Simple Syrup: Combine water, sugar, and lemon juice in a saucepan. Set the saucepan over medium-high heat and bring the mixture to a simmer; simmer, occasionally stirring, until the sugar has completely dissolved. Continue to simmer for 5 more minutes. Remove from heat; set aside and let cool down completely.
- 2For the Baklava: Preheat oven to 325°F.
- 3In a large bowl combine chopped walnuts, sugar, lemon zest, and cinnamon. Set aside.
- 4Brush the bottom of a 9×13 baking pan with melted butter. Unroll the phyllo sheets; as you work with them, keep the stack covered with a damp paper towel so they don’t dry out while you’re working. You can also use plastic wrap to cover the stack.
- 5Arrange 10 layers of phyllo sheets into the prepared baking pan, one sheet at a time, brushing each sheet with butter before adding the next. So, layer 1 sheet, brush with butter, then layer the next, brush with butter, and so on.
- 6After buttering the tenth phyllo sheet, sprinkle about ¾ cup of the walnut mixture over the phyllo.
- 7Continue to layer 5 more phyllo sheets, brushing each sheet with butter before adding the next.
- 8Then, sprinkle with a layer of ¾ cup walnut mixture. Repeat this 4 more times.
- 9Finish the baklava with a layer of 10 phyllo sheets and brush the top with more butter.
- 10Cut the baklava into diamond or square shapes; cut through the baklava and down to the bottom of the pan using a sharp knife. You can cut it vertically into 4 long rows and then cut diagonally to make diamond shapes or cut straight across to make square shapes.
- 11Bake for 55 minutes to 1 hour or until the top of the Baklava is golden and crisp.
- 12Remove from the oven and pour the cooled syrup evenly over the entire Baklava.
- 13Let the Baklava cool completely in a dry and cool place. For best results, let Baklava sit overnight.
Do not thaw your phyllo dough on the countertop. Instead, allow it to thaw in the fridge overnight. This will make it easier to work with.
Don’t let the phyllo dry out. When working with the phyllo dough sheets, keep your stack covered with a damp paper towel or tea towel so they don’t dry out while you’re working.
Be generous with the butter! Make sure you brush each sheet of phyllo dough with butter. This is not the place to skimp.
If your phyllo sheets are too large for the pan you are using, use a sharp knife to cut them so they will fit in your pan.
Let your baklava sit overnight at room temperature. This allows the syrup to soak into and soften the layers.
Keywords: baklava, phyllo dough, walnuts, syrup, dessert, sweet, crispy, flaky, German dessert
Please refer to the recipe card above for the precise quantities of each ingredient required to create this exquisite dessert.
Variations
While the classic walnut and cinnamon filling is beloved, baklava offers a wonderfully versatile canvas for culinary creativity. Exploring different nut combinations can introduce delightful new dimensions of flavor and texture to this already spectacular dessert.
For a vibrant and aromatic twist, consider substituting a portion of the walnuts with finely chopped pistachios. Their slightly sweet, earthy notes pair beautifully with the traditional spices and syrup. Alternatively, a blend of almonds and walnuts creates a more complex nutty profile, adding another layer of intrigue to each bite.
To cater to dietary preferences or simply to experiment with novel taste sensations, try incorporating a touch of cardamom or a hint of orange zest into the nut mixture. These subtle additions can transform the familiar flavors into something wonderfully new and exciting, proving that baklava is a dessert open to endless delicious interpretations.
How to Prepare baklava recipe
Step 1: Preparing the Sweet Syrup
The foundation of a sublime baklava is its luscious syrup, which infuses every layer with moist sweetness. Begin by combining one cup of water with one cup of granulated sugar in a medium-sized saucepan. The water acts as the solvent, ensuring the sugar dissolves completely to create a smooth, syrupy consistency.
Place the saucepan over medium-high heat, stirring occasionally to encourage the sugar’s dissolution. Once the sugar has vanished into the liquid, bring the mixture to a gentle simmer. Allow this sweet concoction to bubble away for approximately five more minutes. This brief simmering period helps to thicken the syrup slightly, ensuring it clings beautifully to the phyllo layers rather than simply running off.
After simmering, remove the saucepan from the heat. Squeeze in one tablespoon of fresh lemon juice. The lemon juice is not only crucial for adding a bright, zesty counterpoint to the sweetness but also acts as a natural preservative for the syrup. Set this fragrant syrup aside to cool down completely. It is absolutely vital that the syrup is cool when it is poured over the hot, freshly baked baklava; a cold syrup poured over hot baklava creates the perfect environment for optimal absorption and that signature soft, yet crisp, texture.
Step 2: Preparing the Nut Filling
While the syrup is cooling, turn your attention to crafting the rich and aromatic nut filling. In a spacious mixing bowl, combine four cups of finely chopped walnuts. The fineness of the chop is important; it allows the nuts to distribute evenly throughout the layers and creates a more cohesive filling texture.
To the chopped walnuts, add one cup of granulated sugar. This sugar will not only sweeten the filling but also help bind the nuts together slightly. Introduce half a tablespoon of finely grated lemon zest to the mixture. The citrusy zest provides a bright, aromatic lift that beautifully cuts through the richness of the nuts and butter, offering a welcome contrast.
Next, add one teaspoon of ground cinnamon. Cinnamon is the quintessential spice for baklava, imparting warmth and depth that is instantly recognizable. Mix all these dry ingredients together thoroughly, ensuring the spices and sugar are evenly distributed amongst the walnuts. This fragrant mixture is now ready to be layered between the delicate phyllo sheets.
Step 3: Assembling the Baklava Layers
This is where the artistry of baklava truly comes to life, requiring patience and a gentle touch. Preheat your oven to a moderate 325°F (160°C). Prepare a 9×13 inch baking pan by generously brushing its bottom and sides with melted unsalted butter. This initial buttering provides a non-stick surface and a foundational layer of richness.
Carefully unroll your phyllo dough. Phyllo is notoriously delicate and dries out very quickly. To prevent this, keep the stack of unused phyllo sheets covered at all times with a slightly damp paper towel or a clean, damp kitchen towel. You can also use plastic wrap for an extra layer of protection against air exposure.
Begin by layering ten sheets of phyllo dough into the prepared baking pan, one sheet at a time. After placing each individual sheet, use a pastry brush to generously coat its entire surface with melted butter. This meticulous buttering is key to achieving those wonderfully crisp, flaky layers that define excellent baklava. It acts as the glue and the crisping agent, creating distinct layers.
Once the tenth buttered phyllo sheet is in place, evenly sprinkle about three-quarters of a cup of the prepared walnut mixture over its surface. Gently press the nuts down slightly to ensure they adhere to the buttered phyllo. This forms your first substantial layer of filling.
Continue this layering process by adding five more sheets of phyllo dough, again buttering each one meticulously. After the fifth buttered sheet, sprinkle another three-quarters of a cup of the walnut mixture evenly over the top. Repeat this sequence – five buttered phyllo sheets followed by three-quarters of a cup of nut mixture – four more times. This methodical approach builds up the intricate structure of the baklava.
Finally, top the assembled layers with the remaining ten sheets of phyllo dough. Ensure each of these top sheets is also generously brushed with melted butter, paying particular attention to creating a smooth, even coating on the very top layer. This final buttering contributes significantly to the golden-brown color and crispy finish of the baked baklava.
Step 4: Cutting the Baklava
Before baking, it is essential to pre-cut the baklava into its intended serving portions. This step ensures that the syrup can penetrate all the way to the bottom and that the pieces are easily separated after baking. Use a very sharp knife for this task to get clean cuts without tearing the delicate phyllo layers.
You can choose to cut the baklava into diamond shapes or neat squares. For diamonds, make four long, parallel cuts down the length of the pan, dividing it into four equal strips. Then, starting from one corner, cut diagonally across each strip to create a series of diamond shapes. Alternatively, for squares, simply cut straight across the pan both lengthwise and widthwise at your desired intervals.
It is crucial to cut all the way through the baklava, down to the very bottom of the pan. This thorough scoring ensures that when the syrup is poured over the top, it can seep down into every crevice, moistening and flavoring all the layers. A dull knife will tear the pastry and make the process messy, so a sharp implement is your best friend here.
Step 5: Baking to Golden Perfection
Now it’s time to transform the assembled pastry into a golden masterpiece. Place the pan with the scored baklava into the preheated oven at 325°F (160°C). Allow it to bake for approximately 55 minutes to 1 hour. The baking time can vary slightly depending on your oven’s performance and the humidity levels.
You are looking for the top of the baklava to turn a beautiful, deep golden-brown color. The edges should appear crisp and slightly caramelized, indicating that the phyllo has achieved its characteristic flakiness. If the top starts to brown too quickly, you can loosely tent the pan with aluminum foil for the remainder of the baking time, but ensure it’s not sealed tightly to allow steam to escape.
Once the baklava is perfectly golden and looks irresistibly crisp, carefully remove it from the oven. Have your completely cooled syrup ready. While the baklava is still hot from the oven, slowly and evenly pour the cooled syrup all over the entire surface. You should hear a satisfying sizzle as the cold syrup hits the hot pastry, signifying the start of the absorption process.
Step 6: Cooling and Resting for Maximum Flavor
The final stage of preparing baklava is perhaps the most important for achieving its signature texture and allowing the flavors to meld. After pouring the cooled syrup over the hot baklava, resist the urge to cut into it immediately. Allow the baklava to cool completely in a dry and cool place, away from any drafts that might cause it to dry out unevenly.
For the absolute best results and to ensure the syrup has fully permeated every single layer, it is highly recommended to let the baklava sit overnight before serving. This extended resting period allows the syrup to be absorbed thoroughly into the phyllo and nut layers, softening them slightly while enhancing the overall flavor profile. The textures will meld beautifully, creating a dessert that is both crisp and delightfully moist.
This patient waiting period is crucial. It transforms the baklava from a freshly baked item into a truly exquisite dessert, where the delicate crunch of the phyllo meets the syrupy sweetness in perfect harmony. By allowing it to rest, you guarantee that each bite will be a delightful experience of perfectly balanced flavors and textures.
Pro Tips for baklava recipe
Don’t Rush the Phyllo Thawing: For the easiest handling, always thaw your phyllo dough in the refrigerator overnight as per package instructions. Rushing this process by thawing at room temperature can lead to sticky, unmanageable sheets that tear easily.
Keep Phyllo Covered: Phyllo dough is incredibly sensitive to air and will dry out in minutes, becoming brittle and difficult to work with. Always keep the stack of phyllo sheets you are not actively using covered with a slightly damp (not wet) paper towel or a clean kitchen towel. This simple step is crucial for maintaining its pliability.
Be Generous with the Butter: The butter is your best friend in achieving those incredibly crisp, golden layers. Don’t be shy with the melted butter; brush each and every sheet of phyllo thoroughly. This isn’t a place to skimp, as it’s what separates each delicate layer and provides that irresistible flaky texture.
Cool Syrup, Hot Baklava: The temperature contrast is vital for the syrup to be absorbed correctly. Ensure your syrup has cooled completely while your baklava is hot from the oven. Pouring cold syrup over hot pastry creates the perfect environment for the syrup to seep into all the layers without making the pastry soggy.
The Overnight Rest is Essential: While tempting to serve immediately, allowing the baklava to rest overnight at room temperature is non-negotiable for the best texture and flavor. This extended period allows the syrup to fully penetrate and soften the layers, creating that signature moist, yet still crisp, experience. Patience here is rewarded immensely.
Serving Suggestions for baklava recipe
Decoration
Once your baklava has rested and achieved its perfect state of syrupy bliss, it’s time to consider presentation. While the golden-brown perfection of the baked pastry itself is inherently beautiful, a few thoughtful decorative touches can elevate it further. A light dusting of finely chopped pistachios over the top, especially on the diamond-shaped cuts, adds a vibrant pop of green and a subtle textural contrast.
Alternatively, a few slivers of toasted almonds strategically placed on each piece can offer a different nutty visual appeal. For a more elaborate touch, consider a very fine drizzle of honey or a light dusting of edible gold leaf for truly special occasions. The goal is to enhance, not overpower, the natural beauty of the baklava.
Side Dishes
Baklava is a rich, sweet dessert that truly shines on its own. However, when served as part of a larger dessert spread or a celebratory meal, certain accompaniments can provide delightful complements or palate cleansers. A dollop of thick, unsweetened Greek yogurt or a small scoop of plain vanilla bean ice cream can offer a cooling, creamy contrast to the intense sweetness and crispiness of the baklava.
Fresh fruit, particularly berries like raspberries or strawberries, can also provide a refreshing tartness that balances the richness of the dessert. For those who enjoy coffee or tea with their sweets, a strong, dark coffee or a fragrant herbal tea makes for an excellent accompanying beverage. The complexity of the coffee or the soothing nature of the tea can beautifully frame the intense flavors of the baklava.
Creative Serving Ideas
Beyond the traditional diamond or square cuts, think outside the box for unique ways to present this classic dessert. Consider cutting slightly larger pieces and serving them warm, perhaps with a small pitcher of extra syrup on the side for those who desire an even more decadent experience. This “deconstructed” approach allows guests to customize their own syrup level.
Another creative idea is to incorporate baklava into other desserts. Crumbled baklava can be a fantastic topping for ice cream sundaes, layered into parfaits with yogurt and fruit, or even used as a base for mini cheesecakes. You could also bake smaller, individual portions in mini muffin tins for charming bite-sized treats, perfect for parties and gatherings.
Preparation & Storage
Storing Leftovers
Proper storage is key to maintaining the delightful texture and flavor of your baklava. Once completely cooled, transfer any leftover baklava to an airtight container. It’s best to store the baklava at room temperature, rather than in the refrigerator, as the cooler temperatures can sometimes make the phyllo dough tough and the syrup too solid. Ensure the container is well-sealed to prevent moisture from affecting the crispiness.
When stored correctly in an airtight container at room temperature, baklava can maintain its deliciousness for approximately 10 to 14 days. This long shelf life makes it an excellent dessert to have on hand for unexpected guests or for enjoying over an extended period. The flavors often meld and deepen beautifully over these days, making it even more enjoyable as time goes on.
Freezing
Baklava freezes exceptionally well, making it an ideal candidate for making ahead of time or for preserving any surplus. For the best results, it’s recommended to freeze the baklava *before* baking. Assemble the entire pan as directed in the recipe, but do not bake it. Once assembled and cut into portions, wrap the entire pan tightly in plastic wrap, followed by a layer of aluminum foil to protect it from freezer burn.
When properly wrapped, the unbaked baklava can be stored in the freezer for up to 3 months. This allows you to prepare a large batch during a less busy time and bake it fresh whenever the craving strikes. It’s a fantastic strategy for holiday baking or for ensuring you always have a homemade dessert ready to impress.
Reheating
If you have frozen your baklava, or simply wish to refresh leftover baklava that has become a bit stale, reheating is a straightforward process. For unbaked baklava that has been frozen, simply remove it from the freezer and allow it to thaw completely on the kitchen counter. Once thawed, bake it according to the recipe’s instructions, ensuring it turns golden brown and crispy. You may need to add a few extra minutes to the baking time if it’s still slightly chilled.
For leftover baked baklava that has lost some of its crispness, you can gently reheat it. Place the pieces on a baking sheet and warm them in a preheated oven at a low temperature, around 250°F (120°C), for about 5-10 minutes. This gentle heat will help to re-crisp the phyllo layers and slightly warm the syrup without overcooking. Avoid microwaving, as this can make the pastry soggy.
Frequently Asked Questions
-
Why is my baklava soggy instead of crispy?
A soggy baklava is a common concern, but usually fixable with attention to a few key details. The most frequent culprits are using a warm syrup on hot baklava, or not allowing sufficient resting time for the syrup to absorb properly. If the syrup is too hot when poured, it can steam the phyllo layers instead of crisping them. Conversely, pouring a cooled syrup onto completely cooled baklava will not allow for adequate penetration and softening. The ideal scenario involves hot, freshly baked baklava meeting completely cooled syrup. Furthermore, insufficient resting time is critical; the baklava needs to sit overnight to allow the syrup to fully permeate the layers and create that signature texture contrast between crisp and moist. Ensuring your storage method also keeps moisture out is important; an airtight container at room temperature is best, as refrigeration can sometimes make the pastry tough.
-
Can I use different nuts in my baklava?
Absolutely! While walnuts are traditional and create a wonderful depth of flavor, baklava is incredibly versatile when it comes to nuts. Pistachios are a popular and delicious alternative, offering a slightly sweeter, more delicate flavor and a beautiful green hue. A combination of pistachios and almonds, or almonds and walnuts, can also create a more complex and interesting nutty profile. Macadamia nuts, with their rich, buttery texture, are another excellent option for a luxurious twist. When substituting, aim for a similar chop size to ensure even distribution within the layers. You can also experiment with adding a pinch of a complementary spice, like cardamom, to accent the chosen nuts, further personalizing your baklava experience.
-
How can I prevent the phyllo dough from drying out while I work?
Working with phyllo dough requires a gentle touch and a good strategy to prevent it from drying out, which is its primary nemesis. The key is to keep the phyllo covered at all times when you are not actively layering it. Once you unroll the package, immediately cover the stack of sheets with a slightly damp (but not wet) paper towel or a clean, lint-free kitchen towel. Some bakers also prefer to use plastic wrap over the damp towel for an extra layer of protection against air. It’s also beneficial to work efficiently; have your butter melted and pastry brush ready before you even open the phyllo package. Assemble the layers methodically, and only uncover the sheets you are about to use, immediately re-covering the rest. If a sheet does become a bit dry, it can sometimes be salvaged by gently brushing it with butter, but it will be more prone to tearing.