Yuzu Coconut Layer Cake
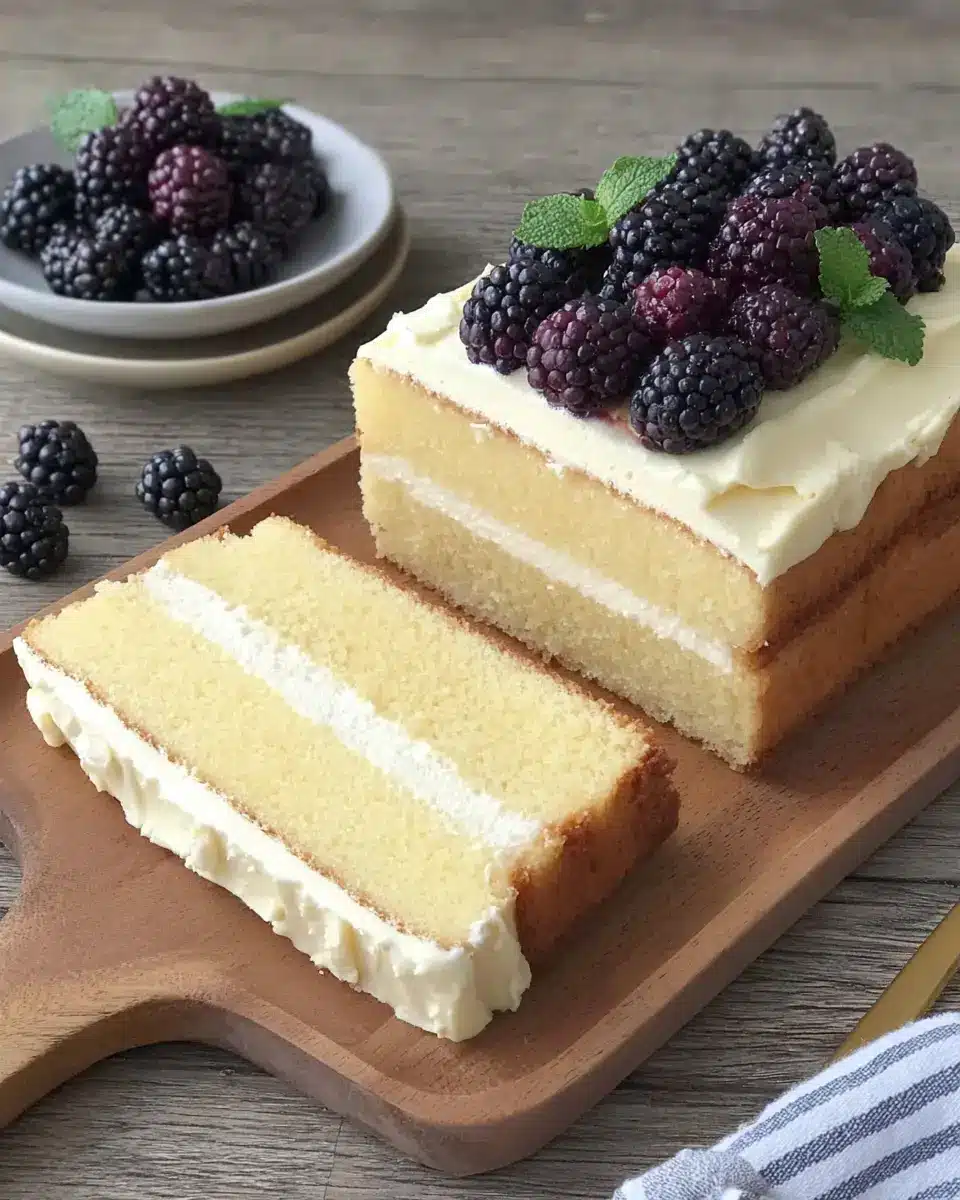
Creamy, bright, and make-ahead friendly, Yuzu Coconut Cake brings together airy citrus sponge, cool coconut mascarpone cream, and a light fruit finish for a dessert that feels elegant without being overly heavy.
This is the kind of cake that fits beautifully into spring gatherings, birthdays, or any meal where you want something soft, chilled, and a little different from the usual vanilla or chocolate option. The yuzu note keeps the sponge lively, while the coconut cream gives every slice a mellow, silky finish.
Why You Will Love This Recipe
- Delicate Citrus Sponge: The yuzu infused sponge cake offers a light, airy texture with a wonderfully bright and fragrant citrus zest that isn’t overpowering. It’s the perfect base for the creamy filling, providing a subtle tang and floral notes that make each bite exciting.
- Silky Coconut Mascarpone Cream: This filling is decadently smooth, rich, and subtly sweet with a gentle coconut undertone. It creates a luscious layer that complements the sponge beautifully, offering a cool and creamy counterpoint to the cake’s texture.
- Effortless Elegance: Despite its sophisticated appearance and delightful flavors, this cake is surprisingly approachable to make. The steps are clear, and the combination of ingredients results in a dessert that looks and tastes gourmet without requiring advanced pastry skills.
- Perfect for Any Occasion: Whether it’s a celebratory birthday, a refreshing spring dessert, or a special treat to end a dinner party, this Yuzu Coconut Cake is a versatile choice. Its unique flavor profile is sure to impress and delight your guests.
- Make-Ahead Convenience: This cake is designed for success even when prepared in advance. The sponge can be baked a day ahead, and the assembled cake benefits from chilling, allowing flavors to meld and ensuring easier slicing for a perfect presentation.
Ingredients You Need
The success of any exceptional cake lies in the quality of its ingredients, and this Yuzu Coconut Cake is no exception. Opting for fresh, high-quality components will elevate the final taste and texture significantly, ensuring a truly memorable dessert experience. From the fragrant yuzu to the rich mascarpone, each element plays a crucial role in creating this delightful treat.
Yuzu Coconut Cake

A creamy, bright, and make-ahead friendly Yuzu Coconut Cake featuring an airy citrus sponge, cool coconut mascarpone cream, and a light fruit finish. This dessert feels elegant without being overly heavy, perfect for spring gatherings, birthdays, or any meal where you desire something soft, chilled, and a little different.
- 53 g cake flour, sifted
- 3 tsp yuja cha (Korean citron tea marmalade)
- 10 g brown sugar
- 30 g brown sugar
- 3 egg whites, at room temperature
- 10 ml whole milk
- 3 egg yolks
- 50 g superfine sugar
- 35 ml water
- 2 large egg yolks
- 180 g cold mascarpone cheese
- 2 tsp unsweetened grated coconut
- 135 g cold whipping cream
- 4.8 g powdered gelatin, bloomed in water
- 2 tbsp shredded coconut, toasted
- 10 frozen blackberries, thawed
- 1Prepare the yuzu sponge cake using your preferred basic sponge cake method with the listed sponge ingredients. After baking, leave the cake to cool fully before continuing, as a warm cake may cause the cream to soften.
- 2For the coconut mascarpone cream, scatter the powdered gelatin over the cold water in a small bowl. Set it aside so the gelatin can absorb the liquid and soften.
- 3Pour the whipping cream into a chilled mixing bowl and beat on high speed until it reaches a very soft ribbon stage. Do not whip it to peaks. Transfer it to the refrigerator while the remaining filling components are prepared.
- 4Bring a small amount of water to a boil in a saucepan, then lower the heat to a gentle simmer. In a separate heatproof bowl, whisk together the egg yolks, the measured water, and the superfine sugar. Set the bowl over the simmering water and whisk continuously until the mixture reaches at least 74°C. Remove it from the heat once the temperature is reached.
- 5Whisk the softened gelatin into the warm yolk mixture until thoroughly incorporated. Add the mascarpone and mix until the texture is smooth and free from lumps. Stir in the grated coconut to complete the base of the filling.
- 6Remove the softly whipped cream from the refrigerator and fold it gently into the mascarpone mixture. Continue folding until the cream is evenly combined and reaches a soft-peak consistency. Refrigerate the coconut mascarpone cream for about 30 minutes so it can firm slightly.
- 7Slice the cooled sponge cake into two layers. Spread a generous portion of the chilled coconut mascarpone cream over one layer, then place the second layer on top and press lightly. Additional cream may be spread over the top, or reserved for serving.
- 8Finish the cake with the thawed blackberries and a scattering of toasted shredded coconut before serving.
Keywords: Yuzu Coconut Cake, Citrus Cake, Coconut Cream Cake, Make-ahead Dessert, Spring Dessert, Make-ahead Cake
The specific quantities and measurements for each ingredient can be found within the detailed recipe card. Paying close attention to these will ensure the perfect balance of flavors and the desired consistency for both the sponge and the creamy filling.
Variations
For those looking to adapt this Yuzu Coconut Cake to specific dietary needs or flavor preferences, several exciting variations can be explored. These modifications allow for personalization while maintaining the cake’s delightful essence.
Vegan Adaptation: To create a vegan version, you would replace the eggs in the sponge with a flax egg or commercial egg replacer, and use a plant-based milk like almond or soy. For the filling, a combination of silken tofu blended with coconut cream and a touch of agar-agar or vegan gelatin substitute would provide a creamy texture. Ensure your sugar is vegan as well. This transforms the cake into a wholly plant-based delight that is just as luscious and satisfying.
Low-Carb or Keto Friendly: Transforming this cake into a keto-friendly option involves strategic substitutions. Use almond flour or coconut flour instead of cake flour for the sponge, and swap the sugars for a suitable keto-friendly sweetener like erythritol or stevia blend. For the filling, mascarpone and heavy cream are generally keto-friendly, but ensure any added thickeners like gelatin are pure. This variation caters to those following a low-carbohydrate lifestyle without sacrificing flavor.
Citrus Intensity Play: While yuzu is unique, you can adjust the citrus profile. For a brighter, more floral note, consider a blend of yuzu and Meyer lemon zest. If yuzu is unavailable, a good quality orange or grapefruit marmalade can offer a similar marmalade-like sweetness and tang, though the specific aromatic quality of yuzu will be missed. Experimenting with different citrus zest proportions can also fine-tune the intensity to your liking.
How to Prepare Yuzu Coconut Cake
Step 1: Crafting the Yuzu Sponge Base
The foundation of our exquisite Yuzu Coconut Cake is a light and airy sponge. Begin by gently combining the egg yolks with a larger portion of the brown sugar in a mixing bowl. Whisk these together until the mixture achieves a noticeably lighter color and a slightly thickened consistency, indicating that the sugar has begun to dissolve and emulsify with the yolks.
In a separate, small container, whisk together the yuja cha, also known as Korean citron tea marmalade, with the whole milk. This step is crucial for ensuring the unique yuzu flavor is evenly distributed throughout the batter. The warmth of the milk can help to slightly soften the marmalade, making it easier to incorporate into the cake mixture later on. This aromatic blend sets the stage for the cake’s distinctive citrus notes, promising a bright and fragrant outcome.
For that essential lightness, the egg whites must be whipped to perfection. In a meticulously clean, dry bowl, beat the egg whites until they become foamy and begin to form soft peaks. Gradually introduce the remaining smaller amount of brown sugar while continuing to beat. The goal here is to achieve stiff, glossy peaks, which signifies that the egg whites have been sufficiently aerated and stabilized. This aeration is key to the sponge’s airy crumb, providing structure and volume without denseness. Once the whites are at this stage, it’s time to bring the two mixtures together.
Gently fold the yolk mixture into the whipped egg whites. Use a spatula and a deliberate, upward-folding motion to preserve as much of the air incorporated into the whites as possible. This careful folding ensures a tender crumb. Following this, sift the cake flour directly over the combined mixture. Sifting prevents lumps and allows the flour to integrate smoothly. Continue to fold, just until no dry streaks of flour are visible; overmixing can develop gluten and result in a tougher cake. This delicate process of combining ingredients is paramount to achieving the desired light and tender texture characteristic of a superior sponge cake.
Bake this delicate batter using your established preferred sponge cake method. The specific oven temperature and baking time will depend on your oven and the size of your baking pan. It’s vital to bake it until a skewer inserted into the center comes out clean, signaling it’s fully cooked. Once baked, allow the cake to cool completely on a wire rack. This cooling period is essential; a warm cake will melt the mascarpone cream, leading to a structurally unsound and messy dessert. Patience here ensures a solid foundation for assembly, preventing the cake from collapsing under the weight of the filling.
Step 2: Preparing the Silky Coconut Mascarpone Cream
The luscious filling is what truly elevates this Yuzu Coconut Cake, providing a creamy, decadent contrast to the light sponge. To begin, take a small bowl and sprinkle the powdered gelatin evenly over the measured cold water. Allow this mixture to sit undisturbed for about 5-10 minutes; this process, known as blooming, allows the gelatin granules to absorb all the water and soften completely, preparing them to dissolve smoothly.
In a separate, thoroughly chilled mixing bowl, pour the cold whipping cream. Whip this cream on high speed until it reaches a soft ribbon stage. This means that when you lift the whisk, the cream falls back in thick ribbons that slowly melt into the rest of the cream. It’s crucial not to over-whip it to stiff peaks, as this will make the filling too dense and less spreadable. Once this stage is reached, transfer the bowl of softly whipped cream to the refrigerator to keep it cold while you proceed with the next steps.
To create a stable, luscious mascarpone base, set up a double boiler. Fill a small saucepan with a few inches of water and bring it to a gentle simmer over medium-low heat, then reduce the heat to maintain a low simmer. In a heatproof bowl that fits snugly over the saucepan without touching the water, whisk together the egg yolks, superfine sugar, and a small measured amount of water. This mixture will be gently heated and whisked continuously until it reaches a safe, thickened stage, typically around 74°C (165°F) if you are using a thermometer. This cooking process safely pasteurizes the egg yolks while creating a smooth, rich base for the filling.
Once the yolk mixture has reached the desired temperature and consistency, remove the bowl from the heat. Immediately whisk in the bloomed and softened gelatin until it is completely dissolved and no granules remain. This ensures the gelatin is evenly distributed, which is vital for setting the cream. Next, add the cold mascarpone cheese to the warm yolk and gelatin mixture. Whisk vigorously or use a hand mixer on low speed until the mascarpone is thoroughly incorporated and the mixture is smooth and creamy, free from any lumps.
To infuse a subtle yet distinct coconut flavor throughout the filling, stir in the unsweetened grated coconut. This addition lends a delicate aroma and a faint chewiness that complements the smooth cream. Ensure it’s well distributed. The base of your filling is now ready, rich and flavorful, but still in a liquid state. The next step is to combine this with the chilled whipped cream to achieve the perfect, airy consistency.
Retrieve the softly whipped cream from the refrigerator. Gently fold it into the mascarpone mixture in two or three additions. Use a large spatula and employ a gentle folding motion, starting from the bottom of the bowl and bringing it up and over the cream. This technique is vital for maintaining the airiness of the whipped cream. Continue folding until the cream is just combined and the mixture has a homogenous, soft-peak consistency. Take your time to ensure the filling remains light and fluffy rather than dense and heavy. Once fully combined, the cream needs a brief period of chilling. Refrigerate the filling for approximately 30 minutes. This allows it to firm up slightly, making it much easier to spread evenly between the cake layers without it running or being too liquid.
Step 3: Assembling the Yuzu Coconut Cake
With both the yuzu sponge cake and the chilled coconut mascarpone cream ready, the assembly process can begin. Carefully take your completely cooled sponge cake and slice it horizontally into two even layers. A long, serrated knife works best for this, allowing for a clean cut without tearing the delicate cake. If the cake has a domed top, you can gently trim it flat to ensure a stable base.
Place the bottom cake layer onto your serving plate or cake stand. Using an offset spatula or a regular spatula, spread a generous and even layer of the chilled coconut mascarpone cream over the entire surface of this first cake layer. Ensure the cream extends almost to the edges, creating a consistent filling throughout. This luscious layer will provide moisture and a rich flavor to every bite of the cake.
Carefully place the second cake layer on top of the cream-covered first layer. Gently press down on the top layer to ensure it is level and adheres well to the cream filling. This light pressure helps to stabilize the cake and ensures clean slices later on. If you have any extra cream, you can apply a thin layer over the top of the cake at this stage, or reserve it to add dollops on individual servings.
The final touch involves the garnishes, which add both visual appeal and contrasting textures and flavors. Scatter the thawed blackberries evenly over the top of the cake. Their vibrant color and tartness provide a beautiful contrast to the sweet, creamy filling. Following the berries, sprinkle the toasted shredded coconut over the top. The toasting process enhances the coconut’s nutty aroma and adds a delightful crispness. This combination of fresh berries and toasted coconut creates a visually stunning and palate-pleasing finish.
Step 4: Chilling for Perfection
Once the cake is assembled and beautifully garnished, it’s imperative to allow it to chill properly. Place the entire cake in the refrigerator for at least 1-2 hours, or ideally longer if time permits. This chilling period is not just about aesthetics; it’s critical for the cake’s structure and flavor development.
During chilling, the gelatin in the mascarpone cream fully sets, firming up the filling to a sliceable consistency. This prevents the layers from sliding apart when cut. Furthermore, the flavors have time to meld together, allowing the bright citrus notes of the yuzu to harmonize with the creamy coconut and the tartness of the blackberries. A well-chilled cake will slice much more cleanly, presenting beautiful layers and a neat appearance.
The chilled temperature also enhances the refreshing quality of the cake, making it particularly delightful on a warm day or after a rich meal. Serving the cake cold ensures that the mascarpone filling remains firm and the textures are at their best. This step is the quiet hero of a successful Yuzu Coconut Cake, transforming it from a collection of components into a cohesive, exquisite dessert.
Pro Tips for Yuzu Coconut Cake
Temperature is Key: Ensure your mascarpone cheese and whipping cream are very cold straight from the refrigerator before you begin making the filling. This is crucial for achieving the correct consistency and preventing the filling from becoming too soft or oily.
Gentle Folding: When incorporating the whipped egg whites into the yolk mixture for the sponge, be extremely gentle. Overmixing or aggressive folding will deflate the air pockets, resulting in a dense cake instead of the desired airy, light texture.
Toast Coconut Wisely: Toast the shredded coconut until it’s just fragrant and lightly golden brown. Keep a close eye on it as it can burn very quickly, which will impart a bitter flavor rather than a desirable nutty aroma to the garnish.
Cooling is Crucial: Allow the sponge cake to cool completely before slicing and assembling. A warm cake will melt the mascarpone cream, leading to a runny filling and a structurally compromised cake that is difficult to serve neatly.
Resting Period: After assembly, refrigerate the cake for at least 1-2 hours. This chilling time allows the filling to set properly, the flavors to meld beautifully, and ensures that the cake will slice cleanly, showcasing its delicate layers.
Serving Suggestions for Yuzu Coconut Cake
Decoration
The inherent beauty of this Yuzu Coconut Cake lies in its simplicity, but a few touches can elevate its visual appeal. The scattered blackberries provide a vibrant splash of color and a fresh, natural look. Adding a final dusting of powdered sugar can create a delicate, snowy effect, particularly lovely for a winter or holiday gathering. If you desire a more elaborate finish, consider piping a few rosettes of the leftover mascarpone cream around the edges or on top of the cake before adding the berries. Fresh mint leaves, strategically placed, offer a bright green contrast and a hint of refreshing aroma.
Side Dishes
This cake is wonderfully balanced on its own, but a few accompaniments can create a more complete dessert experience. A small scoop of simple vanilla bean ice cream or a dollop of unsweetened whipped cream can add another layer of cool creaminess. For a refreshing counterpoint, a small bowl of fresh mixed berries—raspberries, blueberries, or even more blackberries—works beautifully, echoing the flavors already present in the cake. A delicate shortbread cookie or a crisp almond biscotti can provide a pleasant textural contrast to the soft cake and creamy filling.
Creative Serving Ideas
Beyond the traditional slice, consider serving this Yuzu Coconut Cake in individual portions for an elegant presentation. Small glasses or parfait dishes can showcase the distinct layers of cake and cream, making for an eye-catching dessert. A drizzle of honey or a light yuzu syrup over the top just before serving can add an extra touch of sweetness and citrus intensity. For a tea party setting, serve miniature versions of the cake, allowing guests to sample this delightful flavor combination in a bite-sized format. A sprig of fresh mint or a candied yuzu peel can add a sophisticated flourish to these smaller servings.
Preparation & Storage
Storing Leftovers
To keep your Yuzu Coconut Cake tasting its best, proper storage is key. The finished cake should be stored in an airtight container in the refrigerator. Due to the presence of mascarpone cheese and whipped cream, it’s essential to keep it chilled. The cake will remain fresh and delicious for up to 3 days when stored correctly. Ensure the container is sealed tightly to prevent the cake from drying out or absorbing other odors from the refrigerator.
Before serving leftovers, allow the cake to sit at room temperature for about 10-15 minutes. This short resting period will slightly soften the chilled mascarpone cream, making it easier to slice and enhancing its creamy texture without compromising the cake’s structural integrity. Serving it too cold can make the filling quite firm and less appealingly smooth.
Freezing
Freezing the fully assembled Yuzu Coconut Cake is generally not recommended, as the texture of the mascarpone cream and whipped cream can be compromised upon thawing, potentially becoming watery or grainy. However, the individual sponge cake layers can be frozen quite successfully. Once baked and completely cooled, wrap each layer tightly in several layers of plastic wrap, followed by a layer of aluminum foil. This double-wrapping prevents freezer burn.
Thaw the frozen sponge cake layers overnight in the refrigerator before assembling the cake. This method helps maintain the cake’s moisture and texture. If you must freeze a slice of the assembled cake, do so individually wrapped and be prepared for a slight change in cream texture after thawing. It’s best to add fresh berries as a garnish after thawing if you choose this route.
Reheating
This Yuzu Coconut Cake is designed to be served chilled, so reheating is not typically necessary. In fact, attempting to reheat the cake would likely melt the creamy filling and ruin its delicate texture. The goal is to enjoy the cool, refreshing qualities of the mascarpone cream and the moistness of the yuzu sponge.
If you find the cake has become too firm from extended refrigeration, the brief resting period at room temperature is the only ‘reheating’ method required. This is more of a tempering process than actual reheating, allowing the components to reach an optimal serving temperature. Focus on the chilling aspect for its ideal enjoyment, rather than any form of warming.
Frequently Asked Questions
-
Can I make the Yuzu Coconut Cake ahead of time for a party?
Yes, this Yuzu Coconut Cake is an excellent make-ahead dessert, making it ideal for entertaining. You can bake the yuzu sponge cake layers up to 24 hours in advance and store them, well-wrapped, at room temperature or in the refrigerator. The coconut mascarpone cream can also be prepared a few hours ahead of assembly and kept chilled. Once the cake is fully assembled with the cream and garnished, it benefits from at least 1-2 hours (or even up to 12 hours) of chilling in the refrigerator. This allows the flavors to meld beautifully and ensures the cream filling sets perfectly, making for cleaner slices and a more cohesive dessert.
-
What can I use if I can’t find yuzu or yuja cha for the cake?
If fresh yuzu or yuja cha (Korean citron tea marmalade) is unavailable, you have a few good alternatives that can still impart a lovely citrus flavor to the cake. For a similar sweet-tart citrus profile, you could substitute with a good quality lemon marmalade, ensuring it’s not too bitter. Alternatively, a blend of finely grated zest from one lemon and one lime, combined with a tablespoon of honey or agave syrup, can provide a bright and fragrant citrus kick. Orange marmalade is also an option, though it will offer a sweeter, less tangy flavor profile. When making a substitution, always taste the mixture and adjust sweetness as needed to achieve a balanced citrus note for your sponge.
-
My mascarpone cream is too soft and won’t set; what went wrong?
There are a few common reasons why mascarpone cream might remain too soft. Firstly, ensure that both the mascarpone cheese and the whipping cream were very cold when you started preparing the filling; room temperature ingredients will not whip properly. Secondly, the egg yolk mixture needs to be cooked to a sufficient temperature to help thicken, and the gelatin must be fully bloomed and dissolved. Overheating or under-whipping the cream can also be a culprit; it should only reach a soft ribbon stage, not stiff peaks, as it will continue to thicken when folded into the mascarpone base. If the mixture is still too soft after chilling, try refrigerating it for an additional 30-60 minutes, stirring gently every 15 minutes, to help it firm up before assembly.