Cheesy Chicken Cannelloni Recipe – How to Make Cannelloni!
This baked chicken cannelloni is a true delight for any occasion, marrying tender pasta tubes with a rich, savory filling. The combination of seasoned chicken, creamy ricotta, and vibrant spinach creates a symphony of flavors that will undoubtedly become a family favorite.
It’s an elegant yet approachable dish, perfect for weeknight dinners or for impressing guests without spending hours in the kitchen. The creamy sauce that blankets the cannelloni adds a luxurious touch, making every bite an indulgence.
Why You Will Love This Recipe
- Effortless Elegance: This dish looks and tastes sophisticated, but it’s surprisingly simple to prepare, making it perfect for both casual family meals and special gatherings.
- Flavorful Filling: The expertly seasoned chicken, creamy ricotta, and fresh spinach create a well-balanced and incredibly delicious stuffing for the cannelloni.
- Creamy Indulgence: A luscious sauce made with half-and-half and Parmesan cheese coats the cannelloni, adding a rich, decadent finish to every bite.
- Make-Ahead Magic: This recipe is a fantastic make-ahead option, allowing you to assemble it in advance and simply bake it when you’re ready to serve, saving precious time.
- Customizable Comfort: While this recipe is perfect as is, it also offers flexibility, allowing you to adapt it to your family’s preferences with ease.
Ingredients You Need
The success of any great dish lies in the quality of its ingredients, and this chicken cannelloni is no exception. Opting for fresh, high-quality components will elevate the final flavor profile significantly, ensuring a truly memorable meal for you and your loved ones to enjoy. Each element plays a crucial role in creating the harmonious blend of tastes and textures that define this classic Italian-inspired recipe.
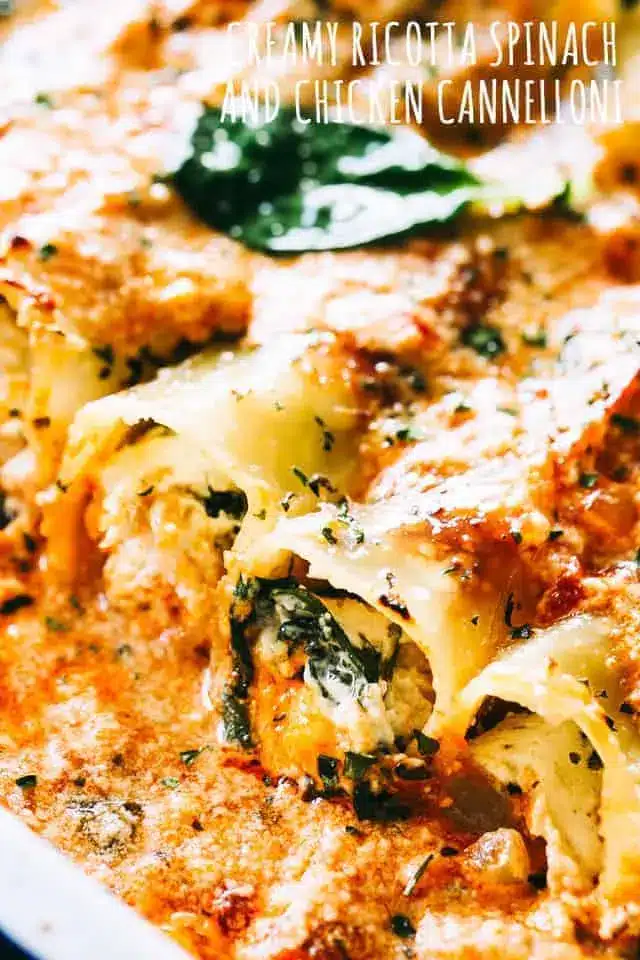
Cheesy Baked Cannelloni with Chicken

My baked chicken cannelloni is made with cannelloni pasta tubes stuffed with a cheesy ricotta, chicken, and spinach filling, topped with creamy sauce. This is an easy make-ahead dinner that’s family-friendly, customizable, and so tasty! It's a classic Italian dish made EASY.
- 12 cannelloni tubes
- 1 tablespoon olive oil
- 1 yellow onion, diced
- 2 cloves garlic, minced
- 3 cooked chicken breasts, finely chopped
- ½ cup milk
- 1 cup part-skim Ricotta cheese
- 8 to 10 ounces baby spinach
- salt and freshly ground black pepper, to taste
- 1 cup pasta sauce
- 1½ cups half-and-half
- ¼ cup grated Parmesan cheese
- ½ teaspoon dried basil
- ¼ teaspoon dried oregano
- ⅛ teaspoon ground nutmeg
- salt and freshly ground black pepper, to taste
- 1Par-cook the cannelloni. Cook the cannelloni tubes in boiling water for 5 minutes; rinse and set aside to cool for a few minutes, or just until cool enough to handle.
- 2Prepare to bake. Preheat the oven to 400°F.
- 3Sauté. Heat the oil in a large skillet over medium-high heat. Add the onions and sauté for 2 minutes; stir in the garlic and chicken, and continue cooking for 4 minutes.
- 4Make it creamy. Add the milk and let it simmer for 2 minutes, or until most of the liquid has evaporated. Stir in the ricotta cheese until well blended.
- 5Add the spinach. Add the spinach and cook for 1 to 2 minutes, or until wilted. Remove from heat and let stand a few minutes, or until cool enough to handle.
- 6Stuff the cannelloni. Spoon pasta sauce on the bottom of a 9x13 baking dish and set aside. Using a spoon, your hands, or a piping bag, stuff the prepared chicken mixture into cannelloni tubes.
- 7Assemble. Arrange the cannelloni in a single layer on the bottom of the baking dish, over the pasta sauce.
- 8Make the sauce. In a mixing bowl, whisk together the half-and-half, parmesan, basil, oregano, nutmeg, salt, and pepper until thoroughly combined. Pour the half-and-half mixture over the cannelloni.
- 9Bake. Transfer the baking dish to the oven and bake for 18 to 20 minutes, or until the top is golden brown and the cream is reduced.
- 10Finish and serve. Remove from the oven and let it rest for 3 to 5 minutes, or until the sauce thickens slightly. Spoon the sauce over the cannelloni and serve.
Keywords: cannelloni, chicken, ricotta, spinach, creamy sauce, baked pasta, Italian, comfort food
- cannelloni tubes: the sturdy pasta shells designed specifically for stuffing and baking.
- olive oil: a fundamental base for sautéing aromatics and building flavor.
- yellow onion: adds a subtle sweetness and depth when softened.
- garlic: provides that essential pungent aroma and savory character.
- cooked chicken breasts: the heart of the filling, offering protein and substance.
- milk: helps to create a creamy texture within the chicken mixture.
- part-skim ricotta cheese: lending a wonderfully soft and mild cheesy element to the filling.
- baby spinach: wilts down beautifully, adding a touch of green and nutrients.
- salt and freshly ground black pepper: essential for seasoning and enhancing all other flavors.
- pasta sauce: a flavorful tomato base to cradle the cannelloni.
- half-and-half: the secret to a luxuriously smooth and creamy topping.
- grated Parmesan cheese: adds a sharp, nutty, and salty dimension to the sauce.
- dried basil: a classic herb that complements Italian dishes perfectly.
- dried oregano: another aromatic herb that brings authentic Italian notes.
- ground nutmeg: a hint of this spice adds a subtle warmth and complexity to the creamy sauce.
Quantities for each ingredient are detailed within the recipe card for your convenience.
Variations
To cater to different dietary needs or simply to explore new flavor profiles, this chicken cannelloni recipe is wonderfully adaptable. Consider a delightful vegetarian version by substituting the chicken with a medley of roasted vegetables like zucchini, bell peppers, and mushrooms. This not only adds a vibrant array of colors but also introduces a different kind of earthy sweetness to the filling.
For those following a lower-carbohydrate lifestyle, you can get creative by using large zucchini strips, blanched and patted dry, in place of the traditional pasta tubes. The rich chicken and ricotta filling will still shine, offering a satisfying and flavorful meal without the pasta.
Another exciting modification involves incorporating different cheeses into the filling. A sharp cheddar or a smoked gouda could add a bolder, more pronounced cheesy flavor, transforming the cannelloni into something uniquely your own. Experimenting with herbs like thyme or rosemary in the filling or sauce can also introduce delightful new dimensions to this already beloved dish.
How to Prepare chicken cannelloni recipe
Step 1: Par-cook the Cannelloni Tubes
The initial step involves preparing the cannelloni tubes for their delicious filling. This usually requires a brief boiling process to ensure they become tender but not mushy when baked. Boiling them for approximately 5 to 7 minutes is typically sufficient, depending on the brand and thickness of the pasta.
Once par-cooked, it’s important to drain the tubes thoroughly and rinse them with cool water. This halts the cooking process and makes them easier to handle. Setting them aside on a clean surface, perhaps lightly oiled to prevent sticking, allows them to cool down while you prepare the flavorful filling.
This crucial step guarantees that your cannelloni will be perfectly cooked after baking, avoiding any unpleasant crunchiness. It’s a small effort that makes a significant difference in the final texture and overall enjoyment of the dish. Do not skip this vital preparation.
Step 2: Sauté the Aromatics and Chicken
Begin by heating a tablespoon of olive oil in a large skillet over medium-high heat. This will serve as the base for developing the savory flavors of the filling. Once the oil is shimmering, add the finely diced yellow onion to the pan.
Sauté the onions for about 2 to 3 minutes, stirring occasionally, until they become translucent and begin to soften. This process caramelizes the natural sugars in the onion, adding a subtle sweetness. Next, stir in the minced fresh garlic and continue to cook for another minute until fragrant, being careful not to burn it.
Add the finely chopped cooked chicken breasts to the skillet. Continue to cook for approximately 4 minutes, stirring to combine the chicken with the sautéed onions and garlic. This step allows the chicken to absorb the aromatic flavors and begin to meld together as a cohesive filling base.
Step 3: Create the Creamy Filling Base
Once the chicken mixture has been sautéed, it’s time to introduce the liquid that will bind and enrich the filling. Pour in about half a cup of milk. Allow this mixture to simmer gently for about 2 minutes.
During this simmering period, the milk will reduce slightly, creating a more concentrated flavor and a creamier consistency. Stir continuously to prevent any sticking to the bottom of the skillet. The goal is to absorb most of the liquid, leaving a rich, luscious base for the subsequent ingredients.
Following this, stir in one cup of part-skim ricotta cheese. Continue to mix until the ricotta is well incorporated and fully blended with the chicken and milk mixture. This creates the wonderfully smooth and cheesy foundation of your cannelloni filling.
Step 4: Wilt the Spinach and Cool the Filling
Now, it’s time to incorporate the fresh baby spinach into the creamy chicken and ricotta mixture. Add the 8 to 10 ounces of spinach to the skillet. Stir it into the hot filling.
Cook for just 1 to 2 minutes, or until the spinach has visibly wilted down and become tender. The heat from the filling will gently cook the spinach, infusing its fresh, slightly earthy flavor throughout the mixture. Avoid overcooking the spinach to maintain its vibrant green color and delicate texture.
Once the spinach is wilted, remove the skillet from the heat. Allow the filling to stand for a few minutes to cool down slightly. This makes it easier and safer to handle when you begin the stuffing process, ensuring a comfortable and efficient assembly of your cannelloni. A slightly cooled filling also helps it set better within the pasta tubes.
Step 5: Assemble the Cannelloni
Begin by spooning a layer of your favorite pasta sauce onto the bottom of a 9×13 inch baking dish. This sauce layer will prevent the cannelloni from sticking to the dish and will add an extra burst of flavor from below. Ensure the entire bottom of the dish is covered evenly.
Next, carefully stuff the prepared cannelloni tubes with the cooled chicken and spinach filling. You can use a spoon for this, or for a neater approach, a piping bag fitted with a large tip works exceptionally well. Gently fill each tube until it’s completely packed with the delicious mixture.
Arrange the stuffed cannelloni in a single layer over the pasta sauce in the baking dish. Try to place them snugly together, ensuring they form an even, cohesive layer. This arrangement allows for consistent baking and makes for a beautiful presentation once served. This step is key to a beautiful final dish.
Step 6: Prepare and Bake
In a separate mixing bowl, whisk together the 1 ½ cups of half-and-half, ¼ cup of grated Parmesan cheese, ½ teaspoon of dried basil, ¼ teaspoon of dried oregano, and ⅛ teaspoon of ground nutmeg. Season this creamy sauce mixture with salt and freshly ground black pepper to taste.
Whisk until all the ingredients are thoroughly combined and the sauce is smooth and well-emulsified. Carefully pour this luscious sauce evenly over the arranged cannelloni in the baking dish. Ensure every tube is generously coated with the creamy mixture, creating a rich topping for your dish.
Transfer the baking dish to a preheated oven set at 400°F (200°C). Bake for 18 to 20 minutes, or until the top is beautifully golden brown and the creamy sauce has reduced and thickened slightly. The aromas emanating from your oven will be incredible during this baking period. Remove from the oven and let it stand for 3 to 5 minutes before serving, allowing the sauce to thicken further and the cannelloni to set. This resting period is crucial for optimal texture and easier serving.
Pro Tips for chicken cannelloni recipe
Use a Piping Bag for Stuffing: For the most efficient and mess-free way to fill your cannelloni tubes, consider using a piping bag. Simply transfer the cooled chicken mixture into a large zip-top bag, snip off a corner, and pipe the filling directly into each tube.
Don’t Overcrowd the Baking Dish: Ensure your cannelloni are arranged in a single layer without being too tightly packed. This allows the creamy sauce to cook evenly and the pasta to steam properly, resulting in a more tender texture.
Taste and Adjust Seasoning: Before pouring the half-and-half mixture over the cannelloni, always taste it and adjust the salt and pepper as needed. The flavor of the sauce will significantly impact the overall dish, so ensure it’s perfectly seasoned to your preference.
Freshly Grated Parmesan is Key: While pre-grated Parmesan will work, using freshly grated cheese will result in a superior flavor and texture for the creamy sauce. The difference in taste and meltability is remarkable.
Consider a Dairy-Free Option: For a dairy-free variation, substitute the ricotta with a cashew-based ricotta alternative and use a plant-based milk and cream. Ensure your pasta sauce is also dairy-free.
Serving Suggestions for chicken cannelloni recipe
Decoration
To elevate the presentation of your chicken cannelloni, consider a few simple decorative touches. A final sprinkle of freshly chopped parsley or basil over the golden-brown surface before serving adds a burst of freshness and color. A few extra shavings of Parmesan cheese can also enhance the visual appeal and offer guests more cheesy goodness.
Side Dishes
This rich and satisfying chicken cannelloni pairs beautifully with a variety of side dishes. A simple green salad with a light vinaigrette offers a refreshing contrast to the creamy pasta. Garlic bread, whether homemade or store-bought, is always a welcome addition for soaking up any leftover sauce. Roasted asparagus or steamed broccoli also provide healthy and colorful accompaniments.
Creative Serving Ideas
For a more formal meal, serve individual portions of the cannelloni, ensuring each plate has two to three perfectly filled tubes. Alternatively, present the entire baking dish family-style, allowing guests to serve themselves from the bubbling, golden casserole. For a delightful Italian feast, pair it with a classic antipasto platter featuring olives, cured meats, and cheeses, or a hearty bowl of Minestrone soup.
Preparation & Storage
Storing Leftovers
Leftover chicken cannelloni can be stored in an airtight container in the refrigerator for up to 3-4 days. Ensure the dish has cooled completely before transferring it to the refrigerator to prevent condensation and maintain optimal quality.
Freezing
While this dish is best enjoyed fresh, it can be frozen, though the creamy sauce may alter slightly in texture upon reheating. For best results, freeze the cannelloni unbaked. Cover the baking dish tightly with plastic wrap and then foil, and freeze for up to 2-3 months. Alternatively, portion individual servings into freezer-safe containers.
Reheating
To reheat refrigerated leftovers, gently warm them in the oven at around 350°F (175°C) until heated through. If reheating from frozen, thaw the cannelloni completely in the refrigerator overnight. Before baking, you may need to add a splash of milk or cream to the sauce to loosen it up, then bake as usual, potentially for a slightly longer duration.
Frequently Asked Questions
-
Can I prepare the chicken cannelloni filling ahead of time?
Absolutely! The chicken and ricotta filling can be prepared up to 24 hours in advance and stored in an airtight container in the refrigerator. This significantly cuts down on assembly time when you’re ready to bake the dish, making it an excellent option for busy weeknights or for entertaining guests.
-
What can I do if my cannelloni tubes are not fully cooked after baking?
If you find your cannelloni tubes are still a bit firm after the initial baking time, you can cover the dish loosely with aluminum foil and continue baking for an additional 10-15 minutes. This will allow the pasta to steam and soften further without the top becoming too browned. Some brands of cannelloni may require a brief par-boil before stuffing, which can prevent this issue altogether.
-
Is it possible to make this recipe gluten-free?
Yes, with a few adjustments, this chicken cannelloni can be made gluten-free. You can use gluten-free cannelloni tubes if available, or alternatively, you can use large zucchini slices or gluten-free lasagna sheets rolled up to create a similar effect. Ensure all other ingredients, such as the pasta sauce, are also certified gluten-free.