Ajvar (Roasted Red Pepper Relish) – Easy Macedonian Recipe!

The aroma of late summer, the warmth of a communal kitchen, and the vibrant hue of roasted red peppers – these are the sensory memories that Ajvar evokes for many. This beloved Balkan relish, particularly cherished in Macedonia, is more than just a condiment; it’s a taste of tradition, a celebration of harvest, and a testament to the simple beauty of fresh ingredients transformed.
Imagine the satisfaction of creating your own jar of this exquisite, jam-like spread, knowing that each spoonful carries the essence of sun-ripened peppers and patient simmering. It’s a culinary journey that connects you to generations of cooks who have perfected this art, and the reward is a flavor profile that is both comforting and incredibly versatile.
Why You Will Love This Recipe
- Authentic Flavor: Experience the true taste of Macedonia with this traditional Ajvar recipe, perfected over generations for an unparalleled smoky and slightly sweet profile.
- Remarkable Versatility: This relish isn’t limited to just one use; it elevates grilled meats, sandwiches, pizzas, and even breakfast dishes with its unique flavor.
- Simple, Quality Ingredients: Crafted with just a handful of core components, the focus remains on the natural sweetness and depth of roasted red peppers.
- Satisfying Kitchen Ritual: While it requires time and attention, the process of making Ajvar is deeply rewarding, offering a connection to traditional culinary practices.
Ingredients You Need
The foundation of exceptional Ajvar lies in the quality of its primary ingredient: the red peppers. Opting for ripe, meaty peppers ensures a richer flavor and a more desirable texture once roasted and processed. While traditional Ajvarka peppers are ideal, good quality red bell peppers will yield a wonderfully authentic result.
Ajvar (Macedonian Roasted Red Pepper Relish)
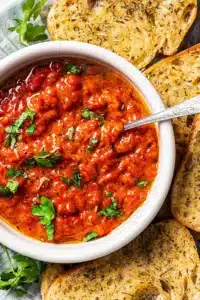
An authentic Macedonian recipe for Ajvar, a homemade red pepper relish that tastes great on just about everything, from grilled meats to bread, and more.
- 8 to 10 pounds red bull horn peppers, or red bell peppers
- 3 teaspoons salt, or to taste
- 1 teaspoon freshly ground black pepper, or to taste
- 1¾ cup sunflower oil or vegetable oil, divided
- 4 (12 ounce) jars, for jarring
- 1Preheat the oven to 450°F.
- 2Wash and dry the peppers, then prick them in several places with a fork.
- 3Place the peppers on a baking sheet and roast for 30 to 40 minutes or until charred and tender, turning occasionally.
- 4Transfer the peppers to a plastic bag and close the bag. Let stand for 10 to 15 minutes.
- 5Remove the peppers from the bag, peel off the skin, and discard it. Cut the peppers open and discard the seeds. Place them in a mesh bag and let them drain overnight.
- 6The next day, roughly chop the peppers, place them in a food processor, and pulse a few times to a chutney consistency.
- 7Put the pepper puree in a pot, add salt, pepper, and 3/4 cup of sunflower oil, and bring to a boil. Reduce to a simmer and cook for 2 to 3 hours, stirring frequently with a long wooden spoon to prevent it from burning on the bottom of the pot.
- 8Meanwhile, sterilize the jars by preheating the oven to 180°F. Wash the jars, place them on a baking sheet, and then put them in the oven for 30 minutes.
- 9Sterilize the lids by placing them in a bowl and pouring boiling water over them.
- 10When the Ajvar is done, remove it from the stove and let it cool for about 8 to 10 minutes.
- 11Pack the Ajvar into the jars and place the jars back on the baking sheet. Preheat the oven to 350°F and place the jars in the oven for 15 minutes or until a thin crust forms on top of the Ajvar.
- 12Meanwhile, heat 1 cup of cooking oil on the stovetop.
- 13Once you see the crust on the Ajvar form, remove the jars from the oven, and pour some of the heated oil into each jar over the Ajvar, just enough to cover the surface.
- 14Wipe the rims of the jars clean before applying the lids. Seal the jars with the lids.
- 15Arrange the jars in a crate or box and cover them with kitchen towels.
- 16Leave them covered to cool down for 24 to 48 hours or until completely cooled.
Keywords: Ajvar, Roasted Red Pepper Relish, Macedonian, Balkan, Condiment, Vegetarian
- red bull horn peppers, or red bell peppers: about 8 to 10 pounds, the star of this rich relish.
- salt: 3 teaspoons, or to taste, to enhance and balance the sweet and smoky notes.
- freshly ground black pepper: 1 teaspoon, or to taste, for a subtle warmth and depth.
- sunflower oil or vegetable oil: 1 and 3/4 cups, divided, used both for cooking and preserving the relish.
- 12-ounce jars: 4, for storing your delicious homemade Ajvar, ensuring it lasts.
The precise quantities for these ingredients can be found within the accompanying recipe card, guiding you through the creation of your perfect batch.
Variations
While the classic Macedonian Ajvar is a masterpiece on its own, its adaptability allows for delightful variations that cater to different preferences and dietary needs. Exploring these options can introduce new layers of flavor and texture to this already beloved relish, making it even more personal and exciting.
For those seeking a plant-based delight, consider incorporating roasted eggplant into your Ajvar. Roasting the eggplant alongside the red peppers, then peeling and blending it in, adds a wonderfully creamy texture and a subtle earthiness that complements the sweetness of the peppers beautifully. This variation transforms the relish into an even richer and more satisfying spread.
If you’re a fan of bolder flavors, don’t shy away from adding garlic or a touch of heat. Whole garlic cloves can be roasted directly with the peppers, their sweetness intensifying in the heat before being blended into the relish. For a spicy kick, a few chili peppers can join the roasting party, or a pinch of red chili flakes can be stirred in towards the end of the simmering process, offering a delightful warmth that awakens the palate.
Another intriguing avenue is the addition of a subtle tang. A small splash of vinegar, introduced at the very end of the cooking process, can provide a bright, zesty counterpoint to the sweetness. This small adjustment can lift the overall flavor profile, making the Ajvar even more complex and appealing, especially for those who enjoy a bit of acidity.
How to Prepare Macedonian Ajvar recipe
Step 1: Preparing and Roasting the Peppers
The journey to perfect Ajvar begins with selecting the finest red peppers. Aim for about 8 to 10 pounds of red bull horn peppers or ripe red bell peppers. Wash them thoroughly under cool water and pat them dry with a clean kitchen towel. It’s crucial to prick each pepper several times with a fork; this simple step allows steam to escape during roasting, preventing them from bursting and ensuring more even cooking and charring.
Preheat your oven to a robust 450°F (230°C). Arrange the prepared peppers on a large baking sheet. Don’t overcrowd the pan, as this can lead to steaming rather than roasting; you may need to work in batches. Roast the peppers for approximately 30 to 40 minutes, turning them occasionally. You’re looking for the skins to become blistered and charred, and the peppers themselves to soften significantly. This charring is key to developing the signature smoky flavor that defines authentic Ajvar.
The roasting process concentrates the natural sugars in the peppers, caramelizing them and infusing them with a delightful sweetness that balances the smoky notes. Once the peppers are nicely charred and tender, remove them from the oven. The next critical step is to capture the steam, which will make peeling a breeze.
Step 2: Steaming and Peeling for Optimal Texture
As soon as the peppers come out of the hot oven, immediately transfer them into a large plastic bag or a bowl with a tight-fitting lid. Seal the bag or cover the bowl tightly to trap the generated steam. Allow the peppers to steam for about 10 to 15 minutes. This steaming period is essential for loosening the skins, making them incredibly easy to peel off without taking any of the precious pepper flesh with them.
Once they’ve had a good steam bath, carefully remove the peppers from the bag or bowl. The charred skins should slip off with minimal effort. While the peppers are still warm, cut them open lengthwise and meticulously remove all the seeds and membranes. Discard these unwanted parts. The goal is to have clean, de-seeded pepper flesh ready for the next stage of preparation. This careful removal ensures a smooth and pleasant texture in your final Ajvar.
After peeling and de-seeding, place the softened pepper flesh into a mesh bag or a fine-mesh strainer. Position the bag or strainer over a container to allow any excess liquid to drain away. This step is vital for achieving the correct thick, jam-like consistency of Ajvar, preventing it from becoming too watery. Letting them drain overnight is recommended for the best results, ensuring that only the concentrated pepper flavor remains.
Step 3: Processing the Peppers and Initial Cooking
The day after roasting and draining, it’s time to transform the softened peppers into a smooth purée. Roughly chop the drained peppers into smaller pieces to make them easier to process. Transfer these chopped peppers into a food processor. Pulse the peppers a few times until you achieve a consistency that resembles a chunky chutney. Avoid over-processing into a completely smooth paste; a slight texture is desirable and traditional.
Once you have your pepper purée, it’s time to begin the slow cooking process. Transfer the purée into a large, heavy-bottomed pot or Dutch oven. This type of pot distributes heat evenly and prevents scorching, which is crucial during the long simmering time. Add the salt, freshly ground black pepper, and approximately 3/4 cup of the sunflower or vegetable oil to the pot with the pepper purée.
Stir these ingredients together thoroughly. Bring the mixture to a boil over medium-high heat, then immediately reduce the heat to low, allowing the Ajvar to simmer gently. Stir frequently with a long wooden spoon. The frequent stirring is absolutely essential to prevent the Ajvar from sticking to the bottom of the pot and burning, which would impart an undesirable bitter flavor. Continue to simmer for 2 to 3 hours, or until the Ajvar has thickened considerably and most of the excess liquid has evaporated. The consistency should be that of a thick, spreadable relish.
Step 4: Sterilizing Jars and Lids for Preservation
While the Ajvar is patiently simmering and reducing, it’s the perfect time to prepare your jars for long-term storage. Proper sterilization is paramount to ensuring your homemade Ajvar remains fresh and safe to consume for an extended period. You will need four 12-ounce jars for this recipe, along with their corresponding lids. Ensure all jars and lids are clean before you begin the sterilization process.
To sterilize the jars, preheat your oven to 180°F (82°C). Wash the jars thoroughly in hot, soapy water, rinse them well, and place them upright on a baking sheet. Put the baking sheet with the jars into the preheated oven and let them stay there for at least 30 minutes. This dry heat effectively kills any lingering bacteria. For the lids, place them in a heatproof bowl and carefully pour boiling water over them, ensuring they are fully submerged. Let them sit in the boiling water while you prepare to fill the jars.
Having sterilized jars and lids ready prevents any contamination from entering your precious Ajvar. This meticulous attention to detail in the canning process is what allows you to enjoy the fruits of your labor for months to come, safely preserving the vibrant flavors of your homemade relish. It’s a small but vital step in creating a truly shelf-stable product that you can proudly share or savor over time.
Step 5: Finishing the Ajvar and Jarring
Once your Ajvar has reached its desired thick consistency and has been seasoned to perfection – taste and adjust the salt and pepper as needed at this stage, as the flavors will have concentrated significantly – it’s time to prepare for jarring. Remove the pot from the heat and let the Ajvar cool slightly for about 8 to 10 minutes. This brief cooling period makes it easier and safer to handle when filling the hot jars.
Carefully ladle the warm Ajvar into the sterilized jars, filling them almost to the brim, leaving a small headspace at the top. Before sealing, ensure the rims of the jars are perfectly clean. Any residue can interfere with the seal. This is where the oil comes in for an extra layer of preservation. While the jars are being filled, heat the remaining 1 cup of cooking oil in a small saucepan on the stovetop until it is hot but not smoking. Once the jars are filled with Ajvar, pour a small amount of this hot oil into each jar, just enough to create a thin layer that covers the surface of the Ajvar. This oil layer acts as a barrier against air, further preventing spoilage.
Quickly place the sterilized lids onto the jars and seal them tightly. The heat from the Ajvar and the oil will help create a vacuum seal as the jars cool. After sealing, arrange the filled jars on a baking sheet and place them back into the oven, now set to 350°F (175°C), for another 15 minutes. This final bake helps to form a thin crust on top of the Ajvar within the jars, contributing to its preservation. Once removed from the oven, place the sealed jars in a crate or box and cover them completely with kitchen towels. Allow them to cool undisturbed for 24 to 48 hours. During this time, you’ll hear the satisfying popping sound of the lids sealing.
Step 6: Cooling and Long-Term Storage
The final stages of creating your homemade Ajvar involve patient cooling and proper storage. After the jarring and final baking process, it is crucial to allow the sealed jars to cool completely. This gradual cooling period, typically lasting between 24 to 48 hours, is essential for the vacuum seal to form properly and to ensure the integrity of the preservation. Covering the jars with kitchen towels during this time helps to promote a slow, even cooling process, which is beneficial for maintaining the quality of the Ajvar.
Once the jars have cooled entirely and you’ve confirmed that each lid has a secure seal (the center of the lid should not flex when pressed), they are ready for long-term storage. Unopened jars of your homemade Macedonian Ajvar should be stored in a cool, dry, and dark place, such as a pantry or a dedicated food storage cupboard. This environment minimizes exposure to light and temperature fluctuations, which can degrade the quality and flavor of the relish over time.
Refrigeration is only necessary once a jar has been opened. An opened jar of Ajvar will typically keep well in the refrigerator for up to one week, though its deliciousness might mean it doesn’t last that long. The canning process, when done correctly with sterilized equipment and proper sealing, ensures that your homemade Ajvar can be enjoyed for many months, bringing a taste of Macedonian sunshine to your table whenever you desire.
Pro Tips for Macedonian Ajvar recipe
Patience is a Virtue: The long simmering time is non-negotiable for developing the deep, concentrated flavors characteristic of authentic Ajvar. Resist the urge to rush this process; it’s where the magic happens. Allowing the peppers to cook down slowly melds all the flavors into a harmonious blend.
Stir, Stir, Stir: A wooden spoon is your best friend during the cooking process. Its heat resistance and antibacterial properties make it ideal for the long, constant stirring required to prevent scorching. Consistent stirring ensures even cooking and prevents the bottom layer from burning, which would ruin the batch.
Seasoning at the End: While you add a bit of salt and pepper at the beginning, be conservative. Peppers release liquid as they cook, and the flavors concentrate. It’s best to do a final taste and adjustment of salt and pepper towards the end of the simmering process when you have a clearer idea of the final flavor profile. This prevents an overly salty outcome.
The Importance of Drainage: Don’t skip the overnight drainage step for the roasted and peeled peppers. Excess moisture will lead to a thinner, less desirable Ajvar consistency. Ensuring the peppers are well-drained is key to achieving that perfect thick, spreadable texture that holds up beautifully on bread or as a dip.
Sterilization is Key: For any preserved food, proper sterilization of jars and lids is paramount. This isn’t just a recommendation; it’s a critical step to prevent spoilage and ensure the safety of your Ajvar. Cleanliness throughout the entire process, from preparing ingredients to filling jars, is the foundation of successful canning.
Serving Suggestions for Macedonian Ajvar recipe
Decoration
When presenting Ajvar, a simple garnish can elevate its visual appeal. A drizzle of good quality olive oil or a sprinkle of fresh, finely chopped parsley can add a pop of color and freshness. For a more rustic presentation, a sprig of fresh dill or a few small roasted red pepper slices can also be aesthetically pleasing. Consider garnishing the dish or platter where the Ajvar is served, rather than directly on the relish itself, to maintain its smooth texture.
Side Dishes
Ajvar is incredibly versatile and pairs wonderfully with a vast array of side dishes. It’s a perfect accompaniment to grilled meats and sausages, adding a smoky, slightly sweet counterpoint. Roasted vegetables, particularly potatoes or root vegetables, also benefit greatly from a dollop of Ajvar. For a lighter option, serve it alongside a fresh green salad or with crusty bread for dipping. It can also be a fantastic addition to cheese boards, complementing various cheeses with its unique flavor profile.
Consider serving it with traditional Macedonian dishes like grilled kebapi (kebabs) or alongside a hearty lentil soup for added depth of flavor. It also works surprisingly well with seafood, particularly grilled fish or shrimp. The bright, slightly tangy notes of the Ajvar can cut through the richness of the seafood, creating a balanced and delicious pairing.
For a more casual meal, Ajvar can be spread onto toasted bread or crackers as a simple yet flavorful appetizer. It can also be used as a base for mini pizzas or bruschetta, topped with cheese and other desired ingredients. Its versatility means it can seamlessly transition from a humble spread to a sophisticated appetizer component.
Creative Serving Ideas
Beyond its traditional uses, Ajvar opens up a world of creative culinary applications. Consider using it as a flavorful spread for sandwiches and wraps, replacing mayonnaise or mustard for a unique twist. It can also be incorporated into marinades for chicken or pork, infusing the meat with its distinctive taste. For a brunch option, try stirring a spoonful into scrambled eggs or using it as a base for a flavorful Shakshuka, a popular Middle Eastern and North African egg dish.
Another innovative idea is to incorporate Ajvar into pasta sauces or risotto, adding a smoky sweetness and a beautiful reddish hue. It can also be blended into salad dressings or used as a dip for crudités and chips. Think outside the box and experiment with how this relish can enhance your favorite dishes. Its rich flavor profile makes it a fantastic addition to any culinary exploration.
For a party appetizer, consider layering Ajvar with cream cheese or Greek yogurt in a serving dish, topped with a drizzle of olive oil and a sprinkle of fresh herbs. Serve with pita bread or vegetable sticks for a crowd-pleasing dip. The combination of creamy and savory notes is irresistible. It can also be a secret ingredient in your next batch of homemade meatballs or meatloaf, adding moisture and a subtle flavor dimension.
Preparation & Storage
Storing Leftovers
Once a jar of your homemade Ajvar has been opened, it’s crucial to store it properly to maintain its freshness and flavor. Always refrigerate opened Ajvar immediately. Keep it in an airtight container or ensure the original jar’s lid is sealed tightly. Typically, opened Ajvar will remain delicious and safe to consume in the refrigerator for up to one week.
Proper refrigeration is key to preventing the growth of any unwanted microorganisms. Always use clean utensils when scooping out the Ajvar to avoid introducing bacteria into the jar. If you notice any signs of mold, off-smells, or changes in texture, it’s best to discard the remaining portion to be safe. The vibrant color and rich aroma should remain consistent if stored correctly.
While one week is the general guideline, the actual shelf life can vary slightly depending on the exact ingredients used and the cleanliness of the canning process. It’s always better to err on the side of caution. If you plan to use it more frequently, consider transferring a smaller portion to a smaller jar for easier access and less exposure of the main jar to room temperature.
Freezing
Ajvar freezes remarkably well, offering an extended shelf life beyond its refrigerated period. However, it’s important to note that freezing is best done with Ajvar that has not undergone the final canning process. If you intend to freeze your homemade Ajvar, set aside a portion of the cooked relish before you begin the jarring and baking steps. Allow this portion to cool completely to room temperature before transferring it to a freezer-safe container.
Ensure the container is airtight to prevent freezer burn and maintain the quality of the Ajvar. Leave a little headspace at the top of the container, as liquids expand when frozen. Properly stored, frozen Ajvar can retain its excellent quality for up to 6 months. This makes it a convenient option for enjoying your homemade relish long after the traditional canning season has passed.
When you’re ready to use the frozen Ajvar, the best method for thawing is to transfer it from the freezer to the refrigerator. Allow it to thaw slowly overnight. Once thawed, give it a good stir to reintegrate any separated oils or liquids. The consistency and flavor should be very close to that of freshly made Ajvar, ready to be enjoyed again.
Reheating
Reheating is generally not necessary for Ajvar if it has been stored correctly and is being used as a spread or condiment at room temperature. The flavors are best enjoyed fresh, and heating can sometimes alter the texture or intensity of the relish. If you have refrigerated your Ajvar and it is very firm, simply allow it to sit at room temperature for a short period to soften slightly before serving.
However, if you are incorporating Ajvar into a cooked dish, such as a sauce or marinade, you can certainly reheat it along with the other ingredients. In such cases, you would typically add the Ajvar towards the end of the cooking process and heat it through gently. Avoid high heat for extended periods, as this can diminish its fresh, vibrant flavor. The goal is to warm it sufficiently to meld with the other components of the dish.
For those rare instances where a slightly warmed Ajvar might be desired, perhaps as a very light appetizer dip, you could warm it very gently in a saucepan over low heat, stirring constantly, or briefly in a microwave on a low power setting. Be extremely cautious not to overheat, as this can lead to a loss of flavor and an unpleasant texture. The goal is a slight warming, not cooking.
Frequently Asked Questions
-
What is the traditional pepper used for Macedonian Ajvar, and what are good substitutes?
The most traditional pepper used for Macedonian Ajvar is the “red bull horn pepper,” often referred to as Ajvarka peppers. These peppers are long, slightly curved, and have a meaty flesh with a sweet flavor and mild heat. They are ideal for achieving the characteristic texture and taste of authentic Ajvar. However, Ajvarka peppers can be difficult to find in some regions, particularly outside of Eastern Europe. In such cases, ripe red bell peppers are an excellent and widely available substitute. Choose bell peppers that are firm, heavy for their size, and have a deep red color, indicating ripeness and sweetness. The key is to select peppers with thick, meaty walls that will yield a good amount of flesh after roasting and peeling, minimizing water content and maximizing flavor concentration.
-
Can I make Ajvar without roasting the peppers, and what would be the difference in flavor and texture?
While it is technically possible to make a red pepper spread without roasting the peppers, the result would be significantly different from traditional Ajvar, and generally not as desirable. Roasting is a critical step that imbues the peppers with their signature smoky flavor and caramelizes their natural sugars, leading to a deeper, sweeter, and more complex taste. It also softens the peppers, making them easier to peel and process into the desired smooth, relish-like consistency. If you were to use raw peppers, the flavor would be much brighter, fresher, and more vegetal, lacking the characteristic smokiness and depth that makes Ajvar so beloved. The texture might also be less smooth, and the overall flavor profile would be less concentrated and rich. Therefore, roasting is an indispensable step in creating authentic Ajvar and is highly recommended for achieving the best possible outcome.
-
How long does homemade Ajvar typically last, and are there specific signs that indicate it has gone bad?
When properly canned and stored in unopened, sterilized jars in a cool, dark, dry place, homemade Ajvar can last for a remarkably long time, often up to a year or even longer. The canning process, including sterilization and the formation of a vacuum seal, acts as a preservation method. Once a jar has been opened, however, its shelf life is significantly reduced. Opened Ajvar should be stored in the refrigerator and typically lasts for about one week. Signs that your Ajvar may have gone bad include the presence of mold on the surface, an off-putting or sour smell, a change in color (e.g., becoming dull or greyish), or a bubbly or foamy appearance. If you notice any of these signs, it is best to discard the product to avoid any health risks. Always inspect your Ajvar before consumption, especially if it has been stored for an extended period.