Antipasto Salad with Grilled Chicken – Easy Summer Salad Recipe!
This vibrant antipasto salad with grilled chicken is a celebration of classic Italian flavors, transforming simple ingredients into a dish that’s both impressive and incredibly easy to make. It’s the perfect answer to those warm summer evenings when you crave something light, refreshing, yet satisfyingly substantial, making it an ideal choice for a starter or a complete meal.
The genius of this salad lies in its dual-purpose dressing; a zesty basil pesto vinaigrette not only coats every component beautifully but also lovingly marinates the chicken, infusing it with a depth of flavor that complements the other fresh elements. This clever approach saves time and amplifies the overall taste experience.
Why You Will Love This Recipe
- Quick Preparation: This delightful antipasto salad can be assembled and ready to enjoy in a remarkably short amount of time, making it perfect for weeknight dinners or spontaneous entertaining.
- Bursting with Flavor: Every forkful is an explosion of taste, from the tangy pepperoncini and creamy mozzarella to the fresh tomatoes and the herb-infused grilled chicken.
- Versatile Serving: Whether you’re looking for a light lunch, a show-stopping appetizer, or a complete dinner, this salad effortlessly adapts to any occasion.
- Healthy and Wholesome: Packed with fresh vegetables, lean protein, and healthy fats, this salad offers a nutritious and guilt-free dining experience that nourishes your body.
- Customizable: While this recipe is fantastic as is, it also provides a wonderful canvas for your own culinary creativity, allowing you to add your favorite ingredients and personalize it to your exact preferences.
Ingredients You Need
The foundation of any outstanding dish is the quality of its ingredients. For this antipasto salad, opting for the freshest produce and the finest cheeses will truly elevate the final result. Simple, high-quality components are the secret to allowing the vibrant Italian flavors to shine through brilliantly.
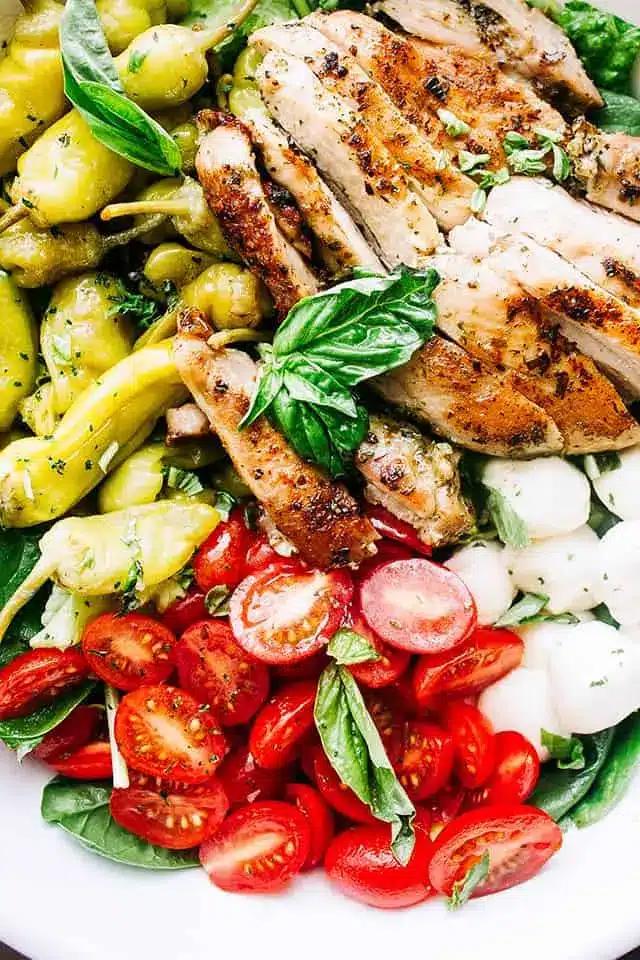
Antipasto Salad with Grilled Chicken

This fresh and delicious antipasto salad is packed with grilled chicken, mozzarella cheese, tomatoes, and pepperoncini, tossed in a homemade basil pesto vinaigrette. It's perfect as a starter or a main meal.
- For the Vinaigrette Dressing: ½ cup store-bought Basil Pesto, ¼ cup extra virgin olive oil, 3 tablespoons white wine vinegar, 1 tablespoon fresh lemon juice, Salt and fresh ground pepper, to taste
- For the Chicken: 1 pound (4 pieces) boneless skinless chicken breasts
- For the Salad: 4 cups chopped Romaine lettuce, 1 cup cherry tomatoes, halved, 8 ounces fresh mozzarella cheese balls, 1 cup pickled pepperoncini
- 1Make the dressing: In a bowl, combine pesto, olive oil, vinegar, and lemon juice; add salt and pepper to taste, and whisk until combined. Pour half of the dressing into a ziploc bag. Place the other half in the fridge.
- 2Marinate the chicken: Add the chicken breasts to the ziploc bag, seal it, and shake it all up until well combined. Place the chicken in the fridge for 30 minutes, or for up to 2 hours.
- 3Prepare to grill: When you're ready to cook your chicken, preheat the grill to 400ºF. Brush grill grates with olive oil.
- 4Grill the chicken: Remove the chicken breasts from the marinade and place them on the hot grill. Cook without touching until the chicken breasts start getting some grill marks, about 5 minutes. Turn the chicken breasts over, cover the grill, and let them finish cooking, about 7 more minutes, depending on the thickness of the chicken. Chicken is done when a meat thermometer registers 165ºF.
- 5Rest: Remove the chicken from the grill. Cover and let it rest for 5 minutes before slicing.
- 6Assemble the Salad: Start with lettuce. In the meantime, prepare the salad and transfer the chopped lettuce to a large salad bowl.
- 7Add antipasto: Next, top the lettuce with tomatoes, cheese, and pepperoncini.
- 8Add the chicken: Cut the chicken breasts into strips and add them to the salad.
- 9Dress the salad: Pour the remaining basil pesto dressing over the salad; toss to combine.
- 10Serve.
Keywords: antipasto, salad, grilled chicken, Italian, pesto, mozzarella, pepperoncini, summer salad
These are the key components that come together to create this incredible antipasto salad. For precise measurements and detailed quantities, please refer to the comprehensive recipe card provided.
Variations
The beauty of an antipasto salad is its inherent flexibility, allowing for endless creative interpretations. You can easily tailor this recipe to suit specific dietary needs or simply to introduce new flavor profiles into your meal rotation. Experimentation is highly encouraged to discover your personal favorite combinations.
For a delicious vegan version, you can omit the chicken and mozzarella entirely. Instead, focus on a wider array of marinated vegetables, such as artichoke hearts, roasted red peppers, and a colorful mix of olives. Consider adding grilled or roasted eggplant slices for a substantial, meaty texture. A sprinkle of toasted pine nuts or sunflower seeds would add a delightful crunch and nutty depth.
If you’re following a low-carb lifestyle, this salad is already a fantastic starting point. Simply ensure you use low-carb vegetables and omit any high-sugar ingredients. You might want to increase the amount of cheese, perhaps adding some shaved Parmesan or crumbled feta for extra flavor. A more generous portion of grilled chicken or even some grilled shrimp would provide ample protein and satiety.
To transform this into a more substantial dinner option, consider adding a complex carbohydrate. While not strictly traditional antipasto, small, cooked orzo pasta, similar to what you might find in an Italian pasta salad, can be tossed in. Alternatively, serving this salad alongside crusty Italian bread for dipping into the delicious vinaigrette would make it even more filling and satisfying.
How to Prepare antipasto salad with grilled chicken
This section will guide you through each step of creating your antipasto salad with grilled chicken, from preparing the flavorful vinaigrette and marinating the chicken to grilling it to perfection and finally assembling the vibrant salad. Each stage is designed to be straightforward, ensuring a successful and delicious outcome.
Step 1: Crafting the Basil Pesto Vinaigrette and Marinade
The heart of this salad’s flavor profile lies in its vibrant basil pesto vinaigrette. To begin, you will need a good quality store-bought basil pesto as your base, which saves significant time while still delivering authentic taste. In a medium-sized bowl, combine this pesto with a generous measure of extra virgin olive oil; the olive oil helps to emulsify the dressing and adds a smooth richness.
Next, introduce a touch of acidity with white wine vinegar. This tangy component brightens the overall flavor and cuts through the richness of the pesto and olive oil. A squeeze of fresh lemon juice will further enhance the zestiness, providing a sunny, citrusy note that complements the basil beautifully. Seasoning with salt and freshly ground black pepper is crucial to balance all the flavors; be sure to taste and adjust as needed, as pesto can vary in its saltiness.
Once everything is whisked together until well combined and emulsified, you will need to divide this glorious mixture. Pour half of the prepared vinaigrette into a resealable plastic bag or a shallow dish. This portion will serve as your marinade for the chicken, allowing it to absorb all those wonderful herbaceous and tangy notes. The other half should be set aside in a separate container and refrigerated; this will be used to dress the salad later, ensuring every component is coated in that delicious flavor.
Step 2: Marinating the Chicken for Maximum Flavor
Now that your flavorful vinaigrette is divided, it’s time to infuse the chicken breasts with its essence. Place the boneless, skinless chicken breasts directly into the bag or dish containing half of the basil pesto vinaigrette. Ensure that each piece of chicken is well-coated with the marinade. This is where the magic happens, as the oils and acids in the dressing begin to tenderize the chicken and imbue it with a deep, aromatic flavor.
Once the chicken is thoroughly coated, seal the bag tightly, removing as much air as possible, or cover the dish securely. Place the marinating chicken in the refrigerator. For optimal flavor penetration without compromising the chicken’s texture, aim to marinate for at least 30 minutes. If you have a little more time, you can extend this to up to 2 hours. However, it’s important not to marinate for much longer, as the acidity in the vinegar and lemon juice could begin to break down the proteins too much, resulting in a mushy texture.
While the chicken is marinating, you can use this time to prepare other components of the salad or to get your grilling station ready. This waiting period is crucial for developing the complex flavors that will make your grilled chicken the star of the antipasto salad. The patience exercised during this marinating stage will be amply rewarded with incredibly juicy and flavorful chicken.
Step 3: Grilling the Chicken to Perfection
Prepare your grill for cooking by preheating it to a medium-high heat, ideally around 400°F (200°C). A hot grill is essential for achieving those desirable char marks and ensuring the chicken cooks evenly and quickly. Once the grill is hot, it’s a good practice to clean the grates thoroughly and then lightly oil them. This prevents the marinated chicken from sticking and ensures a clean release when it’s time to flip.
Carefully remove the marinated chicken breasts from the bag, allowing any excess marinade to drip off. Place the chicken breasts onto the hot, oiled grill grates. Resist the urge to move or press the chicken for the first 5 minutes of cooking. Allowing the chicken to sear undisturbed is key to developing a beautiful crust and preventing it from sticking to the grill. You should start to see distinct grill marks appearing on the underside of the chicken.
After about 5 minutes, or when the first side has developed good grill marks, it’s time to flip the chicken. Use tongs or a spatula to carefully turn each piece over. Once flipped, close the grill lid. This helps to trap the heat and ensure the chicken cooks through evenly. Continue to cook for another 7-10 minutes, or until the chicken is cooked through. The exact cooking time will depend on the thickness of the chicken breasts. To ensure it’s done, use an instant-read meat thermometer; the internal temperature should reach 165°F (74°C).
Step 4: Resting and Slicing the Grilled Chicken
Once the chicken has reached the correct internal temperature and is perfectly grilled, remove it from the grill immediately. Place the cooked chicken breasts onto a clean cutting board. It is absolutely crucial to let the chicken rest for at least 5 minutes before slicing. This resting period allows the juices, which have been driven to the center of the meat during cooking, to redistribute back throughout the chicken.
If you skip this resting step, those flavorful juices will escape onto the cutting board the moment you slice into the chicken, leaving you with dry, less-flavorful meat. During this brief rest, the proteins in the chicken will relax, ensuring that every bite remains succulent and moist. Cover the chicken loosely with foil during this resting time to keep it warm, but avoid wrapping it tightly, as this can steam the crust you worked hard to achieve.
After the chicken has rested sufficiently, you can proceed to slice it. For this salad, slicing the chicken into strips or bite-sized pieces works best. This makes it easier to distribute evenly throughout the salad and ensures that each bite contains a good ratio of chicken to other ingredients. Aim for uniform thickness in your slices so that the chicken is dispersed consistently across the entire dish.
Step 5: Assembling the Antipasto Salad
With your perfectly grilled chicken resting and ready to be sliced, it’s time to bring all the elements of your antipasto salad together. Start by preparing your salad base. In a large, spacious salad bowl, place the chopped Romaine lettuce. Romaine is an excellent choice due to its crisp texture and sturdy leaves, which hold up well against the heavier antipasto ingredients.
Next, artfully arrange the other components of the antipasto salad over the bed of lettuce. Scatter the halved cherry tomatoes, which provide bursts of sweetness and acidity. Add the fresh mozzarella cheese balls; their creamy texture and mild flavor are a delightful contrast to the other ingredients. Finally, distribute the pickled pepperoncini throughout the salad, adding their signature tangy and slightly spicy kick that is so characteristic of antipasto.
Once the vegetables and cheese are in place, add the sliced grilled chicken on top. Ensure the chicken is spread evenly across the salad for a balanced distribution of protein. Now, retrieve the reserved half of the basil pesto vinaigrette from the refrigerator. Drizzle this delicious dressing generously over the entire salad. Toss everything gently to combine, ensuring that all the ingredients are lightly coated with the dressing. Serve immediately to enjoy the freshest flavors and textures.
Pro Tips for antipasto salad with grilled chicken
Tip: Quality Matters For the best flavor, use high-quality ingredients. Opt for fresh mozzarella balls, good-quality basil pesto, and ripe cherry tomatoes. These simple choices will make a significant difference in the final taste of your antipasto salad.
Tip: Don’t Skip the Marinade Time While you can technically grill chicken without marinating, the 30-minute to 2-hour marinade is crucial for infusing the chicken with the basil pesto vinaigrette. This step is what elevates the chicken from plain grilled meat to a flavorful component of the salad.
Tip: Grill Temperature is Key Ensure your grill is properly preheated to around 400°F (200°C) before adding the chicken. This high heat is essential for achieving those desirable grill marks and a good sear, while also ensuring the chicken cooks through quickly without drying out.
Tip: Resting the Chicken is Non-Negotiable As mentioned in the preparation steps, letting the grilled chicken rest for at least 5 minutes after cooking is vital. This allows the juices to redistribute, resulting in tender, moist, and flavorful chicken that complements the salad perfectly. Don’t rush this step!
Tip: Taste and Adjust Seasoning Before tossing the salad, always taste the dressing. Different brands of pesto and vinegars can vary in their saltiness and acidity. Adjust the salt, pepper, or even add a touch more lemon juice or vinegar to achieve your perfect flavor balance.
Serving Suggestions for antipasto salad with grilled chicken
Decoration
For an elegant presentation, consider garnishing the antipasto salad with a few fresh basil leaves. A light sprinkle of grated Parmesan cheese over the top can also add an extra layer of savory flavor and visual appeal. A final drizzle of high-quality extra virgin olive oil just before serving can enhance the salad’s richness and shine.
Side Dishes
This antipasto salad is quite substantial on its own, but it pairs beautifully with crusty Italian bread for dipping into any leftover dressing. A simple side of garlic bread or some focaccia would also be a welcome addition. For a lighter accompaniment, consider serving it alongside a bowl of minestrone soup or a simple green salad with a light vinaigrette.
Creative Serving Ideas
Instead of serving the salad in one large bowl, you can assemble individual portions in shallow bowls or plates for a more refined presentation. For an appetizer, serve smaller portions in martini glasses or mason jars, layering the ingredients attractively. You could also deconstruct the salad and serve the grilled chicken skewers alongside a smaller portion of the greens and antipasto elements for a different dining experience.
Preparation & Storage
Storing Leftovers
If you have any leftover antipasto salad with grilled chicken, it’s best to store the components separately if possible to maintain optimal texture. However, if already combined, transfer the salad to an airtight container. It will typically keep well in the refrigerator for 1-2 days. The dressing will continue to meld with the ingredients, but the lettuce may become slightly wilted over time.
Freezing
This antipasto salad is not generally recommended for freezing. The fresh components like lettuce, tomatoes, and mozzarella do not hold up well to freezing and thawing, and their texture would be significantly compromised. The grilled chicken, however, could be frozen separately if desired, but it’s best to enjoy the assembled salad fresh.
Reheating
There is no need to reheat this salad, as it is designed to be served chilled or at room temperature. If you have stored leftovers and they are very cold, you can let them sit at room temperature for about 15-20 minutes before serving. This allows the flavors to become more pronounced and the texture more pleasant.
Frequently Asked Questions
-
Can I make this antipasto salad ahead of time?
Yes, you can prepare some components of this antipasto salad ahead of time to make assembly quicker. The basil pesto vinaigrette can be made up to 3 days in advance and stored in an airtight container in the refrigerator. The chicken can also be grilled and sliced a day in advance and stored separately in the refrigerator. For the best results, it’s recommended to chop the lettuce and halve the tomatoes closer to serving time to maintain their freshness and crispness. Combine and dress the salad just before serving to prevent the lettuce from becoming soggy.
-
What are the best substitutes for pepperoncini in this salad?
Pepperoncini add a distinctive tangy and slightly spicy flavor to the antipasto salad. If you can’t find them or prefer not to use them, there are several good substitutes. Jarred roasted red peppers offer a sweet and slightly smoky flavor and a similar texture. Kalamata olives, pitted and halved, provide a briny, salty, and fruity alternative. For a bit of heat, you could also add a small amount of chopped mild green chilies or even a few slices of pickled jalapeños, adjusting the quantity to your spice preference. Diced dill pickles can also offer a tangy crunch.
-
How can I make this salad more substantial for a main course?
To transform this antipasto salad into a heartier main course, consider adding more filling ingredients. You could incorporate cooked orzo pasta or couscous for a satisfying carbohydrate base, similar to a pasta salad. Adding grilled or roasted vegetables like zucchini, eggplant, or bell peppers will boost the volume and nutritional value. For extra protein, consider adding chickpeas, cannellini beans, or even some grilled shrimp or calamari. A few slices of hearty Italian bread served alongside for dipping will also make the meal more filling.