Irresistible Vegan Chocolate Mousse with Aquafaba Delight

With a gentle swirl of cocoa delight in the air, I unearthed a dessert that’s about to change your chocolate cravings forever. Enter the 4-Ingredient Vegan Chocolate Mousse with Aquafaba—a luxurious treat that’s not only rich in flavor but also guilt-free.
This mousse harnesses the magic of whipped aquafaba, transforming an every-day ingredient into an airy, beautiful dessert that everyone can enjoy. Whether you’re a seasoned home-chef or simply looking to impress, this recipe will win your heart with its easy prep and minimal ingredients. Perfect for gatherings or a simple night in, you can dive in knowing you’re indulging in guiltless sweetness, free from dairy and refined sugars. Who said vegan desserts can’t be dreamy? I can’t wait for you to explore all the creamy, chocolatey goodness waiting for you—how do you plan to make it your own?
Why You Will Love This Recipe
- Simplicity: Crafted with only four core ingredients, this mousse is accessible for all skill levels, making impressive desserts achievable for everyone.
- Guilt-Free Indulgence: Enjoy the deep, rich chocolate flavor without the burden of dairy or refined sugars, allowing for a truly guiltless treat.
- Aquafaba Magic: This unique ingredient provides a light, airy, and beautifully delicate texture, offering a sophisticated twist on a classic French dessert that’s surprisingly simple to achieve.
- Versatile Customization: Easily adapt the base recipe with additions like a pinch of sea salt or fresh berries, allowing you to tailor the flavor profile to your personal preferences and any occasion.
- Crowd-Pleasing Appeal: Its elegant presentation and decadent taste make it a guaranteed hit for dinner parties, special occasions, or simply when you need a comforting yet elegant dessert.
Ingredients You Need
Prepare to create a delicious Vegan Chocolate Mousse that will amaze your taste buds with its simplicity and depth of flavor. The key to this dessert’s success lies in the quality of its few, carefully chosen ingredients, ensuring a rich and satisfying experience with every spoonful. Remember that sourcing good quality, dairy-free dark chocolate will significantly enhance the final taste profile of your mousse.
4-Ingredient Vegan Chocolate Mousse with Aquafaba
Indulge in a luxurious and guilt-free dessert with this 4-Ingredient Vegan Chocolate Mousse. Made using the magic of aquafaba, this mousse is airy, rich, and incredibly easy to prepare. Perfect for any occasion, it's a delightful treat that proves vegan desserts can be dreamy and decadent.
- 1 cup Aquafaba (from canned chickpeas)
- 200 grams Dark Chocolate (dairy-free)
- 1/4 cup Maple Syrup (can substitute with agave syrup)
- 1 teaspoon Vanilla Extract (optional but recommended)
- 1Step 1: Melt the ChocolateBreak your dark chocolate into small pieces and place them in a heatproof bowl. Set the bowl over a pot of simmering water, ensuring the bottom doesn’t touch the water. Gently stir the chocolate as it melts for about 5 minutes until smooth and glossy. Remove from heat and allow it to cool slightly while you prepare the aquafaba.
- 2Step 2: Whip the AquafabaIn a large, clean mixing bowl, pour in the aquafaba from your canned chickpeas. Using an electric mixer, whip the aquafaba on medium-high speed for approximately 10 minutes, or until you achieve stiff peaks. You’ll know it’s ready when the mixture holds peaks that stand upright. Take care not to under-whip, as this will affect the lightness of your Vegan Chocolate Mousse.
- 3Step 3: Combine IngredientsOnce the melted chocolate has cooled slightly, gently fold it into the whipped aquafaba using a spatula. Start by adding a small amount to lighten the mixture, then gradually incorporate the rest. Be cautious and fold gently to maintain the airiness of the aquafaba. This step is crucial for achieving that light texture that makes your Vegan Chocolate Mousse so delightful.
- 4Step 4: Sweeten the MousseNext, drizzle in the maple syrup and add the vanilla extract to the chocolate-aquafaba mixture. Again, use a spatula to fold everything together until evenly combined and you can no longer see the chocolate streaks. This step enhances the flavor while ensuring your mousse remains deliciously sweet without any refined sugar.
- 5Step 5: Serve and ChillSpoon your silky Vegan Chocolate Mousse into individual serving dishes or ramekins, filling them about three-quarters full. Place them in the refrigerator to chill for at least 1 hour, allowing the mousse to set properly. This chilling period ensures it holds its shape while developing amazing flavors—perfect for impressing your guests with a sophisticated dessert!
Keywords: vegan chocolate mousse, aquafaba dessert, dairy-free, refined sugar-free, easy dessert, chocolate recipe, plant-based
While the precise quantities are detailed within the recipe card, always ensure you have these essential components ready for a seamless preparation. These fundamental ingredients work in harmony to create a surprisingly complex and utterly delicious dessert.
Variations
Let your creativity shine as you explore these delightful twists on the classic vegan chocolate mousse, transforming it into something uniquely yours. Each variation offers a subtle yet impactful change, allowing you to cater to different tastes and occasions.
Sea Salt Sparkle: Add a generous pinch of flaky sea salt to the melted dark chocolate just before folding it into the aquafaba. This creates a delightful sweet-salty contrast that elevates the chocolate’s richness and adds an addictive complexity to each bite, making it a true indulgence.
Cocoa Powder Power: For a lighter, lower-sugar option, consider replacing some or all of the dark chocolate with high-quality unsweetened cocoa powder. Whisk the cocoa powder with a touch of the maple syrup and a tablespoon of warm water to create a smooth paste before gently folding it into the aquafaba. This method results in a wonderfully rich chocolate flavor with a slightly different, often lighter, texture.
Spicy Kick: For those who enjoy a bit of heat, a tiny sprinkle of cayenne pepper or a pinch of chili powder added along with the maple syrup can introduce a surprising and sophisticated warmth. The subtle heat complements the deep chocolate notes beautifully, creating a complex flavor profile that will intrigue your palate.
Nutty Flavor: Fold in a tablespoon or two of smooth almond butter or peanut butter into the melted chocolate mixture. This addition will impart a rich, creamy nuttiness that beautifully complements the chocolate, adding another layer of decadence and a satisfying depth to the mousse.
Fruit Infusion: Gently fold in a couple of tablespoons of pureed fresh raspberries or a well-mashed ripe banana into the mixture before chilling. This not only adds a vibrant color but also infuses a natural sweetness and fruity undertone that dances harmoniously with the chocolate, perfect for a refreshing twist.
Zesty Burst: Incorporate a teaspoon of finely grated orange or lemon zest into the mousse mixture. The bright, aromatic citrus notes provide a refreshing counterpoint to the rich chocolate, cutting through the sweetness and adding a sophisticated, summery brightness that is incredibly appealing.
How to Prepare Vegan Chocolate Mousse Aquafaba
Step 1: Melt the Chocolate
Begin this delightful culinary journey by carefully breaking your chosen dairy-free dark chocolate into small, uniform pieces. Place these delicate fragments into a heatproof bowl that is compatible with a double boiler setup. Suspend this bowl over a pot of gently simmering water, ensuring that the bottom of the bowl does not make direct contact with the water; this gentle heat prevents scorching.
As the chocolate begins to soften, dedicate yourself to its care by stirring it frequently with a spatula or whisk. Continue this patient process for approximately five minutes, or until the chocolate has completely transformed into a smooth, glossy, and utterly luxurious liquid. Once perfectly melted and free of any lumps, carefully remove the bowl from the heat source and set it aside to cool slightly while you proceed to the next crucial step of the recipe.
Step 2: Whip the Aquafaba
In a large, impeccably clean mixing bowl, pour the clear, viscous aquafaba – the liquid reserved from a can of chickpeas. It is absolutely vital that the bowl and any utensils used are completely free of grease or residue, as even a tiny amount of fat can prevent the aquafaba from whipping to its full potential. This pristine environment is key to achieving the airy structure essential for a perfect mousse.
Utilize an electric mixer, starting on a medium-high speed, and commence whipping the aquafaba with unwavering consistency. This process will require patience, typically around ten minutes, during which the liquid will gradually transform, becoming opaque, increasing in volume, and developing into a fluffy, meringue-like consistency. You are aiming for what are known as “stiff peaks”—when you lift the beaters, the mixture should stand up straight, holding its shape without drooping.
Step 3: Combine Ingredients
Once your melted dark chocolate has cooled to a temperature that is warm but not hot to the touch, it is time to gently introduce it to the whipped aquafaba. The key here is to maintain the airiness that you worked so hard to create in the aquafaba; therefore, a delicate folding technique is paramount.
Begin by adding just a small portion of the melted chocolate to the aquafaba mixture. Use a large spatula to gently fold it in, essentially lifting from the bottom of the bowl and folding over the top, to lighten the aquafaba’s base. Once this initial amount is partially incorporated, gradually add the remaining melted chocolate in stages, continuing to fold with the utmost care and precision. This gradual incorporation and gentle folding are essential for achieving that signature light and fluffy texture that defines a truly exceptional vegan chocolate mousse.
Step 4: Sweeten the Mousse
Now, it’s time to infuse your mousse with its essential sweetness and enhance its chocolatey notes. Drizzle the pure maple syrup evenly over the combined chocolate and aquafaba mixture. If you are using vanilla extract, add that now as well; its warm undertones will beautifully complement the richness of the chocolate.
Once again, reach for your trusty spatula and employ the same gentle folding technique used previously. Carefully fold the maple syrup and vanilla extract into the mixture until they are completely and uniformly distributed, ensuring there are no streaks of undiluted syrup or concentrated vanilla. The goal is to integrate these flavor-enhancing ingredients without deflating the delicate air bubbles that give the mousse its ethereal lightness.
Step 5: Serve and Chill
With your velvety smooth vegan chocolate mousse now fully prepared, it’s time to present it beautifully. Spoon the luscious mixture into individual serving dishes, elegant ramekins, or small glasses, filling each one about three-quarters of the way to the top. This allows ample space for any desired garnishes or a little extra room for indulgence.
For the mousse to achieve its perfect texture and set properly, it must undergo a period of chilling. Place the filled serving dishes carefully into the refrigerator. Allow them to chill undisturbed for a minimum of one hour, though longer is often better for a firmer set and intensified flavors. This crucial chilling period is what transforms the airy mixture into a stable, delightful mousse that is ready to impress and satisfy.
Step 6: Final Touches and Enjoyment
Once your vegan chocolate mousse has chilled and reached the desired consistency, it is ready to be enjoyed. Before serving, take a moment to admire its rich color and smooth texture. This is also the perfect opportunity to add any desired garnishes that will elevate its presentation and add delightful complementary flavors and textures.
Consider a delicate dusting of cocoa powder, a few fresh berries, or a sprig of mint for a burst of color and freshness. You can also top it with a swirl of coconut whipped cream for an extra layer of creamy indulgence. Serve immediately to your eager guests or savor this decadent, guilt-free dessert yourself.
Pro Tips for Vegan Chocolate Mousse Aquafaba
Perfect Aquafaba: The absolute key to a light and airy mousse is whipping your aquafaba until stiff, glossy peaks form. This means when you lift the beaters, the mixture should stand straight up and hold its shape without drooping. Don’t rush this stage; it may take the full 10 minutes or even longer depending on your mixer.
Cool the Chocolate: It is critical to let your melted dark chocolate cool down to a lukewarm temperature before you start folding it into the whipped aquafaba. If the chocolate is too hot, it will effectively “cook” and deflate the delicate air bubbles in the aquafaba, resulting in a denser, less ethereal mousse.
Gentle Folding Technique: When combining the chocolate and aquafaba, use a large spatula and a gentle folding motion. Scoop from the bottom of the bowl and carefully fold it over the top, rotating the bowl as you go. Avoid vigorous stirring or over-mixing, which will inevitably knock the air out of the aquafaba.
Ingredient Quality Matters: Since there are so few ingredients in this recipe, the quality of each one truly shines through. Opt for a high-quality, dairy-free dark chocolate that you enjoy the taste of on its own; its flavor will be the star of the show in your mousse. Similarly, use good quality maple syrup for a pure, natural sweetness.
Chill Time is Non-Negotiable: While the active preparation time is quite short, allowing the mousse to chill properly is essential for it to set and develop its signature texture. Resist the urge to serve it too soon; a minimum of one hour in the refrigerator is necessary for the mousse to firm up and become perfectly spoonable.
Clean Equipment is Crucial: Ensure your mixing bowl and beaters are spotlessly clean and completely free of any grease or fat. Even a tiny residue can prevent the aquafaba from whipping correctly, rendering it unable to achieve the necessary stiff peaks. This meticulous cleanliness is paramount for success.
Serving Suggestions for Vegan Chocolate Mousse Aquafaba
Decoration
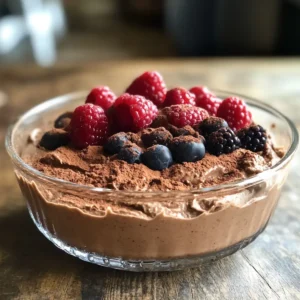
Elevate the visual appeal of your decadent vegan chocolate mousse with a few thoughtful decorative touches. A light dusting of unsweetened cocoa powder or finely grated dark chocolate shavings provides a classic, elegant finish that hints at the richness within. For a pop of vibrant color and a refreshing counterpoint, consider topping with a small cluster of fresh, jewel-like berries such as raspberries, blueberries, or sliced strawberries.
A single fresh mint leaf or a delicate sprig of mint can add an attractive green accent and an invigorating aroma that complements the chocolate beautifully. A delicate swirl of coconut whipped cream, piped artfully on top, adds another layer of creamy texture and visual interest, making the dessert look truly artisanal and inviting.
Side Dishes
While this mousse is delightful on its own, it can be beautifully complemented by a few carefully selected side dishes that enhance its overall dining experience. A small plate of crispy vegan biscotti or amaretti cookies offers a wonderful textural contrast, providing a satisfying crunch against the mousse’s creaminess. These can be served alongside or used to dip into the mousse for an extra layer of enjoyment.
For a truly sophisticated pairing, consider a warm cup of strong, freshly brewed coffee or a shot of rich espresso; the bitterness and depth of the coffee beautifully balance and amplify the chocolate notes in the mousse. Alternatively, a small glass of chilled dessert wine, such as a port or a sweet sherry, can offer an elegant and refined accompaniment that enhances the dessert’s decadent character.
Creative Serving Ideas
Think beyond the traditional ramekin to present your vegan chocolate mousse in truly memorable ways. For a fun, individual treat, spoon the mousse into small shot glasses or espresso cups for an elegant, bite-sized indulgence perfect for a party or a tasting menu. Layering the mousse with crumbled vegan cookies or a sprinkle of toasted nuts in clear glasses creates a delightful parfait effect, showcasing different textures and flavors.
You could also consider a more elaborate presentation by serving the mousse in hollowed-out fruit halves, such as oranges or small melons, for a naturally elegant and edible serving vessel that adds a fruity twist. Another creative approach is to pipe the mousse into delicate tuiles or chocolate cups for an impressive display that is both beautiful and delicious, making each serving a work of art.
Preparation & Storage
Storing Leftovers
If you find yourself with any leftover vegan chocolate mousse, rest assured it can be stored to enjoy later. The key to maintaining its delightful texture is to transfer any uneaten mousse into an airtight container. Ensure the lid is sealed tightly to prevent it from absorbing any odors from the refrigerator and to keep it from drying out.
Store the covered container in the main body of your refrigerator, avoiding the door where temperature fluctuations are more common. Properly stored, the mousse should remain enjoyable for up to two days, though it is always best consumed as fresh as possible for optimal fluffiness and flavor.
Freezing
While the ideal way to enjoy this mousse is fresh, it can be frozen if you need to prepare it further in advance. Portion the mousse into individual freezer-safe containers or an airtight container. It is advisable to leave a little headspace, as liquids can expand slightly when frozen.
Once sealed tightly, the mousse can be stored in the freezer for up to one month. Be aware that freezing and subsequent thawing may slightly alter the mousse’s texture, potentially making it a little less airy than when it was freshly made. Therefore, it is best to consume it within this timeframe for the best possible quality.
Reheating
It is important to note that this vegan chocolate mousse is not intended to be reheated in the traditional sense, as doing so would likely cause it to lose its delicate, airy structure. Instead, if you have frozen your mousse, the best method of “reheating” is simply to thaw it properly.
To thaw, carefully remove the frozen mousse from the freezer and place it in the refrigerator overnight. This slow thawing process allows it to gradually return to a chilled state without drastic temperature changes that can damage its texture. Once thawed, it can be served directly from the refrigerator, and you can gently stir it if needed to redistribute any separated moisture, though it may not be as light as when first made.
Frequently Asked Questions
-
What should I look for when selecting aquafaba for the best results in my vegan chocolate mousse?
For optimal whipping and a light, airy mousse texture, I highly recommend using the liquid from a can of plain chickpeas. Look for aquafaba that is free from added salts or preservatives if possible, as these can sometimes interfere with the whipping process. The liquid should have a slightly viscous, syrup-like consistency and appear clear to slightly cloudy, indicating it contains the proteins necessary for creating stable foam. Avoid using aquafaba that is overly watery or has an unusual smell, as this may indicate it’s not suitable for achieving stiff peaks.
-
How should I properly store any leftover vegan chocolate mousse to maintain its quality and texture?
To keep your leftover vegan chocolate mousse as delightful as possible, transfer it immediately into an airtight container. This is crucial to prevent the mousse from drying out or absorbing any unwanted odors from other foods in your refrigerator. Store the sealed container in the main compartment of your fridge, not in the door, to ensure a consistent, cool temperature. While it is best enjoyed within two days for peak fluffiness, proper storage will help it retain a pleasant texture for you to enjoy at a later time.
-
Can I freeze this vegan chocolate mousse for longer storage, and if so, what is the best way to do it and thaw it?
Absolutely, you can freeze this vegan chocolate mousse for longer storage, making it an excellent candidate for make-ahead desserts. Portion the mousse into individual freezer-safe containers or a larger airtight container, leaving a little room at the top as liquids can expand slightly when frozen. Once sealed securely, it can be stored in the freezer for up to one month. When you are ready to enjoy it, the best thawing method is to transfer it from the freezer to the refrigerator overnight. This slow thawing process helps to minimize texture changes, and you can gently stir it before serving if needed, though it may not be quite as airy as when freshly prepared.