Irresistible Beef and Cheese Chimichangas
Are you craving a dish that satisfies your hunger while also tantalizing your taste buds? Something that combines the savory notes of seasoned beef with the comforting stretch of melted cheese, all wrapped up in a crispy tortilla? Look no further than Beef and Cheese Chimichangas. This exciting dish isn’t just a meal; it’s an experience that comes from the heart of Mexican cuisine, bringing warmth and comfort with each bite.
What makes Beef and Cheese Chimichangas so special? Firstly, it’s the balance of flavors and textures—the juicy, seasoned beef melds perfectly with melted cheese, enveloped in a golden, crispy shell. Imagine taking a bite and feeling that satisfying crunch followed by the gooey richness inside. Wouldn’t that be the perfect comfort food? And the best part? It’s easier to make than you might think, making it an ideal option for weeknight dinners or special occasions.
This recipe doesn’t just cater to your taste; it offers versatility. Whether you’re hosting a casual get-together or preparing a festive feast, Beef and Cheese Chimichangas can be a hit. Plus, they can be customized to suit your palate, allowing you to experiment with different fillings or toppings. So, the next time you want to impress family and friends or simply enjoy a flavorful meal, consider making Beef and Cheese Chimichangas.
Why You Will Love This Recipe
- Flavorful Combination: The expertly seasoned ground beef, combined with creamy refried beans and gooey melted cheese, creates a symphony of tastes that is utterly mouthwatering and deeply satisfying.
- Crispy Perfection: Achieving that ideal golden-brown, crispy exterior is incredibly rewarding, providing a delightful textural contrast to the tender, flavorful filling within each chimichanga.
- Quick Preparation: Despite their impressive appearance and taste, these chimichangas are surprisingly quick to assemble and fry, making them a fantastic option for a weeknight dinner without sacrificing quality.
- Highly Versatile: This recipe serves as a brilliant canvas for your culinary creativity; you can easily adapt the fillings, cheeses, and toppings to suit any preference or dietary need, ensuring everyone enjoys them.
- Crowd-Pleasing Appeal: Their fun, handheld nature and universally loved flavors of beef and cheese make them an instant hit at parties, family gatherings, or even as a special appetizer.
Ingredients You Need
The secret to truly outstanding Beef and Cheese Chimichangas lies in the quality of your ingredients. Opting for fresh, good-quality ground beef will provide a rich, savory base, while a blend of cheeses, such as cheddar and Monterey Jack, offers the perfect melt and flavor profile. Ensuring your spices are fresh will also amplify the authentic Mexican taste you’re aiming for.
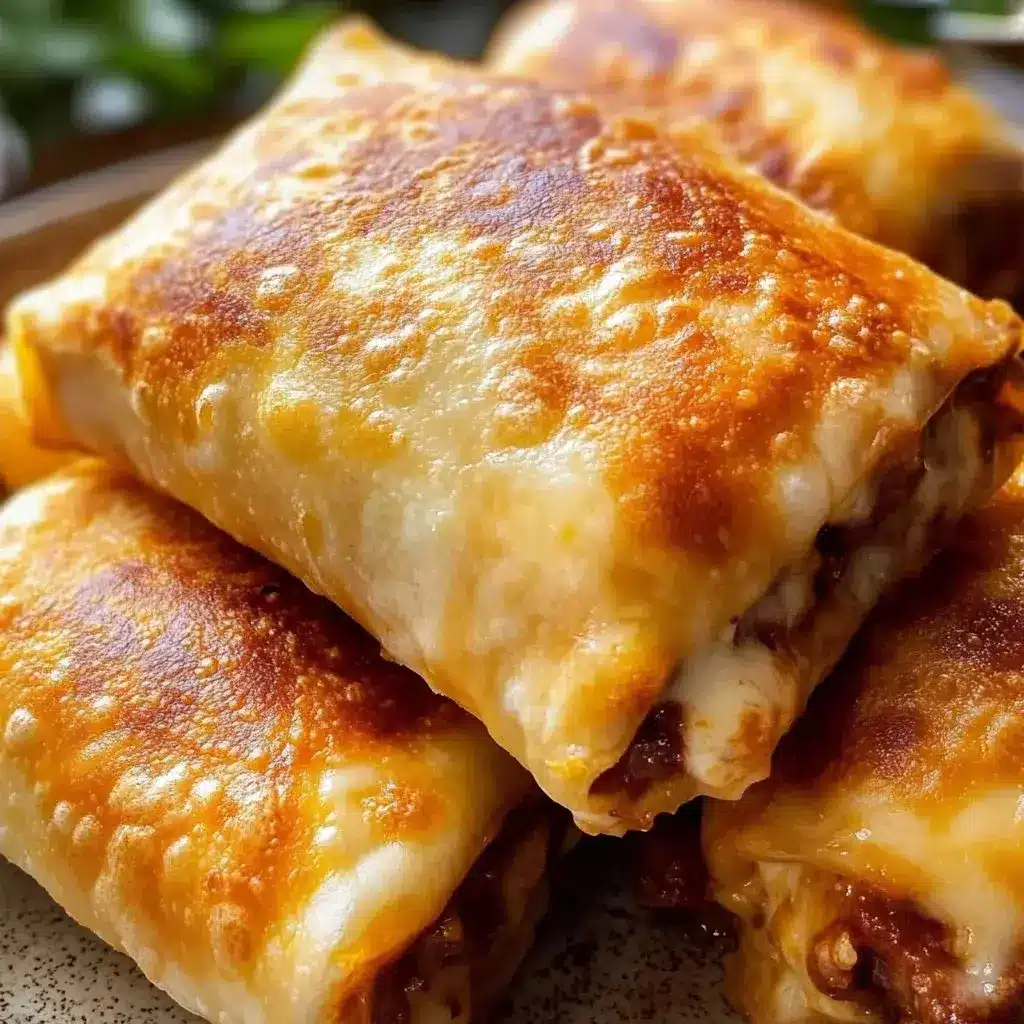
Beef and Cheese Chimichangas

Delicious and satisfying Beef and Cheese Chimichangas featuring seasoned beef, melted cheese, and a crispy tortilla shell, perfect for any occasion.
- 1 lb ground beef
- 1 cup shredded cheese (cheddar or Mexican blend)
- 1/2 cup onion, diced
- 1 can refried beans
- 1 tsp garlic powder
- 1 tsp chili powder
- 1/2 tsp cumin
- 8 large flour tortillas
- Salt and pepper to taste
- Optional: Sour cream and salsa for serving
- 1Gather all your ingredients, ensuring onions are finely diced and spices are measured out.
- 2In a skillet over medium heat, add the ground beef and diced onion. Cook until browned and onion is translucent, about 5-7 minutes. Drain excess fat.
- 3Stir in the refried beans, garlic powder, chili powder, cumin, salt, and pepper. Mix until heated through, about 3-5 minutes.
- 4While the beef mixture cools slightly, warm tortillas in a dry skillet or microwave to make them pliable.
- 5Spoon a portion of the beef mixture onto the center of each tortilla. Top with a sprinkle of shredded cheese.
- 6Fold tortillas over the filling, tucking in the sides to create a sealed pocket.
- 7In a deep frying pan, heat enough oil over medium heat to submerge the chimichangas. The oil should be hot but not smoking.
- 8Carefully place each chimichanga seam-side down in the hot oil. Fry until golden brown and crispy on all sides, about 3-4 minutes per side.
- 9Remove from oil and drain on paper towels to absorb excess oil.
Keywords: Beef, Cheese, Chimichangas, Comfort Food, Easy Recipe, Mexican, Fried
- ground beef: one pound of good quality ground beef is the foundation of this classic dish.
- shredded cheese: one cup of a cheddar or Mexican blend cheese provides that essential gooey, melted interior.
- onion: half a cup of finely diced onion adds a subtle sweetness and aromatic depth to the filling.
- refried beans: one can of creamy refried beans binds the filling together and adds a comforting texture.
- garlic powder: one teaspoon of garlic powder infuses a robust, savory garlic flavor throughout the mixture.
- chili powder: one teaspoon of chili powder brings a mild warmth and characteristic Mexican spice.
- cumin: half a teaspoon of cumin adds an earthy, smoky note that is crucial for authentic flavor.
- large flour tortillas: eight large flour tortillas are needed to encase the delicious filling.
- oil for frying: an adequate amount of neutral oil, like vegetable or canola, for achieving a perfect golden crisp.
- salt and pepper: to taste, ensuring the flavors are perfectly balanced and enhanced.
- sour cream and salsa: optional garnishes to serve alongside, adding freshness and a touch of tang.
The specific quantities for each ingredient can be found within the recipe card above for your convenience.
Variations
For a delightful vegan twist on this beloved dish, you can easily substitute the ground beef with crumbled firm tofu or a hearty mixture of black beans and corn. Season this plant-based filling generously with the same aromatic spices, like chili powder, cumin, and garlic powder, to maintain that authentic flavor profile. Then, instead of dairy cheese, opt for a dairy-free shredded cheese alternative that melts well, or simply embrace the richness of the spiced vegetables and beans.
If you’re aiming for a low-carb or keto-friendly version, the approach needs a slight modification. Begin by preparing the beef and cheese filling as usual, ensuring to omit the refried beans, which are high in carbohydrates. Instead, you might incorporate finely chopped mushrooms or a generous portion of extra cheese to maintain richness and satiety. For the wrapper, consider using large lettuce leaves, like romaine or butter lettuce, or explore specialized low-carb tortillas readily available in most supermarkets.
Another exciting variation involves infusing the filling with international flavors. Imagine a “Spicy Chorizo and Potato Chimichanga” where crumbled spicy chorizo replaces the ground beef, and small, tender cubes of seasoned potato are added for texture. Or perhaps a “Chicken Verde Chimichanga” where shredded chicken is simmered in a tangy tomatillo salsa, mixed with corn and cotija cheese. These creative adjustments allow for endless culinary exploration while still honoring the core concept of a delicious, crispy stuffed tortilla.
How to Prepare Beef and Cheese Chimichangas
Step 1: Gather and Prepare Your Ingredients
Before you begin the cooking process, it’s crucial to have all your ingredients prepped and ready to go. This involves finely dicing your onion, ensuring your spices are measured out into small bowls, and having your ground beef and shredded cheese within easy reach. Having everything organized streamlines the entire cooking experience, making it more enjoyable and less prone to error.
This initial step is often overlooked, but it’s a cornerstone of efficient cooking, especially when dealing with recipes that have multiple components. It minimizes pauses during cooking and ensures that you can smoothly transition from one stage to the next without frantically searching for an ingredient. Think of it as setting the stage for a culinary performance where every actor (ingredient) is in its right place.
Furthermore, consider pre-shredding your cheese if it’s not already in that form. This small act saves precious minutes during assembly and prevents you from having to stop and shred while the beef mixture is hot. A well-prepared mise en place, as it’s known in professional kitchens, is your first victory in achieving delicious Beef and Cheese Chimichangas.
Step 2: Cook the Savory Beef and Onion Base
In a large skillet, heat a tablespoon of oil over medium heat. Add the one pound of ground beef to the skillet. Break up the meat with a spoon and cook it until it is thoroughly browned, which typically takes about seven to ten minutes. During this time, the beef will release its natural fats, creating a flavorful base for the rest of the filling.
Once the ground beef is browned, add the finely diced half cup of onion to the skillet. Continue to cook, stirring occasionally, until the onion becomes translucent and tender, usually about five to seven minutes. The onions will soften and their natural sweetness will develop, complementing the savory notes of the beef beautifully. It’s essential to cook the onions thoroughly so they meld seamlessly into the filling.
After the beef and onions have cooked, it’s important to drain off any excess fat from the skillet. This step is vital for preventing the chimichangas from becoming greasy and heavy once fried. Tilt the skillet carefully over a heatproof bowl or use a spoon to remove the rendered fat, leaving behind the flavorful, lean beef and onion mixture. This ensures a cleaner flavor profile and a more pleasant texture in the final dish.
Step 3: Infuse with Beans and Spices
Now it is time to introduce the heart of the filling’s flavor and texture: the refried beans and spices. Add the entire can of refried beans to the skillet with the browned beef and onions. Stir everything together until the beans are well incorporated and the mixture is cohesive. This creates the creamy binder that holds all the delicious components of your chimichanga filling together.
Next, sprinkle in the one teaspoon of garlic powder, one teaspoon of chili powder, and half a teaspoon of cumin. Add salt and pepper to taste as well. Stir vigorously to ensure that all the spices are evenly distributed throughout the beef, bean, and onion mixture. This ensures that every bite of your chimichanga will be bursting with authentic Mexican flavor. Taking the time to mix thoroughly here is key to unlocking the full taste potential.
Continue to cook the mixture over medium-low heat, stirring frequently, for another three to five minutes. This allows the flavors to meld together beautifully and ensures that the refried beans are heated through and creamy. The aroma at this stage should be incredibly enticing, hinting at the deliciousness to come. Taste and adjust seasonings if necessary before proceeding to the next step.
Step 4: Prepare the Tortillas for Filling
While the seasoned beef mixture is cooling slightly, it’s time to prepare your tortillas. To make them pliable and prevent them from cracking when rolled, you need to warm them. You can achieve this by briefly heating them in a dry skillet over medium heat, flipping them once or twice until they are warm and soft. Alternatively, you can microwave them for about 20-30 seconds, stacked between damp paper towels.
The goal here is to make the tortillas flexible enough to be rolled and folded without tearing. Overheating can make them brittle, so a gentle warming is all that’s needed. Once warmed, keep them covered with a clean kitchen towel or foil to retain their warmth and pliability as you assemble the chimichangas.
This step is crucial for the structural integrity of your chimichangas. A stiff, cold tortilla is much more likely to split when you’re trying to roll it tightly, leading to a messy frying process. Taking these few extra moments to properly warm the tortillas will make the assembly significantly easier and result in beautifully formed chimichangas ready for frying. A well-prepared tortilla ensures a perfectly sealed package of deliciousness.
Step 5: Assemble Your Flavorful Parcels
Lay a warmed flour tortilla flat on a clean work surface. Spoon a generous portion of the cooled beef and bean mixture onto the center of the tortilla. You want to use enough filling to be satisfying, but not so much that it becomes difficult to enclose the chimichanga. A good rule of thumb is about 1/3 to 1/2 cup of filling per tortilla.
After adding the savory filling, sprinkle a good amount of your shredded cheese over the top of the beef mixture. This is where the magic of melted cheese begins! The heat from the filling will start to melt the cheese, creating that irresistible gooey interior that is the hallmark of a great chimichanga. Don’t be shy with the cheese; it’s a key component!
Ensure the filling and cheese are concentrated in the center of the tortilla. This positioning makes it easier to fold the edges over and create a compact parcel. The distribution of the filling directly impacts how well the chimichanga holds together during the frying process, so aim for an even, centered layer.
Step 6: Seal the Chimichangas Securely
Now it’s time to fold your tortillas into perfect little pockets. Take the bottom edge of the tortilla and fold it up over the filling. Then, fold in the left and right sides of the tortilla towards the center, creating a sealed envelope shape. This technique helps to keep all the delicious filling contained within the tortilla during the frying process.
Continue to roll the chimichanga upwards, tucking in the sides as you go, to create a tight, secure cylinder. The goal is to create a well-sealed package that will prevent any of the filling from escaping into the hot oil. If your tortilla is having trouble sealing, you can moisten the edge slightly with a little water, though this is usually not necessary if the tortillas were warmed properly.
The secure folding is paramount to successful chimichanga frying. A poorly sealed chimichanga can burst open in the hot oil, creating a mess and potentially wasting precious filling. Take your time with this step to ensure each one is tightly and neatly rolled. The seam side should always be placed down in the hot oil first to help it seal completely.
Step 7: Heat the Frying Oil to Perfection
In a deep, heavy-bottomed skillet or a Dutch oven, pour enough neutral cooking oil (such as vegetable, canola, or peanut oil) to ensure the chimichangas will be mostly submerged when fried. Heat the oil over medium heat. It’s important not to overcrowd the pan, so if you have a smaller skillet, you may need to fry the chimichangas in batches.
The ideal temperature for frying chimichangas is typically between 350°F and 375°F (175°C to 190°C). You can test the oil’s readiness by dropping a small piece of tortilla into it; if it sizzles immediately and floats to the surface, the oil is ready. If it browns too quickly, the oil is too hot; if it just bubbles gently, it’s not hot enough.
Maintaining the correct oil temperature is critical for achieving perfectly crispy chimichangas. If the oil is too cool, they will absorb too much oil and become greasy and soggy. If the oil is too hot, the exterior will brown too quickly before the interior has a chance to heat through properly and the cheese to melt. Use a kitchen thermometer for accuracy if you have one, or rely on the visual test with a small piece of tortilla.
Step 8: Achieve Golden-Brown Crispy Perfection
Once the oil has reached the optimal temperature, carefully place the folded chimichangas into the hot oil, seam-side down first. Be cautious, as the oil will bubble vigorously. Do not overcrowd the skillet; fry in batches to ensure the oil temperature remains consistent and the chimichangas have enough space to fry evenly.
Fry each chimichanga for approximately 3 to 4 minutes per side, or until they are a deep golden brown and delightfully crispy. Use tongs to gently turn them, ensuring all sides are evenly cooked and beautifully browned. The sound of the oil sizzling around them is the promise of a delicious crunch with every bite.
The total frying time will depend on the size of your chimichangas and the exact temperature of your oil. The goal is to achieve that signature crispy exterior that crackles when you bite into it, while ensuring the filling inside is heated through and the cheese is perfectly melted and gooey. This stage is where the humble ingredients transform into a spectacular dish.
Step 9: Drain and Serve Your Masterpieces
Once the chimichangas have reached a beautiful golden-brown crisp on all sides, carefully remove them from the hot oil using tongs or a slotted spoon. Immediately place them on a plate lined with paper towels. This step is essential for absorbing any excess oil, ensuring your chimichangas are delightfully crisp and not greasy.
Allow them to drain for a minute or two. The paper towels will do their work quickly to wick away any residual oil. While they are still warm, you can sprinkle them with a touch more salt, if desired. This is the moment of triumph where your hard work has culminated in a truly delectable dish.
Serve your hot, crispy Beef and Cheese Chimichangas immediately. They are best enjoyed fresh from the fryer when their texture is at its peak and the cheese is perfectly melted. Pair them with your favorite toppings and side dishes to complete this satisfying culinary experience. Enjoy every crunchy, cheesy, savory bite!
Pro Tips for Beef and Cheese Chimichangas
Don’t Overfill Tortillas: A common mistake is packing too much filling into each tortilla. This can cause them to burst during frying, leading to a messy kitchen and less appealing chimichangas. Use a measured amount of filling, ensuring you can still fold the tortilla securely without straining it.
Ensure Proper Oil Temperature: Frying at the correct temperature is crucial. If the oil is too cool, the chimichangas will absorb too much grease and become soggy. If it’s too hot, the exterior will burn before the inside is cooked through and the cheese is melted. Aim for a consistent 350-375°F (175-190°C).
Drain Fat Adequately: After browning the ground beef, thoroughly drain off any excess fat. This prevents the filling from becoming greasy and also helps the exterior of the chimichanga crisp up nicely without being weighed down by fat.
Warm Tortillas Properly: Always warm your flour tortillas before filling and rolling. This makes them much more pliable and less likely to tear. A quick pass in a dry skillet or a few seconds in the microwave does the trick, ensuring a smooth assembly process and a neat final product.
Seal Tightly: When folding the tortillas, ensure they are sealed securely, especially along the seam. This prevents the filling from leaking out into the hot oil during frying. Tucking in the sides before rolling creates a compact, well-contained chimichanga that fries beautifully.
Serving Suggestions for Beef and Cheese Chimichangas
Decoration
To elevate the presentation of your Beef and Cheese Chimichangas, consider a vibrant garnish. A dollop of cool sour cream or Mexican crema provides a refreshing contrast to the richness of the fried tortilla and savory filling. Freshly chopped cilantro adds a burst of herbaceous flavor and a beautiful green hue.
For those who enjoy a bit of heat and zest, a sprinkle of finely diced jalapeños or a side of your favorite salsa is a perfect addition. A scattering of crumbled cotija cheese or a light dusting of chili powder can also add visual interest and an extra layer of flavor. These simple decorative touches make your homemade chimichangas look as good as they taste.
Alternatively, you could create a colorful salsa fresca, also known as pico de gallo, with diced tomatoes, onions, cilantro, and a squeeze of lime juice. This fresh salsa not only looks appealing with its array of colors but also provides a bright, zesty counterpoint to the deep-fried goodness of the chimichangas.
Side Dishes
Complement your Beef and Cheese Chimichangas with classic Mexican accompaniments. A side of fluffy Mexican rice, seasoned with tomato and spices, is a traditional and satisfying pairing that soaks up any extra flavors beautifully. Creamy refried beans, perhaps a different preparation than the filling, can also offer a comforting and complementary texture and taste.
For a lighter and fresher option, consider a crisp green salad tossed with a lime vinaigrette. Adding ingredients like corn, black beans, avocado, and cherry tomatoes to the salad can make it a more substantial and colorful side dish. Guacamole, with its creamy texture and fresh avocado flavor, is another indispensable partner that enhances the overall dining experience.
Other excellent choices include sweet corn kernels, black bean and corn salsa, or even some lightly seasoned roasted vegetables like bell peppers and onions. The key is to select sides that balance the richness of the chimichangas, offering different textures and flavor profiles to create a well-rounded and enjoyable meal. Explore different options to find your perfect combination.
Creative Serving Ideas
Transform your chimichangas into an appetizer by serving them in smaller sizes, perhaps cut in half after frying, and arranged attractively on a platter with various dipping sauces like salsa roja, salsa verde, and queso dip. This makes them perfect for sharing at parties or game nights.
For a more festive meal, serve them “enchilada-style” by topping the fried chimichangas with a rich enchilada sauce and an extra sprinkle of cheese, then briefly broiling them until the cheese is bubbly and slightly browned. This adds another layer of flavor and a luxurious feel to the dish.
Consider creating a “Chimichanga Bar” where guests can customize their own. Offer the prepared chimichangas alongside a variety of toppings such as shredded lettuce, diced tomatoes, onions, pickled jalapeños, sour cream, guacamole, and different salsas. This interactive approach allows everyone to build their perfect chimichanga and adds a fun element to any gathering. You could even have a station with drinks like horchata or limeade to complete the theme.
Preparation & Storage
Storing Leftovers
If you find yourself with delicious leftover Beef and Cheese Chimichangas, proper storage is key to maintaining their quality. Allow them to cool completely at room temperature before transferring them to an airtight container. This prevents condensation from making the tortillas soggy during refrigeration. They can be stored in the refrigerator for up to three days.
When storing, it’s best to place them in a single layer if possible, or separate them with parchment paper to prevent sticking. Avoid storing them with overly wet toppings like fresh salsa, as this can also lead to sogginess. For optimal results, store the chimichangas themselves and add toppings just before reheating.
Refrigeration slows down the spoilage process and keeps the food safe to eat. However, it’s important to note that even with proper storage, the crispiness of the fried exterior will inevitably diminish over time. This is a natural consequence of refrigeration for fried foods, but they will still be perfectly edible and enjoyable.
Freezing
Beef and Cheese Chimichangas freeze remarkably well, making them an excellent candidate for meal prep. Once the chimichangas have cooled completely, wrap each one individually and tightly in plastic wrap. Follow this by wrapping them securely in aluminum foil, or place them in a freezer-safe bag or container.
This double layer of protection is essential for preventing freezer burn, which can degrade the texture and flavor of the chimichangas. Ensure all air is removed from the packaging before sealing. Properly frozen, they can be stored in the freezer for up to two months, retaining much of their original deliciousness.
When freezing, consider preparing them without any wet toppings if you plan to freeze them for an extended period. Adding fresh garnishes like sour cream or salsa after reheating will ensure they remain vibrant and delicious. Labeling the packages with the date can also be helpful for tracking freshness.
Reheating
Reheating chimichangas requires a method that aims to restore their signature crispiness. The best way to reheat them is in a preheated oven. Place the chimichangas on a baking sheet lined with parchment paper and bake at 350°F (175°C) for about 15-20 minutes, or until they are heated through and the exterior is crispy again.
An air fryer can also be an excellent tool for reheating, as it circulates hot air efficiently. Set your air fryer to around 350°F (175°C) and heat for 5-8 minutes, checking frequently until they are hot and crispy. This method often yields results closest to freshly fried.
While microwaving is the quickest method, it generally results in a softer, less crispy exterior. If you must use the microwave, heat them in short intervals (30-60 seconds), checking for doneness each time, to avoid overcooking. You can follow microwaving with a brief stint in a toaster oven or under the broiler to try and regain some crispness, but it won’t be the same as oven or air fryer reheating.
Frequently Asked Questions
-
Can I make the filling for Beef and Cheese Chimichangas ahead of time?
Yes, you absolutely can prepare the beef and bean filling for your chimichangas in advance. Once cooked and cooled, store the filling in an airtight container in the refrigerator for up to two days. When you’re ready to assemble and serve, simply warm the filling slightly before spooning it into the tortillas and proceeding with the assembly and frying steps. This is a fantastic way to save time on busy weeknights or to prepare for a gathering. Ensure the filling is completely cooled before refrigerating to prevent bacterial growth and maintain quality.
-
What are the best side dishes to serve with Beef and Cheese Chimichangas?
Beef and Cheese Chimichangas are wonderfully versatile and pair well with a variety of classic Mexican-inspired side dishes. Traditional Mexican rice, seasoned with tomato and spices, is a popular choice and offers a hearty complement to the richness of the chimichangas. Creamy refried beans, or a simpler version of black beans seasoned with cumin and garlic, also make for a satisfying accompaniment. For a fresher counterpoint, consider a crisp green salad tossed with a zesty lime vinaigrette, or a colorful corn and black bean salsa. Guacamole, with its creamy texture and fresh flavor, is almost essential, and don’t forget some fresh salsa or sour cream for topping. A side of elote (Mexican street corn) can also add a delightful burst of flavor.
-
How can I make Beef and Cheese Chimichangas healthier without sacrificing flavor?
There are several ways to make Beef and Cheese Chimichangas a bit healthier while keeping them delicious. You can opt for leaner ground meat, such as ground turkey or chicken, to reduce saturated fat content. Instead of deep-frying, consider baking or air-frying the chimichangas until golden and crispy, which significantly cuts down on the amount of oil used. You could also incorporate more vegetables into the filling, such as finely chopped bell peppers, mushrooms, or zucchini, to increase fiber and nutrient content. Reducing the amount of cheese or using a reduced-fat cheese option can also help lower calories and fat. Finally, serving them with lighter toppings like fresh salsa, guacamole, and a side salad instead of heavy sour cream or extra cheese will contribute to a healthier meal.