Golden Pineapple Dump Cake
Pineapple Dump Cake stands as a testament to the magic of simple ingredients coming together effortlessly. It’s a dessert that whispers sweet, tropical promises with every forkful, offering a delightful escape without requiring culinary acrobatics. This recipe is designed for those moments when you crave a comforting, homemade treat that feels both special and incredibly easy to achieve.
The beauty of this cake lies in its unpretentious nature; it’s a dessert that welcomes everyone, regardless of their baking experience. It delivers a taste of sunshine and cozy sweetness, making it a perfect centerpiece for gatherings or a simple indulgence just for you. Get ready to experience a truly fuss-free, flavorful delight.
Why You Will Love This Recipe
- Effortless Assembly: With no bowls or mixers needed, you simply layer ingredients directly into the baking dish, making cleanup a breeze.
- Tropical Sweetness: The crushed pineapple provides a juicy, tangy-sweet base that perfectly complements the buttery, golden cake topping.
- Perfectly Textured Topping: The dry cake mix, combined with melted butter and brown sugar, bakes into delightfully crisp and tender patches, offering a wonderful contrast.
- Nutty Crunch: Chopped pecans are scattered over the cake mix, adding a satisfying texture and a warm, nutty flavor that elevates the entire dessert.
- Speedy Preparation: This is a true “dump and bake” recipe, minimizing your active time in the kitchen so you can enjoy the delicious results sooner.
Ingredients You Need
The success of this simple yet spectacular dessert hinges on the quality and freshness of its few, foundational ingredients. Choosing ripe, flavorful pineapple and a good quality yellow cake mix will ensure the best possible outcome. Even the humble pecan plays a vital role in adding depth and texture that transforms this into a truly satisfying treat. Always ensure your butter is fresh for that rich, golden finish.
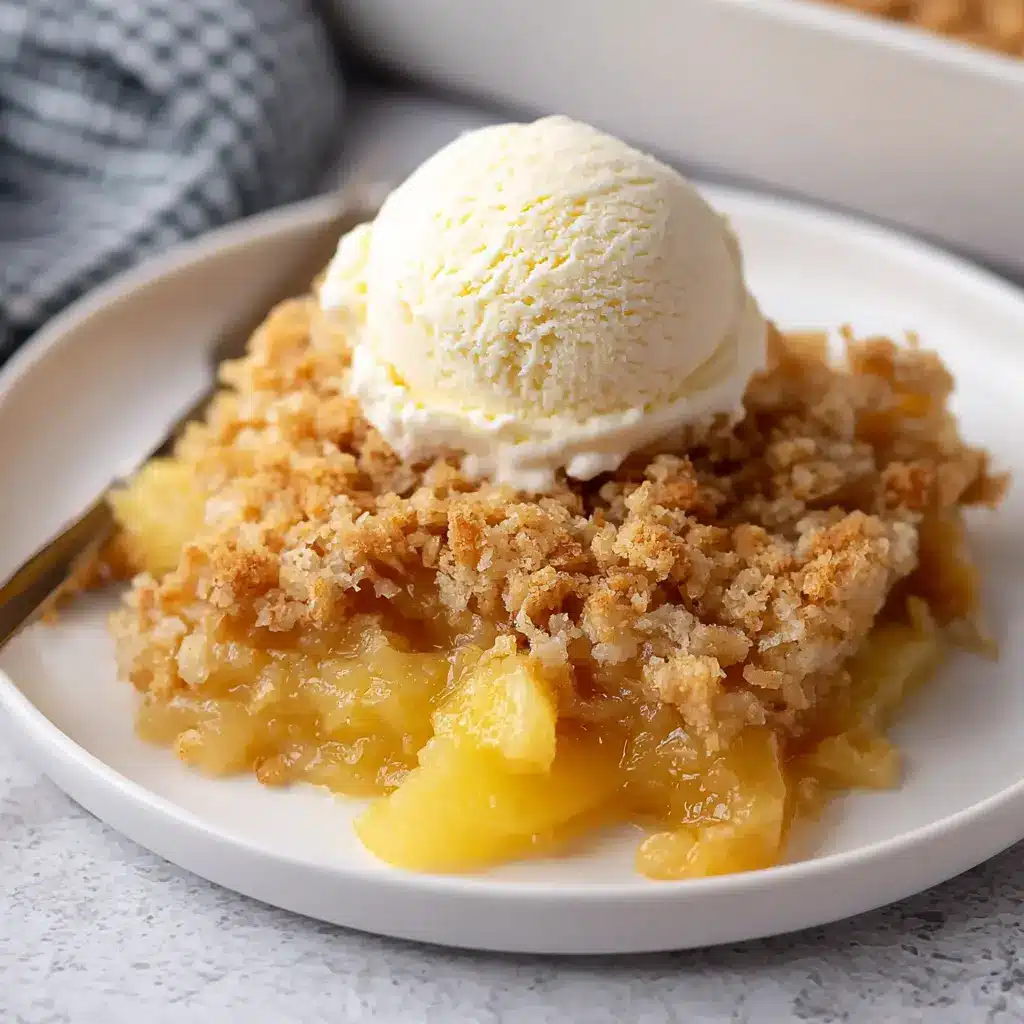
Pineapple Dump Cake
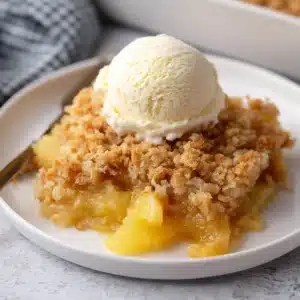
A quick, crowd-friendly dessert with a buttery golden topping, juicy pineapple filling, and almost no hands-on prep. It bakes in one dish, serves easily for gatherings, and tastes especially good warm with vanilla ice cream.
- 1 package yellow cake mix (dry, about 1 box)
- 1 cup pecans, roughly chopped
- 2 cans crushed pineapple in juice (20 ounces each, undrained)
- 1/2 cup packed brown sugar (either light or dark)
- 8 ounces butter, melted and allowed to cool slightly
- Vanilla ice cream, for serving if desired
- 1Preheat oven to 350°F (175°C).
- 2Spoon the crushed pineapple, including all of its juice, into a 9 x 13-inch baking dish. Spread it into an even layer.
- 3Sprinkle the dry yellow cake mix evenly over the pineapple.
- 4Scatter the chopped pecans across the cake mix.
- 5Sprinkle the brown sugar evenly over the top.
- 6Pour the melted butter slowly and as evenly as possible over the entire dish.
- 7Bake for about 1 hour, or until the filling is bubbling around the edges and the top is deeply golden and lightly crisp.
- 8Let the cake rest for approximately 20 minutes before serving. Serve warm, with vanilla ice cream if desired.
Keywords: Pineapple Dump Cake, easy dessert, fruit cake, potluck dessert, quick dessert
Quantities for these delightful ingredients can be found within the recipe card, ensuring you have everything you need for a perfect bake.
Variations
While the classic Pineapple Dump Cake is undeniably delicious, its inherent simplicity makes it a fantastic canvas for creative twists. Think about how you can adapt it to suit different dietary needs or flavor preferences, ensuring everyone can enjoy a slice of this tropical delight.
Vegan Delight: To transform this into a vegan-friendly dessert, you’ll need a few smart substitutions. Opt for a vegan yellow cake mix, ensuring it doesn’t contain dairy or eggs. For the butter, a plant-based vegan butter alternative will work beautifully, providing the same richness and aiding in creating that golden crust. You may also consider adding a touch more pineapple juice or a splash of plant-based milk to the dry cake mix if it seems too dry, ensuring proper hydration. The pecans and brown sugar are naturally vegan, so they can remain as is.
Low-Carb Indulgence: For those watching their carbohydrate intake, a low-carb adaptation is entirely achievable. Instead of a traditional yellow cake mix, use a sugar-free yellow cake mix or a blend of almond flour and coconut flour with your preferred low-carb sweetener, baking powder, and a binder like psyllium husk or xanthan gum. Ensure the pineapple is canned in its own juice or water, not syrup, and perhaps drain it slightly more. You can still incorporate the pecans and butter, but be mindful of the carbohydrate content of your chosen sweetener and any added ingredients.
Spiced Tropical Twist: Elevate the tropical notes with a hint of warming spice. Before sprinkling the dry cake mix, toss the crushed pineapple with a teaspoon of cinnamon and a pinch of nutmeg or ground ginger. This will infuse the fruity base with a cozy aroma and flavor that pairs beautifully with the pineapple and butter. The pecans will also benefit from this spice infusion, creating an even more complex and comforting dessert experience, especially wonderful during cooler months.
How to Prepare Pineapple Dump Cake
Step 1: Preheating and Pineapple Foundation
Begin by preheating your oven to a steady 350 degrees Fahrenheit (175 degrees Celsius). This ensures that your cake bakes evenly from the moment it enters the heat, crucial for achieving that perfect golden top and bubbly filling. Select a sturdy 9×13-inch baking dish, the ideal size for this generous dessert, and have it ready to receive its fruity base.
Carefully spoon the entire contents of your crushed pineapple cans, including every precious drop of the juice, into the prepared baking dish. The juice is not just flavorful; it’s essential for moistening the dry cake mix and creating the luscious, syrupy layer beneath the cake. Use a spatula or the back of a spoon to spread the pineapple and its juice into a single, even layer across the entire bottom of the dish. Aim for uniform coverage, ensuring no bare spots of the dish are visible, as this will form the delectable foundation of your dump cake.
Step 2: Layering the Dry Cake Mix
Once your pineapple base is perfectly spread, it’s time to introduce the cake component. Take your box of dry yellow cake mix and carefully sprinkle it evenly over the entire surface of the pineapple layer. The goal here is to create a cohesive, unbroken blanket of dry mix that will absorb the moisture from the pineapple and the richness from the butter as it bakes.
Resist the urge to press down or compact the cake mix. A light, even dusting is key to allowing the cake to bake up tender and fluffy, with those delightful crispy patches forming naturally. Ensure the cake mix covers the pineapple all the way to the edges of the dish. This complete coverage is vital for preventing the pineapple from bubbling up too much and potentially burning around the sides, and for creating a consistent cake layer throughout.
Step 3: Adding Pecans and Brown Sugar
Now comes the textural intrigue. Scatter the roughly chopped pecans evenly over the surface of the dry cake mix. These nuts will toast as the cake bakes, releasing their delightful aroma and contributing a satisfying crunch that beautifully contrasts with the soft fruit and cake. Distribute them with care so you get a good distribution in every bite.
Following the pecans, lightly sprinkle the packed brown sugar over the entire layer. The brown sugar not only adds a deeper, caramel-like sweetness but also helps the top of the cake bake up to a beautiful, golden-brown hue. Its molasses content contributes to a richer flavor profile and a slightly crispier finish than white sugar would provide alone. Ensure it’s spread relatively evenly to achieve consistent sweetness and browning across the entire dessert.
Step 4: The Golden Touch of Butter
Melt your butter completely, allowing it to cool just slightly so it doesn’t scorch. This step is where the magic truly begins to happen, as the butter will slowly seep down through the dry cake mix, binding it together and contributing to the formation of those coveted crispy, golden patches. You want to pour this melted butter as evenly as possible over the entire surface of the dish.
Drizzle the butter slowly, working your way across the cake mix and over the pecans and brown sugar. While it doesn’t need to be perfect, try to achieve good coverage to minimize any dry spots. The butter is crucial for both flavor and texture, transforming the dry cake mix into a rich, delicious topping. It lubricates the dry ingredients, helping them bake into tender, moist crumbs rather than remaining powdery.
Step 5: Baking to Golden Perfection
Carefully place the assembled baking dish into your preheated oven. Set a timer for approximately one hour, but keep an eye on the cake as it bakes, as oven temperatures can vary. The goal is to achieve a deeply golden-brown crust on top and to see the pineapple filling actively bubbling around the edges of the dish.
You’ll know it’s ready when the top looks beautifully caramelized, with some areas potentially a bit darker and crispier than others – this is exactly what you want in a dump cake! The center should appear set and no longer powdery or wet. If you notice some sections browning too quickly, you can loosely tent the dish with aluminum foil, but generally, it should bake without issue. The rich aroma filling your kitchen is a sure sign that deliciousness is imminent.
Step 6: The Crucial Resting Period
Once your Pineapple Dump Cake emerges from the oven, gloriously golden and bubbling, resist the urge to dive in immediately. Allowing the cake to rest for about 20 minutes is a critical step that significantly improves its texture and ease of serving. This brief cooling period allows the molten filling to settle and thicken slightly.
During this resting time, the intense heat dissipates, making it safer to handle and eat. More importantly, the pineapple filling, which is quite fluid when hot, will firm up just enough so that when you scoop it, you get distinct portions of fruit and cake rather than a messy overflow. This patience will be rewarded with cleaner slices and a more enjoyable eating experience. The dessert will still be wonderfully warm and comforting when served.
Pro Tips for Pineapple Dump Cake
Even Butter Distribution: The key to a consistently golden and tender topping lies in how evenly you distribute the melted butter. Take your time to drizzle it across the entire surface, ensuring there are no dry pockets of cake mix left exposed. This step is crucial for achieving that perfect balance of crisp and moist textures throughout the cake.
Don’t Drain the Pineapple: It might seem counterintuitive, but keeping the pineapple juice is non-negotiable for this recipe. This liquid is what hydrates the dry cake mix, transforming it into a wonderfully moist and tender cake layer. Skipping this step will result in a dry, crumbly topping that lacks the signature lusciousness of a dump cake.
Embrace Imperfection: The charm of a dump cake lies in its rustic, effortless nature. Don’t stress about achieving perfectly uniform layers or a perfectly smooth topping. The beauty of this dessert is in its simplicity and the delightful randomness of the textures and flavors that bake up. The slightly uneven browning and the pockets of crispy cake are part of its appeal.
Resting is Essential: While the temptation to serve hot from the oven is strong, allowing the cake to rest for about 20 minutes is vital. This short period lets the filling set slightly, making it easier to scoop and preventing a runny mess. The flavors also meld beautifully during this time, enhancing the overall taste experience.
Experiment with Toppings: While vanilla ice cream is a classic, don’t be afraid to explore other accompaniments. Freshly whipped cream, a dollop of coconut cream for a tropical twist, or even a sprinkle of toasted coconut flakes can add another dimension of flavor and texture.
Serving Suggestions for Pineapple Dump Cake
Decoration
While the golden-brown crust of the dump cake is visually appealing on its own, a few simple decorative touches can elevate its presentation. Consider adding a dusting of powdered sugar over the top once it has cooled slightly, creating a snowy contrast to the warm tones of the cake. Fresh pineapple chunks or rings, lightly caramelized in a pan, can be artfully arranged on top for an extra burst of flavor and visual appeal. A sprig of fresh mint adds a pop of vibrant green and a hint of refreshing aroma, making the dessert look as delightful as it tastes.
Side Dishes
The ultimate sidekick to a warm Pineapple Dump Cake is undeniably a scoop of creamy vanilla ice cream. The contrast between the warm, sweet cake and the cold, smooth ice cream is a classic for a reason, creating a delightful sensory experience. For those who prefer a lighter accompaniment, a dollop of freshly whipped cream provides a soft, airy counterpoint that still complements the richness of the cake beautifully. A light drizzle of caramel sauce can also add another layer of decadence, enhancing the brown sugar notes already present in the dessert.
Creative Serving Ideas
Beyond the traditional scoop, consider serving Pineapple Dump Cake in individual ramekins for an elegant presentation, especially if entertaining guests. This allows each person to have their own perfectly portioned dessert. For a brunch setting, serve smaller slices alongside a fresh fruit salad, allowing the tropical flavors of the dump cake to complement a medley of other fruits. If you’re feeling adventurous, you could even incorporate a small amount of whipped cream or ice cream into a trifle-style dessert, layering crumbled dump cake with pudding or custard for a fun and flavorful creation.
Preparation & Storage
Storing Leftovers
Once your Pineapple Dump Cake has cooled down completely, you can store any leftovers to enjoy later. Cover the baking dish tightly with plastic wrap or aluminum foil, or transfer the cooled cake into an airtight container. This prevents the cake from drying out and absorbs any unwanted odors from the refrigerator. Properly stored, the cake should remain delicious for up to 4 days.
The topping may soften slightly as it sits, especially if refrigerated, but the flavor will remain wonderfully intact. It’s a testament to the forgiving nature of dump cakes that they retain their appeal even after being stored. Just ensure the container is sealed well to maintain freshness and prevent any moisture loss.
Freezing
For longer-term storage, Pineapple Dump Cake freezes remarkably well, making it ideal for preparing ahead of special occasions or for future cravings. You can freeze the entire cake, or for convenience, portion it into individual servings before freezing. Ensure the cake is thoroughly cooled, then wrap it tightly in several layers of plastic wrap, followed by a layer of aluminum foil or place it in a freezer-safe airtight container. This double layer of protection helps prevent freezer burn and preserves the texture and flavor.
When stored correctly in the freezer, Pineapple Dump Cake can maintain its quality for up to 2 months. Thaw frozen portions overnight in the refrigerator for the best results, allowing them to gradually come back to room temperature before reheating. This slow thawing process helps to maintain the integrity of the cake and its components, ensuring a delightful texture upon reheating.
Reheating
Reheating Pineapple Dump Cake is a simple process that brings back its warm, comforting qualities. For individual portions, the microwave is often the quickest and easiest option. Place a slice on a microwave-safe plate and heat in short bursts of 20-30 seconds, checking for warmth in between, until heated through. Be careful not to overheat, which can make the cake mushy.
If you want to restore some of the crispness to the topping, the oven is a better choice. Place a serving or a larger portion of the cake in a baking dish and warm it in a preheated oven at around 325 degrees Fahrenheit (160 degrees Celsius) for 10-15 minutes, or until heated through and the top looks refreshed. This method helps to revive that desirable slightly crisp texture of the cake’s topping, making it almost as good as freshly baked.
Frequently Asked Questions
-
Can I make Pineapple Dump Cake ahead of time and reheat it?
Absolutely! Pineapple Dump Cake is an excellent make-ahead dessert. You can bake it completely, let it cool, and then store it at room temperature for a few hours, or refrigerate it if storing for longer. When ready to serve, you can gently reheat it in a low oven (around 325°F or 160°C) until warmed through, which will help revive some of the topping’s crispness. Alternatively, individual slices can be quickly reheated in the microwave. This makes it perfect for parties and gatherings where you want to minimize last-minute work.
-
Why do I need to include the pineapple juice? What happens if I drain it?
The pineapple juice is an absolutely critical component of this dump cake recipe. The dry cake mix needs moisture to hydrate and bake properly, and the juice provides that essential liquid. Without the juice, the dry cake mix would remain powdery and dry, resulting in a texture that is unpleasantly chalky and lacks the sweet, syrupy base that makes this dessert so delightful. Draining the juice would fundamentally alter the cake’s texture and flavor profile, leading to a disappointing outcome rather than the moist, tender cake and fruity filling you expect.
-
What is the best way to ensure a crispy topping on my Pineapple Dump Cake?
Achieving a crispy topping involves a few key elements. First, ensure the butter is distributed as evenly as possible over the dry cake mix; this allows it to permeate and crisp up the cake particles. Second, don’t be afraid of a little browning – the golden-to-deep-brown hues indicate crispiness. Some areas being darker than others are characteristic of a great dump cake topping. Finally, while resting is important, avoid over-cooling if you desire maximum crispness; serving it warm rather than piping hot can help maintain a good balance. If your topping seems too soft after baking, a quick blast under the broiler for a minute or two (watching it very closely!) can sometimes help crisp it up further, but this should be done with extreme caution.