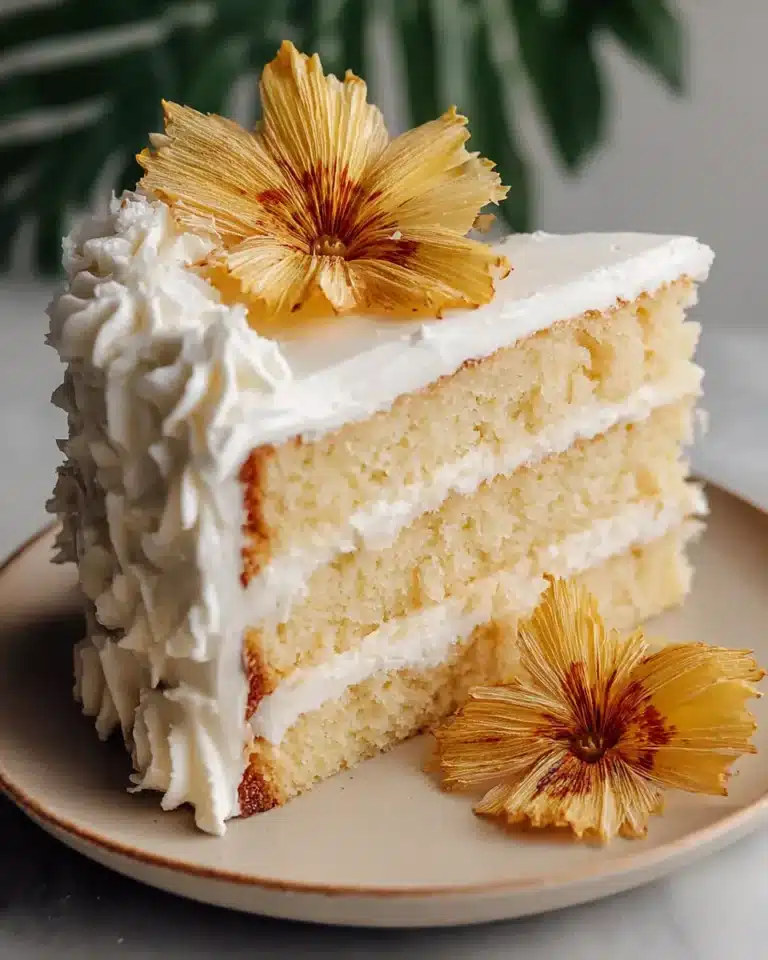
Lemon Coconut Naked Cake
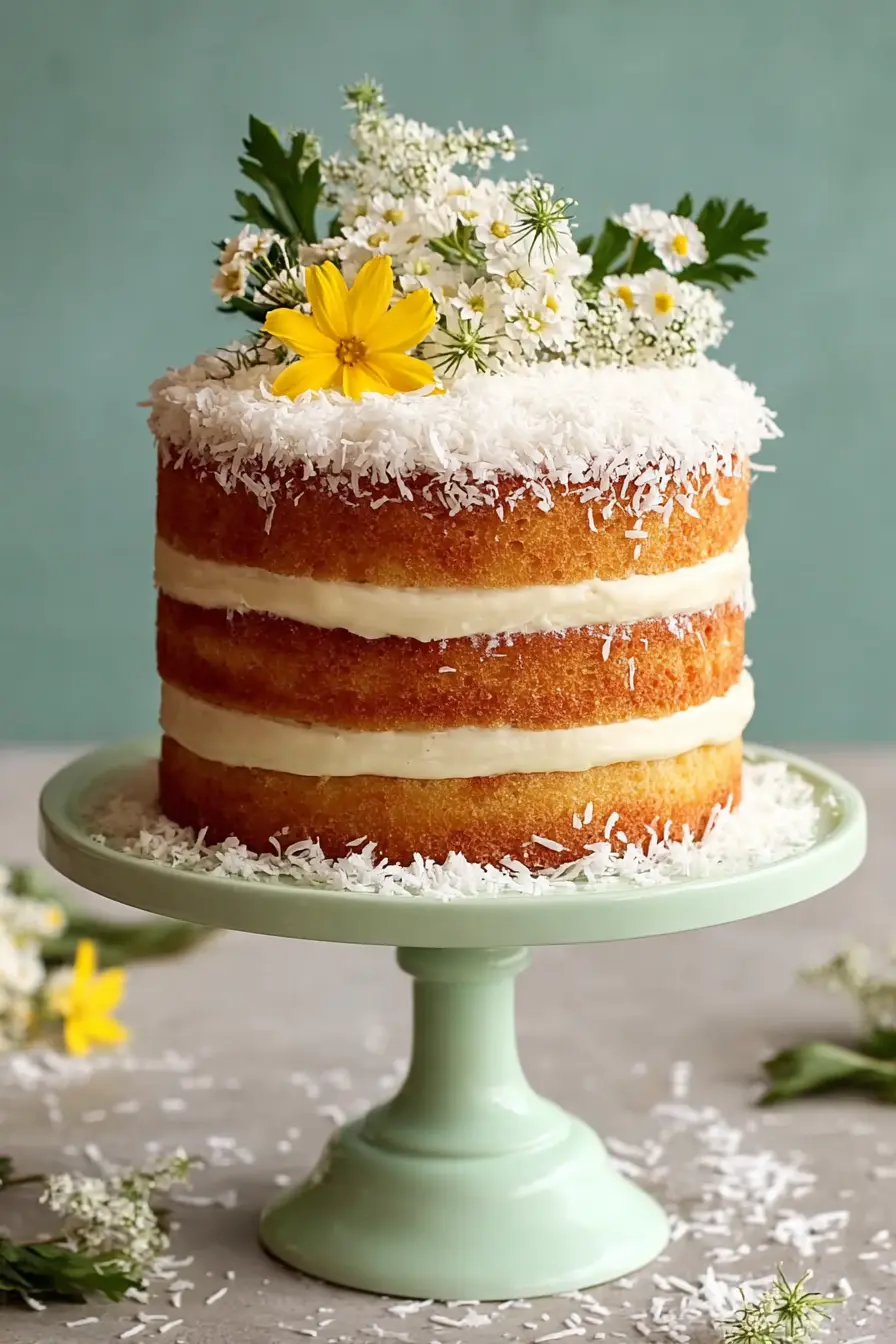
Welcome to a delightful journey of flavors and textures, where sunshine in a cake form awaits your eager palate. This Lemon Coconut Naked Cake is more than just a dessert; it’s an experience designed to bring joy and a touch of elegance to any occasion, no matter how simple or grand.
Imagine tender, moist layers infused with the tropical sweetness of coconut and brightened by the zesty essence of fresh lemons, all enveloped in a cloud-like honey buttercream. This cake promises to be a showstopper, yet it remains surprisingly approachable for home bakers, offering a perfect balance of sophistication and ease.
Why You Will Love This Recipe
- Effortless Elegance: The “naked” style means less frosting fuss, allowing the beautiful layers and fresh ingredients to shine through, creating a visually stunning dessert without complex decorating techniques.
- Balanced Flavors: A harmonious blend of sweet coconut, bright lemon, and mellow honey ensures every bite is a delightful dance of complementary tastes that aren’t overpowering.
- Moist & Tender Crumb: Thanks to the careful combination of coconut milk, Greek yogurt, and a special syrup soak, each layer boasts an exceptionally soft and yielding texture that melts in your mouth.
- Make-Ahead Friendly: This cake is designed for convenience, allowing you to bake the layers in advance and assemble it later, making it an ideal choice for busy hosts or planning special events.
- Versatile Appeal: Whether for a spring brunch, a birthday celebration, or just a delightful afternoon treat, its light yet satisfying profile makes it a universally loved dessert for all ages.
Ingredients You Need
The magic of this Lemon Coconut Naked Cake truly begins with the quality of ingredients you choose, so selecting fresh, vibrant components will elevate your baking experience. Opt for freshly grated lemon zest for the most potent aroma, full-fat coconut milk for richness, and good quality honey to impart its delicate floral notes into both the syrup and frosting.
Lemon Coconut Naked Cake

A tender, coconut-infused layer cake brightened with fresh lemon zest and finished with a honey-kissed buttercream. This elegant naked cake features moist layers, a light citrus syrup, and a delicate coconut topping for a refined yet approachable dessert.
- 3 cups all-purpose flour
- 1 tablespoon finely grated fresh lemon zest
- 1 cup sweetened shredded coconut
- 1 1/2 cups granulated sugar
- 3/4 cup coconut oil, cooled
- 1 cup full-fat coconut milk
- 1/2 cup plain Greek yogurt
- 3 large eggs, brought to room temperature
- 1 tablespoon vanilla extract
- 1 1/2 teaspoons baking soda
- 1 1/2 teaspoons baking powder
- 1 teaspoon salt
- 1/4 cup freshly squeezed lemon juice
- 1/3 cup honey
- 1 1/2 cups salted butter, softened
- 2 ounces cream cheese, softened
- 1 1/2 cups icing sugar
- 1/3 cup honey
- 1 teaspoon vanilla extract
- Extra sweetened shredded coconut
- 1Preheat the oven to 350°F. Prepare either three 6-inch round cake pans or two 8-inch round cake pans by greasing them thoroughly. Line the bases with parchment paper, then lightly butter or coat with cooking spray to help the cakes release cleanly after baking.
- 2In the bowl of a stand mixer, or in a large mixing bowl using a hand mixer, combine the coconut oil, Greek yogurt, eggs, granulated sugar, vanilla extract, and coconut milk. Beat until the mixture is smooth and fully blended.
- 3Add the flour, baking soda, baking powder, and salt to the wet mixture. Mix on low speed just until the batter comes together without overworking it.
- 4Gently fold in the lemon zest and shredded coconut until evenly distributed throughout the batter.
- 5Divide the batter evenly among the prepared pans. Transfer to the oven and bake for 30 to 35 minutes, or until the tops are set and the centers no longer appear unsteady.
- 6Remove the cakes from the oven and allow them to rest in the pans for 5 minutes. Loosen the edges with a knife, then carefully turn the layers out onto a wire rack to cool. Using a skewer or similar tool, make 3 to 5 small holes across the top of each cake layer.
- 7To prepare the syrup, place the lemon juice and honey in a small saucepan over high heat. Bring the mixture to a boil and cook for 1 to 2 minutes, or until it thickens slightly. Remove from the heat and let it cool until just warm, about 10 minutes.
- 8For the frosting, beat the softened butter and cream cheese together in the bowl of a stand mixer until very pale and fluffy, about 3 to 4 minutes.
- 9Add the icing sugar and honey gradually, then continue beating for about 2 more minutes until the frosting is smooth, airy, and well whipped. Mix in the vanilla extract until fully incorporated. If a firmer consistency is needed, add a little more icing sugar.
- 10Place one cake layer onto a serving plate or cake stand. Spoon a light amount of the honey-lemon syrup over the surface. Spread one-third of the buttercream over the top, then scatter over a small handful of shredded coconut.
- 11Repeat the layering process with the remaining cake layers, applying syrup, frosting, and coconut to each. Avoid overfilling between layers so the finished cake remains stable and easy to slice.
- 12Serve the cake immediately, or refrigerate it for up to 1 day before serving.
Keywords: Lemon Coconut Naked Cake
The precise quantities for these exceptional ingredients are all thoughtfully detailed within the accompanying recipe card, ensuring you have everything needed for success.
Variations
Embracing creativity with this base recipe unlocks a world of delightful customizations. For a vibrant dessert that caters to different dietary preferences, consider a few inspired twists.
Vegan Delight: To transform this into a delightful vegan treat, the key lies in substituting the eggs and dairy. Use a flax egg (one tablespoon of ground flaxseed mixed with three tablespoons of water, left to sit for five minutes) for each large egg. Replace the Greek yogurt with a plant-based alternative like coconut or soy yogurt, and ensure your coconut milk is full-fat for richness. For the buttercream, use vegan butter sticks and consider a plant-based cream cheese alternative, or a simple vegan frosting made from powdered sugar and plant-based milk.
Low-Carb Adaptation: For those mindful of carbohydrate intake, modifications can be made to create a lighter version. Swap the all-purpose flour for a blend of almond flour and a touch of coconut flour to maintain structure and moisture. Granulated sugar can be substituted with a granular sweetener like erythritol or xylitol, adjusting the amount to taste. The honey in the syrup and frosting would need to be replaced with a liquid low-carb sweetener, and the icing sugar in the buttercream can be swapped for powdered erythritol.
Gluten-Free Celebration: Crafting a gluten-free version is wonderfully achievable by using a high-quality gluten-free all-purpose flour blend. Ensure your blend contains a binder like xanthan gum; if not, you may need to add about half a teaspoon. All other ingredients, including the coconut, lemon, and honey, are naturally gluten-free, making this an easy adaptation to ensure everyone can enjoy a slice of this exquisite cake.
How to Prepare Lemon Coconut Naked Cake
Step 1: Prepare the Cake Layers
Begin by preheating your oven to a steady 350°F (175°C), ensuring it’s evenly heated for consistent baking. For this exquisite layer cake, meticulous pan preparation is absolutely crucial; it ensures your delicate layers will release beautifully and retain their perfect shape for stacking. Take your chosen cake pans – either three 6-inch rounds or two 8-inch rounds – and grease them thoroughly with butter or cooking spray.
Next, line the bottom of each prepared pan with a circle of parchment paper. This extra layer acts as a safeguard, preventing any sticking and making demolding a breeze. Once the parchment is in place, lightly butter or spray the parchment paper as well. This double-layer of protection guarantees that when the cakes are baked, they will slide out effortlessly, keeping their pristine edges intact and ready for assembly.
The importance of this step cannot be overstated for a naked cake; any unevenness or damage to the edges will be visible. Ensuring your pans are perfectly prepped sets the foundation for a visually stunning cake, where the layers themselves are the stars of the show. Take your time here; a few extra minutes of careful preparation will pay dividends when it’s time to reveal those perfect golden-brown discs of cake.
Step 2: Mix the Wet and Dry Ingredients
In the generous bowl of your stand mixer, or alternatively in a large mixing bowl if using a hand mixer, combine the core liquid ingredients for a smooth base. This initial blend includes the cooled coconut oil, the creamy plain Greek yogurt, the room-temperature large eggs, the granulated sugar, the aromatic vanilla extract, and the rich full-fat coconut milk. Ensure these ingredients are beaten together until they achieve a thoroughly smooth and completely blended consistency; this forms the essential foundation for your cake batter.
Once the wet ingredients are harmoniously combined, it’s time to introduce the dry components. Carefully add the all-purpose flour, the baking soda, the baking powder, and the salt directly into the wet mixture. Begin mixing on a low speed, just enough to bring the batter together. It is extremely important here to avoid overmixing; the goal is to combine the ingredients until no dry streaks of flour remain, which helps maintain the tenderness of the cake layers and prevents them from becoming tough or dense.
The key to a tender cake lies in this gentle mixing approach. Overworking the gluten in the flour develops a tougher structure, which is undesirable for a delicate layer cake. By mixing only until the batter is just combined, you ensure that the gluten development is minimized, resulting in a lighter, more tender crumb that is characteristic of a superior homemade cake. This careful balance in mixing creates the perfect canvas for the flavors to come.
Step 3: Incorporate Zest and Coconut, Divide Batter
Now it’s time to introduce the star flavors that define this cake: the vibrant lemon zest and the tropical shredded coconut. Gently fold these additions into the batter using a spatula. This folding technique is crucial; it ensures that the fragrant lemon zest and the textured coconut are evenly distributed throughout the entire batter without being overmixed. Keeping the zest fragrant and the coconut evenly dispersed contributes significantly to the overall flavor and texture of the finished cake layers, making each bite a delightful experience.
The next critical step is to divide the cake batter as evenly as possible among the prepared cake pans. For the most consistent results, using a kitchen scale to weigh the batter in each pan is highly recommended. Evenly divided batter ensures that each layer bakes at the same rate, leading to cakes that are uniform in height and thickness. This uniformity is paramount for a stable and visually appealing naked cake assembly, where clean, straight layers are essential for that iconic look.
Once the batter is divided, carefully transfer the pans to the preheated oven. Baking time will vary slightly depending on your oven and the size of your pans, but typically ranges from 30 to 35 minutes. Keep a close eye on them towards the end of the baking period to ensure they do not overbake, which can lead to dry layers. The goal is perfectly baked layers that are ready to absorb the delicious syrup.
Step 4: Bake and Cool Layers, Prepare for Syrup
Once the cake layers are baked to perfection, remove them from the oven and allow them to rest undisturbed in their pans for a brief five minutes. This short resting period allows the cakes to firm up slightly, making them more robust and less prone to breaking when you attempt to remove them from the pans. Resist the urge to leave them in the pans for too long, as this can lead to continued cooking and potentially dry edges.
After the brief rest, it’s time to carefully unmold the cakes. Run a thin knife or offset spatula around the edges of each cake to gently loosen them from the sides of the pan. Then, invert each pan onto a wire cooling rack. If you prepared your pans correctly, the cakes should release smoothly. Once they are out of the pans, carefully peel away the parchment paper from the bottoms of the layers.
Allow the cake layers to cool completely on the wire rack. This is essential before proceeding to the syrup stage. When the layers are sufficiently cool to handle, but still slightly warm if possible for optimal syrup absorption, take a skewer or a thin cake tester and poke several small holes across the entire surface of each cake layer. These perforations will act as tiny channels, allowing the lemon-honey syrup to penetrate deeply into the cake, ensuring a moist and flavorful crumb.
Step 5: Prepare the Lemon-Honey Syrup
To create the flavorful syrup that will add moisture and a bright citrus kick to your cake layers, begin by placing the freshly squeezed lemon juice and the honey into a small saucepan. The combination of tart lemon and sweet honey creates a beautifully balanced flavor profile that complements the cake’s ingredients perfectly. Use good quality honey for the best aroma and taste; its floral notes will add an extra layer of complexity to the finished dessert.
Place the saucepan over high heat and bring the mixture to a rolling boil. Cook the syrup for approximately one to two minutes, or until it has thickened just slightly. You are not aiming for a thick, jam-like consistency here; rather, a light, fluid syrup that can be easily brushed or drizzled over the cake layers. The goal is to concentrate the flavors and slightly reduce the liquid, creating a coating that will imbue the cake with its delicious essence without making it soggy.
Once the syrup has reached the desired light consistency, remove the saucepan from the heat. Allow the syrup to cool for about ten minutes. It should still be warm when you apply it to the cake layers, as warm syrup is absorbed more readily and effectively by the cake crumb. This warm, fragrant syrup is the secret to an exceptionally moist and flavorful naked cake, enhancing the lemon and coconut notes with a subtle, elegant sweetness.
Step 6: Make the Honey Buttercream Frosting
The foundation of a truly exceptional buttercream lies in its texture, and achieving a light, fluffy consistency is key. In the clean bowl of your stand mixer, or a large mixing bowl if using a hand mixer, begin by beating the softened salted butter and the softened cream cheese together. Ensure both the butter and cream cheese are at room temperature for optimal blending. Beat them vigorously for approximately three to four minutes until the mixture becomes very pale, remarkably light, and impressively fluffy; this aeration process is what gives the frosting its desirable airy texture.
Gradually introduce the icing sugar and the honey into the creamed butter and cream cheese mixture. Continue beating the frosting for another two minutes or so. The aim here is to achieve a frosting that is not only smooth and lusciously creamy but also delightfully airy and well-whipped. This careful beating process ensures that the sugar dissolves completely, preventing any grittiness, and that the frosting has a stable yet yielding consistency that is perfect for spreading and layering.
Finally, mix in the vanilla extract until it is fully incorporated into the buttercream. This adds a subtle warmth and depth that harmonizes with the lemon and coconut flavors. If you find that the frosting is a little too soft for your liking, or if the weather is particularly warm, you can add a tablespoon or two more of icing sugar to achieve a firmer consistency. The resulting frosting should be a delightful balance of sweet, tangy, and rich, perfect for holding together your beautiful cake layers.
Step 7: Assemble and Finish the Naked Cake
With all your components perfectly prepared, it’s time for the delightful assembly of your Lemon Coconut Naked Cake. Start by placing the first cake layer onto your chosen serving plate or cake stand. Gently spoon a modest amount of the prepared honey-lemon syrup over the entire surface of this first layer, ensuring it is evenly distributed. This syrup soak is vital for achieving that signature moistness and infusing the cake with bright citrus notes.
Next, spread about one-third of your luscious honey buttercream evenly over the syruped cake layer. Don’t go overboard with the frosting; a moderate amount is perfect for a naked cake, allowing the layers to be the visual focus. After spreading the buttercream, scatter a small handful of the extra sweetened shredded coconut over the frosting. This adds a lovely texture and reinforces the coconut flavor.
Carefully place the second cake layer on top of the first, gently pressing down to ensure stability. Repeat the process: brush with honey-lemon syrup, spread another third of the buttercream, and sprinkle with coconut. Continue this layering sequence with your final cake layer. For the top layer, apply the remaining buttercream sparsely, focusing on creating a delicate, rustic finish rather than a thick, smooth coating. The beauty of a naked cake lies in its exposed layers; therefore, only apply enough frosting to hold the layers together and provide a hint of decorative charm, allowing the cake’s natural structure to be admired.
Pro Tips for Lemon Coconut Naked Cake
Room Temperature is Key: Always ensure your eggs, Greek yogurt, and butter are brought to room temperature before you begin. This simple step is crucial for achieving a smooth, homogenous batter and a creamy, stable frosting that won’t curdle or separate. Cold ingredients resist emulsification, leading to a less desirable texture in both your cake layers and your buttercream.
Cool Completely Before Frosting: Patience is a virtue when it comes to cake assembly. Allow your cake layers to cool completely on a wire rack before attempting to add the syrup and frosting. Applying warm syrup to a warm cake can cause the buttercream to soften excessively and slide, leading to a lopsided or messy cake. A fully cooled cake provides a stable base for frosting.
Restrained Frosting Application: The charm of a naked cake lies in its minimalist approach to decoration. Avoid overfilling between the layers with excessive amounts of frosting. A restrained application not only suits the aesthetic of a naked cake but also ensures the cake remains stable and is much easier to slice cleanly without the filling oozing out.
Syrup Saturation: Don’t be shy with the lemon-honey syrup. Brushing each cooled layer generously with the warm syrup is the secret to keeping the cake crumb exceptionally moist and flavorful even after assembly and storage. Ensure the syrup is applied evenly across the surface to maximize its moisturizing and flavoring effect.
Gentle Folding Techniques: When incorporating ingredients like lemon zest and shredded coconut into the cake batter, use a gentle folding motion. This preserves the air incorporated into the batter, leading to a lighter, more tender cake. Overmixing or vigorous stirring can deflate the batter and result in a denser cake structure.
Serving Suggestions for Lemon Coconut Naked Cake
Decoration
The beauty of a naked cake is its inherent simplicity, which allows for elegant and understated decoration. Fresh berries, such as raspberries, blueberries, or thinly sliced strawberries, make a stunning and flavorful garnish, their vibrant colors contrasting beautifully with the pale cake and creamy frosting. A light dusting of powdered icing sugar over the top can mimic a delicate snowfall, adding a touch of magic.
For a more natural aesthetic, consider adorning the cake with edible flowers like violas, pansies, or rose petals. Fresh mint sprigs or small sprigs of thyme can also add a touch of green and a subtle herbal aroma. A few extra curls of fresh lemon zest scattered artfully over the top can echo the cake’s bright citrus flavor and provide a visual cue to its primary taste profile.
A light scattering of toasted shredded coconut, especially around the base or edges, enhances the tropical theme and adds a delightful crunch. For a touch of rustic charm, consider serving the cake on a wooden board or a vintage cake stand. The key is to keep the decoration harmonious with the cake’s style, letting the exposed layers and fresh flavors take center stage.
Side Dishes
This Lemon Coconut Naked Cake pairs exceptionally well with a variety of complementary accompaniments that enhance its delicate flavors. A simple dollop of lightly sweetened whipped cream, infused perhaps with a hint of vanilla or lime zest, offers a classic and refreshing contrast to the cake’s richness and sweetness.
Fresh fruit salads are another perfect partner. A medley of seasonal berries, cut peaches, or ripe mango chunks can provide a burst of natural sweetness and textural variety that complements the cake’s own tropical and citrus notes. Consider a salad with a light honey-lime dressing to tie in with the cake’s flavor profile.
For those who enjoy a more sophisticated pairing, a small serving of lemon sorbet or a scoop of coconut gelato can create a delightful flavor echo, amplifying the key tastes of the cake without overwhelming the palate. Alternatively, a drizzle of raspberry coulis can add a vibrant tartness and a pop of color that makes the dessert even more appealing.
Creative Serving Ideas
To present this cake in a truly memorable way, think beyond the standard slice. Consider creating individual mini naked cakes in ramekins or small jars; these are perfect for portion control and make for charming party favors or elegant single-serving desserts. They also allow for easier transport and serving at outdoor events or picnics.
Another creative approach is to deconstruct the elements slightly. Serve a slice of the cake alongside a small mound of coconut whipped cream and a few fresh berries arranged artfully on the plate. This allows diners to customize their dessert experience, combining the elements as they please and appreciating the distinct components.
For a themed event, such as a tropical luau or a spring garden party, you can elevate the presentation further. Incorporate elements like small edible flowers, miniature palm fronds, or even a light dusting of edible gold or silver glitter for a touch of extravagance. A small glass of chilled sparkling wine or a refreshing hibiscus iced tea can complete the festive and delightful serving experience, making your Lemon Coconut Naked Cake an unforgettable culinary highlight.
Preparation & Storage
Storing Leftovers
Due to the inclusion of cream cheese and butter in the frosting, it is essential to store any leftover Lemon Coconut Naked Cake in the refrigerator. Cover the cake tightly with plastic wrap or transfer it to an airtight cake container. This will help prevent the cake layers from drying out and will also protect it from absorbing any unwanted odors from other foods in the refrigerator, preserving its fresh taste.
While the cake is best enjoyed within one day of assembly for optimal texture and freshness, it can typically be stored in the refrigerator for up to two to three days. The flavors often meld and deepen slightly over this period, which can be quite pleasant. However, be mindful that the moisture from the syrup and frosting may continue to soften the cake layers over time, so consume it within a reasonable timeframe to appreciate its intended texture.
Before serving any refrigerated leftovers, it is highly recommended to allow the slices to sit at room temperature for about 15 to 30 minutes. This brief resting period allows the buttercream to soften slightly, becoming more creamy and yielding, and also helps the delicate lemon, honey, and coconut flavors to fully emerge and become more vibrant. Serving the cake too cold can mute its exquisite flavor profile.
Freezing
Freezing this Lemon Coconut Naked Cake is possible, but it requires careful consideration due to the nature of the frosting and the naked style. If you choose to freeze the entire assembled cake, ensure it is thoroughly chilled first. Wrap the cake extremely well in several layers of plastic wrap, followed by a layer of aluminum foil to protect it from freezer burn. Freeze for up to 1 to 2 months.
Alternatively, you can freeze the individual cake layers before assembly. Wrap each cooled cake layer tightly in plastic wrap, then in foil, and store them in a freezer-safe bag or container. This method allows you to preserve the layers perfectly for later use. If freezing unfrosted layers, they will generally keep well for up to 2 months.
When you are ready to serve a frozen cake or layers, it is best to thaw them gradually in the refrigerator overnight. This slow thawing process helps to maintain the cake’s structure and moisture. Once thawed, if freezing unfrosted layers, you would then proceed with frosting and assembling as per the recipe. Avoid reheating the cake in the oven, as this will melt the frosting and ruin the delicate finish.
Reheating
Reheating is generally not recommended for this Lemon Coconut Naked Cake, as it is designed to be served cool or at room temperature, with a creamy, un-melted frosting. The delicate naked finish relies on the frosting holding its shape, and any form of reheating, whether in an oven or microwave, would cause the buttercream to melt and liquefy, destroying the cake’s aesthetic appeal and altering its intended texture.
Instead of reheating, the best approach for enjoying leftover cake is to allow it to come to room temperature naturally. As mentioned in the storage section, taking chilled slices out of the refrigerator about 15 to 30 minutes before serving will allow the frosting to soften slightly and the flavors to bloom, resulting in the most enjoyable eating experience. This is the intended way to savor the cake’s delicate balance of moisture and flavor.
If you find that your cake feels a bit too dry after refrigeration and sitting at room temperature, you can very lightly brush the surface of a slice with a little extra lemon-honey syrup or even a touch of simple syrup before serving. This is a subtle way to reintroduce moisture without compromising the frosting or the cake’s structure. Remember, the goal is to enjoy the cool, refreshing qualities of this elegant dessert.
Frequently Asked Questions
-
Can I make this Lemon Coconut Naked Cake completely vegan and gluten-free at the same time?
Yes, it is certainly possible to create a cake that is both vegan and gluten-free by carefully combining the substitutions discussed for each dietary need. You would use a high-quality gluten-free flour blend (with xanthan gum), flax eggs to replace the eggs, plant-based yogurt and coconut milk for the cake, and vegan butter and cream cheese alternatives for the frosting. It’s advisable to test a small batch of the batter and frosting first to ensure the texture and flavor are to your liking, as gluten-free and vegan baking can sometimes yield slightly different results in terms of crumb structure and richness. Pay close attention to the moisture levels, as gluten-free flours can absorb liquid differently than wheat flour.
-
What is the best way to achieve perfectly level cake layers for a naked cake assembly?
Achieving perfectly level cake layers is key to a stable and aesthetically pleasing naked cake. Firstly, ensure your oven temperature is accurate and calibrated. Using a kitchen scale to divide the batter evenly among your cake pans is highly recommended; this ensures each layer bakes to the same thickness. After baking, if one side of a cake layer is slightly domed, you can carefully trim it using a long, serrated knife once the cake has cooled completely. A cake leveler is a specialized tool that can also help create perfectly flat surfaces by slicing off any domed tops uniformly, making the stacking process much more straightforward and the final presentation cleaner and more professional. Don’t be afraid to level your cakes, as this is where the true naked cake elegance comes from.
-
How can I ensure the lemon flavor is bright and fresh, and not artificial or overpowering in the cake?
The key to a bright and fresh lemon flavor, rather than artificial or overpowering, lies in using fresh, high-quality ingredients and balancing them correctly. Always opt for fresh lemon zest grated directly from the peel; this contains the essential oils that provide the most aromatic and vibrant lemon essence. Avoid using pre-packaged lemon zest or lemon extract unless absolutely necessary, as these can sometimes impart a chemical or artificial taste. The lemon-honey syrup soak is also crucial; it infuses the cake with a more natural, nuanced lemon flavor. Ensure the balance of lemon juice to honey in the syrup is just right – not too tart and not too sweet – to complement the cake’s coconut and honey elements without overwhelming them. The use of fresh lemon juice in both the cake batter (if applicable) and the syrup ensures a pure, zesty profile.