Chocolate Coconut Cake Pops

Coconut cake pops are a delightful make-ahead dessert, perfectly embodying deep cocoa flavor within a soft, truffle-like center. Their decadent chocolate shell, generously finished with sweet shredded coconut, makes them an absolute winner for parties, thoughtful gifts, or simply as a delightful bite-sized treat to enjoy straight from the refrigerator.
These charming dessert pops possess a certain specialness without demanding an overly fussy preparation process. The journey begins with a wonderfully rich chocolate cake, which is then transformed into a yielding crumb. This is bound together with a velvety smooth chocolate coffee frosting, an element that elevates every single bite, infusing it with an even more profound and satisfying chocolate essence.
Why You Will Love This Recipe
- Effortless Elegance: These cake pops offer a sophisticated appearance perfect for any celebration, yet they are surprisingly simple to make.
- Flavorful Fusion: The rich chocolate cake base harmonizes beautifully with the subtle coffee notes in the frosting and the sweet chewiness of the coconut.
- Perfectly Portioned: Each pop is a delightful, bite-sized indulgence, making them ideal for guests to enjoy without needing cutlery.
- Make-Ahead Magic: Prepare these pops in advance, saving you precious time on the day of your event.
- Customizable Delight: Easily adapt them to suit various themes or dietary preferences with simple ingredient swaps.
Ingredients You Need
The quality of your ingredients plays a pivotal role in achieving the perfect coconut cake pop. Opting for fresh, high-quality components will undoubtedly elevate the taste and texture of your final creation, ensuring a truly memorable dessert experience. Using good butter, rich cocoa powder, and fresh eggs will form the foundation of a superior cake and frosting.
Coconut Cake Pops
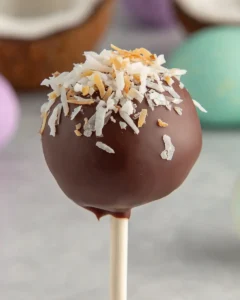
Coconut cake pops are a make-ahead dessert with deep cocoa flavor, a soft truffle-like center, and a chocolate shell finished with sweet coconut, making them ideal for parties, gifting, and bite-sized treats from the fridge. These little dessert pops feel special without being overly fussy. You start with a rich chocolate cake, turn it into a soft crumb, and bind it with a smooth chocolate coffee frosting that makes every bite taste fuller and more chocolatey. The coconut is what gives them their final personality. It adds a sweet finish, a little texture on the outside, and a classic flavor pairing that works beautifully with the dark cocoa base.
- For the cake:
- 1 teaspoon vanilla extract
- 1 cup unsalted butter, softened to room temperature
- 1/2 teaspoon kosher salt
- 2 teaspoons baking powder
- 1 1/3 cups milk
- 2 large eggs
- 2 cups flour
- 1 3/4 cups granulated sugar
- 1 teaspoon baking soda
- 3/4 cup cocoa powder
- For the chocolate coffee frosting:
- 2 tablespoons freshly brewed coffee
- 2 1/2 cups icing sugar, sifted
- 1/4 teaspoon kosher salt
- 1/3 cup cocoa powder
- 3 tablespoons milk
- 1/4 cup unsalted butter
- 1/2 teaspoon pure vanilla extract
- For assembly and topping:
- 1/2 cup sweetened shredded coconut, plus more for finishing
- 1 bag chocolate chips
- 1Preheat the oven to 350°F. For high-altitude baking, raise the temperature to 375°F. Grease and flour two 9-inch cake pans so the layers release cleanly after baking.
- 2In a medium mixing bowl, sift together the flour, cocoa powder, baking powder, baking soda, and kosher salt. Set the dry mixture aside once it is evenly combined.
- 3Place the softened butter and granulated sugar in a large bowl. Using a mixer on medium-high speed, beat until the mixture becomes pale and fluffy, about 3 to 5 minutes. This stage helps create a lighter cake texture.
- 4Reduce the mixer speed to low. Add the vanilla extract, then incorporate the eggs one at a time, mixing well after each addition. Scrape down the bowl as needed to ensure the batter blends evenly.
- 5With the mixer still on low, add half of the sifted dry ingredients to the butter mixture, followed by half of the milk. Mix just until combined. Repeat with the remaining dry ingredients and the remaining milk, blending only until the batter is smooth. Do not overmix.
- 6Divide the batter evenly between the prepared cake pans. Bake for 20 to 25 minutes, or until a cake tester inserted into the center comes out clean.
- 7Let the cakes rest in their pans for about 10 minutes. Then transfer them carefully to a wire rack and allow them to cool fully before proceeding with frosting or further assembly.
- 8While the cakes cool, make the frosting by beating the butter with the cocoa powder, icing sugar, coffee, milk, vanilla, and salt until smooth and spreadable. You want a frosting that is creamy, not stiff, so it blends easily with the cake crumbs.
- 9Crumble the cooled cake into a large bowl until no large pieces remain. Add some of the chocolate coffee frosting and the shredded coconut, then mix gently until the texture feels like soft dough and holds together when pressed in your hand. Add the frosting gradually rather than all at once, because too much will make the pops heavy and hard to dip cleanly.
- 10Scoop and roll the mixture into even balls, then place them on a parchment-lined tray. Chill until firm enough to handle comfortably. Melt a small amount of the chocolate chips, dip the tip of each lollipop stick into the melted chocolate, and insert it halfway into each ball. Return the tray to the fridge so the sticks set securely in place.
- 11Melt the remaining chocolate chips until smooth, using short microwave bursts or a gentle double-boiler method. Dip each pop into the melted chocolate, let the excess drip off, then sprinkle with extra shredded coconut before the coating sets. Stand the finished pops upright in a tall glass or egg carton and let them firm up completely before serving.
Keywords: Coconut Cake Pops, Chocolate Cake Pops, Make-ahead Dessert, Party Treats, Chocolate, Coconut, Coffee Frosting
The precise quantities for each ingredient are readily available within the accompanying recipe card, ensuring you have all the necessary details for a successful bake.
Variations
Consider a Vegan Coconut Cake Pop variation by substituting the butter with a plant-based alternative like coconut oil or vegan butter, and using a non-dairy milk such as almond or soy milk. The eggs can be replaced with a flax egg or a commercial egg replacer. Ensure your chocolate chips for the coating are also dairy-free to complete the vegan transformation.
For a Low-Carb Coconut Cake Pop, you could experiment with almond flour or coconut flour as the base for the cake. Sweeten the cake and frosting with a sugar substitute like erythritol or xylitol, being mindful of their distinct sweetness profiles. The frosting could be made richer with cream cheese or a bit more butter to compensate for the different flour textures.
Elevate your pops with a White Chocolate Coconut Twist by using white chocolate chips for the coating instead of dark or milk chocolate. This will lend a sweeter, creamier finish that complements the coconut beautifully. You might even consider infusing the cake batter with a hint of coconut extract for an even more pronounced tropical flavor.
How to Prepare Coconut Cake Pops Recipe
Step 1: Baking the Perfect Chocolate Cake Base
Begin by preheating your oven to a steady 350°F (175°C); if you find yourself baking at a higher altitude, it’s advisable to increase this to 375°F (190°C) to ensure proper rising. Carefully grease two 9-inch cake pans and then dust them lightly with flour, a crucial step that guarantees your delicate cake layers will release cleanly without sticking. This meticulous preparation ensures the structural integrity of your cake, which is fundamental for creating smooth, well-formed cake pops.
In a medium-sized bowl, take the time to thoroughly whisk together the all-purpose flour, high-quality cocoa powder, leavening agents like baking powder and baking soda, and a pinch of kosher salt. Continue whisking until all these dry ingredients are uniformly combined, creating a homogenous dry mixture. This even distribution of ingredients is vital for achieving a consistent crumb and ensuring that the leavening agents work effectively throughout the baking process, leading to a perfectly textured cake.
The foundation of a tender and moist cake lies in the proper creaming of butter and sugar. In a large mixing bowl, ensure your unsalted butter is softened to room temperature, allowing it to cream beautifully with the granulated sugar. Beat these two ingredients together using an electric mixer until the mixture achieves a pale, fluffy appearance, a sign that air has been adequately incorporated. This aerated state contributes significantly to the lightness and softness of the final cake crumb, making it ideal for transformation into cake pops.
Next, introduce the vanilla extract to the creamed butter and sugar mixture, giving it a quick mix. Then, add the large eggs, one at a time, ensuring each egg is fully incorporated before adding the next. Scrape down the sides of the bowl periodically with a spatula to guarantee that all the batter is mixed evenly and smoothly. This gradual addition and thorough mixing prevent the batter from becoming dense and ensure a consistent texture throughout.
Now it’s time to combine the wet and dry ingredients. Add approximately half of the meticulously prepared dry mixture to the large mixing bowl. Simultaneously, pour in about half of the milk. Mix these on a low speed using your electric mixer, just until they are barely combined; avoid overmixing at this stage to maintain the cake’s tender crumb. Repeat this process with the remaining dry ingredients and the remaining milk, again mixing only until the batter is smooth and homogenous.
Once the batter has achieved a smooth, uniform consistency, divide it equally between the two prepared cake pans. Spread the batter evenly in each pan to ensure consistent baking. Bake for approximately 20 to 25 minutes. You’ll know the cakes are ready when the centers spring back lightly when gently pressed and a cake tester inserted into the middle comes out clean, indicating they are fully cooked through.
Step 2: Crafting the Luscious Chocolate Coffee Frosting
While the cake layers are cooling, dedicate your attention to preparing the luscious chocolate coffee frosting, the key binder for your cake pops. In a medium bowl, combine the softened unsalted butter with the sifted icing sugar and cocoa powder. Gradually add the freshly brewed coffee, milk, vanilla extract, and a pinch of kosher salt. This combination needs to be beaten until it achieves a luxuriously smooth and spreadable consistency.
The texture of this frosting is paramount; it should be creamy and rich, but not overly stiff or dense. A frosting that is too firm will make it difficult to blend with the cake crumbs, potentially resulting in dry pops, while a frosting that is too thin can make the mixture too sticky and difficult to handle. The goal is a consistency that is easily workable, allowing it to bind the cake crumbs effectively without overwhelming the delicate cake flavor.
If your frosting seems a little too thick, you can thin it out by adding a tiny splash more milk, a teaspoon at a time, until the desired consistency is reached. Conversely, if it’s a bit too loose, you can thicken it by adding a bit more sifted icing sugar, again, gradually, to avoid making it overly sweet or dense. The perfect frosting will glide smoothly off a spoon and hold its shape when piped, indicating it’s ready to transform cake crumbs into irresistible cake pop dough.
The subtle hint of coffee in the frosting isn’t just for flavor enhancement; it also plays a role in intensifying the deep chocolate notes of the cake. This synergy between the coffee and cocoa creates a more complex and satisfying flavor profile that is characteristic of high-quality chocolate desserts. Ensure your coffee is freshly brewed and cooled slightly before adding it to prevent it from melting the butter prematurely.
Pay close attention to the proportions of cocoa powder and icing sugar. The amount of cocoa will dictate the depth of the chocolate flavor, while the icing sugar balances the bitterness and provides sweetness. Adjusting these slightly can cater to your personal preference for a more intensely chocolatey or sweeter cake pop. The addition of a small amount of salt is also critical, as it enhances all the other flavors and balances the sweetness.
Step 3: Creating the Cake Pop Dough
Once the chocolate cake layers have cooled completely, it’s time to transform them into the perfect base for your cake pops. Carefully crumble the cooled cakes into a large, clean mixing bowl, ensuring that no large chunks remain. Aim for a fine, consistent crumb texture, as this will make it much easier to form smooth, round cake pops that hold their shape beautifully. This crumbling process is where the magic of repurposing cake begins.
Begin by adding a portion of the prepared chocolate coffee frosting to the crumbled cake. Add the sweetened shredded coconut to this mixture as well; this will contribute a delightful chewiness and a subtle sweetness to the internal texture of the cake pops. Gently mix these ingredients together. The aim is to moisten the crumbs sufficiently to create a dough-like consistency that holds together when pressed in your hand, resembling a firm playdough.
It’s crucial to add the frosting gradually, rather than all at once. Too much frosting can make the mixture overly moist, heavy, and difficult to handle, potentially leading to cake pops that are too soft to dip cleanly. Start with a few tablespoons of frosting and mix, then assess the texture. Continue adding small amounts of frosting until the mixture just begins to clump together and can be easily shaped into balls without crumbling apart.
The texture you are aiming for is one that is pliable and holds its shape when squeezed, but it should not be sticky or greasy to the touch. If the mixture feels too dry and crumbly, it indicates that more frosting is needed to bind the crumbs. Conversely, if it feels overly sticky, you might have added too much frosting, and a small addition of more cake crumb (if you have any reserved) or a short chilling period can help firm it up.
The shredded coconut is not just for decoration; incorporating it into the cake pop mixture adds a delightful textural element and enhances the overall coconut flavor. Ensure the coconut is evenly distributed throughout the mixture so that each cake pop benefits from its sweet chewiness. Using sweetened shredded coconut offers a lovely balance of texture and sweetness within the core of the cake pop.
Take your time with this mixing stage. It’s better to under-mix slightly and add more frosting than to over-mix and end up with a dense or greasy dough. The goal is a cohesive mixture that rolls smoothly into perfect spheres, providing a stable structure for the subsequent dipping and decorating steps. A well-formed dough is the cornerstone of beautifully presented cake pops.
Step 4: Shaping and Chilling the Cake Balls
Once your cake pop dough has achieved the perfect consistency, it’s time to shape it into individual balls. Using a tablespoon or a small cookie scoop, portion out equal amounts of the mixture. Roll each portion between your palms to form smooth, even spheres. Aim for uniformity in size; this ensures that each cake pop bakes and dips evenly, creating a professional and aesthetically pleasing final product.
As you roll each cake ball, place them onto a parchment-lined baking sheet. Parchment paper is essential as it prevents the cake balls from sticking to the tray and makes for easy cleanup. Ensure that the balls are not touching each other too closely on the tray, as this can cause them to deform slightly as they chill. This careful shaping process is fundamental to the visual appeal of your finished cake pops.
After all the cake balls have been rolled, the next critical step is to chill them until they are firm enough to handle comfortably. Place the baking sheet with the cake balls into the refrigerator for at least 30 minutes, or until they are sufficiently firm to the touch. This chilling period is vital; it helps the cake balls hold their shape during the dipping process and prevents them from breaking apart when the lollipop sticks are inserted.
Do not rush this chilling process. The firmness achieved during refrigeration is what allows the cake pop to maintain its round form when submerged in melted chocolate. If the balls are too soft, they will likely deform, leading to an uneven chocolate coating and a less attractive presentation. Patience here will pay dividends in the final outcome.
While the cake balls are chilling, you can prepare your lollipop sticks. Melt a small amount of the chocolate chips in a microwave-safe bowl in short, 30-second bursts, stirring between each interval until smooth, or use a double boiler. This small amount of melted chocolate will act as an adhesive to secure the lollipop stick firmly into the cake ball.
Once the cake balls are chilled and firm, carefully dip the tip of each lollipop stick into the melted chocolate. Then, gently insert this chocolate-coated tip about halfway into the base of each cake ball. The melted chocolate will solidify as it cools, creating a strong bond that anchors the stick securely within the cake pop. Return the tray to the refrigerator to allow these sticks to set completely in place before proceeding to the final dipping.
Step 5: Dipping and Decorating the Cake Pops
With the cake balls chilled and the lollipop sticks securely anchored, it’s time for the most visually transformative step: dipping them in melted chocolate. Melt the remaining chocolate chips until they are smooth and glossy. You can achieve this using short bursts in the microwave, stirring well between each interval, or by employing a gentle double-boiler method over simmering water. Ensure the chocolate is fluid and free of lumps for the best coating.
Once your chocolate is perfectly melted and smooth, take a chilled cake pop by its stick and carefully dip it into the melted chocolate, ensuring it’s fully submerged. Gently swirl the pop to coat it evenly. Lift the cake pop out of the chocolate and allow the excess chocolate to drip back into the bowl; you can gently tap the stick against the rim of the bowl to help facilitate this. A smooth, even coating is the goal here.
Immediately after dipping and allowing the excess chocolate to drip, this is the opportune moment to sprinkle the pop with additional sweetened shredded coconut. The melted chocolate coating acts as a sticky surface, ensuring the coconut adheres beautifully to the shell without sliding off later. Work relatively quickly, as the chocolate will begin to set.
After decorating, stand the finished cake pops upright. A tall, narrow glass or an egg carton with holes poked in it are excellent tools for this. This upright position allows the excess chocolate to drip evenly and prevents the pops from resting on their sides, which would create a flat spot on the coating. Ensuring they are standing straight is key to a professional finish.
Allow the dipped and decorated cake pops to firm up completely in this upright position. This can take some time, depending on the temperature of your kitchen and the type of chocolate used. You can expedite this process by placing them back into the refrigerator for a short period until the chocolate shell has set firm to the touch. Avoid leaving them in the fridge for too long, as this can sometimes cause the chocolate to bloom or crack.
The final presentation is where your creativity can truly shine. Besides the coconut, consider adding a drizzle of contrasting chocolate, edible glitter, or small sprinkles while the coating is still wet for added visual appeal. The goal is to create a delightful confection that is as pleasing to the eye as it is to the palate, a true testament to your culinary efforts.
Step 6: Final Setting and Presentation
The cake pops are almost ready to be enjoyed! Once the chocolate coating has set firmly, they are essentially complete. The key now is ensuring they are properly prepared for serving or storage, maintaining their delightful texture and appearance. The contrast between the slightly crisp chocolate shell and the soft, moist interior is what makes these treats so appealing.
It’s important to handle the finished cake pops with care. The chocolate coating, while set, can still be susceptible to smudging if handled too roughly or if left at room temperature for extended periods, especially in warmer environments. Using the sticks as intended helps minimize direct contact with the delicate coating.
If you are preparing these for a party or event, arrange them attractively on a platter or in a decorative stand. The coconut coating provides a beautiful, textured finish that is both rustic and elegant. The visual appeal is enhanced by the uniform shape and the inviting shimmer of the chocolate shell.
For best results, serve these cake pops chilled but not ice-cold. A slight warming at room temperature for a few minutes before serving allows the truffle-like center to reach its optimal soft, fudgy consistency, while the chocolate shell still retains a satisfying slight snap. This perfect balance of temperatures and textures is what makes a cake pop truly exceptional.
Consider the context in which you are serving them. If they are part of a larger dessert spread, their small size makes them an ideal complement to other sweets. If they are the star of the show, perhaps present them individually in small paper liners or in a tiered stand to emphasize their individual charm.
The final setting period is also a good time to inspect each cake pop for any imperfections. Small touch-ups with a little extra melted chocolate can easily fix any minor issues, ensuring each pop looks its absolute best. This attention to detail elevates them from homemade treats to show-stopping confections.
Pro Tips for Coconut Cake Pops Recipe
- Chill is Key: Always chill your rolled cake balls until they are firm to the touch before dipping. This prevents them from losing their shape and ensures a smoother coating.
- The Right Frosting Consistency: Use just enough frosting to bind the cake crumbs into a moldable dough. It should feel moist and cohesive, not sticky or greasy.
- Dip Smart: Melt your chocolate in short intervals to prevent scorching. Stir well between bursts and aim for a fluid, glossy consistency for easy dipping.
- Coconut Application: Sprinkle the shredded coconut onto the wet chocolate coating immediately after dipping. This ensures the coconut adheres well and creates a beautiful textured finish.
- Stick Security: Dip the tip of your lollipop stick into melted chocolate before inserting it into the cake ball. This acts as an edible glue, significantly reducing the chances of the pop detaching from the stick.
- Avoid Freezing Solid: While chilling is essential, freezing the cake balls solid can cause the chocolate coating to crack as it sets or when handled. Aim for cold and firm, not frozen.
Serving Suggestions for Coconut Cake Pops Recipe
Decoration
The shredded coconut coating provides a naturally beautiful and textured finish. For an extra touch of elegance, consider a contrasting drizzle of dark or white chocolate over the coconut layer. Edible glitter or metallic sprinkles can add a festive sparkle, perfect for celebrations.
Side Dishes
These cake pops are wonderfully rich on their own, but they pair exceptionally well with fresh fruit. A side of vibrant strawberries or raspberries offers a bright, tart counterpoint to the sweetness. A small dollop of whipped cream or a scoop of vanilla bean ice cream can also elevate the experience when served as part of a dessert platter.
Creative Serving Ideas
Present them upright in a decorated jar or a specially designed cake pop stand for a stunning centerpiece. For party favors, package individual pops in clear cellophane bags tied with a ribbon, making them a delightful take-home treat. They also look fantastic arranged artfully on a dessert table alongside other sweets.
Preparation & Storage
Storing Leftovers
Finished coconut cake pops can be stored in an airtight container in the refrigerator for up to 5 days. If you are stacking them to save space, place a layer of parchment paper between each layer to prevent the chocolate coating from sticking and smudging.
Freezing
For longer storage, freeze the cake pops. Arrange them in a single layer on a baking sheet and freeze until firm, then transfer them to a freezer-safe container or bag. They can be kept frozen for up to 2 months.
Reheating
These cake pops do not require reheating. To enjoy them at their best, thaw frozen cake pops overnight in the refrigerator. Before serving, allow them to sit at room temperature for about 10-15 minutes to slightly soften the interior, while the chocolate shell retains a delightful snap.
Frequently Asked Questions
- Can I make the cake part of these coconut cake pops ahead of time?
Absolutely! The chocolate cake layers can be baked a day or two in advance. Once completely cooled, they can be crumbled and stored in an airtight container at room temperature. The frosting can also be made ahead and stored in the refrigerator. Combining the cake crumbs and frosting to form the dough is best done closer to when you plan to shape the pops for optimal texture.
- Why are my cake pops cracking after dipping?
Cracking in the chocolate coating can occur for a few reasons. If the cake balls are too cold when dipped, the drastic temperature change can cause the chocolate to set too quickly and crack. Conversely, if the chocolate is too hot, it can melt the cake ball slightly. Ensure your cake balls are chilled but not frozen solid, and that your melted chocolate is at a smooth, manageable temperature. Also, avoid overly thick chocolate coatings.
- How do I ensure the coconut sticks well to the cake pops?
The key to getting the shredded coconut to adhere effectively is to sprinkle it onto the chocolate coating immediately after dipping. The melted chocolate is still wet and acts as the adhesive. If you wait too long, the chocolate will begin to set, and the coconut will not stick properly. Make sure you have your coconut ready and sprinkled evenly over the pop while the chocolate is still shiny and fluid.