My Family's Traditional Baklava Recipe – How to Make Baklava!
Embarking on the culinary journey of creating authentic baklava is a delightful adventure, a tradition steeped in rich history and bursting with exquisite flavors. This iconic dessert, with its intricate layers and honeyed sweetness, has captivated palates for centuries across the Mediterranean and Middle East.
Imagine the delicate crunch of perfectly baked phyllo dough yielding to a treasure trove of toasted, spiced nuts, all enrobed in a luscious, aromatic syrup. This is the magic of baklava, a treat that promises to transport you to a world of pure indulgence with every single bite.
Why You Will Love This Recipe
- Authentic Flavor: This recipe stays true to traditional methods, delivering the genuine taste of homemade baklava that will impress even the most discerning dessert connoisseurs.
- Sensational Texture: Experience the delightful contrast between the shatteringly crisp phyllo layers and the rich, satisfying nut filling, a textural masterpiece that makes each mouthful unforgettable.
- Aromatic Delight: The subtle infusion of citrus zest and warm spices, combined with the sweet, syrupy glaze, creates an intoxicating aroma that fills your kitchen and tantalizes your senses before the first taste.
- Generational Charm: Passed down through generations, this recipe carries a heartwarming legacy, making the act of baking and sharing it a truly special occasion that connects you to culinary heritage.
- Impressive Presentation: Whether cut into neat diamonds or squares, this baklava is a showstopper that looks as beautiful as it tastes, perfect for holidays, gatherings, or simply as a luxurious treat.
Ingredients You Need
The soul of exceptional baklava lies in the quality of its ingredients, each playing a crucial role in building its complex flavor profile and signature texture. Sourcing fresh, high-quality components will elevate your baklava from merely delicious to truly sublime, ensuring every layer sings with authentic taste.
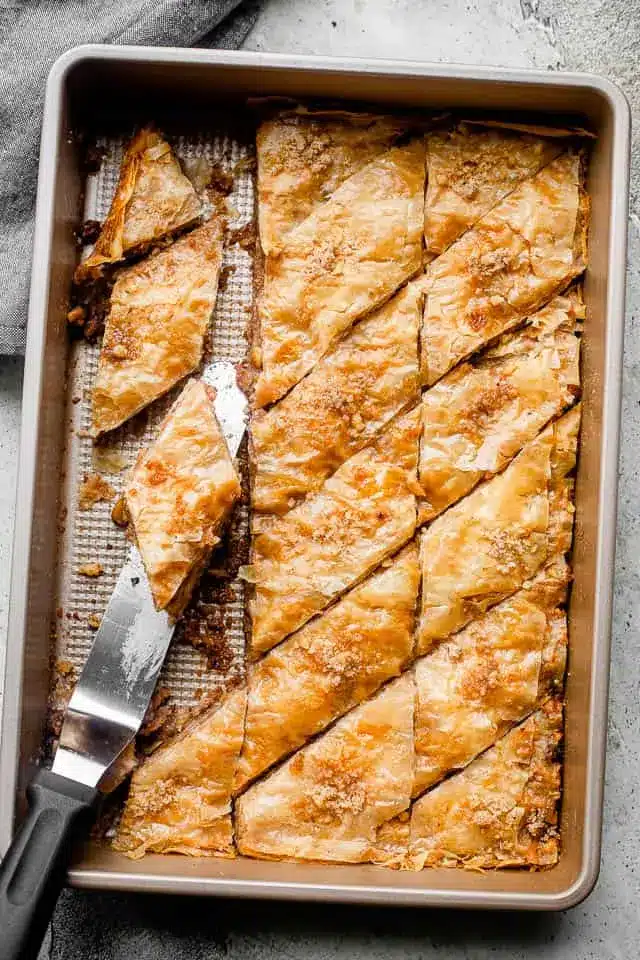
Traditional Baklava Recipe

This sweet and crispy baklava recipe is prepared with buttery and flaky sheets of phyllo dough layered with walnuts and topped with a sweet, lemony, simple syrup.
- For The Simple Syrup:
- 1 cup water
- 1 cup sugar
- 1 tablespoon fresh lemon juice
- For The Baklava:
- 4 cups walnuts, finely chopped
- 1 cup granulated sugar
- ½ tablespoon lemon zest
- 1 teaspoon ground cinnamon
- 1 cup unsalted butter, melted
- 16 ounces phyllo dough (about 40 sheets), thawed according to directions on the package
- 1For the Simple Syrup: Combine water, sugar, and lemon juice in a saucepan. Set the saucepan over medium-high heat and bring the mixture to a simmer; simmer, occasionally stirring, until the sugar has completely dissolved. Continue to simmer for 5 more minutes. Remove from heat; set aside and let cool down completely.
- 2For the Baklava: Preheat oven to 325°F. In a large bowl combine chopped walnuts, sugar, lemon zest, and cinnamon. Set aside.
- 3Brush the bottom of a 9x13 baking pan with melted butter. Unroll the phyllo sheets; as you work with them, keep the stack covered with a damp paper towel so they don’t dry out while you’re working. You can also use plastic wrap to cover the stack.
- 4Arrange 10 layers of phyllo sheets into the prepared baking pan, one sheet at a time, brushing each sheet with butter before adding the next. So, layer 1 sheet, brush with butter, then layer the next, brush with butter, and so on.
- 5After buttering the tenth phyllo sheet, sprinkle about ¾ cup of the walnut mixture over the phyllo.
- 6Continue to layer 5 more phyllo sheets, brushing each sheet with butter before adding the next. Then, sprinkle with a layer of ¾ cup walnut mixture. Repeat this 4 more times.
- 7Finish the baklava with a layer of 10 phyllo sheets and brush the top with more butter.
- 8Cut the baklava into diamond or square shapes; cut through the baklava and down to the bottom of the pan using a sharp knife. You can cut it vertically into 4 long rows and then cut diagonally to make diamond shapes or cut straight across to make square shapes.
- 9Bake for 55 minutes to 1 hour or until the top of the Baklava is golden and crisp. Remove from the oven and pour the cooled syrup evenly over the entire Baklava.
- 10Let the Baklava cool completely in a dry and cool place. For best results, let Baklava sit overnight.
10 phyllo sheets with butter, then 3/4 cup of the nut mixture
5 phyllo sheets with butter, then 3/4 cup of the nut mixture
5 phyllo sheets with butter, then 3/4 cup of the nut mixture
5 phyllo sheets with butter, then 3/4 cup of the nut mixture
5 phyllo sheets with butter, then 3/4 cup of the nut mixture
10 phyllo sheets with butter, then 3/4 cup of the nut mixture
Tips for Success:
Do not thaw your phyllo dough on the countertop. Instead, allow it to thaw in the fridge overnight. This will make it easier to work with.
Don’t let the phyllo dry out. When working with the phyllo dough sheets, keep your stack covered with a damp paper towel or tea towel so they don’t dry out while you’re working.
Be generous with the butter! Make sure you brush each sheet of phyllo dough with butter. This is not the place to skimp.
If your phyllo sheets are too large for the pan you are using, use a sharp knife to cut them so they will fit in your pan.
Let your baklava sit overnight at room temperature. This allows the syrup to soak into and soften the layers.
Keywords: baklava, dessert, phyllo, nuts, syrup, greek, turkish, sweet, pastry
For those seeking precise measurements and ingredient specifics, all details are readily available within the comprehensive recipe card at the end of this guide.
Variations
While the classic walnut and cinnamon combination is undeniably divine, baklava’s inherent versatility invites a world of creative explorations. Imagine a berry-infused syrup or a pistachio-forward filling for a vibrant, verdant twist.
For those embracing a lower-carbohydrate lifestyle, consider using finely ground almonds and a sugar substitute in the nut filling, perhaps paired with a sugar-free syrup made with erythritol and a touch of stevia. This allows for a guilt-free indulgence that still captures the essence of this beloved dessert.
A vegan interpretation can be achieved by substituting the butter with a high-quality vegan butter or coconut oil, ensuring the richness and binding properties are maintained. Experimenting with different spices like cardamom or a hint of rosewater can also introduce intriguing new dimensions to your baklava.
How to Prepare baklava recipe
Step 1: Crafting the Sweet Embrace – The Simple Syrup
The foundation of any truly magnificent baklava is its rich, aromatic syrup, a component that infuses every layer with unparalleled sweetness and moisture. This syrup isn’t just a topping; it’s an integral part of the baklava’s soul, transforming crisp phyllo into a tender, delectable experience.
Begin by combining one cup of water with one cup of granulated sugar in a medium saucepan. This foundational blend is the starting point for creating that luscious, syrupy texture. The water acts as the solvent, allowing the sugar to dissolve beautifully, forming the base of our sweet elixir.
Next, introduce one tablespoon of fresh lemon juice to the mixture. This citrus element is not merely for flavor; it plays a vital role in preventing the syrup from crystallizing, ensuring a smooth, consistent texture. The gentle tang of lemon also beautifully balances the intense sweetness of the sugar, providing a sophisticated depth to the overall flavor profile.
Place the saucepan over medium-high heat. Bring the mixture to a gentle simmer, stirring occasionally until all the sugar granules have completely dissolved. This is a crucial step; ensuring no gritty sugar remains guarantees a silky smooth syrup. Once the sugar is fully incorporated, continue to let it simmer for an additional five minutes.
This extended simmer allows the syrup to thicken slightly, concentrating its flavors and preparing it for its vital role in soaking the baklava. After the simmering period, remove the saucepan from the heat. It is absolutely imperative that this syrup is allowed to cool down completely before it will be used. Pouring hot syrup over freshly baked baklava can lead to a soggy mess, whereas cooled syrup allows for a more controlled and effective absorption into the pastry layers.
Step 2: Preparing the Heart of the Baklava – The Nut Filling
The heart of this delectable dessert lies in its glorious nut filling, a fragrant blend that promises texture and depth in every bite. This mixture is what gives baklava its signature character, offering a delightful contrast to the delicate phyllo.
In a large mixing bowl, combine four cups of finely chopped walnuts. These walnuts should be toasted to perfection before chopping, a step that unlocks their rich, nutty aroma and enhances their savory flavor. You can toast them gently in a dry skillet over medium heat until fragrant, or spread them on a baking sheet and bake in a preheated oven at 350°F (175°C) for about 8-10 minutes, watching them closely to prevent burning.
To this nutty foundation, add one cup of granulated sugar. This sugar not only sweetens the filling but also helps bind the chopped nuts together once baked. It creates a delightful caramelization when it interacts with the butter during the baking process, adding another layer of complexity.
Next, incorporate half a tablespoon of fresh lemon zest. The zest of a lemon provides a bright, citrusy note that cuts through the richness of the nuts and the sweetness of the syrup. It adds a refreshing counterpoint, preventing the baklava from becoming overwhelmingly sweet and giving it a more sophisticated flavor profile. If you prefer a slightly different citrus hint, a bit of orange zest can also be a delightful substitution, offering a warmer, more floral note.
Introduce one teaspoon of ground cinnamon to the mix. Cinnamon is the quintessential spice for baklava, its warm, comforting aroma and flavor are deeply intertwined with the dessert’s identity. For those who enjoy a bit more spice, a pinch of nutmeg or even a hint of ground cloves can be added to deepen the complexity of the filling.
Thoroughly mix all these ingredients together, ensuring the sugar, zest, and cinnamon are evenly distributed throughout the chopped walnuts. This ensures that every bite of your baklava will be consistently delicious and fragrant. Set this bowl aside; this flavorful mixture is now ready to be layered within the delicate phyllo.
Step 3: Assembling the Layers of Delight – The Phyllo Foundation
This is where the magic truly begins to take shape, transforming simple ingredients into an architectural marvel of crisp pastry and flavorful filling. Patience and a gentle touch are your greatest allies in this intricate layering process.
First, preheat your oven to 325°F (160°C). This moderate temperature is ideal for baking phyllo, allowing it to crisp up beautifully without burning too quickly. Then, take your 9×13 inch baking pan and generously brush the bottom and sides with some of the melted unsalted butter. This initial layer of butter prevents sticking and adds a subtle richness to the bottom crust.
Now, carefully unroll your thawed phyllo dough sheets. It is of utmost importance to keep the unused phyllo sheets covered at all times while you are working. A slightly damp paper towel or a clean kitchen towel draped over the stack is the best method to prevent them from drying out and becoming brittle. Plastic wrap can also be used, but ensure a snug fit to trap moisture.
Begin the layering process by arranging ten sheets of phyllo dough into the prepared baking pan. This means placing one sheet down, then brushing it evenly with melted butter, followed by another sheet, and brushing it with butter, and repeating this process ten times. Be thorough with your buttering; each layer of phyllo needs to be coated to ensure it bakes up golden and crispy, and to prevent it from sticking to the next layer.
After you have laid and buttered the tenth phyllo sheet, it’s time to add the first substantial layer of your prepared nut mixture. Sprinkle about three-quarters of a cup of the walnut mixture evenly over the buttered phyllo. Distribute it as uniformly as possible to ensure consistent flavor distribution throughout the finished baklava.
Following this, you will continue layering the phyllo dough, but with a slightly different rhythm. Now, add five more sheets of phyllo, again brushing each individual sheet generously with melted butter before placing the next one on top. This creates smaller, more delicate layers that contribute to the overall flaky texture.
After the fifth sheet in this smaller stack, sprinkle another three-quarters of a cup of the walnut mixture evenly over the phyllo. Repeat this sequence of five buttered phyllo sheets followed by a layer of nut mixture a total of four more times. This systematic repetition builds the characteristic height and texture of the baklava.
Finally, to complete the top of the baklava, add a final layer of ten more sheets of phyllo dough, once again meticulously brushing each one with melted butter. Ensure the very top layer is thoroughly buttered to achieve that desirable golden-brown, crispy finish. This extensive layering and buttering are key to achieving the perfect baklava texture.
Step 4: The Art of the Cut – Precision and Preparation
Before your masterpiece heads to the oven, a crucial step ensures each piece is perfectly portioned and ready to absorb that magical syrup: the cutting. This isn’t just about dividing the baklava; it’s about creating the ideal pathways for the syrup to penetrate deeply.
Using a very sharp knife is essential for this stage. A dull knife can tear the delicate phyllo layers, leading to a less-than-perfect presentation and potentially affecting how the syrup is absorbed. You need a knife that can slice cleanly through all the layers of dough and nuts without disturbing the delicate structure.
Carefully cut the baklava into your desired shapes, whether classic diamonds or neat squares. The cuts must go all the way down to the bottom of the pan. This is non-negotiable; if you only cut through the top layers, the syrup will not be able to reach the lower portions of the baklava effectively, resulting in uneven moisture and texture.
To achieve diamond shapes, you can first cut the baklava into four long, parallel rows from one end of the pan to the other. Then, take your knife and cut diagonally across these rows, creating the characteristic diamond pattern. Alternatively, for square shapes, simply cut straight across the pan at even intervals, both lengthwise and widthwise.
Take your time and make sure each cut is precise and deliberate. This attention to detail in the cutting stage will pay dividends when you serve your beautifully formed pieces of baklava. The clean lines will make for an elegant presentation and ensure that each serving is a perfect balance of crisp phyllo, nutty filling, and sweet syrup.
Step 5: The Golden Transformation – Baking to Perfection
Now, your meticulously assembled baklava is ready for its fiery baptism, the baking process that transforms raw ingredients into a golden, crispy delight. This stage requires careful monitoring to achieve that perfect balance of crispness and color.
Place the pan of cut baklava into the preheated oven, which should be set at 325°F (160°C). The gentle heat of this oven is crucial for allowing the phyllo to dry out and crisp up slowly, without scorching the delicate layers or the nuts within. Avoid the temptation to rush this process with higher heat, as it will likely result in an unevenly baked or burnt dessert.
Bake the baklava for approximately 55 minutes to 1 hour. During this time, keep an eye on its progress. The top layers of phyllo should gradually turn a beautiful, rich golden-brown color. This color indicates that the dough is cooked through and has achieved that desirable crispness.
The exact baking time can vary slightly depending on your oven’s calibration and the thickness of your baklava. If you notice certain areas browning faster than others, you can rotate the pan halfway through the baking time to ensure even cooking and coloring. The aroma filling your kitchen should be heavenly, a testament to the delicious transformation happening within.
Once the baklava has reached that perfect golden hue and appears crisp, carefully remove the pan from the oven. The heat radiating from the pan and the baklava at this stage is intense, so use oven mitts and exercise caution. The sight of it, golden and inviting, is truly rewarding after all the careful assembly.
Step 6: The Grand Finale – Soaking and Cooling
This is perhaps the most critical step in achieving that signature moist, syrupy texture that defines exceptional baklava. The interaction between the hot pastry and the cooled syrup is where the magic truly happens.
As soon as you remove the golden baklava from the oven, take your completely cooled simple syrup and pour it evenly over the entire surface of the hot pastry. Do this slowly and deliberately, allowing the syrup to cascade over the cuts and into every crevice. The sizzle you hear is the sound of the syrup being absorbed into the hot, crisp layers.
Ensure that the syrup is distributed as uniformly as possible. You want every piece of baklava to receive its share of the sweet elixir. If any areas appear to be receiving less syrup, you can gently tilt the pan or use a spoon to guide more syrup towards those spots, being careful not to disrupt the delicate layers.
After the syrup has been poured, the most challenging part begins: waiting. The baklava needs to cool completely in a dry and cool place. This means leaving it undisturbed at room temperature for an extended period. Resist the urge to cut into it while it’s still warm; this will result in a gooey, unappealing texture.
For the absolute best results, and to allow the syrup to fully penetrate and meld with the phyllo and nut layers, let the baklava sit overnight. This overnight resting period is crucial. It allows the flavors to deepen, the textures to meld, and the crisp phyllo to soften just enough to become tender and luscious while retaining a pleasant chewiness. The longer it rests, the more decadent the flavor and texture will become, a true testament to the patience required for truly exceptional baklava.
Pro Tips for baklava recipe
Mastering the art of baklava involves a few key insights that can elevate your creation from good to absolutely extraordinary. These tips focus on handling the delicate phyllo and ensuring optimal flavor absorption.
Tip: Thaw Phyllo Properly. Never thaw your phyllo dough at room temperature on the countertop. This can lead to condensation and make the sheets sticky and difficult to handle. Instead, allow it to thaw slowly and evenly in the refrigerator overnight. This method ensures the phyllo remains dry and pliable, making the layering process much smoother and more successful.
Tip: Keep Phyllo Hydrated. While working with the phyllo sheets, it is imperative that you don’t let them dry out. Keep the stack of unused phyllo dough covered with a slightly damp paper towel or a clean kitchen towel at all times. This prevents the delicate sheets from becoming brittle and cracking, ensuring they remain flexible enough to layer beautifully.
Tip: Embrace the Butter! Be exceptionally generous with the melted butter when brushing each phyllo layer. This is not the stage to skimp; the butter is crucial for achieving that signature shatteringly crisp texture and a rich, golden-brown finish. Every single sheet needs to be coated for optimal results.
Tip: Embrace Different Nuts. While walnuts are traditional and delicious, don’t hesitate to experiment with other nuts for your filling. Finely chopped pistachios offer a vibrant color and distinct flavor. Almonds provide a slightly milder, more subtle nuttiness. A combination of walnuts and pistachios can create a wonderfully complex and visually appealing filling. Even macadamia nuts can offer a rich, buttery texture.
Tip: Allow Ample Resting Time. After baking and pouring the syrup, patience is key. Allow your baklava to rest at room temperature, preferably overnight, before serving. This extended period allows the syrup to fully soak into and soften the layers, creating the perfect balance of crispness and tenderness, and allowing the flavors to meld beautifully.
Serving Suggestions for baklava recipe
Decoration
Elevate the visual appeal of your baklava with simple yet elegant decorative touches. A light dusting of finely chopped pistachios over the top, particularly around the edges or in the center of each piece, adds a pop of vibrant green and a hint of refined texture. For a more traditional look, a single candied walnut or a small sliver of candied orange peel can be placed on each diamond.
Side Dishes
Baklava is a rich dessert that stands wonderfully on its own, but it pairs beautifully with certain accompaniments that complement its sweetness. A small dollop of thick, unsweetened Greek yogurt can offer a refreshing, tangy counterpoint to the syrupy sweetness, creating a delightful contrast in both flavor and texture. A simple scoop of high-quality vanilla bean ice cream can also be a luxurious addition, its creamy coolness providing a perfect balance to the warm spices and crisp pastry.
Creative Serving Ideas
Think beyond the traditional serving platter for a truly memorable experience. For a special occasion, present individual portions of baklava on small dessert plates, perhaps alongside a delicate cup of strong, cardamom-infused Turkish coffee or a fragrant cup of mint tea, common pairings in the regions where baklava originates. You could also deconstruct the concept slightly by serving crumbled baklava over a scoop of vanilla ice cream or alongside a fresh fruit salad, allowing guests to mix and match flavors.
Preparation & Storage
Storing Leftovers
To keep your delicious baklava fresh and at its best, store it in an airtight container at room temperature. Avoid refrigerating it, as the humidity can cause the phyllo to become soggy. Properly stored, baklava can maintain its delightful texture and flavor for approximately 10 to 14 days, making it a perfect treat to enjoy over an extended period.
Freezing
If you wish to prepare baklava ahead of time and freeze it for future enjoyment, the best method is to freeze it before baking. Assemble the baklava completely, then wrap it tightly in plastic wrap followed by a layer of aluminum foil. This double-wrapping protects it from freezer burn. It can be kept in the freezer for up to 3 months.
Reheating
When you are ready to bake your frozen, unbaked baklava, remove it from the freezer and place it directly into a preheated oven at the same temperature specified in the recipe (325°F / 160°C). You may need to add a few extra minutes to the baking time to account for it being frozen. Once baked and golden, proceed with cooling the syrup and allowing it to soak overnight as usual.
Frequently Asked Questions
-
Why is my baklava soggy instead of crispy?
Sogginess in baklava is typically a result of moisture issues. This can occur if the syrup was poured while still hot, or if the baklava was stored in an un-airtight container, especially in a humid environment. Another common cause is not allowing the baklava enough time to dry out and cool completely after the syrup has been added. Ensuring the syrup is fully cooled before application and proper storage in a dry place are critical steps to maintaining crispness. If you’ve used too much syrup or if it’s too thin, that can also contribute to a softer texture.
-
Can I use different nuts in my baklava filling?
Absolutely! While walnuts are the traditional choice, baklava is incredibly forgiving and welcomes a variety of nuts. Finely chopped pistachios are a popular and elegant alternative, offering a vibrant green color and a distinct flavor. Almonds are also a great option, providing a slightly milder, yet still delicious, nutty taste. You can even create a delightful blend of your favorite nuts, such as combining walnuts with almonds or pistachios for a complex flavor profile. Remember to toast your chosen nuts lightly before chopping to enhance their natural flavors and aromas.
-
What is the best way to cut phyllo dough sheets if they are too large for my pan?
If your phyllo dough sheets are larger than your baking pan, it’s perfectly fine to trim them to size. Use a sharp knife or kitchen shears to carefully cut the sheets down to fit the dimensions of your pan before you begin layering. It’s best to do this just before you place the sheet into the pan to minimize exposure to air, which can cause them to dry out. You can stack the trimmed pieces neatly within the pan, brushing each layer with butter as you go, ensuring a seamless construction of your baklava layers.