Easy Apple Bread Recipe – One Bowl, No Yeast!
Welcome to a delightful journey into the heart of comforting bakes with this exquisite apple bread recipe. Imagine the aroma of warm cinnamon and sweet apples wafting through your kitchen, a promise of pure bliss with every slice.
This isn’t just any quick bread; it’s a lovingly crafted treat designed to be both incredibly easy to make and wonderfully satisfying. Whether you’re a seasoned baker or just starting, this recipe is your gateway to creating a masterpiece that will be cherished by family and friends alike.
Why You Will Love This Recipe
- Effortless Preparation: With a simple one-bowl mixing method for the batter, cleanup is a breeze, allowing you more time to savor the anticipation of your delicious creation.
- Moist and Tender Texture: The combination of ingredients, including Greek yogurt and a dual sugar approach, ensures a wonderfully soft and never dry crumb that melts in your mouth.
- Abundant Apple Goodness: Generous layers of tender, spiced apples are interspersed throughout the bread, guaranteeing a burst of fruity flavor in every single bite.
- Versatile Enjoyment: Perfect for a morning treat with coffee, an afternoon snack, or even a decadent dessert served warm with ice cream.
- Year-Round Appeal: While apples are often associated with autumn, this recipe is perfect any time of year, bringing a taste of cozy sweetness regardless of the season.
Ingredients You Need
Crafting this apple bread is a testament to how simple, quality ingredients can come together to create something truly extraordinary. We focus on fresh, ripe apples and pantry staples that are likely already in your kitchen, ensuring accessibility and ease in preparation. The secret to its incredible flavor and texture lies in the thoughtful combination of these components, each playing a vital role in the final symphony of taste and aroma.
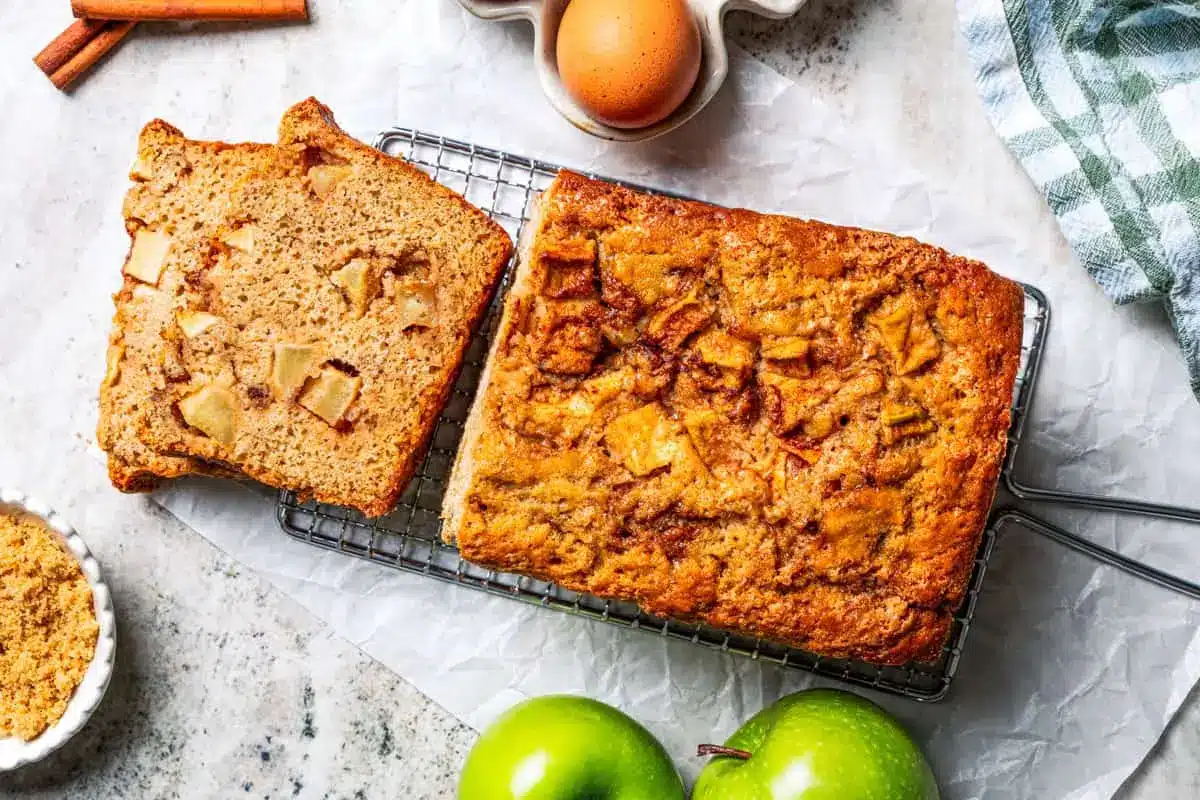
Moist Apple Bread Recipe
This quick apple bread is a soft, spiced loaf filled with juicy cinnamon apples. Mix the batter in one bowl, and it's ready for the oven in 10 minutes!
- For the apples:
- 1½ cups Granny Smith apples, peeled and chopped
- 1 teaspoon ground cinnamon
- For the bread batter:
- 2 eggs
- 1 teaspoon pure vanilla extract
- 1¾ cup all purpose flour
- 1 teaspoon ground cinnamon
- 1 teaspoon baking powder
- 1Prepare the apples: Peel and chop your apples into bite-sized pieces. Toss the apples with the brown sugar, cinnamon, and nutmeg. Set aside.
- 2Prepare to bake: Heat your oven to 350°F (175°C). Line a 9x5-inch loaf pan with parchment paper.
- 3Make the bread batter: Using an electric mixer, cream the softened butter with the granulated sugar and brown sugar in a large bowl. Add eggs one at a time, beating well after each addition. Add the Greek yogurt, vanilla extract, and milk; stir to combine.
- 4Add the dry ingredients: Sift the all-purpose flour, cinnamon, nutmeg, baking powder, and baking soda over the wet ingredients. Stir until just combined; do not overmix.
- 5Assemble: Transfer half of the bread batter to the prepared loaf pan. Layer half of the prepared apples on top. Pour the remaining batter over the apples, then add the remaining apples on top of the batter.
- 6Bake: Bake the bread for 60-70 minutes, covering it with aluminum foil halfway through baking to prevent the top from browning too quickly.
- 7Serve: Remove the bread from the oven and let it rest in the pan for about 10 minutes. Transfer to a wire rack to cool completely before slicing and serving.
Keywords: apple bread, quick bread, spiced bread, dessert, breakfast, tea time
For the apples: chopped Granny Smith apples, brown sugar, ground cinnamon, and ground nutmeg form the luscious filling. For the bread batter: softened unsalted butter, granulated sugar, brown sugar, eggs, Greek yogurt, pure vanilla extract, milk, all-purpose flour, ground cinnamon, ground nutmeg, baking powder, and baking soda create the tender, spiced cake. Specific quantities are detailed within the accompanying recipe card.
Variations
The beauty of this apple bread recipe lies in its inherent adaptability. You can effortlessly transform it into a delightful dessert or a wholesome breakfast option with a few simple tweaks.
Consider a vegan twist by substituting the butter with a good quality vegan butter or coconut oil, and replacing the eggs with a flax egg (1 tablespoon flaxseed meal mixed with 3 tablespoons water, let sit for 5 minutes) or a commercial egg replacer. For the Greek yogurt, opt for a dairy-free alternative like coconut yogurt or cashew yogurt. Ensure your milk is also a plant-based variety, such as almond or oat milk, to maintain the vegan integrity of the recipe.
For a lower-carbohydrate version, explore using almond flour or coconut flour in place of all-purpose flour, adjusting the liquid content as needed, as these flours absorb moisture differently. You might also consider using a sugar substitute like erythritol or stevia in place of both granulated and brown sugar, though this may slightly alter the texture and caramelization of the apples. Adding a handful of chopped walnuts or pecans to the batter can also introduce a pleasing crunch and healthy fats.
To infuse even more warmth and spice, don’t hesitate to experiment with the spices. A blend of gingerbread spices, including ginger and cloves, can offer a more robust flavor profile. You could also add a pinch of cardamom or allspice to the apple filling or the batter for a unique aromatic experience. For an extra layer of sweetness and visual appeal, consider topping the loaf with a simple streusel made from flour, butter, and sugar before baking.
How to Prepare apple bread recipe
Step 1: Prepare the Apples for the Filling
Begin by meticulously peeling and chopping your chosen apples into uniform, bite-sized pieces. It’s important not to make the cubes too small, as they should retain some texture and shape within the bread. Aim for pieces that are roughly 1/2 inch in size; this ensures they cook through beautifully during the baking process without becoming overly mushy.
In a medium-sized bowl, combine the chopped apples with half a cup of brown sugar. This sweetener not only adds a lovely caramel note but also helps the apples release their juices, creating a wonderfully moist filling. Next, sprinkle in one teaspoon of ground cinnamon and an eighth of a teaspoon of ground nutmeg. These classic spices are the heart of apple bread’s comforting aroma and flavor.
Gently toss everything together until the apple pieces are evenly coated with the sugar and spices. The spices will begin to meld with the natural moisture of the apples, creating an irresistible fragrance even before baking. Set this mixture aside while you prepare the bread batter; the waiting allows the flavors to deepen slightly.
Step 2: Get the Oven Ready and Prepare the Loaf Pan
Preheat your oven to a steady 350 degrees Fahrenheit (175 degrees Celsius). This moderate temperature is crucial for ensuring the apple bread bakes evenly, allowing the interior to cook through thoroughly without the exterior becoming too dark or dry. Accurate oven temperature is key to achieving that perfect golden-brown crust.
Next, prepare your 9×5-inch loaf pan. For the easiest removal and cleanup, line the pan with parchment paper. You can either use a pre-cut parchment paper liner designed for loaf pans or cut a piece yourself. Drape it over the inside edges, leaving some overhang on the sides. This overhang will act as convenient handles, allowing you to lift the baked bread out of the pan with ease.
Ensuring the pan is properly prepared prevents sticking, which can be a common issue with quick breads. A well-prepared pan contributes significantly to the overall success and presentation of your final apple bread. This step is simple but vital for a flawless bake.
Step 3: Craft the Delicious Bread Batter
In a large mixing bowl, combine half a cup of softened unsalted butter with half a cup of granulated sugar and a quarter cup of brown sugar. Using an electric mixer (a stand mixer with a paddle attachment or a hand mixer), cream these ingredients together until the mixture is light, fluffy, and pale in color. This process incorporates air, which is essential for a tender bread crumb.
Add the two eggs, one at a time, beating well after each addition. This ensures each egg is fully incorporated into the butter and sugar mixture, creating a smooth emulsion. Next, stir in a third of a cup of Greek yogurt. The yogurt contributes significant moisture and a slight tang, enhancing the overall tenderness and flavor profile of the bread. Follow this with one teaspoon of pure vanilla extract for its classic warmth and aroma, and half a cup of milk to achieve the correct batter consistency.
Stir these wet ingredients together until they are just combined. Avoid overmixing at this stage; the goal is to incorporate them smoothly without developing the gluten in the flour too much, which could lead to a tough loaf. The batter should be smooth and fragrant, ready for the addition of the dry ingredients.
Step 4: Integrate the Dry Ingredients with Care
Now, it’s time to introduce the dry ingredients to the wet mixture. This step requires a gentle hand to ensure a tender texture. Using a fine-mesh sieve or a sifter, measure and sift one and three-quarter cups of all-purpose flour directly over the wet ingredients in the bowl. Sifting the flour removes any lumps and aerates it, contributing to a lighter texture in the final bread.
Along with the flour, sift in one teaspoon of ground cinnamon and a quarter teaspoon of ground nutmeg. These spices further enhance the warm, autumnal flavor of the bread. Also, sift in one teaspoon of baking powder and half a teaspoon of baking soda. These leavening agents are critical for the bread’s rise, ensuring it becomes beautifully airy and doesn’t remain dense. Baking powder provides lift, while baking soda reacts with acidic ingredients (like the brown sugar and yogurt) to create additional rise and tenderness.
Using a spatula or a wooden spoon, gently stir the dry ingredients into the wet ingredients until they are just combined. It is imperative that you do not overmix the batter at this point. Stop mixing as soon as you no longer see streaks of dry flour. A few small lumps are perfectly acceptable and preferable to an overmixed batter, which can result in a tough, dense loaf. The batter should be thick but still pourable.
Step 5: Assemble the Layers in the Loaf Pan
With your prepared batter and apple filling ready, it’s time to assemble the bread in the loaf pan. Take half of the prepared bread batter and carefully spread it evenly into the bottom of the parchment-lined 9×5-inch loaf pan. Ensure the batter forms a relatively flat layer, creating a base for the apple filling.
Next, take half of the prepared apple mixture and distribute it evenly over the layer of batter in the pan. Try to spread the apples out so they are not all clustered in the center, ensuring apple goodness in every slice. The brown sugar and spices will have created a slightly syrupy consistency, which is exactly what you want.
Now, carefully pour the remaining bread batter over the layer of apples. Gently spread this second layer of batter to cover the apples as much as possible, creating a seamless top surface. Finally, arrange the remaining spiced apple pieces on top of the second batter layer. This final layer of apples not only looks beautiful once baked but also provides a delightful burst of flavor right at the surface. The layering ensures that each bite offers a perfect balance of tender bread and warm, spiced apples.
Step 6: Bake the Apple Bread to Golden Perfection
Place the assembled loaf pan into your preheated oven at 350 degrees Fahrenheit (175 degrees Celsius). Set a timer for the initial baking period, starting with 60 minutes. The baking time can vary slightly depending on your oven, so it’s important to keep an eye on it.
Crucially, about halfway through the baking time, or when the top of the bread begins to turn golden brown, you will need to cover it with aluminum foil. This step is essential to prevent the top and the exposed apples from burning while the interior of the bread continues to cook through. Tent the foil loosely over the loaf pan, ensuring it doesn’t touch the batter too much.
Continue baking for the remaining time, or until a toothpick or a thin skewer inserted into the center of the bread comes out clean. This indicates that the bread is fully cooked through. The total baking time is typically between 60 and 70 minutes. Once baked, remove the loaf pan from the oven. Allow the bread to rest in the pan for about 10 minutes before carefully lifting it out onto a wire rack to cool completely. This cooling period is vital for the bread to set properly and achieve its best texture.
Pro Tips for apple bread recipe
Select the Right Apples: For the best texture and flavor, choose crisp, tart apples like Granny Smith, Honeycrisp, Pink Lady, or Fuji. These varieties hold their shape well during baking and offer a pleasant balance to the sweetness of the bread. Avoid overly soft or mealy apples, as they can turn mushy.
Don’t Overmix the Batter: This is perhaps the most critical tip for any quick bread. Overmixing develops the gluten in the flour, leading to a tough, dense loaf. Mix the dry and wet ingredients until they are just combined, and a few lumps are perfectly fine.
Test for Doneness Accurately: A toothpick test is your best friend. Insert a wooden skewer or toothpick into the thickest part of the bread. If it comes out clean with no wet batter attached, your bread is ready. If there’s moist batter, continue baking for a few more minutes and test again.
Allow Complete Cooling: Resist the urge to slice into the bread while it’s still warm. The internal structure needs time to set. Slicing warm bread can cause it to crumble due to the moisture from the apples. Let it cool completely on a wire rack for the cleanest slices and best texture.
Spice it Up (or Down): Feel free to adjust the spices to your preference. If you love cinnamon, add a little more. You can also experiment with other warm spices like cardamom, ginger, or allspice to give your apple bread a unique twist.
Serving Suggestions for apple bread recipe
Decoration
For a simple yet elegant finish, a light dusting of powdered sugar over the cooled loaf can add a touch of sweetness and visual appeal. Alternatively, you could prepare a simple glaze by mixing powdered sugar with a tablespoon or two of milk or lemon juice until smooth, then drizzling it over the top once the bread has cooled. This glaze will harden slightly, adding a delightful crackle.
Consider a scattering of toasted chopped nuts, such as walnuts or pecans, over the glaze or powdered sugar for added texture and visual interest. If you have any extra spiced apple slices, you could arrange a few artfully on top before baking, though ensure they are not too close to the edge to prevent burning.
A small sprig of fresh mint or a dusting of cinnamon on the serving plate can also elevate the presentation. These small touches make the homemade apple bread feel even more special and inviting.
Side Dishes
This apple bread pairs wonderfully with a variety of beverages. A warm cup of coffee, a freshly brewed coffee, or a soothing cup of herbal tea are classic accompaniments. For a more indulgent treat, consider a cinnamon dolce latte or a creamy matcha latte.
It also serves beautifully as part of a breakfast or brunch spread. Alongside fluffy pancakes, crispy bacon, or a savory egg casserole, the apple bread offers a sweet counterpoint. A side of Greek yogurt or a fresh fruit salad would also complement its flavors nicely.
For dessert, a slice of warm apple bread served à la mode with a scoop of vanilla bean ice cream is an absolute delight. A dollop of freshly whipped cream or a drizzle of caramel sauce can further enhance its dessert appeal.
Creative Serving Ideas
Transform slices of apple bread into delightful breakfast or brunch parfaits. Layer crumbled bread with Greek yogurt, fresh berries, and a drizzle of honey or maple syrup in a glass for a visually appealing and delicious treat. This idea works wonderfully for a light breakfast or a refreshing dessert.
Consider making mini apple bread sandwiches. Cut thicker slices and spread them with cream cheese, a touch of cinnamon, or even a thin layer of apple butter. This makes for an elegant tea-time snack or a delightful addition to a picnic basket. For a richer dessert, try grilling thick slices of apple bread like you would French toast, serving them with a dusting of powdered sugar and a side of maple syrup.
Another creative idea is to incorporate crumbled apple bread into a bread pudding. Mix the crumbled bread with milk, eggs, sugar, and more spices, then bake until set. This transforms a simple quick bread into a warm, comforting baked dessert, perfect for a cozy evening. You can even use it as a base for a trifle, layering it with custard and whipped cream.
Preparation & Storage
Storing Leftovers
To keep your delicious apple bread fresh for as long as possible, proper storage is key. Once the bread has cooled completely to room temperature, wrap it tightly in plastic wrap or place it in an airtight container. Stored this way, the bread will remain moist and flavorful at room temperature for up to 3 days.
Ensure the container is truly airtight to prevent the bread from drying out or absorbing any unwanted odors from the kitchen. If your kitchen is particularly warm, or if you live in a humid climate, refrigerating the bread might be a better option to prevent spoilage. However, refrigeration can sometimes dry out baked goods, so room temperature storage is generally preferred if conditions allow.
Check the bread periodically to ensure it hasn’t become stale or moldy. If you notice any signs of spoilage, it’s best to discard it. Enjoying the bread within its optimal freshness window will ensure the best taste and texture experience.
Freezing
Apple bread freezes exceptionally well, making it perfect for baking ahead of time or preserving any extra loaves. To freeze the entire loaf, ensure it is completely cooled. Wrap it first in a double layer of plastic wrap, pressing out as much air as possible. Then, for added protection against freezer burn, wrap the plastic-covered loaf in a layer of aluminum foil or place it inside a heavy-duty freezer bag.
If you prefer to freeze individual slices, this is also an excellent option for convenient portioning. Wrap each slice tightly in plastic wrap, and then place the wrapped slices together in a freezer-safe bag or container. This allows you to take out only the number of slices you need at any given time.
Properly wrapped, the apple bread can be stored in the freezer for up to 3 months. When you are ready to enjoy it, simply remove it from the freezer and allow it to thaw completely at room temperature. This ensures the bread returns to its delicious, moist state without any loss of quality.
Reheating
Reheating apple bread can revive its fresh-baked aroma and texture, especially if it has been stored for a day or two. For a single slice, the microwave is the quickest option. Reheat on a low power setting for 15-30 seconds, or until warmed through. Be cautious not to overheat, as this can make the bread rubbery.
For a slightly crisper exterior and a more evenly warmed interior, consider reheating slices in a toaster oven or a conventional oven. Place the slices on a baking sheet and warm them at around 300 degrees Fahrenheit (150 degrees Celsius) for 5-10 minutes, or until heated through. This method is particularly good for reviving the bread’s texture.
If you are reheating a whole loaf that has been frozen, it is best to let it thaw completely at room temperature first. Once thawed, you can gently warm it in a low oven as described above. For a truly fresh-baked experience after freezing, you can reheat it straight from frozen in a low oven, which may take a bit longer, ensuring it is heated all the way through.
Frequently Asked Questions
-
What is the best type of apple to use for this apple bread recipe?
The best apples for this recipe are firm, crisp, and slightly tart varieties that hold their shape well during baking. Granny Smith apples are a classic choice due to their tartness, which balances the sweetness of the bread, and their excellent firm texture. Other excellent options include Honeycrisp, Pink Lady, and Fuji apples. These varieties offer a good balance of sweetness and acidity, and they won’t turn into mush when baked, ensuring delightful pockets of apple throughout the bread. If you prefer a sweeter bread, you can use a mix of tart and sweet apples.
-
Can I make this apple bread recipe ahead of time, and how should I store it?
Yes, this apple bread can absolutely be made ahead of time. Once baked and completely cooled, it can be stored at room temperature in an airtight container or tightly wrapped in plastic wrap for up to 3 days. For longer storage, the bread freezes wonderfully. Wrap the cooled loaf or individual slices in a double layer of plastic wrap, then in foil or a freezer bag, and freeze for up to 3 months. When ready to serve, thaw frozen bread at room temperature. Reheating is optional but can be done in a microwave, toaster oven, or conventional oven for a warm, fresh-baked feel.
-
What happens if I overmix the batter, and how can I prevent it?
Overmixing the batter is a common pitfall that can lead to a tough, dense, and gummy apple bread. When you overmix, you excessively develop the gluten in the flour, which creates a chewy, undesirable texture instead of a tender crumb. To prevent this, always mix the dry ingredients into the wet ingredients only until they are just combined. It’s perfectly acceptable and even desirable to have a few lumps in the batter; stop mixing as soon as you no longer see streaks of dry flour. Using a spatula and gentle folding motions, rather than vigorous beating, also helps minimize gluten development. Remember, with quick breads, less mixing is almost always more.