Fresh Berry Tart – Light and Easy Berry Dessert!
Embark on a delightful culinary journey with a dessert that whispers of summer freshness and requires minimal effort. This easy berry tart is designed for those moments when you crave something sweet and impressive, yet have limited time and energy.
It’s a testament to how simple ingredients and a clever shortcut, like using store-bought puff pastry, can transform into a show-stopping treat. Perfect for unexpected guests or a spontaneous sweet craving, this tart is sure to become a favorite in your recipe repertoire.
Why You Will Love This Recipe
- Effortless Preparation: With just 10 minutes of prep time, this tart is incredibly quick to assemble, making it ideal for busy days or last-minute dessert needs.
- Minimal Ingredients: Utilizing only five key components, this recipe simplifies your grocery list and streamlines the baking process.
- Versatile Berries: You have the freedom to use a medley of your favorite berries, allowing for endless flavor combinations and seasonal adaptability.
- Crisp, Buttery Crust: The puff pastry base provides a wonderfully flaky and rich texture that perfectly complements the sweet, juicy berries.
- Visually Stunning: Despite its ease, the finished tart is beautifully presented, adorned with vibrant berries and a dusting of powdered sugar, making it a feast for the eyes as well as the palate.
Ingredients You Need
The beauty of this easy berry tart lies in its simplicity, allowing the natural flavors of the fresh ingredients to shine. Using high-quality ingredients, especially fresh, ripe berries, will elevate the final taste and texture of your dessert. Puff pastry offers a wonderfully rich and buttery base that is both elegant and delightfully easy to work with, especially when thawed properly.
Easy Berry Tart
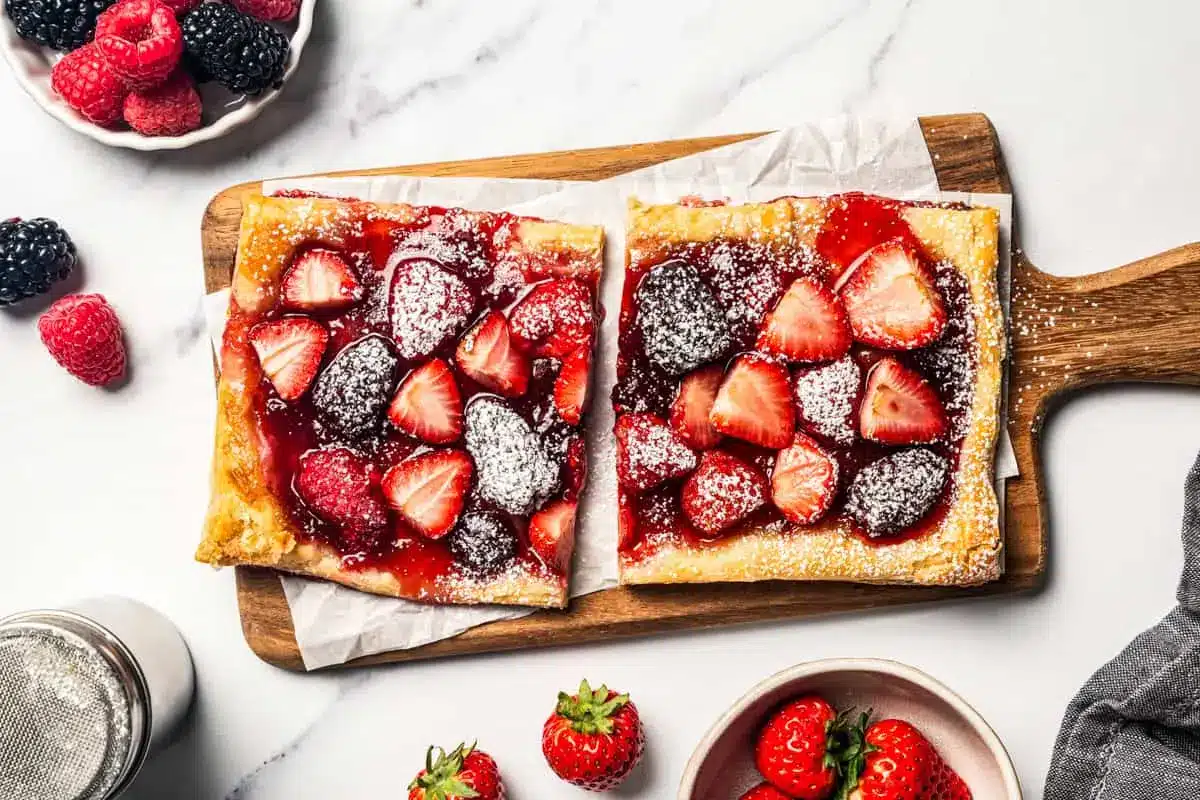
This easy berry tart needs only 5 ingredients and takes 10 minutes to prepare for the oven. It has a crisp, buttery puff pastry crust covered with strawberry jam and sugar-coated berries.
- 1 sheet puff pastry, thawed, cut in half
- 2 cups mixed fresh berries
- ¼ cup granulated sugar
- 4 tablespoons strawberry jam, divided
- powdered sugar
- 1Preheat the oven to 400ºF. Line a baking sheet with parchment paper.
- 2Combine the berries and sugar in a mixing bowl; lightly stir, then let stand for 5 minutes.
- 3Place the puff pastry dough on the previously prepared baking sheet and cut it in half.
- 4Spread 2 tablespoons of strawberry jam right down the middle of each pastry sheet. Evenly divide the berries and arrange them over the strawberry jam, down the middle of each pastry sheet.
- 5Bake for 18 to 20 minutes, or until golden brown.
- 6Remove and let the tart stand for a few minutes. Dust with powdered sugar, cut and serve.
Keywords: berry tart, puff pastry, easy dessert, summer dessert, quick dessert
- puff pastry: one sheet, thawed and cut in half for easier handling.
- fresh berries: approximately two cups of your favorite mix, such as strawberries, raspberries, blueberries, and blackberries.
- granulated sugar: a quarter cup to sweeten the berries and encourage them to release their juices.
- strawberry jam: four tablespoons, divided, to spread as a sweet base on the pastry.
- powdered sugar: for a delicate, snowy dusting over the finished tart.
The exact quantities for each ingredient are provided in the recipe card. The success of this tart hinges on fresh, vibrant ingredients that are readily available in most kitchens.
Variations
This easy berry tart serves as a delightful canvas for culinary creativity. For a vegan twist, ensure your puff pastry is vegan-friendly; many store-bought options are, but it’s always good to check the label. Instead of traditional jam, a vibrant vegan berry compote or a smooth fruit spread made without dairy or eggs would be an excellent choice. The fresh berries themselves are naturally vegan, and a simple dusting of powdered sugar completes this plant-based delight.
If you’re aiming for a low-carb version, you can adapt the sweetness by using a sugar substitute like erythritol or stevia for tossing the berries. For the jam layer, consider a sugar-free fruit spread or a thick, reduced berry sauce made with a low-carb sweetener. The puff pastry itself is higher in carbohydrates, but a small portion of this tart can still fit into a mindful low-carb eating plan, especially if enjoyed as a treat.
Another exciting variation involves incorporating different flavors into the jam layer. Imagine spreading a thin layer of lemon curd instead of strawberry jam for a zesty contrast, or perhaps a rich mango or even a dollop of cream cheese filling before adding the berries. For an added crunch, a sprinkle of chopped toasted nuts like almonds or pecans over the jam layer before adding the berries can introduce a wonderful textural element. These small additions can transform the tart into a completely new experience.
How to Prepare easy berry tart
Step 1: Prepare to Bake
The very first step towards creating this delightful treat is to preheat your oven. Aim for a temperature of 400 degrees Fahrenheit (200 degrees Celsius). This ensures that when the tart enters the oven, it begins to bake and crisp up immediately, developing that wonderful golden-brown crust.
Simultaneously, prepare a baking sheet by lining it with parchment paper. This crucial step prevents the puff pastry from sticking to the baking sheet, making for easy removal of the tart once it’s baked. Parchment paper also helps ensure even baking by creating a slight barrier and can catch any potential berry juices that might bubble over.
This initial preparation sets the stage for a smooth and efficient assembly process. Having your oven hot and your baking sheet ready means you can move swiftly from mixing ingredients to baking the tart, minimizing any downtime that could affect the puff pastry’s texture.
Step 2: Coat the Berries
In a medium-sized mixing bowl, gently combine your fresh berries with the granulated sugar. Use a light hand to stir them together, ensuring each berry is lightly coated. The sugar will begin to work its magic, drawing out the natural juices from the berries.
Allow this mixture to stand for approximately five minutes. This short resting period is known as maceration, and it’s essential for developing a richer berry flavor and creating a lovely, syrupy consistency. The released juices will meld beautifully with the sugar, intensifying the sweet-tart profile of the filling.
This step is particularly important when using berries that might be a bit firm or tart. It ensures that by the time the tart is baked, the berries will be tender and bursting with flavor, creating a harmonious balance with the buttery pastry. Avoid over-mixing or pressing the berries, as this can bruise them and make them mushy.
Step 3: Prepare the Crust
Take your thawed puff pastry and place it directly onto the parchment-lined baking sheet you prepared earlier. Ensure the pastry is spread out evenly and is in its approximate desired shape for the tart. If your puff pastry is a single block, you’ll likely need to unfold or gently roll it slightly to achieve a flatter surface suitable for a tart base.
Next, carefully cut the puff pastry sheet in half. This division will create two individual tart bases, making the tart easier to serve and manage. Make sure your cuts are clean and straight to maintain the pastry’s integrity and visual appeal.
You are essentially creating two rustic, free-form tart shells. The beauty of puff pastry is its ability to rise and puff dramatically in the oven, forming those signature flaky layers. The minimal handling required at this stage preserves that potential for a spectacular bake.
Step 4: Assemble the Tarts
Begin by spreading about two tablespoons of strawberry jam evenly down the center of one half of the puff pastry. Repeat this process with the remaining two tablespoons of jam on the other half of the puff pastry. The jam acts as a delicious adhesive for the berries and adds a layer of concentrated fruity sweetness.
Carefully divide the sugared berries between the two pastry sheets. Arrange them artfully over the jam layer, concentrating them down the middle of each pastry sheet. Try to create a neat, slightly mounded pile of berries. This arrangement ensures that the berries are contained within the pastry borders, even as they cook and potentially spread.
The visual appeal starts to take shape here. The vibrant colors of the berries against the pale jam and pastry create an inviting picture. Ensure the berries are not piled too high, as this could lead to uneven baking or overflow during the cooking process.
Step 5: Bake to Golden Perfection
Place the prepared baking sheet with the assembled tarts into the preheated 400°F (200°C) oven. Bake for approximately 18 to 20 minutes. The exact time may vary slightly depending on your oven’s performance and how thick your pastry is.
You are looking for the puff pastry to become beautifully puffed up and turn a deep golden brown. The berries should be tender, slightly softened, and actively bubbling, releasing their sweet juices. Keep a close eye on the tarts during the last few minutes of baking to prevent them from burning.
Once they have reached this state of golden-brown perfection and bubbling berry goodness, carefully remove the baking sheet from the oven. The aroma filling your kitchen at this point will be absolutely divine, a sweet and fruity promise of the delicious dessert to come.
Step 6: Rest and Serve
After removing the tarts from the oven, allow them to rest on the baking sheet for a few minutes. This resting period is important to let the pastry settle slightly and to prevent the hot jam and berries from causing immediate burns when cut. It also allows any excess juices to thicken a bit.
Once they have cooled sufficiently, you can carefully transfer the berry tarts to a serving plate. Just before serving, lightly dust the tops of the tarts with powdered sugar. This final touch adds a lovely visual contrast and a delicate sweetness that complements the fruit and pastry beautifully.
Cut the tarts into desired portions and serve them warm. The combination of the crisp, flaky pastry and the warm, juicy berries is truly irresistible. Enjoy this simple yet elegant dessert that is sure to impress your family and friends with its vibrant flavors and beautiful presentation.
Pro Tips for easy berry tart
The Best Berries: For the most vibrant flavor and appealing texture, use a mix of fresh, in-season berries. If using frozen berries, ensure they are completely thawed and thoroughly drained, patting them dry with paper towels to prevent a soggy crust. Some bakers even suggest a quick sauté of thawed frozen berries with a bit of cornstarch to thicken their juices before adding them to the tart.
Pastry Handling: Work with puff pastry while it is still cold. If it becomes too warm, the layers can meld together, reducing the flakiness. If the pastry becomes sticky or difficult to handle, pop it back into the refrigerator for 10-15 minutes before continuing. This chilling period helps to firm up the butter within the dough, ensuring those distinct layers puff up perfectly.
Jam Layering: Don’t spread the jam all the way to the edges of the puff pastry. Leave a small border, about half an inch, clear of jam. This allows the pastry to puff up around the filling without the jam oozing out excessively and potentially burning onto the baking sheet. A little bit of ooze can be charming, but too much can be messy.
Even Baking: Puff pastry can sometimes puff unevenly. If you notice one side puffing significantly more than the other during baking, don’t hesitate to gently prick the puffed-up areas with a fork or the tip of a sharp knife. This will release some of the trapped air and help create a more even surface for your berry topping. This is a simple but effective trick to ensure a balanced bake.
Preventing Soggy Bottoms: While the jam layer helps, some bakers prefer to add an extra step to ensure a crispier bottom crust. You can lightly blind-bake the puff pastry for about 5-7 minutes before adding the jam and berries. This initial bake firms up the pastry slightly, creating a barrier that helps prevent moisture from the fruit from making the base soggy. This is especially helpful if you’re using very juicy berries or making the tart ahead of time.
Serving Suggestions for easy berry tart
Decoration
The simplest and most classic decoration is a delicate dusting of powdered sugar over the cooled tart. For an extra touch of elegance, you could pipe a border of whipped cream or crème fraîche around the edge of the tart after it has cooled. A few fresh mint leaves or small edible flowers can also add a pop of color and sophistication.
Consider adding a light glaze made from melted apricot jam or a simple sugar syrup brushed over the berries once they are baked and slightly cooled. This will give the berries a beautiful sheen, making them look even more luscious and appealing. It also helps to preserve their vibrant color and adds a subtle extra layer of sweetness.
For a more playful presentation, especially if serving to children, you could arrange extra fresh berries on top in a decorative pattern after the tart has cooled. A drizzle of white chocolate or dark chocolate sauce can also be added for a decadent touch, complementing the berry flavors wonderfully. Remember that the visual appeal is as important as the taste for a truly memorable dessert experience.
Side Dishes
This berry tart pairs beautifully with a dollop of freshly whipped cream or a scoop of vanilla bean ice cream. For a more sophisticated accompaniment, a quenelle of lemon sorbet or a rich mascarpone cheese can offer a delightful contrast in texture and flavor. The tart’s sweetness is wonderfully balanced by a slightly tart or creamy element.
Consider serving it alongside a light, refreshing beverage. A chilled glass of sparkling wine or Prosecco would be an elegant choice for an adult gathering. For a non-alcoholic option, a homemade lemonade or a fragrant elderflower cordial would complement the fruity notes of the tart perfectly. A simple cup of freshly brewed coffee or a delicate herbal tea also works wonderfully.
If you’re serving this tart as part of a larger dessert spread, it can be paired with lighter options like fruit salads or sorbets. Its richness is balanced by more delicate accompaniments, ensuring that no single element overpowers the others. The goal is to create a harmonious dessert experience that celebrates the fresh, fruity flavors.
Creative Serving Ideas
Transform this easy berry tart into individual servings by cutting it into smaller squares or rectangles before dusting with powdered sugar. This makes for a more manageable and elegant presentation, perfect for parties or when serving a larger crowd. Each guest receives their own perfectly portioned treat.
For a brunch setting, consider serving small slices of the tart alongside a platter of assorted fresh fruits and perhaps some yogurt or granola. It can also be a wonderful addition to a breakfast buffet, offering a sweet counterpoint to savory dishes. The quick preparation makes it ideal for busy mornings or special weekend gatherings.
Another creative idea is to serve the tart warm with a drizzle of chocolate sauce or a spoonful of crème anglaise. This adds an extra layer of indulgence and sophistication, elevating the dessert for a more formal occasion. The contrast between the warm tart and the cool sauce is always a crowd-pleaser. You could also explore pairing it with a berry-infused liqueur for a truly celebratory experience.
Preparation & Storage
Storing Leftovers
If you happen to have any of this delicious berry tart left over, proper storage is key to maintaining its quality. It is best to store any uneaten portions in an airtight container. This will help to prevent the tart from drying out and will also protect it from absorbing any unwanted odors from other foods in the refrigerator.
The tart can be stored in the refrigerator for up to 3 days. While the puff pastry will inevitably lose some of its crispness over time, the flavors will remain delicious. For the best eating experience, it is recommended to take the tart out of the refrigerator about 30 minutes before serving to allow it to come back to room temperature.
Try to avoid stacking other items on top of the container, as this could crush the delicate pastry and the berries. If the tart seems a little soggy after refrigeration, you can gently reheat it in a low oven for a few minutes to help crisp up the pastry again, though this is not always necessary.
Freezing
Freezing this easy berry tart is possible, but it’s important to manage expectations regarding the texture of the puff pastry once thawed. The flaky layers of the puff pastry can become somewhat softened and less crisp after being frozen and thawed. For the best results, it’s advisable to freeze the tart *before* baking, if possible, or to freeze individual slices after they have cooled completely.
If freezing the whole unbaked tart, wrap it tightly in plastic wrap followed by a layer of aluminum foil. Label it clearly and store it in the freezer for up to 1 month. When ready to bake, place the frozen tart directly onto a parchment-lined baking sheet and bake as per the recipe instructions, potentially adding a few extra minutes to the baking time to ensure it cooks through.
If freezing baked slices, ensure they are completely cooled first. Wrap each slice individually in plastic wrap and then place them in a freezer-safe bag or container. Thaw the slices in the refrigerator overnight and then reheat them gently in the oven to revive their crispness.
Reheating
Reheating this berry tart is a simple process that can help revive its texture and flavors, especially if it has been stored in the refrigerator. The primary goal when reheating is to re-crisp the puff pastry while gently warming the berry filling.
The best method for reheating is in a moderate oven, around 300-325°F (150-160°C). Place the tart or individual slices on a baking sheet lined with parchment paper. Heat for about 5-10 minutes for slices, or 10-15 minutes for a whole tart, or until the pastry is warmed through and has regained some of its crispness. Keep a close watch to prevent burning.
Avoid reheating in the microwave, as this will make the puff pastry soggy and chewy, completely compromising its delightful texture. The oven provides a dry heat that is ideal for restoring crispness. If you’ve added a powdered sugar dusting, it’s best to reapply it after reheating for the freshest look.
Frequently Asked Questions
-
Can I use different types of berries or fruits in this tart?
Absolutely! This recipe is incredibly versatile. While it’s called a berry tart, you can successfully substitute or add other fruits that bake well. Stone fruits like peaches, plums, or apricots, cut into bite-sized pieces, work beautifully. Apples or pears, thinly sliced and perhaps tossed with a little cinnamon, can also be a delightful addition. For a more tropical twist, consider mango or pineapple chunks. Just ensure that the fruit you choose is relatively firm and not overly watery, or prepare it to reduce excess moisture before adding it to the tart, similar to the advice for frozen berries.
-
How can I prevent the puff pastry from becoming soggy from the berry juices?
Several techniques can help prevent a soggy bottom. Firstly, ensure your puff pastry is cold when you assemble the tart. Secondly, avoid over-jamming the pastry; leave a clear border. If you’re using particularly juicy fruits or are concerned about moisture, you can lightly blind-bake the puff pastry for about 5-7 minutes before adding the jam and fruit. This pre-baking step helps to set the pastry. Additionally, draining thawed frozen berries thoroughly and patting them dry with paper towels is crucial. Some bakers also advocate for a very thin layer of something absorbent, like a sprinkle of fine breadcrumbs or almond flour, over the jam before adding the berries, though this is usually unnecessary with fresh berries.
-
What is the best way to achieve a perfectly golden-brown puff pastry crust?
The key to achieving a perfectly golden-brown puff pastry crust lies in two main factors: oven temperature and time. Ensure your oven is accurately preheated to the specified temperature (400°F or 200°C). A hot oven is essential for the pastry to puff up quickly and develop that desirable crisp texture. During baking, keep an eye on the tart. Puff pastry can brown quite rapidly. If the edges are browning too quickly while the center is still pale, you can loosely tent the edges with a piece of aluminum foil to shield them from direct heat. Conversely, if the pastry isn’t browning sufficiently, you might need to increase the oven temperature slightly for the last few minutes, always with close supervision to prevent burning. Using the convection setting on your oven, if available, can also promote more even and rapid browning.