Coconut Jello Poke Cake
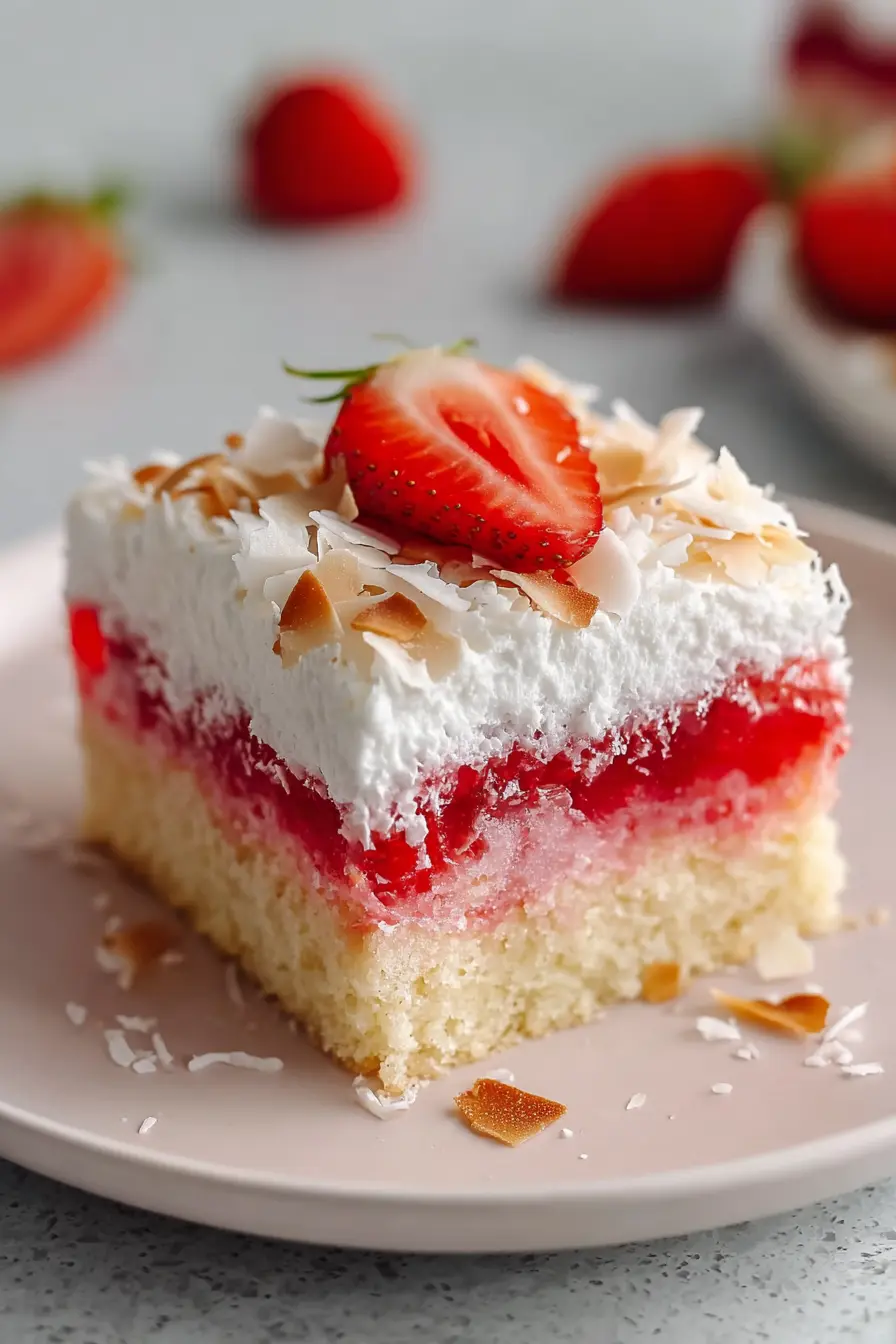
Creamy, make-ahead, and full of bright tropical flavor, Coconut Jello Poke Cake transforms a simple sheet cake into a chilled dessert that feels special without being fussy. You get soft coconut-kissed cake, fruity gelatin in every bite, and a fluffy cream cheese topping finished with berries and toasted coconut, creating a delightful symphony of textures and tastes that will have everyone asking for seconds.
This is the kind of dessert that works beautifully for spring gatherings, birthdays, potlucks, and weekends when you want something pretty in the pan and easy to slice. It looks festive, but the method is wonderfully straightforward, making it an accessible treat for any occasion. Its vibrant appearance and delicious taste make it a guaranteed crowd-pleaser.
Why You Will Love This Recipe
- Effortless Assembly: The use of a cake mix and simple gelatin ensures a quick and easy preparation process, even for novice bakers.
- Tropical Flavor Profile: A delightful blend of coconut, pineapple, and strawberry creates a refreshing and exotic taste experience.
- Make-Ahead Convenience: This cake is designed to be made in advance, allowing flavors to meld and making it perfect for busy schedules or entertaining.
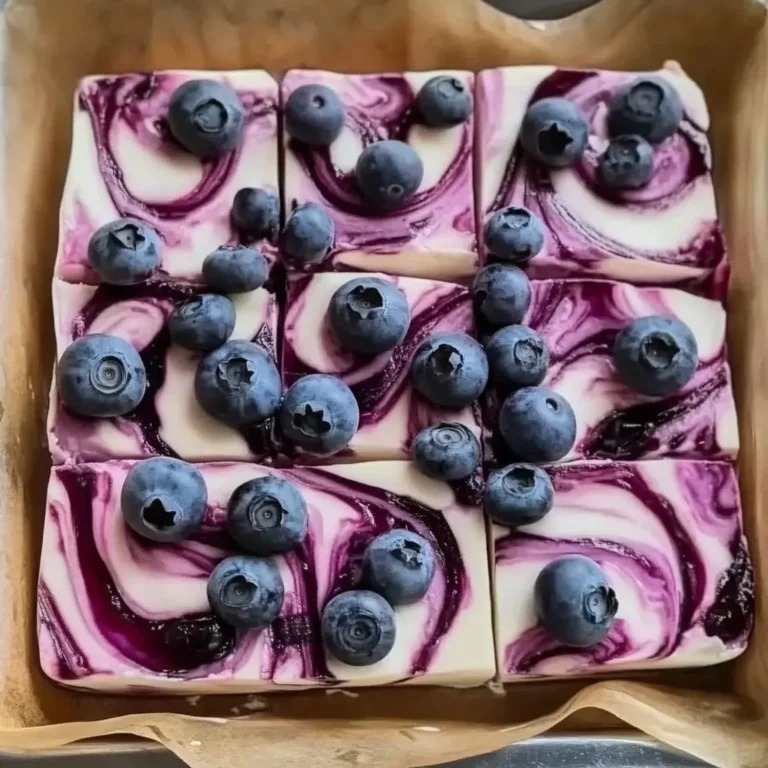
- Visually Appealing: The colorful gelatin-filled holes and fresh berry topping make this poke cake a stunning centerpiece for any dessert table.
- Customizable Topping: The light and airy cream cheese frosting can be easily adapted with different extracts or adjusted for sweetness to suit individual preferences.
Ingredients You Need
The success of any exceptional dessert lies in the quality of its ingredients, and this Coconut Jello Poke Cake is no exception. Opting for fresh, high-quality components will elevate the final flavor and texture, ensuring a truly memorable treat. For instance, using good quality coconut milk will imbue the cake with a richer, more authentic tropical essence, while fresh, ripe strawberries will offer a burst of natural sweetness and vibrant color that frozen alternatives might not provide. Consider organic options where available to enhance the natural goodness of each component.
Coconut Jello Poke Cake

A light and flavorful sheet cake made with coconut-infused batter, soaked with a pineapple-strawberry gelatin mixture, and finished with a rich cream cheese whipped topping, fresh strawberries, and toasted coconut. This creamy, make-ahead dessert is full of bright tropical flavor and perfect for any occasion.
- 3 large eggs, brought to room temperature
- 1 cup regular milk or coconut milk
- 1/2 cup coconut oil, melted
- 1 box white cake mix
- 1 cup thick coconut milk
- 1 cup very hot water
- 1.5 ounces strawberry instant gelatin mix
- 1.5 ounces pineapple instant gelatin mix
- 2 1/2 cups heavy cream, well chilled
- 5 ounces cream cheese, softened
- 3/4 cup confectioners’ sugar, sifted
- 1 1/2 teaspoons vanilla essence
- 1 small pinch salt
- 1 pint fresh strawberries
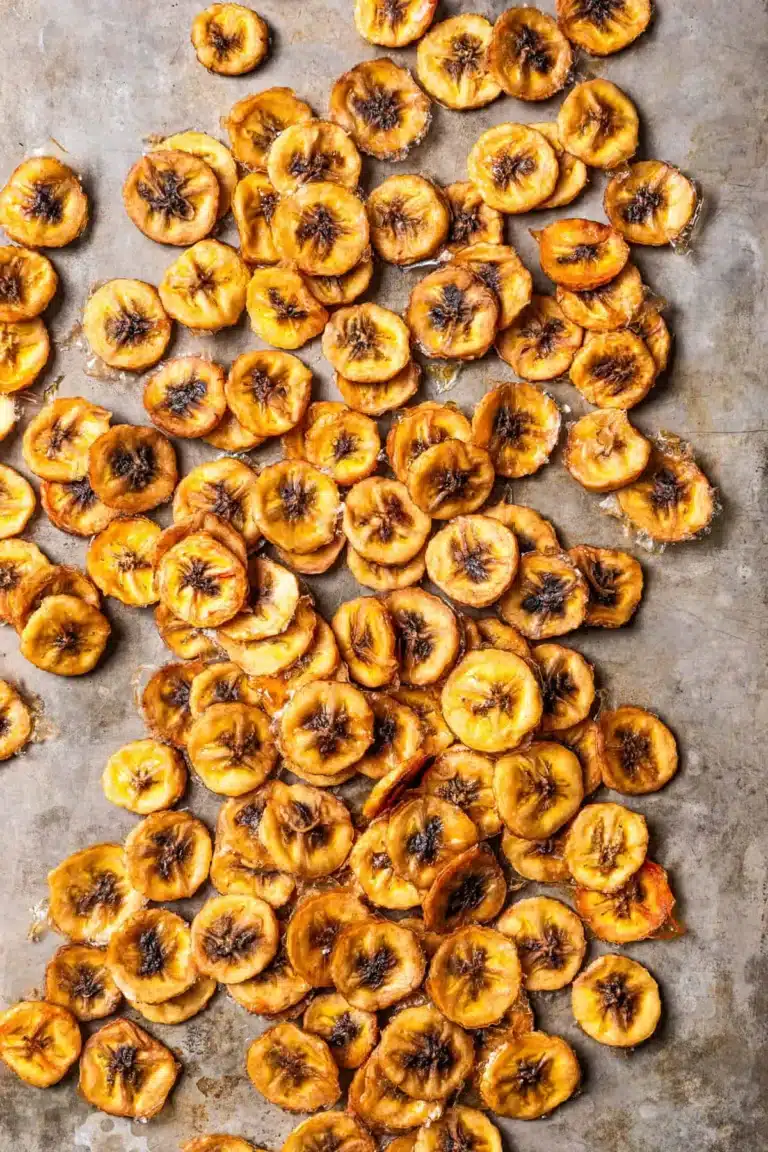
- 1/2 cup toasted coconut
- 1Preheat the oven to 350°F. Lightly grease a 9x13-inch baking dish and set it aside.
- 2In a large bowl, combine the white cake mix, melted coconut oil, eggs, and milk of choice. Whisk until the batter is smooth and fully blended.
- 3Transfer the batter to the prepared dish and bake for 25 to 30 minutes, or until a toothpick inserted into the center emerges clean. Set the cake aside and allow it to cool.
- 4When the cake is mostly cooled, place half of the strawberry gelatin mix and half of the pineapple gelatin mix into a large measuring pitcher. Reserve the remaining gelatin powder for another use.
- 5Pour in the hot water and stir thoroughly until the gelatin has fully dissolved. Add the thick coconut milk and stir until evenly combined.
- 6Using a fork, pierce holes all over the cake, spacing them about 1/2 to 1 inch apart and ensuring they reach down into the cake.
- 7Slowly pour the gelatin mixture across the entire surface, allowing any excess to run toward the edges and soak in. Cover the cake and refrigerate for 45 to 60 minutes so the filling can set.
- 8While the cake is chilling, place the softened cream cheese in the bowl of a stand mixer and beat on high speed until light and fluffy.
- 9Add the sifted confectioners’ sugar, vanilla essence, and salt, then beat again until smooth. Scrape down the sides of the bowl with a rubber spatula.
- 10With the mixer running on low speed, gradually stream in the chilled heavy cream. Once incorporated, increase the speed to high and whip until the topping reaches a firm, whipped consistency.
- 11After the gelatin layer has set and the cake is thoroughly cold, spread the cream cheese topping evenly over the surface.
- 12Scatter the toasted coconut over the topping.
- 13Halve the strawberries and arrange 15 halves over the cake so each serving receives one piece of fruit.
- 14Cover the cake loosely and keep it refrigerated until serving time.
- 15For the best flavor and texture, remove the cake from the refrigerator 20 to 30 minutes before serving. Slice and serve.
Keywords: Coconut Jello Poke Cake, Poke Cake, Jello Cake, Tropical Dessert, Make-ahead Dessert, Sheet Cake, Cream Cheese Frosting, Strawberry, Pineapple, Coconut
The specific quantities for each ingredient are detailed within the comprehensive recipe card provided, ensuring accuracy for a perfect bake every time.
Variations
For those seeking a dairy-free delight, a vegan twist on this poke cake is entirely achievable. Simply swap the regular milk for a full-fat coconut milk in the cake batter for an intensified tropical flavor. The cream cheese topping can be substituted with a whipped coconut cream or a cashew-based frosting, ensuring a rich and decadent experience without any dairy. This adaptation maintains the delightful texture and visual appeal while catering to dietary needs.
If you are managing your carbohydrate intake, a low-carb version can be crafted with a few thoughtful adjustments. Utilize a sugar-free white cake mix and sugar-free gelatin packets to significantly reduce the sugar content. For the topping, a combination of mascarpone cheese, heavy whipping cream, and a low-carb sweetener like erythritol or stevia will create a luscious frosting. Garnish with fresh berries and toasted unsweetened coconut flakes for a satisfyingly sweet finish that adheres to your dietary goals.
Enhancing the dessert with additional fruity layers offers another avenue for creativity. Consider adding a thin layer of macerated pineapple or a bright raspberry coulis beneath the cream cheese topping after the gelatin has set. This introduces another dimension of flavor and a beautiful visual contrast. Such additions can transform the cake into an even more complex and exciting culinary creation, perfect for special occasions.
How to Prepare Coconut Jello Poke Cake
Step 1: Preparing the Cake Batter
The foundation of this delightful dessert begins with preheating your oven to the specified temperature, typically around 350°F (175°C). This ensures the cake bakes evenly and reaches the perfect golden-brown hue. Simultaneously, prepare your 9×13-inch baking dish by lightly greasing it to prevent any sticking and ensure easy removal of the cake once baked. A thin layer of butter or non-stick cooking spray is usually sufficient for this purpose.
In a large mixing bowl, combine the dry white cake mix with the wet ingredients. This includes the eggs, which should ideally be at room temperature to emulsify better, the melted coconut oil for a subtle tropical aroma and tender crumb, and your chosen milk, which can be regular milk or coconut milk for an extra boost of flavor. Whisk these ingredients together thoroughly until you achieve a smooth, homogenous batter. It’s important to ensure there are no dry streaks of cake mix remaining, as this can lead to an uneven texture in the finished cake.
Once the batter is perfectly smooth, pour it into the prepared baking dish, spreading it evenly to ensure a consistent thickness across the pan. This even distribution is key to achieving a cake that bakes uniformly. Place the dish in the preheated oven and bake for the duration recommended in the recipe, usually between 25 to 30 minutes. You’ll know the cake is ready when a toothpick or cake tester inserted into the center comes out clean, indicating that the cake is fully cooked through and no longer gooey in the middle. Allow the cake to cool to a slightly warm or mostly cooled state before proceeding to the next step; a cake that is still hot might become too fragile to absorb the gelatin mixture effectively, while a completely cooled cake may not absorb it as readily.
Step 2: Creating the Fruity Gelatin Filling
While the cake is cooling, you can begin preparing the vibrant and flavorful gelatin filling that is characteristic of poke cakes. In a large measuring cup or a separate bowl, combine the specified amount of strawberry and pineapple instant gelatin mixes. It’s important to use the instant variety as it dissolves more easily and quickly, which is essential for creating a smooth filling. The combination of strawberry and pineapple offers a delightful balance of sweet and slightly tart fruity notes that complement the coconut cake beautifully.
To dissolve the gelatin, carefully pour in the very hot water. Stir this mixture continuously and vigorously until the gelatin powder is completely dissolved and the liquid is clear, with no grainy particles remaining. This thorough dissolution is critical for achieving a smooth texture in the filling, preventing any chalkiness. Once the gelatin is fully dissolved, stir in the thick coconut milk. This ingredient adds a wonderful creaminess and richness to the filling, tying it back to the overall coconut theme of the dessert and softening the intense fruit flavor just enough to create a harmonious blend. Ensure it is well incorporated.
The consistency of this mixture is important; it should be pourable but also substantial enough to seep into the cake. The hot water activates the gelatin, and the thick coconut milk emulsifies with it to create a delightful, slightly thickened liquid. It’s advisable to have this mixture ready to go as soon as the cake has cooled sufficiently, as the gelatin will begin to set as it cools, and you want to pour it over the cake while it’s still fluid enough to penetrate the cake structure.
Step 3: Poking and Filling the Cake
Once your cake has reached the ideal cooling stage—slightly warm or mostly cooled, but not completely cold or overly hot—it’s time to create the channels for the luscious gelatin filling. Using a fork, carefully poke holes all across the surface of the cake. Aim for a generous number of holes, spacing them about half an inch to an inch apart. The key is to poke deep enough so that the gelatin mixture can penetrate into the cake layers, ensuring that every bite of cake is infused with fruity flavor and moisture. You can go in different directions, creating a crosshatch pattern, to maximize the surface area for filling.
With the holes generously made, slowly and steadily pour the prepared gelatin mixture over the entire top of the cake. Do not dump it all in one spot; instead, try to distribute it as evenly as possible. The liquid will naturally seep into the poked holes and spread across the surface, reaching the edges of the cake as well. This slow pouring process allows the filling to saturate the cake thoroughly without pooling excessively in one area. You might need to gently tilt the pan to encourage even distribution, ensuring all parts of the cake receive a good soaking.
After the gelatin mixture has been poured, the cake needs time to chill and allow the filling to set. Cover the cake loosely with plastic wrap or a lid, ensuring it doesn’t touch the gelatin surface too much, and place it in the refrigerator. The recommended chilling time is typically between 45 to 60 minutes, or until the gelatin filling is firm and the cake is thoroughly cold. This chilling period is crucial for the flavors to meld and for the cake to achieve the perfect texture for the topping to be applied. A well-chilled cake will also prevent the topping from melting too quickly.
Step 4: Crafting the Cream Cheese Topping
As the cake chills and the gelatin filling sets, it’s the perfect time to prepare the luxurious cream cheese topping. In the clean bowl of a stand mixer fitted with the whisk attachment, or using a hand mixer, begin by beating the softened cream cheese. Ensure the cream cheese is truly softened to room temperature; this is vital for achieving a smooth and lump-free consistency. Beat it on medium-high speed until it becomes light, fluffy, and utterly smooth, with no visible lumps. Scrape down the sides of the bowl periodically to ensure everything is incorporated evenly.
Next, gradually add the sifted confectioners’ sugar to the cream cheese mixture. Sifting the sugar helps prevent clumps and ensures a silky smooth texture. Add the vanilla extract, which provides a wonderful aroma and flavor, and a small pinch of salt. Salt is often overlooked in sweet recipes, but it acts as a flavor enhancer, balancing the sweetness and bringing out the best in the other ingredients. Continue to beat the mixture until it is completely blended, smooth, and has a creamy, spreadable consistency. Again, scrape down the sides of the bowl as needed.
Once the cream cheese base is perfectly smooth, it’s time to incorporate the heavy cream. Ensure the heavy cream is very cold, as this is essential for it to whip up properly and create a stable, airy topping. With the mixer running on a low speed, slowly stream in the chilled heavy cream. Once it’s mostly incorporated, increase the mixer speed to high. Whip the mixture until it transforms into a thick, airy, and spreadable topping with firm peaks. Be careful not to overmix, as this can cause the topping to become grainy or curdle. The goal is a light, cloud-like consistency that holds its shape when spread.
Step 5: Assembling and Garnishing the Cake
With the cake thoroughly chilled and the gelatin filling completely set, and your luscious cream cheese topping whipped to perfection, it’s time for the final assembly. Carefully remove the cake from the refrigerator. Take your prepared cream cheese topping and spoon it evenly over the chilled cake. Use an offset spatula or the back of a spoon to spread the topping into a smooth, even layer, ensuring it covers the entire surface of the cake right to the edges. This creates a beautiful, creamy canvas for the final decorative elements.
Now comes the fun part: garnishing the cake to make it visually stunning and add extra layers of flavor and texture. Sprinkle the toasted coconut generously over the cream cheese topping. Toasting the coconut brings out its rich, nutty flavor and adds a delightful crunch that contrasts beautifully with the soft cake and creamy topping. Spread it evenly, or in decorative patterns, as desired, ensuring good coverage for maximum impact.
Finally, arrange the fresh strawberry halves over the toasted coconut. A common and elegant presentation is to place a strawberry half on each serving of cake, ensuring that every slice receives a beautiful piece of fruit. This adds a burst of fresh, vibrant flavor and a gorgeous pop of red color that complements the white and tropical tones of the cake. Once garnished, cover the cake loosely and keep it refrigerated until it’s time to serve. For the absolute best flavor and texture, allow the cake to sit at room temperature for about 20 to 30 minutes before slicing and serving, letting the flavors fully emerge.
Step 6: Final Touches and Serving Preparation
Before serving, it’s crucial to allow the cake to temper slightly at room temperature. While it’s best kept chilled due to the cream cheese topping, taking it out of the refrigerator approximately 20 to 30 minutes prior to slicing allows the flavors to develop and the cake to soften just enough. This brief resting period prevents the cake from tasting overly cold and muted, allowing the delicate coconut, pineapple, and strawberry notes to shine through more prominently. It ensures a more enjoyable tasting experience overall.
When it is time to serve, use a sharp knife to cut the cake into desired portions. It’s often helpful to wipe the knife clean between cuts to ensure neat, clean slices. The visual appeal of the gelatin-filled holes, the fluffy topping, and the fresh fruit garnish makes each slice a delight to behold. This cake is perfect for any occasion, from a casual family gathering to a more formal celebration, offering a sweet and tropical escape.
The combination of the moist cake, the subtly sweet gelatin layer, and the tangy cream cheese topping, all enhanced by the fresh fruit and toasted coconut, creates a dessert that is both comforting and sophisticated. It’s a testament to how simple ingredients and a straightforward method can yield such spectacular results. Enjoy this delightful dessert knowing that it’s a crowd-pleaser that’s as fun to make as it is to eat.
Pro Tips for Coconut Jello Poke Cake
- Cool Cake for Better Absorption: Always allow the cake to cool sufficiently before pouring the gelatin mixture. A slightly warm cake will absorb the filling best without becoming soggy or falling apart, ensuring the flavor permeates throughout.
- Slow and Steady Pour: Pour the gelatin mixture gradually over the poked cake. This technique ensures that the liquid has ample time to seep into all the holes and crevices, creating an evenly infused cake and preventing pooling on the surface.
- Cold Cream for a Stable Topping: Use very cold heavy cream when whipping the topping. Cold cream whips up faster, becomes thicker, and creates a more stable topping that holds its shape beautifully when spread and doesn’t melt easily.
- Room Temperature for Flavor: Don’t serve the cake straight from the refrigerator; let it sit out for 20-30 minutes. This brief tempering period allows the flavors to bloom and the textures to soften, making the cake more enjoyable.
- Garnish Just Before Serving: For the freshest look, add delicate garnishes like fresh berries right before serving. This prevents them from becoming soft or losing their vibrant color, ensuring your cake looks as stunning as it tastes.
Serving Suggestions for Coconut Jello Poke Cake
Decoration
The visual appeal of Coconut Jello Poke Cake is one of its greatest assets. To enhance its presentation, consider adding extra toasted coconut flakes around the edges of the cake or creating a delicate pattern on top with them. Fresh mint sprigs can add a touch of green and a hint of refreshing aroma, providing a lovely contrast to the creamy white topping and red berries. If you’re feeling artistic, you can pipe small rosettes of the cream cheese topping around the edges or in the center for an extra flourish. A light dusting of powdered sugar can also add a touch of elegance.
Side Dishes
While this cake is a complete dessert on its own, it pairs wonderfully with a few complementary items. A simple scoop of vanilla bean ice cream provides a classic pairing that melts beautifully with the slightly warm cake. A small bowl of fresh, mixed berries on the side can offer a palate cleanser or an extra burst of freshness. For a beverage pairing, a hot cup of coffee is an excellent choice; its slight bitterness beautifully balances the sweetness of the cake. Alternatively, a glass of unsweetened iced tea provides a refreshing contrast, especially on a warm day.
Creative Serving Ideas
To make serving even more special, consider individual portions. You can slice the cake into neat squares and serve them on small dessert plates, perhaps with a tiny dollop of extra whipped cream on the side. For a party, arrange the slices on a tiered dessert stand, allowing guests to easily help themselves. If you’re using a clear glass baking dish, the vibrant colors of the gelatin layer will be visible through the sides, adding a beautiful visual element. You could also add a drizzle of mango puree or passion fruit sauce over the top of each slice for an additional tropical twist.
Preparation & Storage
Storing Leftovers
Properly storing leftover Coconut Jello Poke Cake is essential to maintain its optimal texture and flavor. Due to the presence of cream cheese, heavy cream, and fresh fruit, it must be kept refrigerated. Cover the cake loosely with plastic wrap or a fitted lid to protect it from absorbing other odors in the refrigerator and to prevent the topping from drying out. It is best enjoyed within three days of preparation, as the cake may become slightly softer and the fresh berries can lose some of their crispness over time.
Freezing
While this cake is best enjoyed fresh, it can be frozen for longer storage, though with some caveats regarding texture. For best results, freeze the cake without the fresh strawberry garnish; this topping can be added after thawing. Cut the cake into individual portions and wrap each piece tightly in plastic wrap, followed by a layer of aluminum foil or a freezer-safe bag. This double layer of protection helps prevent freezer burn. Frozen portions can typically be stored for up to one month. The topping might become slightly less firm and the berries may appear softer after thawing.
Reheating
This dessert is not intended to be reheated. Instead of warming it, allow the cake to temper at room temperature for about 20 to 30 minutes before serving. This brief period out of the refrigerator allows the flavors to meld and the cake to soften slightly, enhancing its overall taste and texture. The coolness of the cake is part of its refreshing appeal, so avoid any form of cooking heat.
Frequently Asked Questions
-
Can I use different flavors of Jello for this poke cake?
Absolutely! While strawberry and pineapple are a classic combination that complements the coconut flavor, feel free to experiment with other fruit flavors. Lime or lemon Jello would add a bright citrus note, while raspberry or cherry could offer a deeper, richer fruitiness. Just ensure you are using instant Jello mixes for the best results and follow the recipe’s guidance on using only half of each packet to maintain the proper balance of flavor and moisture. Consider how the new flavor will interact with the coconut cake and cream cheese topping to create your desired taste profile.
-
What is the best way to ensure the cream cheese topping is light and fluffy?
Achieving a light and fluffy cream cheese topping relies on a few key factors. Firstly, ensure your cream cheese is properly softened to room temperature; this is crucial for smooth blending without lumps. Secondly, use very cold heavy cream; this allows it to whip up more effectively and create stable peaks. Whip the cream cheese mixture until it’s smooth and airy before gradually adding the cold cream, and then whip on high speed only until firm, spreadable peaks form. Be cautious not to overmix, as this can lead to a grainy or separated texture, diminishing the desired lightness.
-
Why do I only use half of each Jello packet, and what can I do with the rest?
Using only half of each Jello packet is intentional to create a flavorful, colorful filling that infuses the cake without making it overly wet or saturated. Using full packets could result in a cake that is too soggy, and the intense sweetness and fruit flavor might overpower the subtle coconut notes. The remaining half packets can be saved for another recipe, perhaps for a smaller batch of Jello or to incorporate into other desserts. You could also use them to make a smaller, individual-sized poke cake, or even add them to a Jello salad for an extra burst of flavor and color, ensuring no deliciousness goes to waste.